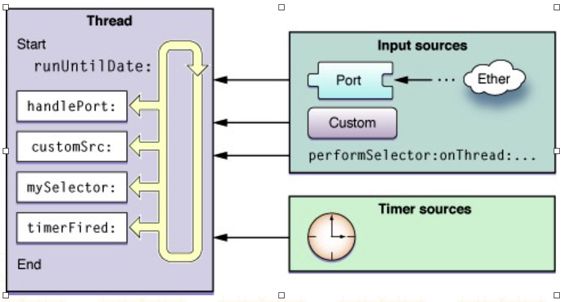
Run loop接收输入事件来自两种不同的来源:输入源(input source)和定时源(timer source)。
输入源又分为基于端口、基于自定义、基于perform selector。
一.NSRunLoop
在Cocoa中,每个线程(NSThread)对象中内部都有一个run loop(NSRunLoop)对象用来循环处理输入事件,处理的事件包括两类,一是来自Input sources的异步事件,一是来自Timer sources的同步事件。run Loop在处理输入事件时会产生通知,可以通过向线程中添加run-loop observers来监听特定事件,以在监听的事件发生时做附加的处理工作。
每个run loop可运行在不同的模式下,一个run loop mode是一个集合,其中包含其监听的若干输入事件源、定时器、以及在事件发生时需要通知的run loop observers。运行在一种mode下的run loop只会处理其run loop mode中包含的输入源事件、定时器事件、以及通知run loop mode中包含的observers。
Cocoa中的预定义模式有:
Default模式
定义:NSDefaultRunLoopMode (Cocoa) kCFRunLoopDefaultMode (Core Foundation)
描述:默认模式中几乎包含了所有输入源(NSConnection除外),一般情况下应使用此模式。
Connection模式
定义:NSConnectionReplyMode(Cocoa)
描述:处理NSConnection对象相关事件,系统内部使用,用户基本不会使用。
Modal模式
定义:NSModalPanelRunLoopMode(Cocoa)
描述:OS X的Modal面板事件。
Event tracking模式
定义:UITrackingRunLoopMode(cocoa)
描述:在拖动loop或其他user interface tracking loops时处于此种模式下,在此模式下会限制输入事件的处理。例如,当手指按住UITableView拖动时就会处于此模式。
Common模式
定义:NSRunLoopCommonModes (Cocoa) kCFRunLoopCommonModes (Core Foundation)
描述:这是一个伪模式,其为一组run loop mode的集合,将输入源加入此模式意味着在Common Modes中包含的所有模式下都可以处理。在Cocoa应用程序中,默认情况下Common Modes包含Default Modes、Modal Modes、Event Tracking Modes.可使用CFRunLoopAddCommonMode方法向Common Modes中添加自定义modes。
获取当前线程的run loop mode
NSString* runLoopMode = [[NSRunLoop currentRunLoop] currentMode];
二.NSTimer、NSURLConnection与UITrackingRunLoopMode
NSTimer与NSURLConnection默认运行在default mode下,这样当用户在拖动UITableView处于UITrackingRunLoopMode模式时,NSTimer不能fire,NSURLConnection的数据也无法处理。NSTimer的例子:在一个UITableViewController中启动一个0.2s的循环定时器,在定时器到期时更新一个计数器,并显示在label上。
-(void)viewDidLoad{
 label =[[UILabel alloc]initWithFrame:CGRectMake(10, 100, 100, 50)];
[self.view addSubview:label];
count = 0;
NSTimer *timer = [NSTimer scheduledTimerWithTimeInterval: 1 target: self selector: @selector(incrementCounter:) userInfo: nil repeats: YES];
}
- (void)incrementCounter:(NSTimer *)theTimer{
count++;
label.text = [NSString stringWithFormat:@"%d",count];
}
在正常情况下,可看到每隔0.2s,label上显示的数字+1,但当你拖动或按住tableView时,label上的数字不再更新,当你手指离开时,label上的数字继续更新。当你拖动UITableView时,当前线程run loop处于UIEventTrackingRunLoopMode模式,在这种模式下,不处理定时器事件,即定时器无法fire,label上的数字也就无法更新。
解决方法:
一种方法是在另外的线程中处理定时器事件,可把Timer加入到NSOperation中在另一个线程中调度;
还有一种方法是修改Timer运行的run loop模式,将其加入到UITrackingRunLoopMode模式或NSRunLoopCommonModes模式中。即[[NSRunLoop currentRunLoop] addTimer:timer forMode:UITrackingRunLoopMode];或[[NSRunLoop currentRunLoop] addTimer:timer forMode:NSRunLoopCommonModes];
- (void)viewDidLoad{
    [super viewDidLoad];
    NSLog(@"主线程 %@", [NSThread currentThread]);
    //创建并执行新的线程
    NSThread *thread = [[NSThread alloc] initWithTarget:self selector:@selector(newThread) object:nil];
    [thread start];
}
- (void)newThread{
   @autoreleasepool{
    //在当前Run Loop中添加timer,模式是默认的NSDefaultRunLoopMode
    [NSTimer scheduledTimerWithTimeInterval:2.0 target:self selector:@selector(timer_callback) userInfo:nil repeats:YES];
    //开始执行新线程的Run Loop,如果不启动run loop,timer的事件是不会响应的
    [[NSRunLoop currentRunLoop] run];
    }
}
- (void)timer_callback{
    NSLog(@"Timer %@", [NSThread currentThread]);
}
NSURLConnection也是如此,见SDWebImage中的描述,以及SDWebImageDownloader.m代码中的实现。修改NSURLConnection的运行模式可使用scheduleInRunLoop:forMode:方法。
NSURLRequest *request = [[NSURLRequest alloc] initWithURL:url cachePolicy:NSURLRequestReloadIgnoringLocalCacheData timeoutInterval:15];
NSURLConnection *connection = [[NSURLConnection alloc] initWithRequest:request delegate:self startImmediately:NO];
[connection scheduleInRunLoop:[NSRunLoop currentRunLoop] forMode:NSRunLoopCommonModes];
[connection start];
我们一直在使用RunLoop,却很少见到它。并且,我们在大多数情况下,都不需要显式的创建或者启动RunLoop,有两种情况,我们却必须手动设置它:
1、在分线程中使用定时器
定时器的实现便是基于runloop的,平时我们使用定时器你或许并没有对runloop做什么操作,那是因为主线程的runloop默认是开启运行的,如果我们在分线程中也需要重复执行某一动作,如下:
- (void)viewDidLoad {
  [super viewDidLoad];
  // Do any additional setup after loading the view, typically from a nib.
queue = dispatch_queue_create("myQueue", DISPATCH_QUEUE_CONCURRENT);
dispatch_async(queue, ^{
 NSTimer * timer = [NSTimer scheduledTimerWithTimeInterval:1 target:self selector:@selector(time) userInfo:nil repeats:YES];
 });
 }
-(void)time{
  NSLog(@"run");
}
你会发现,程序运行后并没有打印任何信息,方法并没有被调用,我们必须在线程中手动的执行如下代码:
[[NSRunLoop currentRunLoop] run];
定时器才能正常工作。
2、当你在线程中使用如下方法时
某些延时函数和选择器在分线程中的使用,我们也必须手动开启runloop,这些方法如下:
@interface NSObject (NSDelayedPerforming)
- (void)performSelector:(SEL)aSelector withObject:(id)anArgument afterDelay:(NSTimeInterval)delay inModes:(NSArray *)modes;
- (void)performSelector:(SEL)aSelector withObject:(id)anArgument afterDelay:(NSTimeInterval)delay;
+ (void)cancelPreviousPerformRequestsWithTarget:(id)aTarget selector:(SEL)aSelector object:(id)anArgument;
+ (void)cancelPreviousPerformRequestsWithTarget:(id)aTarget;
@end

@interface NSRunLoop (NSOrderedPerform)
- (void)performSelector:(SEL)aSelector target:(id)target argument:(id)arg order:(NSUInteger)order modes:(NSArray *)modes;
- (void)cancelPerformSelector:(SEL)aSelector target:(id)target argument:(id)arg;
- (void)cancelPerformSelectorsWithTarget:(id)target;
@end
Source有两个版本:Source0 和 Source1。
Source0 只包含了一个回调(函数指针),它并不能主动触发事件。使用时,你需要先调用 CFRunLoopSourceSignal(source),将这个 Source 标记为待处理,然后手动调用 CFRunLoopWakeUp(runloop) 来唤醒 RunLoop,让其处理这个事件。
Source1 包含了一个 mach_port 和一个回调(函数指针),被用于通过内核和其他线程相互发送消息。这种 Source 能主动唤醒 RunLoop 的线程。
