触摸事件
1.事件是当用户手指触击屏幕及在屏幕上移动时,系统不断发送给应用程序的对象
2.系统将事件按照特定的路径传递给可以对其进行处理的对象
3.在iOS中,一个UITouch对象表示一个触摸,一个UIEvent对象表示一个事件(触发事件的集合NSSet)
4.事件对象中包含与当前多点触摸序列相对应的所有触摸对象,还可以提供与特定视图或窗口相关联的触摸对象
触摸的开始,移动和结束
1.触摸信息有时间和空间两方面
-时间方面的信息称为阶段,表示触摸是否刚刚开始、是否正在移动或处于静止状态以及何时结束(生命周期)
-触摸信息还包括当前在视图或窗口中的位置信息,以及之前的位置信息(如果有的话)
-当一个手指接触屏幕时,触摸就和某个窗口或视图关联在一起,这个关联在事件的整个生命周期都会得到维护
UIRsponder 接口
-UIResponder类定义了对象相应和控制事件的接口,是UIApplication、UIView的超类,这类的实例通常被称为响应对象
-这个类中主要的事件控制方法是
开始: touchesBegan:withEvent: 移动: touchesMoved:withEvent: 结束: touchesEnded:withEvent: 取消事件响应:touchesCancelled:withEvent:
四个手势通知方法
//开始触摸的方法
-(void)touchesBegan:(NSSet *)touches withEvent:(UIEvent *)event
{
    //获取所有的触摸点数量
    NSInteger count=touches.count;
    NSLog(@"获取点击次数%ld",(long)count);

    //获取tap数量
    NSInteger tapCount=[[touches anyObject] tapCount];
    NSLog(@"获取点击次数%ld",(long)tapCount);


    //先通过事件获取触摸点
    UITouch *touch=(UITouch *)[event touchesForView:self.view];

    //获取众多触摸点中的其中一点
    UITouch *touch1=(UITouch *)[touches anyObject];

    //获取触摸点在self.view上的坐标
    CGPoint point=[touch1 locationInView:self.view];
    NSLog(@"@(%f,%f)",point.x,point.y);
}
-(void)touchesMoved:(NSSet *)touches withEvent:(UIEvent *)event
{
    NSLog(@"移动中");
}

-(void)touchesEnded:(NSSet *)touches withEvent:(UIEvent *)event
{
    NSLog(@"移动结束");
}

-(void)touchesCancelled:(NSSet *)touches withEvent:(UIEvent *)event
{
    NSLog(@"取消事件响应");//鼠标点击屏幕长按,然后按住command+shift+h(home键)
}
触控事件响应链
-响应者 (UIResponder)
-响应链
-之前提到过第一响应者,该响应者通常是用户当前正在交互的对象
1.第一响应者是响应链的开始
2.以UIResponder为父类的任何类都是响应者
3.如果第一响应者不处理某个事件,则将该事件传递到响应者链的下一级,一般情况下如果下一级处理,则停止事件的传递
4.如果事件通过整个响应者链并且没有对象处理该事件,则丢弃该事件
响应链顺序
视图->控件->视图控制器->父视图->父视图控制器->窗口->应用程序代理
向下一响应者传递事件
可以在上面4个方法中调用传递事件的响应,将事件传递给下一个响应者
[self.nextResponder touchesBegan:touches withEvent:event];
//这句用来把事件传递给下一响应者,如果这句去掉,来就是不传递给下一个响应者只有四个方法自己来响应,而无法把事件传递下去
手势和触摸的关系
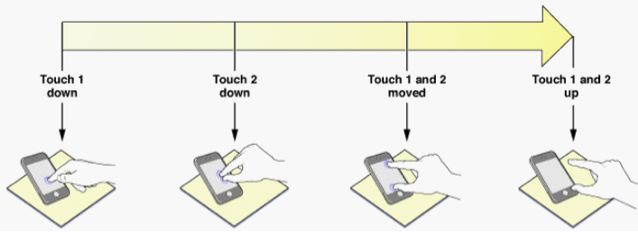
1.手势是指从用一个或多个手指接触屏幕开始,直到手指离开屏幕为止发生的所有事件
2.触摸是指手指放到屏幕上从屏幕上拖动或抬起,手势中涉及的触摸数量等于同时位于屏幕上的手指数量
3.手势是触摸事件的集合
检测触摸和移动
@interface ViewController : UIViewController
@property (nonatomic) int moveCount;
@property (retain, nonatomic) UILabel *messageLabel;
@property (retain, nonatomic) UILabel *tapsLabel;
@property (retain, nonatomic) UILabel *touchesLabel;
-(void) updateLabelsFromTouches:(NSSet *)touches;
@end
控制器代码
因为本项目需要检测多点触控,所以需要为视图打开支持多点触控开关
所以需要在viewDidLoad方法中添加如下代码:
self.view.multipleTouchEnabled = YES;
-iPhone中最多同时可以支持5点触摸
-iPad中最多同时可以支持11点触摸。
-模拟器中按下option键,可以模拟两点触摸
-两次单击之间的间隔足够小的话可以实现双击,三击甚至更多
手势
用一个或多个手指接触屏幕开始,知道手指离开屏幕为止所有的事件
手势的种类
点击(tap)
拖动(drag)
滑动(flick)
横扫(swipe)
双击(double tap)
放大(pinch)
缩小(pinch)
长按(touch hold)
手势识别器
UIGestureRecognizer
手势识别器类型
-UITapGestureRecognizer      (轻拍识别器)
-UIPinchGestureRecognizer    (捏合识别器)
-UIRotationGestureRecognizer (旋转识别器)
-UISwipeGestureRecognizer    (扫动识别器)
-UIPanGestureRecognizer      (拖动识别器)
-UILongPressGestureRecognizer(长按识别器)
-UIScreenEdgePanGestureRecognizer (右滑返回识别器)

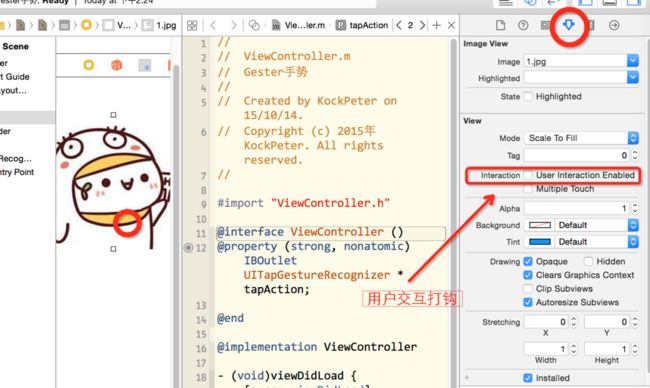
创建一个视图用来做一下触碰的实践
找一张图命名1.jpg放入项目中
在函数的实现文件中写
[super viewDidLoad];
    //创建图片视图
    UIImageView *imgV=[[UIImageView alloc]initWithFrame:CGRectMake(0, 0, 150, 150)];
    //创建图片
    UIImage *img=[UIImage imageNamed:@"1.jpg"];
    //设置图片
    imgV.image=img;
    //打开用户交互,默认是NO
    imgV.userInteractionEnabled=YES;
    //居中
    imgV.center=self.view.center;
    //显示
    [self.view addSubview:imgV];
-UITapGestureRecognizer (轻拍识别器)
创建
 //---------------创建轻拍手势
    UITapGestureRecognizer *tap=[[UITapGestureRecognizer alloc]initWithTarget:self action:@selector(tapAction:)];
    //---------------给图片视图添加单击手势(单击放大或缩小)
    [imgV addGestureRecognizer:tap];
手势动作方法
//实现轻拍手势
-(void)tapAction:(UITapGestureRecognizer *)sender
{
    //获取手势所添加的视图
    UIImageView *imgV=(UIImageView *)sender.view;

    if (self.imgVState)
    {
        //缩小
        [UIView animateWithDuration:1 animations:^{
            imgV.frame=CGRectMake(0, 0, 150, 150);
            imgV.center=self.view.center;
        }];
    }
    else
    {
        //放大
        [UIView animateWithDuration:1 animations:^{
            imgV.frame=CGRectMake(0, 0, 300, 300);
            imgV.center=self.view.center;
        }];
    }
    //取反用来反复缩小放大
    self.imgVState=!self.imgVState;
}
-UIPinchGestureRecognizer (捏合识别器)
先定义一个属性
@interface ViewController ()
@property(nonatomic,assign)BOOL imgVState;//标示图片是放大还是缩小,YES放大/NO:缩小
@end
然后创建捏合识别器
//创建捏合手势
    UIPinchGestureRecognizer *pinch=[[UIPinchGestureRecognizer alloc]initWithTarget:self action:@selector(pinchAction:)];
    //添加捏合
    [imgV addGestureRecognizer:pinch];
创建捏合手势的方法
//捏合的方法
-(void)pinchAction:(UIPinchGestureRecognizer *)sender
{
    sender.view.transform=CGAffineTransformScale(sender.view.transform, sender.scale, sender.scale);
    //捏合的速度设置(数字越大,捏合的速度越快)
    sender.scale=1;
}
-UIRotationGestureRecognizer (旋转识别器)
先定义属性
@interface ViewController ()
@property(nonatomic,assign)CGFloat rotation;//记录每一次旋转后的值
@end
然后创建旋转识别器
//实现旋转的手势的方法
-(void)rotatingAction:(UIRotationGestureRecognizer *)sender
{
    UIImageView *imgV=(UIImageView *)sender.view;
    //设置图片的旋转大小
    imgV.transform=CGAffineTransformMakeRotation(sender.rotation+self.rotation);
    //旋转结束状态结束后记录这次旋转的角度
    if (sender.state==UIGestureRecognizerStateEnded)//如果结束的话便记录下来
    {
        self.rotation=sender.rotation;
    }
}
-UISwipeGestureRecognizer (扫动识别器)
创建扫动识别器
 //---------------创建扫动
    UISwipeGestureRecognizer *swipe=[[UISwipeGestureRecognizer alloc]initWithTarget:self action:@selector(swipeAction:)];
    //添加扫动
    [imgV addGestureRecognizer:swipe];
    //设置扫动的方向
    swipe.direction=UISwipeGestureRecognizerDirectionDown;;//向下扫动
    [pan requireGestureRecognizerToFail:swipe];//当扫动swipe失败后才启用拖拽pan
    [imgV addGestureRecognizer:swipe];
扫动识别器的方法
//扫动的动画
-(void)swipeAction:(UISwipeGestureRecognizer *)sender
{
    //扫动时操作把图定位在(0,0)位置,图大小(250,250)
    [UIView animateWithDuration:1 animations:^{
        sender.view.frame=CGRectMake(0, 0, 250, 250);
    }];
}
-UIPanGestureRecognizer (拖动识别器)
创建拖动识别器
//---------------创建拖拽手势
    UIPanGestureRecognizer *pan=[[UIPanGestureRecognizer alloc]initWithTarget:self action:@selector(panAction:)];
    //添加拖拽
    [imgV addGestureRecognizer:pan];
拖动识别的方法
//拖动手势的方法
-(void)panAction:(UIPanGestureRecognizer *)sender
{
    //获取手势在屏幕上拖动的点
    CGPoint p=[sender translationInView:sender.self.view];
    //设置中心点
    sender.view.center=CGPointMake(sender.view.center.x+p.x, sender.view.center.y+p.y);
    //设置视图在父视图上拖拽的位置
    [sender setTranslation:CGPointZero inView:sender.self.view];//用来设置匀速运动
}
-UILongPressGestureRecognizer(长按识别器)
创建长按识别器
   //---------------创建添加长按识别器
    UILongPressGestureRecognizer *longPress=[[UILongPressGestureRecognizer alloc] initWithTarget:self action:@selector(longPressAction:)];
    //添加长按的动画
    [imgV addGestureRecognizer:longPress];
长按识别器的方法
//长按的方法
-(void)longPressAction:(UILongPressGestureRecognizer *)sender
{
    //判断开始按下
    if (sender.state==UIGestureRecognizerStateBegan)
    {
        UIAlertView *alert=[[UIAlertView alloc]initWithTitle:@"提示" message:@"确定删除" delegate:nil cancelButtonTitle:@"确定" otherButtonTitles:@"取消", nil];
        //显示提示框
        [alert show];
    }
}
-UIScreenEdgePanGestureRecognizer (右滑返回识别器)
此为iOS7中新添加的属性
创建右滑动返回识别器
//---------------创建添加右滑返回识别器
    UIScreenEdgePanGestureRecognizer *edgePan=[[UIScreenEdgePanGestureRecognizer alloc]initWithTarget:self action:@selector(edgePanAction:)];
    //设置滑动的方式,为右滑动
    edgePan.edges=UIRectEdgeLeft;
    [self.view addGestureRecognizer:edgePan];
右滑返回识别的方法
//右滑返回识别的方法
-(void)edgePanAction:(UIScreenEdgePanGestureRecognizer *)sender
{
    NSLog(@"实现了右滑动返回操作");
}