- pre-processor预处理器 -
- compiler 编译器 -
- parser解析器 -
--
4.1 What is LESS / 什么是LESS
Less是一个CSS的预处理器,它拓展了CSS语言,添加了新特性比如变量(variables),Less混合(mixins=mixing in),函数(functions)以及其它一些技术,使CSS更加可维护,更适用,更加可扩展。
在Shopware 5中包括了一个LESS的php解释器。通过它,设计师可以使用许多有趣的特性,比如变量或者LESS混合(mixins)。在这里我们不会详细讲LESS的每个细节,但是我们会告诉你如何在Shopware theme中如何运用LESS。
链接:LESS的官方文档
4.2 Why LESS / 为什么用LESS
我们经常会被问到,为什么选择LESS,而不是SASS或者其它什么。没有一场关于CSS预处理器的争论也许无法说服所有人,在这里提供几个在Shopware中选择LESS的理由:
1. LESS非常轻量级,对于没有过CSS预处理器工作经验的编程者来说,非常易学
2. 这是个稳定的,针对LESS的PHP解析器
3. 没有对其它语言(比如Ruby)的依赖
SASS的忠实粉丝们,别伤心。记住LESS只是我们和编译器推荐给开发者的工具。你可以根据自己的喜好选择其它的预处理器,给你的theme添加编译好的CSS。
4.3 Using LESS in your theme / 在自定义的主题中使用LESS
在你自定义的Shopware theme中,使用LESS很容易。只需要创建正确的文件路径frontend/_public/src/less/,然后在该路径中创建all.less文件,该文件会被自动添加到Shopware的编译器中。
当然,你可以将所有文件都放到同一个文件中,但为了有明了的结构,我们强烈推荐用户为自己的theme的不同部分创建分开的文件。然后在all.less文件使用@import方法导入这些文件。比如:
@import "global.less";
@import "_modules/account-orders.less";```

##4.4 Responsiveness in Shopware / Shopware中的响应式
我们使用LESS则是为了更好的创建响应式主题。

**4.4.1 The .unitize() mixin**
在全响应式网页中,不推荐使用固定的像素值(pixel)。使用pixel的网页会根据屏幕大小(screen size),像素密度(pixel density)和浏览器字体大小(browser fontsize)进行动态的缩放。
因此,我们决定使用中央测量混合(central measurement mixin),它可以将像素转换成其他测量单元。使用该工具的优点是,你可以在你的LESS文件中使用可读的像素值,但是编译后的CSS会有动态测量单元,而这个单元可以在中心点(central point)进行自定义。
在Shopware的Responisve主题中我们使用了`rem`值,从而使所有数值都可以根据单位字体大小(unit)进行缩放。举例:
.my--class {
.unitize(font-size, 16); // Single properties
.unitize-width(200); // Helpers for width and height
.unitize-padding(20, 20); // Helper for padding accepting the four value syntax
.unitize-margin(10, 0, 0, 0); // Helper for margin accepting the four value syntax
// ...
}```
4.4.2 Breakpoint variables
对于响应式网页,我们使用CSS的media queries来创造设备的断点(device breakpoints),从而使该模板可以根据相应的设备类型进行调整。为了获得更多的灵活性,我们先在这里配置一些适用于所有media queries变量。
@phoneLandscapeViewportWidth: 30em;     // 480px
@tabletViewportWidth: 48em;             // 768px
@tabletLandscapeViewportWidth: 64em;    // 1024px
@desktopViewportWidth: 78.75em;         // 1260px```

举例:在不同的media queries中使用断点变量
.my--class {
.unitize-padding(10, 0);
}
@media screen and(min-width: @tabletViewportWidth) {
.my--class {
.unitize-padding(20, 0);
}
}根据 **移动设备优先的原则(mobile first concept)**,建议用户先创建适用于移动设备的样式,然后再使用min-width```这个media queries在最小屏幕宽度处给出一个新的断点。
==> 即从手机屏幕开始设计,然后是tablet,最后是适用于电脑的。通俗一点讲,min-width从小写到大。
4.5 Predefined mixins and components / 预定义的mixins样式和组件
Shopware已经为CSS3的跨浏览器支持预定义了一些minxins样式。当用继承Shopware的Responsive主题时,用户有权限访问所有标准组件,比如按钮(button),警示框(alert)等等。他们都跟着一些简单的CSS类的语法,有可能你以前见过。比如说,
- 要创建一个基本按钮 ==> 在元素上添加一个
btn类 - 想要将按钮设置为高亮的主要按钮 ==> 在元素上添加
is--primary类
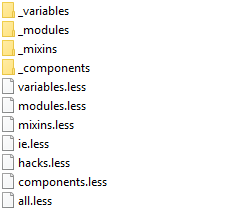
下图为/frontend/_public/src/less/目录下预定义的less文件以及结构。 更多Shopware的UI组件
4.6 LESS variables in Shopware / Shopware中预定义的Less变量
下面是Responsive主题中所有已定义的LESS变量:
// Breakpoints
@phoneLandscapeViewportWidth: 30em;     // 480px
@tabletViewportWidth: 48em;             // 768px
@tabletLandscapeViewportWidth: 64em;    // 1024px
@desktopViewportWidth: 78.75em;         // 1260px
// Basic color definition
@brand-primary: #d9400b;
@brand-primary-light: saturate(lighten(@brand-primary,12%), 5%);
@brand-secondary: #5f7285;
@brand-secondary-dark: darken(@brand-secondary, 15%);```
// Grey tones
@gray: #f5f5f8;
@gray-light: lighten(@gray, 1%);
@gray-dark: darken(@gray-light, 10%);
@border-color: @gray-dark;
// Highlight colors
@highlight-success: #2ecc71;
@highlight-error: #e74c3c;
@highlight-notice: #f1c40f;
@highlight-info: #4aa3df;
//Scaffolding
@body-bg: darken(@gray-light, 5%);
@overlay-bg: #555555;
@text-color: @brand-secondary;
@text-color-dark: @brand-secondary-dark;
@link-color: @brand-primary;
@link-hover-color: darken(@brand-primary, 10%);
@rating-star-color: @highlight-notice;
// Base configuration
@font-size-base: 14;
@font-base-weight: 500;
@font-light-weight: 300;
@font-bold-weight: 600;
@font-base-stack: "Open Sans", "Helvetica Neue", Helvetica, Arial, "Lucida Grande", sans-serif;
@font-headline-stack: @font-base-stack;
// Heading font sizes
@font-size-h1: 26;
@font-size-h2: 21;
@font-size-h3: 18;
@font-size-h4: 16;
@font-size-h5: @font-size-base;
@font-size-h6: 12;
// Shopware font directory
@font-directory: "../../fonts/";
// Open Sans font directory
@OpenSansPath: "../../fonts/open-sans-fontface";
// Button text sizes
@btn-font-size: 14;
@btn-icon-size: 10;
// Default Button
@btn-default-top-bg: #FFFFFF;
@btn-default-bottom-bg: @gray-light;
@btn-default-hover-bg: #FFFFFF;
@btn-default-text-color: @text-color;
@btn-default-hover-text-color: @brand-primary;
@btn-default-border-color: @border-color;
@btn-default-hover-border-color: @brand-primary;
// Primary Button
@btn-primary-top-bg: @brand-primary-light;
@btn-primary-bottom-bg: @brand-primary;
@btn-primary-hover-bg: @brand-primary;
@btn-primary-text-color:#FFFFFF;
@btn-primary-hover-text-color: @btn-primary-text-color;
// Secondary Button
@btn-secondary-top-bg: @brand-secondary;
@btn-secondary-bottom-bg: @brand-secondary-dark;
@btn-secondary-hover-bg: @brand-secondary-dark;
@btn-secondary-text-color: #FFFFFF;
@btn-secondary-hover-text-color: @btn-secondary-text-color;
// Panels
@panel-header-bg: @gray-light;
@panel-header-font-size: 14;
@panel-header-color: @text-color;
@panel-border: @border-color;
@panel-bg: #FFFFFF;
// Labels
@label-font-size: 12;
@label-color: @text-color;
// Form base
@input-font-size: 16;
@input-bg: @gray-light;
@input-color: @brand-secondary;
@input-placeholder-color: lighten(@text-color, 15%);
@input-border: @border-color;
// Form states
@input-focus-bg: #FFFFFF;
@input-focus-border: @brand-primary;
@input-focus-color: @brand-secondary;
@input-error-bg: desaturate(lighten(@highlight-error, 38%), 20%);
@input-error-border: @highlight-error;
@input-error-color: @highlight-error;
@input-success-bg: #FFFFFF;
@input-success-border: @highlight-success;
@input-success-color: @brand-secondary-dark;
// Tables
@panel-table-header-bg: @brand-secondary-dark;
@panel-table-header-color: #FFFFFF;
@table-row-bg: #FFFFFF;
@table-row-color: @brand-secondary;
@table-row-highlight-bg: darken(@table-row-bg, 4%);
@table-header-bg: @brand-secondary;
@table-header-color: #FFFFFF;
// Badges, Hints
@badge-discount-bg: @highlight-error;
@badge-discount-color: #FFFFFF;
@badge-newcomer-bg: @highlight-notice;
@badge-newcomer-color: #FFFFFF;
@badge-recommendation-bg: @highlight-success;
@badge-recommendation-color: #FFFFFF;
@badge-download-bg: @highlight-info;
@badge-download-color: #FFFFFF;
##4.7 Creating CSS source maps / 创建CSS源映射
*- 非常有效的测试方法! 可以直接看到生成文件中的每一条语句在源文件中的对应位置 - 比心 - ❤❤❤ -*
为了方便用户修改调试LESS,Shopware提供了可自动创建CSS源映射(CSS source maps)的选项。这对于调试已存在的样式十分有用。

**设置方法:**Configuration -> Theme Manager -> Settings -> Create a CSS source map
(德语系统:Einstellung -> Theme Manager -> Einstellung -> CSS Source Map erstellen)
>注意:**处于安全原因考虑,建议只在测试平台上开启该功能 !
在清空主题缓存之后你能在Chrome DevTools的console中看见指向当前less文件的映射。(不设置的话是看不到第二行`image-slider.less:97`这条信息的)
