1. CALayer.transform和UIView.transform
* CALayer.transform属性是是个CATransform3D类型的数据,默认值为CATransform3DIdentity
* CGAffineTransform 是用于2D层面的, 操作的是UIView或者其他 2D Core Graphics 元素。
* CATransform3D 是 Core Animation的结构体,是用来做更复杂的关于 CALayer 的3D操作。
* CATransform3D定义了一个三维变换(4x4的矩阵),用于图层的偏移、旋转,缩放,歪斜和透视等效果。
* 需要了解相关的3D变换方法:CATransform3DMakeTranslation,CATransform3DMakeScale,CATransform3DMakeRotation,以及CATransform3DTranslate,CATransform3DScale,CATransform3DRotate。
* CATransform3D.m34表示透视效果,但需要和CATransform3DRotate配合使用才有效果。也就是前提是z方向上有变化(即沿x轴或者y轴旋转之后)。
Q:如何做出圆角
CALayer
1.图层
2.显示和做动画
3.UIView背后的TA
CALayer 和 UIview的区别
1.UIView :负责接收用户点击的触摸屏view扮演的角色
2.CALayer :负责展示界面
3.UIView是对CALayer的一个封装
Layer使用
一、不规则形状的图片
UIImageView *imageView = [[UIImageView alloc] init];
imageView.image = [UIImage imageNamed:@"chatImage.jpg"];
imageView.contentMode = UIViewContentModeScaleAspectFill;
imageView.frame=CGRectMake(50, 50, 200, 250);
[self.viewaddSubview:imageView];
UIImageView *imageViewMask = [[UIImageView alloc] init];
// imageViewMask.image = [[UIImage imageNamed:@"imageMask.png"] stretchableImageWithLeftCapWidth:54 topCapHeight:48];
#warning aware!!
//这里需要勘误一下。录制时当时没用3x切图,所以圆角处有点模糊
imageViewMask.image = [[UIImage imageNamed:@"imageMask.png"] stretchableImageWithLeftCapWidth:18 topCapHeight:16];
imageViewMask.frame= imageView.bounds;//将这个不规则的范围设置成imageview的范围。
imageView.layer.mask= imageViewMask.layer;将这个layer到layer.mask
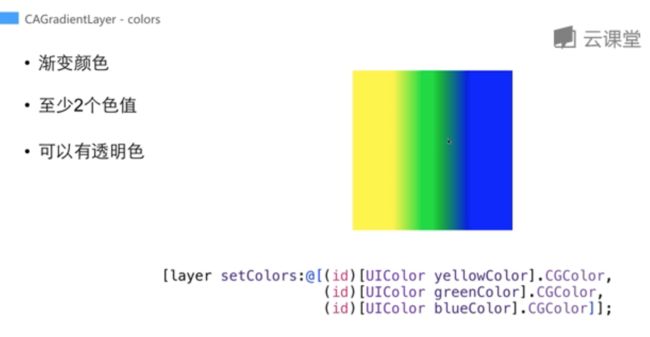
二、渐变
CAGradientLayer *layer = [CAGradientLayer layer];
layer.frame=CGRectMake(100, 100, 150, 150);
[layersetColors:@[
(id)[UIColoryellowColor].CGColor,
(id)[UIColorgreenColor].CGColor,
(id)[UIColorblueColor].CGColor,
(id)[UIColorgreenColor].CGColor
]]; //设置从左到右的颜色
[layersetLocations:@[@0.25, @0.5, @0.75,@0.95]];//默认分割线,从左到右设置需要逐级递增,取值范围0-1
[layersetStartPoint:CGPointMake(0, 0)];//起点
[layersetEndPoint:CGPointMake(1, 1)];//终点
[self.view.layer addSublayer:layer];
CAGradientLayer 常用mask layer
UIImageView *imageView = [[UIImageView alloc] init];
imageView.image = [UIImage imageNamed:@"nature.jpg"];
imageView.contentMode = UIViewContentModeScaleAspectFill;
imageView.frame=CGRectMake(100, 100, 150, 100);
[self.viewaddSubview:imageView];
UIImageView *mirrorImageView = [[UIImageView alloc] init];
mirrorImageView.image= imageView.image;
mirrorImageView.contentMode = UIViewContentModeScaleAspectFill;//内容类型
mirrorImageView.transform = CGAffineTransformMakeScale(1, -1);//图片向下翻转达到一个镜像的目的。
mirrorImageView.bounds= imageView.bounds;
mirrorImageView.center=CGPointMake(imageView.center.x, imageView.center.y+ imageView.bounds.size.height); //找到图片的中心
[self.viewaddSubview:mirrorImageView];
//上面这部分是镜像制作
==========================================================
CAGradientLayer *gradientLayer = [CAGradientLayer layer];//制作遮罩
gradientLayer.frame=CGRectMake(0, 0, imageView.frame.size.width, imageView.frame.size.height);
[gradientLayersetColors:@[(id)[UIColor clearColor].CGColor,
(id)[UIColorcolorWithWhite:0alpha:0.4].CGColor]];
gradientLayer.startPoint=CGPointMake(0, 0.7);
gradientLayer.endPoint=CGPointMake(0, 1);
mirrorImageView.layer.mask= gradientLayer;
CASHapeLayer
1.绘制普通的曲线
- (void)testCAShapeLayerWithoutBezier
{
CAShapeLayer *shapeLayer = [CAShapeLayer layer];
shapeLayer.strokeColor = [UIColor redColor].CGColor;
shapeLayer.fillColor = [UIColor clearColor].CGColor;
[self.view.layeraddSublayer:shapeLayer];
CGMutablePathRef path = CGPathCreateMutable();
CGPathMoveToPoint(path,nil, 50, 200);
CGPathAddCurveToPoint(path,nil, 100, 100, 250, 300, 300, 200);
shapeLayer.path= path;
CGPathRelease(path);
}
- (void)testCAShapeLayerWithBezier
{
CAShapeLayer *shapeLayer = [CAShapeLayer layer];
CGPointstartPoint =CGPointMake(50, 200);
CGPointendPoint =CGPointMake(300, 200);
CGPointcontrolPoint1 =CGPointMake(100, 100);
CGPointcontrolPoint2 =CGPointMake(250, 300);
//设置路径
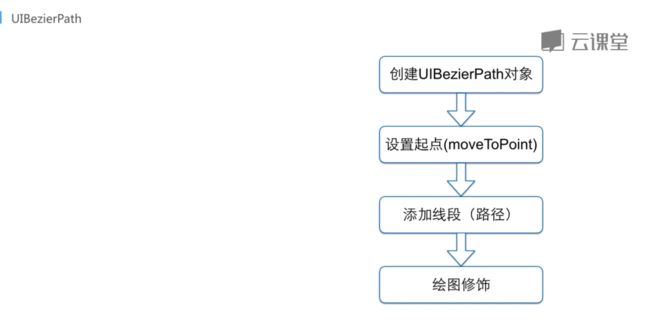
UIBezierPath *path = [UIBezierPath bezierPath];
[path moveToPoint:startPoint]; //设置起点
[pathaddCurveToPoint:endPointcontrolPoint1:controlPoint1controlPoint2:controlPoint2]; //用贝塞尔曲线绘制路径
shapeLayer.path= path.CGPath;
shapeLayer.strokeColor = [UIColor orangeColor].CGColor;
shapeLayer.fillColor = [UIColor clearColor].CGColor;
[self.view.layeraddSublayer:shapeLayer];
}
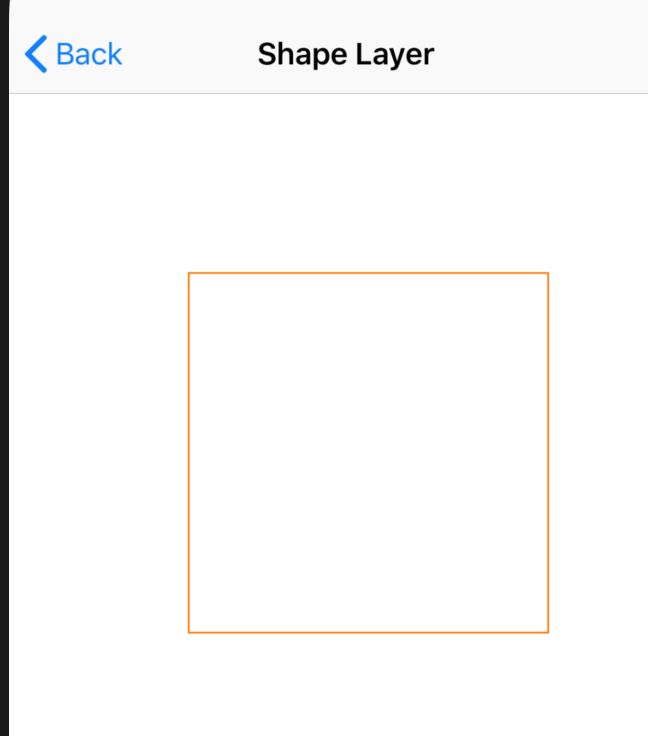
- (void)testCAShapeLayerWithBezier//绘制一个正方形
{
CAShapeLayer *shapeLayer = [CAShapeLayer layer];
shapeLayer.strokeColor = [UIColor orangeColor].CGColor;//绘制线条颜色
shapeLayer.fillColor = [UIColor clearColor].CGColor;//绘制图形内部颜色
UIBezierPath *path2 = [UIBezierPath bezierPathWithRect:CGRectMake(100, 100, 200, 200)];
shapeLayer.path= path2.CGPath;
[self.view.layeraddSublayer:shapeLayer];
}
- (void)testShapeLayerMask
{
UIView*bgView = [[UIViewalloc]init];
bgView.backgroundColor = [UIColor clearColor];
bgView.frame=CGRectMake(50, 100, 300, 200);
[self.viewaddSubview:bgView];
UIImageView *imageView = [[UIImageView alloc] init];
imageView.image = [UIImage imageNamed:@"nature.jpg"];
imageView.contentMode = UIViewContentModeScaleAspectFill;
imageView.frame= bgView.bounds;
[bgViewaddSubview:imageView];
UIBezierPath *maskPath = [UIBezierPath bezierPath];
[maskPathmoveToPoint:CGPointMake(0, 0)];
CGFloatcurveHeight = 40;
CGFloatcurveBeginHeight = imageView.frame.size.height- curveHeight;
[maskPath addLineToPoint:CGPointMake(0, curveBeginHeight)];
CGPointcurveEndPoint =CGPointMake(imageView.frame.size.width, imageView.frame.size.height- curveHeight);
CGPointcontrolPoint =CGPointMake(imageView.frame.size.width/ 2, imageView.frame.size.height+ 20);
[maskPath addQuadCurveToPoint:curveEndPointcontrolPoint:controlPoint];
[maskPath addLineToPoint:CGPointMake(imageView.frame.size.width, 0)];
[maskPathclosePath];
CAShapeLayer *maskLayer = [CAShapeLayer layer];
maskLayer.frame= imageView.bounds;
maskLayer.path= maskPath.CGPath;
//you can try
// [bgView.layer addSublayer:maskLayer];
bgView.layer.mask= maskLayer;
}
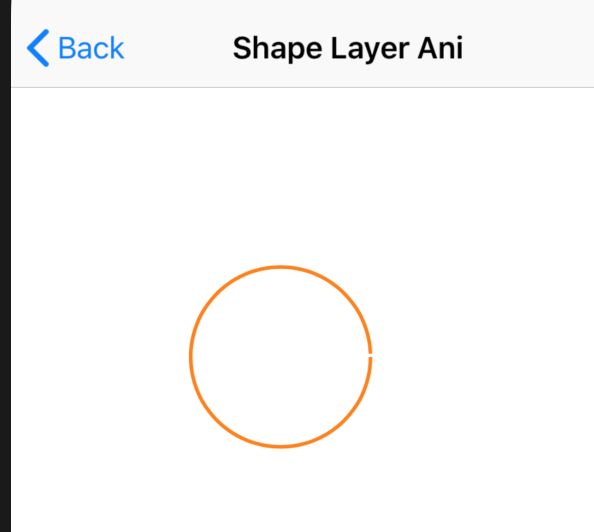
- (void)testCAShapeLayerAnimation
{
CAShapeLayer *shapeLayer = [CAShapeLayer layer];
shapeLayer.frame=CGRectMake(100, 100, 100, 100);
UIBezierPath *path = [UIBezierPath bezierPathWithOvalInRect:shapeLayer.bounds];//定义了一个圆环形的路径
shapeLayer.path= path.CGPath;
shapeLayer.fillColor = [UIColor clearColor].CGColor;//内部颜色
shapeLayer.lineWidth= 2.0f;//线条宽度
shapeLayer.strokeColor = [UIColor orangeColor].CGColor;//绘制线条是橘黄色
shapeLayer.strokeEnd= 0;//这样设置一开始看不到线条的
[self.view.layer addSublayer:shapeLayer];
CABasicAnimation *pathAnimation = [CABasicAnimation animationWithKeyPath:@"strokeEnd"];
pathAnimation.duration= 3.0f;
pathAnimation.timingFunction = [CAMediaTimingFunction functionWithName:kCAMediaTimingFunctionEaseInEaseOut];
pathAnimation.fromValue = [NSNumber numberWithFloat:0.0f];//从0
pathAnimation.toValue = [NSNumber numberWithFloat:1.0f];//到1
pathAnimation.fillMode = kCAFillModeForwards;//向前进行绘制
pathAnimation.removedOnCompletion=NO;
[shapeLayeraddAnimation:pathAnimationforKey:@"strokeEndAnimation"];
}
- (void)testTextLayer
{
CATextLayer *textLayer = [CATextLayer layer];
textLayer.contentsScale = [UIScreen mainScreen].scale;
textLayer.foregroundColor = [UIColor blackColor].CGColor;
textLayer.backgroundColor = [UIColor orangeColor].CGColor;
textLayer.wrapped=YES;
textLayer.alignmentMode = kCAAlignmentLeft;
//font
UIFont *font = [UIFont systemFontOfSize:12];
CGFontRef fontRef = CGFontCreateWithFontName((__bridge CFStringRef)font.fontName);
textLayer.font= fontRef;
textLayer.fontSize= font.pointSize;
CGFontRelease(fontRef);//这里注意
textLayer.frame=CGRectMake(50, 50, 200, 200);
[self.view.layer addSublayer:textLayer];
NSString *text = @"它聪明、熟悉每个用户的喜好,从海量音乐中挑选出你可能喜欢的音乐。它通过你每一次操作来记录你的口味。你提供给云音乐的信息越多,它就越了解你的音乐喜好。";
textLayer.string= text;
//rich text 复文本
NSMutableAttributedString *string = [[NSMutable AttributedString alloc] initWithString:text];
[string addAttribute:(NSString *)kCTForegroundColorAttributeName
value:(__bridge id)[UIColor yellowColor].CGColor
range:NSMakeRange(1, 2)];//指定文本颜色是黄色,区域是从INdex为1的位置,向后两个字展示为黄色
[string addAttribute:(NSString *)kCTFontAttributeName
value:[UIFontfontWithName:@"Arial"size:20]
range:NSMakeRange(1, 2)];//同样的区域,更改了一下字体。
//kCTUnderlineStyleAttributeName:@(kCTUnderlineStyleSingle)增加了下划线的效果
// (__bridge id)kCTForegroundColorAttributeName:(__bridge id)[UIColor blueColor].CGColor 更改了字体的颜色
NSDictionary *attrs = @{(__bridge id)kCTUnderlineStyleAttributeName:@(kCTUnderlineStyleSingle),
(__bridge id)kCTForegroundColorAttributeName:(__bridge id)[UIColor blueColor].CGColor};
[stringsetAttributes:attrsrange:NSMakeRange(text.length- 5, 4)];
textLayer.string= string;
}
- (void)testViewDrawRect
{
NTESTestView *testView = [[NTESTestView alloc] init];//这个类实现了drawrect的方法
[self.viewaddSubview:testView];
testView.frame=CGRectMake(10, 10, 200, 200);
testView.layer.backgroundColor = [UIColor orangeColor].CGColor;
testView.opaque=NO;//当我们自定义UIVIew的drawrect方法时候,所以需要设置为NO,才能让drawrect的方法生效
}
#import "NTESTestView.h"
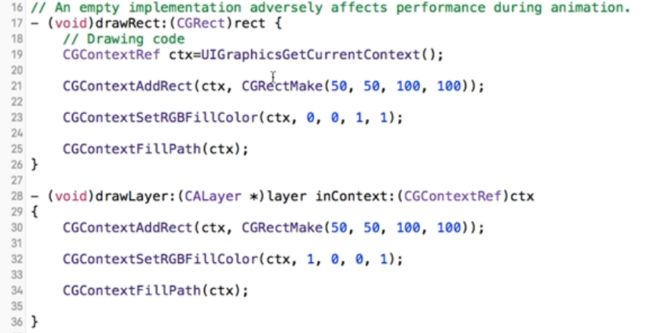
- (void)drawRect:(CGRect)rect {
// Drawing code 自定义的drawRect
CGContextRef ctx=UIGraphicsGetCurrentContext();
CGContextAddRect(ctx, CGRectMake(50, 50, 100, 100)); CGContextSetRGBFillColor(ctx, 1, 0, 0, 1);
CGContextFillPath(ctx);
//avoid using if not override
// [self.layer drawInContext:ctx]; }
- (void)drawLayer:(CALayer*)layer inContext:(CGContextRef)ctx
{
CGContextAddRect(ctx,CGRectMake(50, 50, 100, 100));
CGContextSetRGBFillColor(ctx, 1, 0, 0, 1);
CGContextFillPath(ctx);
}
#import "NTESCustomLayerViewController.h"
- (void)testViewDrawRect
{
NTESTestView *testView = [[NTESTestView alloc] init];
[self.viewaddSubview:testView];
testView.frame=CGRectMake(10, 10, 200, 200);
testView.layer.backgroundColor = [UIColor orangeColor].CGColor;
testView.opaque=NO;
[testView.layer setNeedsDisplay];//需要设置layer才能触发UIView自定义的drawLayer:(CALayer*)layer inContext:(CGContextRef)ctx
}


