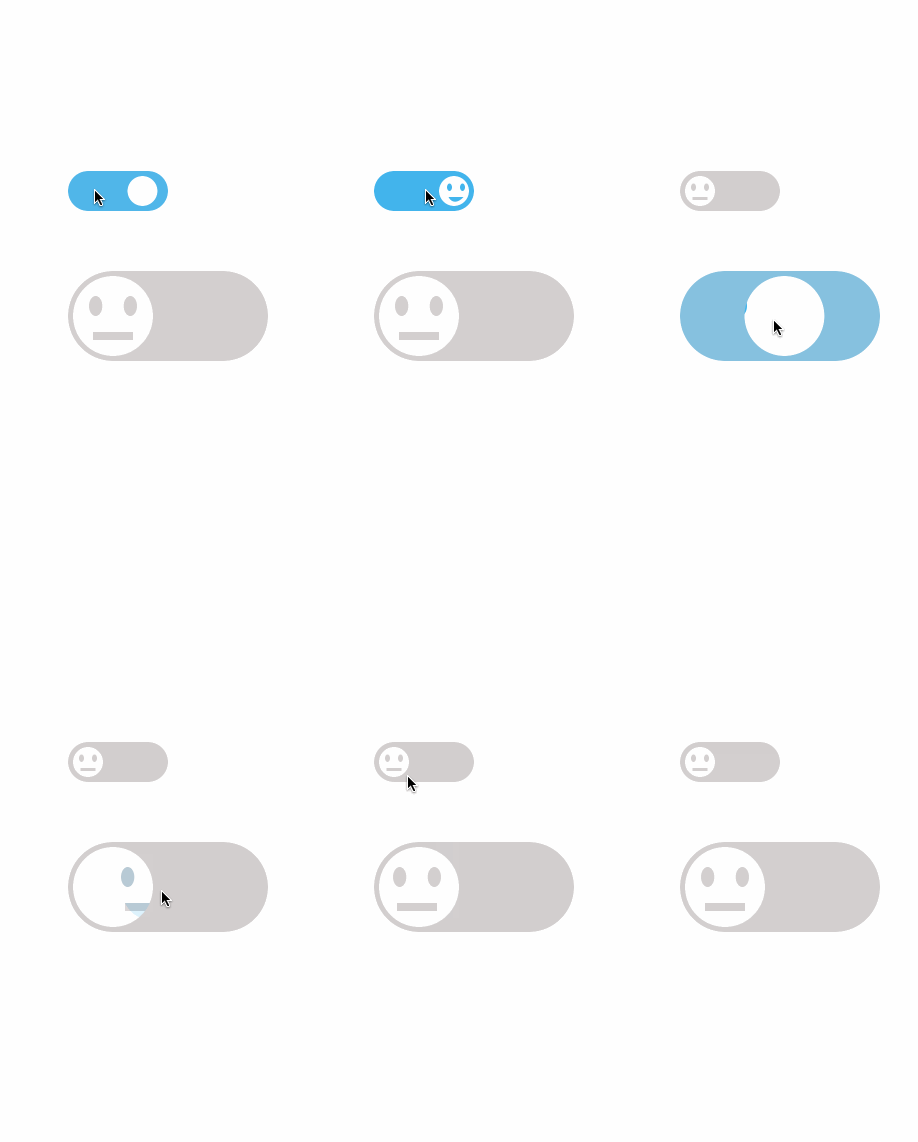
O(∩_∩)O哈!又是一个很cool的动画。原作者在这里。画面看着太美好,于是又试着用Swift写了一个。我的在这里
动画分解
1、首先是椭圆背景色的渐变,灰色---》淡蓝色。
2、脸的动画。这里又分为脸盘(就这么叫吧)和器官(2眼睛+1嘴巴)的动画。
- 脸盘的动画,比较简单,就是x的位移。
- 眼睛+嘴巴这个整体的动画,有个回弹的效果。先是向右飞出去,然后到达右边之后,又从左边飞进来,最后回弹一下。
3、嘴巴的动画。off的时候,是个长方形的嘴,切换到on,变成了笑脸嘴,并且有个逐渐张开的过程。
AIYA,还真是难描述。
元素分解
知道了动画步骤之后,元素就比较好分了。脸盘是1个layer,2眼睛+嘴巴==1个layer,椭圆背景=1view。
开工开工
嘴巴
首先注意到的是嘴巴的绘制,on和off的状态其实是2种不同的曲线,长方形很好画,那么张开的嘴呢?当然都是用万能的贝塞尔曲线啦。其实看了代码,都觉得简单o(>﹏<)o。
闭嘴的frame=(0.25w, 0.7h, 0.5w, 0.1h)
张嘴的,x,y,w都是一样的,只不过是控制2个control point的位置。
private func mouthPath() -> UIBezierPath {

        if isOn {
            let path = UIBezierPath()

            path.moveToPoint(CGPointMake(mouthRect().origin.x, mouthRect().origin.y))
            path.addCurveToPoint(CGPointMake(mouthLenth() + mouthRect().origin.x, mouthY()), controlPoint1: CGPointMake(mouthRect().origin.x + mouthOffset / 4, mouthY() + mouthOffset / 2),
                                 controlPoint2: CGPointMake(mouthRect().origin.x + mouthOffset * 3 / 4, mouthY() + mouthOffset / 2))
            path.closePath()

            return path
        } else {
            let path = UIBezierPath(rect: mouthRect())
            return path
        }
    }
眼睛
眼睛就是2个椭圆,有现成的。frame=(0.2w, 0.25h, 0.4w, 0.6h)
private func rightEyePath() -> UIBezierPath {
        let origin = rightEyeOrigin()
        let size = eyeSize()
        let path = UIBezierPath(ovalInRect: CGRectMake(origin.x, origin.y, size.width, size.height))

        return path
    }
眼睛+嘴巴
其实就是在layer上面,分别把他们画上去。
override func drawInContext(ctx: CGContext) {

        let bezierLeft = leftEyePath()
        let bezierRight = rightEyePath()
        let bezierMouth = mouthPath()

        CGContextAddPath(ctx, bezierLeft.CGPath)
        CGContextAddPath(ctx, bezierRight.CGPath)
        CGContextAddPath(ctx, bezierMouth.CGPath)
        CGContextSetFillColorWithColor(ctx, color().CGColor)
        CGContextSetStrokeColorWithColor(ctx, UIColor.clearColor().CGColor)
        CGContextFillPath(ctx)
    }
脸盘/椭圆背景
这个更简单了,用cornerRadius或者bezierPath都行。
嘴张开的动画
因为嘴是用bezier曲线画的,有2个control point。所以主要是操控control point,来实现张开的效果。
为了支持自定义属性动画,需要用到needsDisplayForKey,改变属性后,可以引发drawInContext重绘。mouthOffset最后其实是等于mounLength的,所以只需要将mouthOffset从0变到mounLength即可。
internal override class func needsDisplayForKey(key: String) -> Bool {
        if key == "mouthOffset" {
            return true
        }

        return super.needsDisplayForKey(key)
    }
动画顺序
拿从off到on的过程来说。
1、背景渐变+脸盘移动+器官向右飞出
2、脸盘移动的动画结束后,器官从左往右飞出,并回弹。同时嘴巴开始张开动画。
3、回弹动画结束,整个动画结束。
动画注意
在动画结束之后,要将对应值设成动画之后的值。
override func animationDidStop(anim: CAAnimation, finished flag: Bool) {
        if flag {
            if let type = anim.valueForKey("animation") as? String {
                // 脸盘移动到端点
                if type == "faceBgLayerAnimation" {

                    faceBgLayer.removeAllAnimations()
                    faceBgLayer.position = positionOfFaceView(!isOn)

                    faceLayer.isOn = !isOn
                    faceLayer.mouthOffset = !isOn ? faceLayer.bounds.size.width / 2 : 0
                    faceLayer.setNeedsDisplay()

                    if (!isOn) {
                        mouthAnimation(isOn, offset: faceLayer.bounds.size.width / 2)
                        moveRightBackAnimation()
                    } else {
                        moveLeftBackAnimation()
                    }
                } else if type == "backgroundAnimation" {

                    self.backgroundColor = isOn ? onColor : offColor

                } else if type == "moveBackAnimation" {

                    faceLayer.removeAllAnimations()

                    isOn = !isOn
                    isAnimating = false
                }
            }
        }
    }
