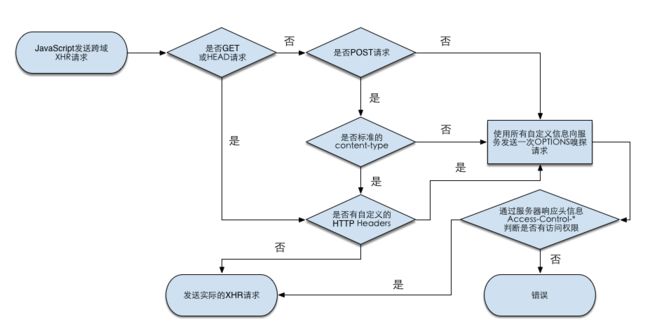
XMLHttpRequest Level 2 标准
在jq中的ajax只是对于XMLHttpRequest的封装,
后来衍生出了一个fetch,其兼容性,
目前是一个实验性的阶段。当然也有其的polyfill存在。
1.XMLHttpRequest的基本用法
XMLHttpRequest包含prototype属性,所以是个函数不是一个对象。
var xhr = new XMLHttpRequest();       //创建一个XMLHttpRequest对象
console.log(xhr.readyState);          //0
xhr.open('GET', 'test.action',true);  //打开并且为异步
xhr.timeout=2000;                     //设置超时时间为2000毫秒,默认0 没有超时
xhr.responseType='text'               //默认是空字符串等同于`text`,还有`arraybuffer`, `blob`, `document`, `json`类型,
                                      //老版本采用`overrideMimeType`方法
console.log(xhr.readyState);          //1
xhr.setRequestHeader('name','diandi') //设置请求头,必须是打开状态的时候才能设置
xhr.onreadystatechange= function(){   //每次readyState改变都会进
    console.log(xhr.response);        //响应的对象
    console.log(xhr.responseText);    //返回对应 xhr.responseType的类型的数据
    console.log(xhr.responseXML);     //返回的XML格式的数据
    console.log(xhr.status)           //返回的状态码
};
xhr.send('test');                     //发送数据
1.1 四种状态xhr.readyState
| 状态 | 状态值 | 描述 |
|---|---|---|
| UNSENT | 0 | 未使用刚初始化 |
| OPENED | 1 | 打开状态可以设置RequestHeader |
| HEADERS_RECEIVED | 2 | 接收到响应头 |
| LOADING | 3 | 接收响应内容中 |
| DONE | 4 | 接收结束 |
1.2 获取上传和下载的进度条
xhr.onprogress = function(evt){}; //下载的事件
xhr.upload.onprogress = function(evt){};  //上传的事件
evt的参数说明
参数 | 描述
---:| ---
total | 传输的总字节
loaded | 完成传输的字节
lengthComputable | 如果长度不为0,则设置为true,并且设置total,当数据响应的时候Content-Encoding:gzip的时候不能获取内容长度
相关事件
类型 | 描述 | 次数 | 条件
---:| --- | ---| ---
onloadstart |Progress开始的时候 | 一次 | 首先
onprogress |Progress中 | 一次或更多。 |loadstart触发以后
onerror |Progress失败 | 没有或者一次 | 最后一个progress触发以后
onabort |Progress被终止 | 没有或者一次 | 最后一个progress触发以后
ontimeout | 超时Progress被终止 | 没有或者一次 | 最后一个progress触发以后
onload |progress成功 | 没有或者一次 | 最后一个progress触发以后
onloadend |progress结束 | 一次 |error或abort或timeout或load触发以后
1.3 send方法支持的类型
function send();
function send(ArrayBufferView data);
function send(Blob data);
function send(Document data);
function send(DOMString? data);
function send(FormData data);
参考资料
- XMLHttpRequest Level 2 使用指南
- XMLHttpRequest2 新技巧
- XMLHttpRequest
CORS
浏览器都会包含着同源的安全策略。同源政策的目的,是为了保证用户信息的安全,防止恶意的网站窃取数据。
不同的端口、不同的协议、不同的域名都是不同源。CORS需要浏览器和服务器同时支持,但是客户端不需要改动什么,
目前,所有浏览器都支持该功能,IE浏览器不能低于IE10。
并且在chrome下跨越请求只支持http, data, chrome, chrome-extension, https, chrome-extension-resource协议。
1. 简单请求,不需要请求2次,只使用GET、POST进行的请求,请求没有自定义的请求头。
1.1 客户端代码
var xhr=new XMLHttpRequest();
xhr.open('get','http://localhost:3000');
//xhr.open('post','http://localhost:3000');
xhr.send();
1.2 服务端代码
var koa = require('koa');
var app = koa();
app.use(function*() {
    this.set('Access-Control-Allow-Origin', '*');
    this.body = this.method == 'POST' ? 'is Post' : 'is Get';
});
app.listen(3000);
Access-Control-Allow-Origin为设置允许请求的来源地址,*代表全部
2. 需要先OPTIONS请求来检验是否允许请求,然后再次请求,可以设置各种头
2.1 客户端代码
var xhr=new XMLHttpRequest();
xhr.open('get','http://localhost:3000');
//xhr.open('post','http://localhost:3000');
xhr.setRequestHeader('Foo','http://localhost:3000');
xhr.send();
2.2 服务端代码
var koa = require('koa');
var app = koa();
app.use(function*() {
    this.set('Access-Control-Allow-Origin', '*');
    this.set('Access-Control-Allow-Headers', 'foo');
    this.body = this.method == 'POST' ? 'is Post' : 'is Get';
});
app.listen(3000);
Access-Control-Allow-Headers大小中定义的请求头的大小写不敏感,用逗号隔开
3. 提交cookie信息,如果不改变RequestHeader,也只请求一次
3.1 客户端代码
var xhr=new XMLHttpRequest();
xhr.open('get','http://localhost:3000');
//xhr.open('post','http://localhost:3000');
xhr.withCredentials=true;
xhr.send();
3.2 服务端代码
var koa = require('koa');
var app = koa();
app.use(function*() {
    this.set('Access-Control-Allow-Origin', 'http://test.in66.com:8080');
    this.set('Access-Control-Allow-Credentials', true);
    this.body = this.method == 'POST' ? 'is Post' : 'is Get';
});
app.listen(3000);
Access-Control-Allow-Credentials必须为true且Access-Control-Allow-Origin必须是指定的来源地址,
其中的Cookie只会提交http://localhost:3000下的Cookie信息
4. 其他的服务器返回头
| 字段 | 说明 |
|---|---|
| Access-Control-Expose-Headers | 设置相应返回的时候可以读取的头,不设置的时候能读取Content-Type |
| Access-Control-Allow-Methods | 是逗号分隔的一个字符串,表明服务器支持的所有跨域请求的方法 |
| Access-Control-Max-Age | OPTIONS请求的有效期,以秒为单位 |
FormData
利用FormData可以完全模拟实现提交表单,也弥补了以前上传文件只能利用target是一个iframe的方法
1.基本用法
var oform = new FormData();
oform.append("name", "diandi");
oform.append("age", 10);
oform.append("file", input.files[0]);//上传控件的文件
......             //构建xhr
xhr.send(oform);
2.直接通过一个表单元素
var ele = document.getElementById("testform");
oform = new FormData(ele);
......             //构建xhr
xhr.send(oform);
3.文件分块上传
var oform = new FormData();
var fsize=input.files[0].size;        //获取文件的大小
oform.append("file", input.files[0].slice(0,10)); //上传文件前面10长度的二进制
......             //构建xhr
xhr.send(oform);
input.files[0].slice(0,10)分割后的为Blob,File基于Blob,继承了Blob的功能.
4.文件上传进度
  var formData = new FormData();
  formData.append('key', key)
  formData.append('token', tokens)
  formData.append('file', files);
  $.ajax({
    url: uploadQiNiuurl,
    type: 'POST',
    data: formData,
    contentType: false,
    processData: false,
    beforeSend: function(XMLHttpRequest) {
        XMLHttpRequest.upload.addEventListener("progress", function(evt) {
            if (evt.lengthComputable) {
                filesPercentArr[index] = {
                    loaded: evt.loaded,
                    total: evt.total,
                }
                dtd.notify(filesPercentArr);
            }
        }, false);
    }
  }).done(function(res) {

  }).fail(functio() {}))

