文/ZYRzyr
原文链接:http://www.jianshu.com/p/d8fdd6efe2cb
[Deprecated]本文篇幅过长,且有不全之处,作者将其拆分并重新编写,请移步新系列:Spring Boot实际应用讲解(一):Hello World
前言
本文将介绍Spring Boot的使用。
Spring Boot是由Pivotal团队提供的全新框架,其设计目的是用来简化新Spring应用的初始搭建以及开发过程。简而言之,使用Spring Boot,将极大的提高开发效率。
阅读本文需要熟悉以下技术:
-
Spring(必须) -
MySQL(必须) -
Maven(必须) -
Hibernate(非必须)
接下来,将使用IntelliJ IDEA创建一个Spring Boot工程,实现简单的增删改查功能,该工程包含以下几点内容:
- 项目属性配置
- Controller的使用
- 数据库操作
- 事务管理
- AOP
- 统一异常处理
- 单元测试
创建工程
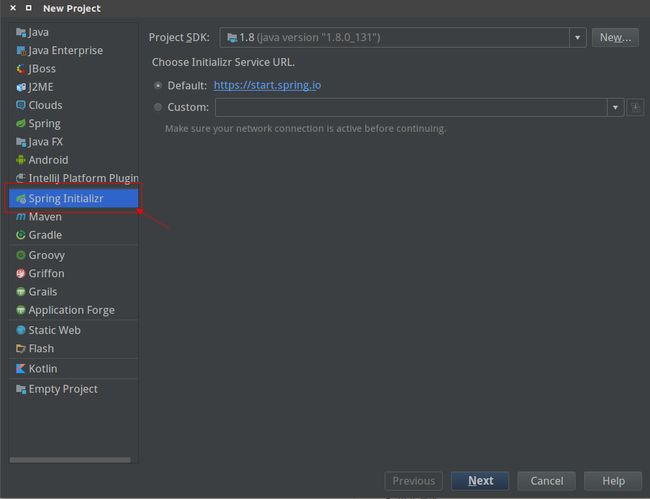
IntelliJ IDEA新建一个工程,选择如下图所示,点击Next(IDEA企业版才有此选项):
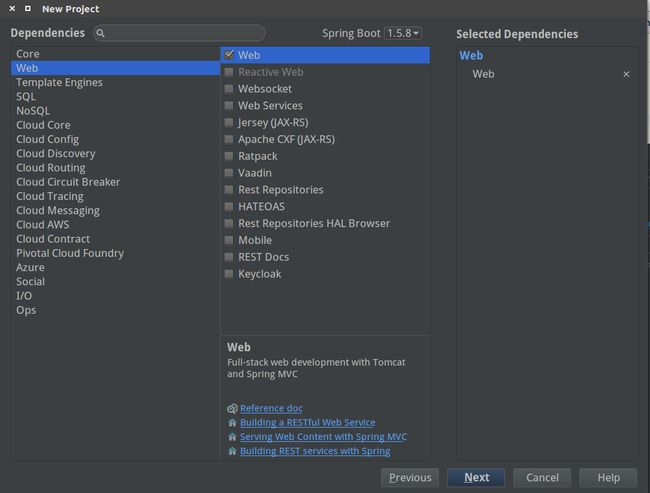
Next后,输入项目信息之后,进入如下界面,选择如图选项后,一直
Next到最后
Finish:
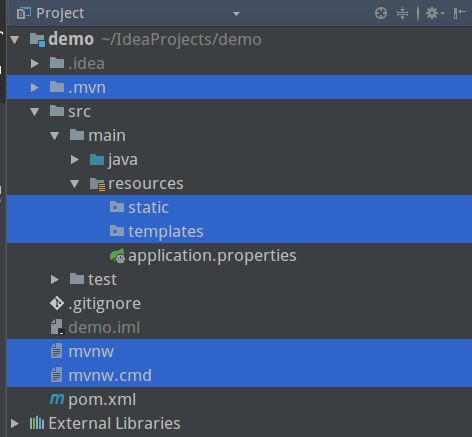
Finish后,需要等待Maven下载相关依赖,此时可见如下目录结构:
删除其中选中的5项无用的文件,并将目录中的
application.properties重命名为
application.yml,此时,
application.yml即为整个工程的配置文件,并且只有这一个。
因为
Spring Boot内置了
Tomcat,所以无需额外进行配置,直接按快捷键
Shift + F10即可运行此项目,在浏览器输入
http://localhost:8080/,跳转后看见如下错误页面,则说明该工程已运行成功:
依赖库
本项目中要使用到JPA、MySQL、AOP,所以要在pom.xml中添加如下依赖:
            org.springframework.boot
            spring-boot-starter-data-jpa


            mysql
            mysql-connector-java


            org.springframework.boot
            spring-boot-starter-aop
配置
在实际的项目开发中,通常会有开发环境,测试环境,生产环境等,Spring Boot针对这点,也有很好的支持:
1.在resources文件夹下新建两个文件:application-dev.yml和application-pro.yml,前者表示开发环境,后者表示生产环境。
2.在application-dev.yml和application-pro.yml中就可写与各自环境相关的配置,如端口号,数据库等等。
application-dev.yml配置如下(注意格式):
server:
  port: 8081    //端口为8081

spring:
  datasource:
    driver-class-name: com.mysql.jdbc.Driver     //使用MySQL
    url: jdbc:mysql://localhost:3306/book_dev?useSSL=false   //使用开发用数据库book_dev
    username: root
    password: 123456

  jpa:
    hibernate:
      ddl-auto: create-drop           //自动生成数据表的方式
    show-sql: true
application-pro.yml配置如下(注意格式):
server:
  port: 8082     //端口为8081

spring:
  datasource:
    driver-class-name: com.mysql.jdbc.Driver     //使用MySQL
    url: jdbc:mysql://localhost:3306/book?useSSL=false    //使用开发用数据库book_dev
    username: root
    password: 123456

  jpa:
    hibernate:
      ddl-auto: update     //自动生成数据表的方式
    show-sql: true
3.此时需要在原来的application.yml文件中,指定工程启动时,运行哪个环境的配置文件,代码如下(注意格式):
spring:
  profiles:
    active: dev    //表示加载application-dev.yml中的配置
//这里还可以写所有环境通用的配置
正式开始
接下来将实现一个功能:提供一个可用的POST请求路径,输入参数name,book,提交成功后加入数据库中。
1.创建实体类User:
import javax.persistence.*;
import javax.validation.constraints.NotNull;
import java.io.Serializable;

@Entity    //表示该类是一个实体类,由于之前的配置中写了 ddl-auto,jpa会将类名作为表名自动生成表
@Table(uniqueConstraints = {@UniqueConstraint(columnNames = {"name", "book"})})//表示同一行name和book作为唯一约束
public class User implements Serializable {

    @Id  //主键约束
    @GeneratedValue  //自增
    private Integer id;

    @NotNull
    private String name;

    @NotNull
    private String book;

    public User() {
    }

    public User(Integer id) {
        this.id = id;
    }

    public User(String name, String book) {
        this.name = name;
        this.book = book;
    }

    public Integer getId() {
        return id;
    }

    public void setId(Integer id) {
        this.id = id;
    }

    public String getName() {
        return name;
    }

    public void setName(String name) {
        this.name = name;
    }

    public String getBook() {
        return book;
    }

    public void setBook(String book) {
        this.book = book;
    }

    @Override
    public String toString() {
        return "User{" +
                "id=" + id +
                ", name='" + name + '\'' +
                ", book='" + book + '\'' +
                '}';
    }
}
2.创建数据库操作接口UserRepository:
import com.zyr.book.domain.User;
import org.springframework.data.jpa.repository.JpaRepository;
import org.springframework.stereotype.Repository;

import java.util.List;

@Repository
public interface UserRepository extends JpaRepository { //继承JpaRepository后,可直接使用其已有的方法,类似hibernate,且可在本类中自定义自己的操作。
    List findByName(String name);
}
3.创建service接口UserService:
import com.zyr.book.domain.User;

public interface UserService {
    User insertUser(String name, String book);
}
4.实现接口UserService,完成业务逻辑:
import com.zyr.book.domain.User;
import com.zyr.book.enums.ApiErrorType;
import com.zyr.book.exception.UserException;
import com.zyr.book.repository.UserRepository;
import com.zyr.book.service.UserService;
import com.zyr.book.util.TextUtil;
import org.springframework.beans.factory.annotation.Autowired;
import org.springframework.stereotype.Service;
import org.springframework.transaction.annotation.Transactional;

@Transactional   //事物管理注解,当数据库操作失败后,自动回滚
@Service("userService")
public class UserServiceImpl implements UserService {

    private UserRepository userRepository;

    @Autowired     //使用构造器注入方式
    public UserServiceImpl(UserRepository userRepository) {
        this.userRepository = userRepository;
    }

    @Override
    public User insertUser(String name, String book) {
        if (TextUtil.isEmpty(name)) {
            throw new UserException(ApiErrorType.NULL_NAME);  //名字为空,抛出异常
        }

        if (TextUtil.isEmpty(book)) {
            throw new UserException(ApiErrorType.NULL_BOOK); //书籍为空,抛出异常
        }

        return userRepository.save(new User(name, book));
    }
}
此处的错误处理均使用抛异常的方式,方便之后的统一异常处理。
其中UserException如下:
import com.zyr.book.enums.ApiErrorType;

public class UserException extends RuntimeException { //必须继承RuntimeException,在统一异常处理时才能被捕获

    private ApiErrorType apiErrorType;

    public UserException(ApiErrorType apiErrorType) {
        super(apiErrorType.getMessage());
        this.apiErrorType = apiErrorType;
    }

    public ApiErrorType getApiErrorType() {
        return apiErrorType;
    }

    public void setApiErrorType(ApiErrorType apiErrorType) {
        this.apiErrorType = apiErrorType;
    }
}
其中ApiErrorType如下:
public enum ApiErrorType {
    UNKNOWN_ERROR("服务器异常"),
    EMPTY_BOOK("该用户没有书籍"),
    EMPTY_USER("无此用户"),
    NULL_NAME("姓名不能为空"),
    NULL_BOOK("书籍不能为空"),
    DUPLICATED_BOOK("该用户已有此书");

    private String message;

    ApiErrorType(String message) {
        this.message = message;
    }

    public String getMessage() {
        return message;
    }
}
5.定义Controller:
import com.zyr.book.domain.User;
import com.zyr.book.service.UserService;
import org.springframework.beans.factory.annotation.Autowired;
import org.springframework.web.bind.annotation.PostMapping;
import org.springframework.web.bind.annotation.RestController;

@RestController
public class UserController {

    private UserService userService;

    @Autowired   //构造器注入方式
    public UserController(UserService userService) {
        this.userService = userService;
    }

    @PostMapping("/add")
    public User add(User user) throws Exception {    //注意这里,方法抛出异常
        return userService.insertUser(user.getName(), user.getBook());
    }
}
- 类上的
@RestController,表示该类中的方法返回值,会自动转换成JSON格式; - 方法上的
@PostMapping("/add"),表示此方法仅支持POST方式,相应的还有@GetMapping、@PutMapping、@DeleteMapping等等RESTful API的请求方式,括号里的add表示请求路径,此处的请求路径即为:http://localhost:8081/add; - 方法上直接抛出异常,方便之后的统一异常处理;
测试
以上5步,已经完成了基本的业务代码,现在有3中方式进行测试刚才所写的功能是否有效:
- 单元测试
-
IDEA自带的测试工具 - 编写客户端调用该
API
此处介绍前两种测试方式:
1.单元测试
鼠标选中UserServiceImpl中的insertUser方法,右键—>Go To—>Test—>Create New Test...,IDEA自动创建测试类,在其中加入测试用例如下:
@RunWith(SpringRunner.class)
@SpringBootTest
public class UserServiceImplTest {

    @Autowired
    private UserService userService;

    @Test
    public void insertUser() throws Exception {
        User user = userService.insertUser("Bob", "书");
        assertEquals("Bob", user.getName());
        assertEquals("书", user.getBook());
    }
}
同样的方式创建UserController类中add方法的测试用例:
import org.junit.Test;
import org.junit.runner.RunWith;
import org.springframework.beans.factory.annotation.Autowired;
import org.springframework.boot.test.autoconfigure.web.servlet.AutoConfigureMockMvc;
import org.springframework.boot.test.context.SpringBootTest;
import org.springframework.test.context.junit4.SpringRunner;
import org.springframework.test.web.servlet.MockMvc;
import org.springframework.test.web.servlet.request.MockMvcRequestBuilders;
import org.springframework.test.web.servlet.result.MockMvcResultMatchers;

@RunWith(SpringRunner.class)
@SpringBootTest
@AutoConfigureMockMvc
public class UserControllerTest {

    @Autowired
    private MockMvc mockMvc;  //模拟网络请求

    @Test
    public void testAdd() throws Exception {
        mockMvc.perform(MockMvcRequestBuilders.post("/add")
                .param("name", "用户A")
                .param("book", "一本书A"))
                .andExpect(MockMvcResultMatchers.status().isOk())
                .andExpect(MockMvcResultMatchers.content()
                        .string("{\"id\":1,\"name\":\"用户A\",\"book\":\"一本书A\"}"))
        ;
    }
}
创建完成之后,分别运行测试用例即可。
2.IDEA自带的测试工具
打开IDEA上面的 Tools—>Test RESTful Web Service,打开之后如下图:
其中HTTP method选择POST,Host/port输入http://localhost:8081,Path输入add,切换到Request在Request Parameters中输入参数,如下图:
输入完成之后,点击左侧第一个绿色的三角形按钮,即可完成一次
POST模拟请求,请求成功后以
JSON返回输入的参数:
{"id":1,"name":"Bob","book":"书"}
此时若是再此执行相同一次上面的操作,则会返回如下错误信息:
{
    "timestamp":1510211138423,
    "status":500,
    "error":"Internal Server Error",
    "exception":"org.springframework.dao.DataIntegrityViolationException",
    "message":"could not execute statement; SQL [n/a]; constraint [UKl7798etvxnmv3iq4thmund7us]; nested exception is org.hibernate.exception.ConstraintViolationException: could not execute statement",
    "path":"/add"
}
返回这种错误信息的原因,就是前面在UserController里面的add方法直接抛出了异常。乍一看好像没问题,状态码是500说明服务器有问题,真实原因确实也是因为无法插入重复的数据出的错,但仔细一想,这样的错误信息,会让客户端产生误解,以为是服务器现在有问题而暂时无法使用,只能傻傻的等待,但其实是客户端的参数不对造成的误解,所以此处的状态码应该返回以4开头的4XX,来说明是客户端请求有误,并且要让客户端能一目了然的知道是什么地方出了错,并且这样做,也符合RESTful API的风格,由此,便引入了Spring Boot中的统一异常处理。
统一异常处理
1.新建类Error,保存错误信息:
public class Error {
    private String message;

    public Error() {
    }

    public Error(String message) {
        this.message = message;
    }

    public String getMessage() {
        return message;
    }

    public void setMessage(String message) {
        this.message = message;
    }

    @Override
    public String toString() {
        return "Error{" +
                "message='" + message + '\'' +
                '}';
    }
}
2.新建类GlobalExceptionHandler,捕获所有异常:
import com.zyr.book.domain.Error;
import com.zyr.book.enums.ApiErrorType;
import com.zyr.book.exception.UserException;
import org.slf4j.Logger;
import org.slf4j.LoggerFactory;
import org.springframework.dao.DataIntegrityViolationException;
import org.springframework.http.HttpStatus;
import org.springframework.http.ResponseEntity;
import org.springframework.web.HttpRequestMethodNotSupportedException;
import org.springframework.web.bind.annotation.ControllerAdvice;
import org.springframework.web.bind.annotation.ExceptionHandler;
import org.springframework.web.bind.annotation.ResponseBody;

@ControllerAdvice
public class GlobalExceptionHandler {

    private final static Logger logger = LoggerFactory.getLogger(GlobalExceptionHandler.class);

    @ResponseBody    //此注解表示:以JSON形式返回数据
    @ExceptionHandler
    public ResponseEntity handle(Exception e) {  //方法名可随意
        if (e instanceof UserException) {   //捕获service中主动抛出的异常,并且获取其中的错误信息以返回给客户端
            return new ResponseEntity<>(new Error(((UserException) e).getApiErrorType().getMessage()),
                    HttpStatus.BAD_REQUEST);
        } else if (e instanceof DataIntegrityViolationException) {   //捕获数据库操作异常,此处为违反唯一性约束
            return new ResponseEntity<>(new Error(ApiErrorType.DUPLICATED_BOOK.getMessage()),
                    HttpStatus.FORBIDDEN);
        } else if (e instanceof HttpRequestMethodNotSupportedException) { //捕获请求方法异常
            return new ResponseEntity<>(new Error(e.getLocalizedMessage()),
                    HttpStatus.METHOD_NOT_ALLOWED);
        } else {
            logger.error("【系统异常】", e);
            return new ResponseEntity<>(new Error(ApiErrorType.UNKNOWN_ERROR.getMessage()),
                    HttpStatus.INTERNAL_SERVER_ERROR);
        }
    }
}
可在GlobalExceptionHandler方法handle中的if...else if中加入想要捕获的异常,自定义其返回信息与状态码。最后的else中,打印出了未捕获的异常,以方便Fix bug。
以上完成之后,重启项目,在REST Client中重新提交两次相同的POST请求后,第二次即返回错误信息{"message":"该用户已有此书"}。如果用Jquery ajax进行访问,则需要在ajax的回调函数error中写自己的失败响应逻辑。
AOP
AOP即Aspect Oriented Programming,翻译为面向切面编程,可以简单的理解为:在一些方法的执行过程中,统一指定一个地方并做一些额外的事。比如方法A,B,C,可以在它们开始执行前、执行后、返回之后等等时候做一些统一的处理。接下来,以打印请求信息为例说明。
新建类HttpAspect:
import org.aspectj.lang.JoinPoint;
import org.aspectj.lang.annotation.AfterReturning;
import org.aspectj.lang.annotation.Aspect;
import org.aspectj.lang.annotation.Before;
import org.aspectj.lang.annotation.Pointcut;
import org.slf4j.Logger;
import org.slf4j.LoggerFactory;
import org.springframework.stereotype.Component;
import org.springframework.web.context.request.RequestContextHolder;
import org.springframework.web.context.request.ServletRequestAttributes;

import javax.servlet.http.HttpServletRequest;

@Aspect   //此注解说明该类是一个切面类
@Component
public class HttpAspect {

    private static final Logger logger = LoggerFactory.getLogger(HttpAspect.class);

    @Pointcut("execution(public * com.zyr.book.controller..*.*(..))")  //切入点,execution内的内容即为想要切入的地方,类似于正则匹配,此处切入的地方是com.zyr.book.controller包内的所有public方法
    public void log() {
    }

    @Before("log()")  //直接调用上面定义的切入点log,表示在com.zyr.book.controller包内的所有public方法执行前,先执行此方法内的内容,即打印请求信息
    public void doBefore(JoinPoint joinPoint) {
        ServletRequestAttributes attributes = (ServletRequestAttributes) RequestContextHolder.getRequestAttributes();
        HttpServletRequest request = attributes.getRequest();

        logger.info("-------------------------------Request Log Begin----------------------------------------------");
        logger.info("url={}", request.getRequestURL());
        logger.info("method={}", request.getMethod());
        logger.info("ip={}", request.getRemoteAddr());
        logger.info("class_method={}", joinPoint.getSignature().getDeclaringTypeName() + "." + joinPoint.getSignature().getName());
        logger.info("args={}", joinPoint.getArgs());
        logger.info("-------------------------------Request Log End------------------------------------------------");
    }

    @AfterReturning(returning = "object", pointcut = "log()") //直接调用上面定义的切入点log,表示在com.zyr.book.controller包内的所有public方法执行完成并返回后,执行此方法的内容,即打印方法的返回值
    public void doAfterReturning(Object object) {
        if (object != null) {
            logger.info("response={}", object.toString());
        }
    }
}
以上完成之后,重启项目,在REST Client中提交一次POST请求,即可在控制台看见打印的信息:
跨域问题
如果使用Jquery ajax进行访问,可能会有跨域问题,如果有,需要在新建工程时,自动生成的XXApplication,即有一个main方法的那个类(本Demo的是BookApplication)里加入跨域过滤器:
    @Bean
    public CorsFilter corsFilter() {
        UrlBasedCorsConfigurationSource source = new UrlBasedCorsConfigurationSource();
        source.registerCorsConfiguration("/**", buildConfig());
        return new CorsFilter(source);
    }

    private CorsConfiguration buildConfig() {
        CorsConfiguration corsConfiguration = new CorsConfiguration();
        corsConfiguration.addAllowedOrigin("*");
        corsConfiguration.addAllowedHeader("*");
        corsConfiguration.addAllowedMethod("*");
        return corsConfiguration;
    }
完整Demo地址
ZYRzyr的GitHub地址 = Spring Boot 简易使用指南
欢迎Start,Follow!
最后
本文内容基本涵盖了在实际的单体式架构的项目中开发所面临的情况,若文中有误,欢迎评论指正。后续将推出:微服务架构—Spring Cloud简易使用指南。有兴趣可以继续关注ZYRzyr的
原文作者/ZYRzyr
原文链接:http://www.jianshu.com/p/d8fdd6efe2cb
请进入这里获取授权:https://101709080007647.bqy.mobi


