本人有若干成套学习视频, 可试看! 可试看! 可试看, 重要的事情说三遍 包含Java, 数据结构与算法, iOS, 安卓, python, flutter等等, 如有需要, 联系微信tsaievan.
现在市面上的即时通讯app都有语音转文本的功能, 那么语音转文本如何实现呢? 自己写是不现实的, 因为这涉及到模式识别的算法, 所以只能用到第三方SDK了, 我在项目中用到的是百度语音SDK, 自己也是刚刚实现功能, 很多地方都还需要优化, 就简单介绍一下如何实现吧
一 注册应用
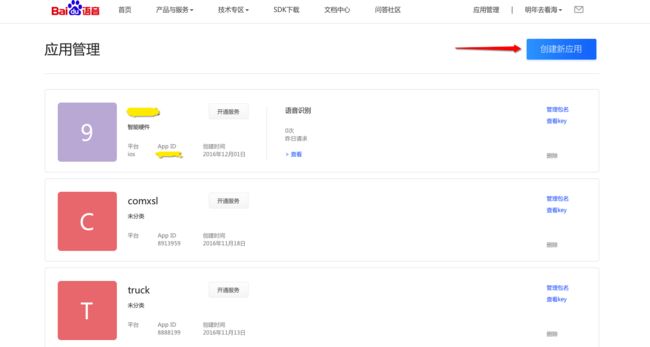
- 首先登录百度语音
-
在应用管理中添加新的应用
-
创建到第4步时, 把bundle identifier填进去
- 创建成功后, 可以拿到App ID, API Key ,Secret Key, 这些东西都是后面配置用得到的
二 配置环境
-
下载iOS版本的SDK
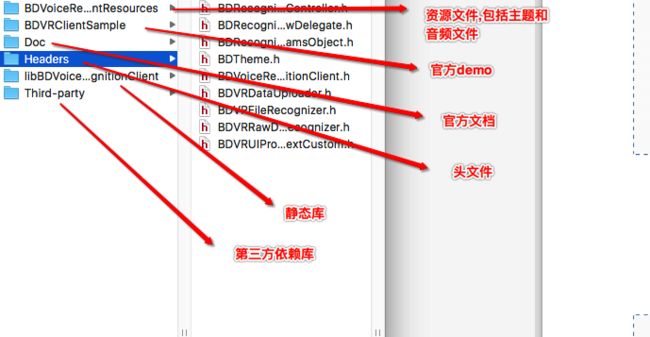
下载了官方的SDK之后, 可以看到以下文件
- 如果嫌麻烦的话, 直接把除了Doc和Sample文件的其余文件全部拖到工程里去
- 添加依赖库
关于添加依赖库, 百度官方是这样解释的:
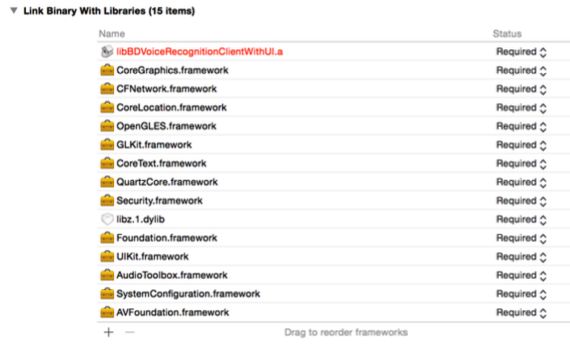
BDVRClient 使用了录音和播放功能,因此需要在 Xcode 工程中引入 AudioToolbox.framework和 AVFoundation.framework;BDVRClient 还使用到了网络状态检测功能,因此还需要引入SystemConfiguration.framework;为了生成设备 UDID,需要引入 Security.framework;为了支持 gzip压缩,需要引入 libz.1.dylib; 网络模块需要引入 CFNetwork.framework;某些场景需要获取设备地理位置以 高识别准确度,需引入 CoreLocation.framework。为了支持识别控件,需要引入 OpenGLES.framework,QuartzCore.framework,GLKit.framework,CoreGraphics.framework 和 CoreText.framework。
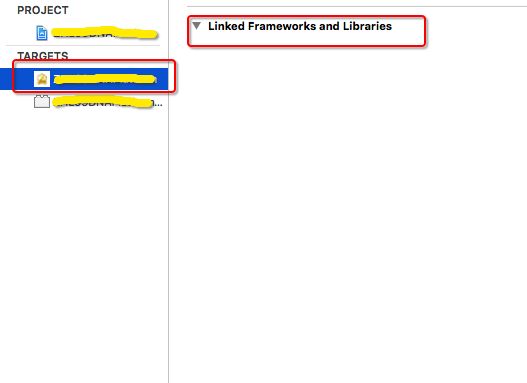
添加方式:右键点击 Xcode 中的工程文件,在出现的界面中,选中 TARGETS 中应用,在出现的界面中选中 Build Phase->Link Binary With Libraries,点击界面中的“+”图标,在弹出的界面中选择此 7 个 Framework 即可,添加完成效果图如图 8 所示(libBDVoiceRecognitionClient.a 将在随后添加
添加完成后先预编译一下, 我在编译的时候遇到的问题都是由于libBDVoiceRecognitionClient.a这个静态库没有正确添加导致的
另外一个问题是我现在的工程文件只能在真机环境下运行, 在模拟器的环境运行始终报错, 目前我还没找到合适的解决方法
三 开始写代码
- 首先创建一个音频识别管理类
**Note: 需要注意的是, 静态库采用Objective C++实现, 因此, 需要保证工程中引用静态库头文件的实现文件的扩展名必须为.mm **
- 我们实现一个单例构造方法
+ (instancetype)sharedRecognizer {
   static ZHLVoiceRecognizer *recognizer = nil;
   static dispatch_once_t onceToken;
   dispatch_once(&onceToken, ^{
       recognizer = [[ZHLVoiceRecognizer alloc] init];
   });
   return recognizer;
}
- 在这个类中,我们添加一个
BDVoiceRecognitionClient类的属性
/**
 语音识别代理
 */
@property (nonatomic,strong)BDVoiceRecognitionClient *client;
- 对它进行懒加载
- (BDVoiceRecognitionClient *)client {
    if (!_client) {
        _client = [BDVoiceRecognitionClient sharedInstance];
        [_client setPropertyList:@[@(EVoiceRecognitionPropertyMusic),                  // 音乐
                                   @(EVoiceRecognitionPropertyVideo),                  // 视频
                                   @(EVoiceRecognitionPropertyApp),                    // 应用
                                   @(EVoiceRecognitionPropertyWeb),                    // web
                                   @(EVoiceRecognitionPropertySearch),                 // 热词
                                   @(EVoiceRecognitionPropertyEShopping),              // 电商&购物
                                   @(EVoiceRecognitionPropertyHealth),                 // 健康&母婴
                                   @(EVoiceRecognitionPropertyCall),                   // 打电话
                                   @(EVoiceRecognitionPropertyMedicalCare) ,           // 医疗
                                   @(EVoiceRecognitionPropertyCar),                    // 汽车
                                   @(EVoiceRecognitionPropertyCatering),               // 娱乐餐饮
                                   @(EVoiceRecognitionPropertyFinanceAndEconomics),    // 财经
                                   @(EVoiceRecognitionPropertyGame),                   // 游戏
                                   @(EVoiceRecognitionPropertyCookbook),               // 菜谱
                                   @(EVoiceRecognitionPropertyAssistant),              // 助手
                                   @(EVoiceRecognitionPropertyRecharge),               // 话费充值
                                   /* 离线垂类 */
                                   @(EVoiceRecognitionPropertyContacts) ,              // 联系人指令
                                   @(EVoiceRecognitionPropertySetting),                // 手机设置
                                   @(EVoiceRecognitionPropertyTVInstruction),          // 电视指令
                                   @(EVoiceRecognitionPropertyPlayerInstruction),      // 播放器指令
                                   @(EVoiceRecognitionPropertyRadio)]];
        /* 设置识别语言为中文 */
        [_client setLanguage:EVoiceRecognitionLanguageChinese];
        /* 设置不禁用标点符号 */
        [_client disablePuncs:NO];
        /* 设置对语音进行端点检测 */
        [_client setNeedVadFlag:YES];
        /* 设置对上传的语音进行压缩 */
        [_client setNeedCompressFlag:YES];
        /* 设置在线识别的响应等待时间,如果超时,触发同步离线识别 */
        [_client setOnlineWaitTime:5];
        [_client setPlayTone:EVoiceRecognitionPlayTonesRecStart isPlay:YES];
        [_client setPlayTone:EVoiceRecognitionPlayTonesRecEnd isPlay:YES];
        /* 在开始识别前,需要加载离线识别引擎, 需要传入授权信息、语言模型文件信息及语法槽信息 */
        /* 识别垂类语法槽信息 */

        NSDictionary* recogGrammSlot = @{@"$name_CORE" : @"张三\n 李四\n",
                                         @"$song_CORE" : @"小苹果\n 我的滑板鞋\n", @"$app_CORE" : @"百度\n 百度地图\n",
                                         @"$artist_CORE" : @"刘德华\n 周华健\n"};
        NSString *licensePath = [[NSBundle mainBundle] pathForResource:@"bdasr_temp_license" ofType:@"dat"];
        NSString *datFilePath = [[NSBundle mainBundle] pathForResource:@"s_1" ofType:nil];
        int result = [_client loadOfflineEngine:@"8979326" license:licensePath  datFile:datFilePath LMDatFile:nil grammSlot:recogGrammSlot];
        if (result == 0) {
            NSLog(@"加载离线识别引擎成功");
        }else {
            NSLog(@"加载离线识别引擎失败");
        }
        [_client setApiKey:@"UsLZWXdC45BHo1YXMni2M4Ga" withSecretKey:@"ebb161770a7c78d2df8e46ddc4badf25"];

    }
    return _client;
}
其实懒加载中我们做了很多事情, 而我们进行语音识别主要也是靠BDVoiceRecognitionClient这个类的对象,
1.设置属性列表
 EVoiceRecognitionPropertyMap = 10060,  // 地图
 EVoiceRecognitionPropertyInput = 20000, // 输入
以上两个要单独使用, 不能添加到数组中,否则就会出现这个错误
EVoiceRecognitionStartWorkPropertyInvalid
2.进行各种设置
        /* 设置识别语言为中文 */
        [_client setLanguage:EVoiceRecognitionLanguageChinese];
        /* 设置不禁用标点符号 */
        [_client disablePuncs:NO];
        /* 设置对语音进行端点检测 */
        [_client setNeedVadFlag:YES];
        /* 设置对上传的语音进行压缩 */
        [_client setNeedCompressFlag:YES];
        /* 设置在线识别的响应等待时间,如果超时,触发同步离线识别 */
        [_client setOnlineWaitTime:5];
        [_client setPlayTone:EVoiceRecognitionPlayTonesRecStart isPlay:YES];
        [_client setPlayTone:EVoiceRecognitionPlayTonesRecEnd isPlay:YES];```

3.在开始识别前,需要加载离线识别引擎, 需要传入授权信息、语言模型文件信息及语法槽信息
    /* 在开始识别前,需要加载离线识别引擎, 需要传入授权信息、语言模型文件信息及语法槽信息 */
    /* 识别垂类语法槽信息 */

    NSDictionary* recogGrammSlot = @{@"$name_CORE" : @"张三\n 李四\n",
                                     @"$song_CORE" : @"小苹果\n 我的滑板鞋\n", @"$app_CORE" : @"百度\n 百度地图\n",
                                     @"$artist_CORE" : @"刘德华\n 周华健\n"};
    NSString *licensePath = [[NSBundle mainBundle] pathForResource:@"bdasr_temp_license" ofType:@"dat"];
    NSString *datFilePath = [[NSBundle mainBundle] pathForResource:@"s_1" ofType:nil];
    int result = [_client loadOfflineEngine:@"8979326" license:licensePath  datFile:datFilePath LMDatFile:nil grammSlot:recogGrammSlot];
    if (result == 0) {
        NSLog(@"加载离线识别引擎成功");
    }else {
        NSLog(@"加载离线识别引擎失败");
    }
**Note: 其中, 在方法``` - (int)loadOfflineEngine: (NSString*)appCode
license: (NSString*)licenseFile
datFile: (NSString*)datFilePath
LMDatFile: (NSString*)LMDatFilePath
grammSlot: (NSDictionary*)dictSlot;```中的第一个参数appCode, 就是之前在百度语音官网上注册的你的AppID**

然后再设置API key 和 Secret Key
[_client setApiKey:@"你的ApiKey" withSecretKey:@"你的SecretKey"];
4.接着, 就要写一个开始语音识别的代码了, 其实也是一句代码的事情, 剩下的都是错误处理
- (void)beginVoiceRecognition {
int beginStatus = [self.client startVoiceRecognition:self];
switch (beginStatus) {
case EVoiceRecognitionStartWorking:
NSLog(@"启动成功");
break;
case EVoiceRecognitionStartWorkNOMicrophonePermission:
NSLog(@"没有系统麦克风使用权限");
break;
case EVoiceRecognitionStartWorkNoAPIKEY:
NSLog(@"没有ApiKey");
break;
case EVoiceRecognitionStartWorkGetAccessTokenFailed:
NSLog(@"获取有效的 AccessToken 错误,需要验证开放云平台的注册信息");
break;
case EVoiceRecognitionStartWorkNetUnusable:
NSLog(@"没有网络");
break;
case EVoiceRecognitionStartWorkDelegateInvaild:
NSLog(@"没有实现语音回调结果");
break;
case EVoiceRecognitionStartWorkRecorderUnusable:
NSLog(@"录音设备不可用");
break;
case EVoiceRecognitionStartWorkPreModelError:
NSLog(@"启动预处理模块出错");
break;
case EVoiceRecognitionStartWorkPropertyInvalid:
NSLog(@"识别属性设置不合法");
break;
default:
break;
}
}
然后把这个方法暴露给外界使用

5.遵守代理
6.实现代理回调方法
-
(void)VoiceRecognitionClientWorkStatus:(int)aStatus obj:(id)aObj {
switch (aStatus) {
case EVoiceRecognitionClientWorkStatusFlushData: {
// 该状态值表示服务器返回了中间结果,如果想要将中间结果展示给用户(形成连续上屏的效果), // 可以利用与该状态同时返回的数据,每当接到新的该类消息应当清空显示区域的文字以免重复
NSMutableString *tmpString = [[NSMutableString alloc] initWithString:@""];
[tmpString appendFormat:@"%@",[aObj objectAtIndex:0]];
NSLog(@"result: %@", tmpString);
if (self.delegate && [self.delegate respondsToSelector:@selector(getVoiceToMessage:fromRecognizer:)]) {
[self.delegate getVoiceToMessage:tmpString fromRecognizer:self];
}
break;
}
case EVoiceRecognitionClientWorkStatusFinish: {
// 该状态值表示语音识别服务器返回了最终结果,结果以数组的形式保存在 aObj 对象中 // 接受到该消息时应当清空显示区域的文字以免重复
if ([_client getRecognitionProperty] != EVoiceRecognitionPropertyInput) {
NSMutableArray *resultData = (NSMutableArray *)aObj;
NSMutableString *tmpString = [[NSMutableString alloc] initWithString:@""];
// 获取识别候选词列表
for (int i=0; i<[resultData count]; i++) {
[tmpString appendFormat:@"%@\r\n",[resultData objectAtIndex:i]]; }
NSLog(@"result: %@", tmpString);
} else {
NSMutableString *sentenceString = [[NSMutableString alloc] initWithString:@""];
for (NSArray *result in aObj) { // 此时 aObj 是 array,result 也是 array
// 取每条候选结果的第0条,进行组合
// result 的元素是 dictionary,对应每个候选词和对应的可信度
NSDictionary *dic = [result objectAtIndex:0];
NSString *candidateWord = [[dic allKeys] objectAtIndex:0];
[sentenceString appendString:candidateWord];
}
NSLog(@"result: %@", sentenceString);
}
break;
}
case EVoiceRecognitionClientWorkStatusReceiveData: {
// 此状态只在输入模式下发生,表示语音识别正确返回结果,每个子句会通知一次(全量, // 即第二次收到该消息时所携带的结果包含第一句的识别结果),应用程序可以
// 逐句显示。配合连续上屏的中间结果,可以进一步 升语音输入的体验
NSMutableString *sentenceString = [[NSMutableString alloc] initWithString:@""];
for (NSArray *result in aObj) { // 此时 aObj 是 array,result 也是 array
// 取每条候选结果的第 条,进 组合
// result 的元素是 dictionary,对应 个候选词和对应的可信度
NSDictionary *dic = [result objectAtIndex:0];
NSString *candidateWord = [[dic allKeys] objectAtIndex:0];
[sentenceString appendString:candidateWord];
}
NSLog(@"result: %@", sentenceString);
if (self.delegate && [self.delegate respondsToSelector:@selector(getVoiceToMessage:fromRecognizer:)]) {
[self.delegate getVoiceToMessage:sentenceString fromRecognizer:self];
}
break;
}
case EVoiceRecognitionClientWorkStatusNewRecordData: {
// 有音频数据输出,音频数据格式为 PCM,在有 WiFi 连接的条件下为 16k16bit,非 WiFi
// 为 8k16bit} break; case EVoiceRecognitionClientWorkStatusEnd: { // 用户说话完成,但服务器尚未返回结果 NSLog(@"用户说话完成,但服务器尚未返回结果"); MBProgressHUD *hud = [MBProgressHUD showHUDAddedTo:[UIApplication sharedApplication].keyWindow.rootViewController.view animated:YES]; hud.mode = MBProgressHUDModeCustomView; hud.labelText = @"正在语音转文字中,请稍候"; [hud hide:YES afterDelay:2]; } break; case EVoiceRecognitionClientWorkStatusCancel: { break; } case EVoiceRecognitionClientWorkStatusError: { MBProgressHUD *hud = [MBProgressHUD showHudTo:[UIApplication sharedApplication].keyWindow.rootViewController.view image:nil text:@"语音转文字失败,请重试" animated:YES]; hud.mode = MBProgressHUDModeCustomView; [hud hide:YES afterDelay:2]; NSLog(@"语音转文字发生错误"); break; } case EVoiceRecognitionClientWorkPlayStartTone: case EVoiceRecognitionClientWorkPlayStartToneFinish: case EVoiceRecognitionClientWorkStatusStartWorkIng: case EVoiceRecognitionClientWorkStatusStart: case EVoiceRecognitionClientWorkPlayEndToneFinish: case EVoiceRecognitionClientWorkPlayEndTone: ;}
}
在上面这个方法实现中, 我将语音识别的结果传给我本类的代理方法
@class ZHLVoiceRecognizer;
@protocol ZHLVoiceRecognizerDelegate
@optional
- (void)getVoiceToMessage:(NSString *)message fromRecognizer:(ZHLVoiceRecognizer *)recognizer;
@end
7.这样,我在其他类中遵守```ZHLVoiceRecognizerDelegate```这个代理, 实现代理方法时, 就能拿到语音识别的结果, 就是那个字符串啦

比如,在我们公司的项目中, 我就将其赋值给textView.text,这样就用户就可以看到语音识别的结果了
- (void)getVoiceToMessage:(NSString *)message fromRecognizer:(ZHLVoiceRecognizer *)recognizer {
self.textView.text = message;
}
#####给大家看看实现效果, 我觉得语音识别的准确率是很高的,请原谅我不是很标准的普通话

#PS. 本人有若干成套学习视频, 包含`Java`, `数据结构与算法`, `iOS`, `安卓`, `python`, `flutter`等等, 如有需要, 联系微信`tsaievan`.


