实验环境:RHEL6.5 server1.example.com 172.25.254.1
server2.example.com 172.25.254.2
实验内容:
1.tomcat基本配置
1.1安装tomcat
1.2配置环境变量并启动tomcat
1.3设置开机启动
2.配置测试网页
(1)自己写的JSP测试页进行测试
(2) 网络中的测试页
3.编辑nginx的配置文件
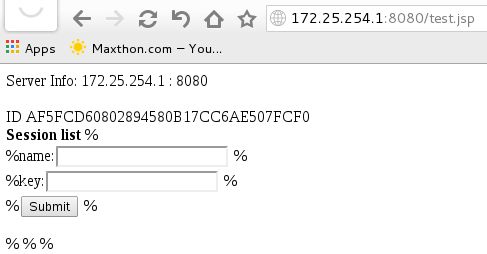
4.测试访问 172.25.254.1/test.jsp
5.tomcat 集群
5.1Server2端配置:
5.2 rr论寻
5.3 ip_hash绑定
安装包:apache-tomcat-7.0.37.tar.gz
前提:已经配置好Nginx与JDK环境
1.tomcat基本配置
1.1安装tomcat
[root@server1 mnt]# cd /opt/lnmp/
[root@server1 lnmp]# ls
apache-tomcat-7.0.37.tar.gz java
[root@server1 lnmp]# tar zxf apache-tomcat-7.0.37.tar.gz
[root@server1 lnmp]# ln -s apache-tomcat-7.0.37 tomcat ##链接改名
1.2配置环境变量并启动tomcat
[root@server1 lnmp]# vim /etc/profile
[root@server1 lnmp]# source /etc/profile
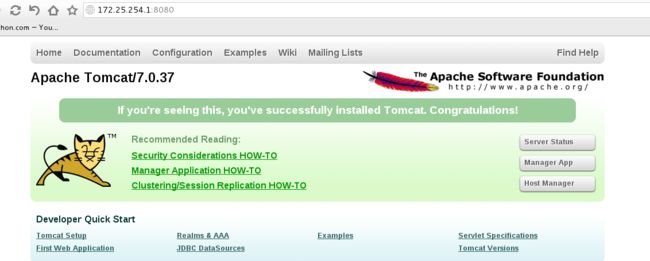
[root@server1 lnmp]# startup.sh ##启动tomcat,tomcat的端口号是8080
Using CATALINA_BASE: /opt/lnmp/tomcat
Using CATALINA_HOME: /opt/lnmp/tomcat
Using CATALINA_TMPDIR: /opt/lnmp/tomcat/temp
Using JRE_HOME: /opt/lnmp/java/
Using CLASSPATH: /opt/lnmp/tomcat/bin/bootstrap.jar:/opt/lnmp/tomcat/bin/tomcat-juli.jar
[root@server1 bin]# netstat -antple|grep 8080
tcp 0 0 :::8080 :::* LISTEN 0 21195 2913/java
1.3设置开机启动
[root@server1 lnmp]# cd tomcat/bin/ ###bin下的部分sh文件是tomcat的功能启动脚本文件
[root@server1 bin]# vim /etc/rc.local ##因为nginx和tomcat等没有开机启动脚本,/etc/rc.local是开机读取的文件,
source /etc/profile ##该文件读取的是环境变量中的绝对路径
/opt/lnmp/nginx/sbin/nginx
/opt/lnmp/tomcat/bin/startup.sh
2.配置测试网页
(1)自己写的JSP测试页进行测试
vim /opt/lnmp/tomcat/webapps/ROOT/steven.jsp
SERVER-willis - Time is:<%=new java.util.Date()%>
刷新可看到实时时间
(2) 网络中的测试页
vim /opt/lnmp/tomcat/webapps/ROOT/test.jsp
<%@ page contentType="text/html; charset=GBK" %>
<%@ page import="java.util.*" %>
Server Info:
<%
out.println(request.getLocalAddr() + " : " + request.getLocalPort()+"
");%>
<%
out.println("
ID " + session.getId()+"
");
String dataName = request.getParameter("dataName");
if (dataName != null && dataName.length() > 0) {
String dataValue = request.getParameter("dataValue");
session.setAttribute(dataName, dataValue);
}
out.print("Session list");
Enumeration e = session.getAttributeNames();
while (e.hasMoreElements()) {
String name = (String)e.nextElement();
String value = session.getAttribute(name).toString();
out.println( name + " = " + value+"
");
System.out.println( name + " = " + value);
}
%>
name:
key:
3.编辑nginx的配置文件
[root@server1 nginx]# pwd
/opt/lnmp/nginx
[root@server1 nginx]# vim conf/nginx.conf
location / {
root html;
index index.jsp index.php index.html index.htm;
}
location ~ \.jsp$ {
proxy_pass http://localhost:8080;
}
[root@server1 lnmp]# nginx -t
nginx: the configuration file /opt/lnmp/nginx/conf/nginx.conf syntax is ok
nginx: configuration file /opt/lnmp/nginx/conf/nginx.conf test is successful
[root@server1 lnmp]# nginx -s reload
4.测试访问 172.25.254.1/test.jsp
5.tomcat 集群
再启动一个虚拟机server2 IP为172.25.254.2
5.1Server2端配置:
把server1端配置好的java-jdk,nginx和tomcat复制到启动的server2中
[root@server2 ~]# mkdir /opt/lnmp
[root@server2 ~]#
[root@server2 ~]# cd /opt/lnmp
[root@server2 lnmp]# scp -r 172.25.254.1:/opt/lnmp/* .
[root@server2 lnmp]# scp -r 172.25.254.1:/etc/profile /etc/
[root@server2 lnmp]# source /etc/profile
[root@server2 lnmp]# startup.sh
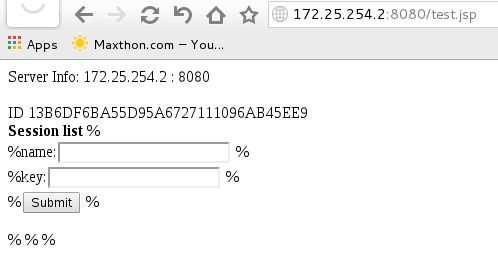
测试server2的tomcat
5.2 rr论寻
[root@server2 lnmp]# vim /opt/lnmp/nginx/conf/nginx.conf
18 http {
19 include mime.types;
20 default_type application/octet-stream;
21 upstream tomcat{
22 server 172.25.6.10:8080;
23 server 172.25.6.20:8080;
24 }
49 location / {
50 root html;
51 index index.jsp index.php index.html index.htm;
52 }
53 location ~ \.jsp$ {
54 proxy_pass http://tomcat;
55 }
56
测试:访问172.25.254.2:8080 无论是那个ip访问的都是server1一次server2一次
关闭server1的tomcat,只访问server2
5.3 ip_hash绑定(同一个ip访问的是同一台服务器)
(1)vim /opt/lnmp/nginx/conf/nginx.conf
18 http {
19 include mime.types;
20 default_type application/octet-stream;
21 upstream tomcat{
22 ip_hash;
23 server 172.25.15.110:8080;
24 server 172.25.15.112:8080;
25 }
(2)测试 ./shutdown.sh
关闭一台后访问另外一台


