python数据分析个人学习读书笔记-目录索引
第4章 解释了多种聚类模型;从最常见的k均值算法开始,一直到高级的BIRCH算法和DBSCAN算法。
本章会介绍一些技术,帮助对一个银行营销电话的数据进行聚类。将学习以下主题:
·评估聚类方法的表现
·用k均值算法聚类数据
·为k均值算法找到最优的聚类数
·使用mean shift聚类模型发现聚类
·使用c均值构建模糊聚类模型
·使用层次模型聚类数据
·使用DBSCAN和BIRCH算法发现潜在的订阅者
4.1导论
分类问题中,我们知道每个观测值的归类(经常称作监督学习或有老师的学习),聚类问题则不然,不需要标签就能在数据中发现模式(称作无监督学习)。
聚类方法根据观测值之间的相似度将其归到不同的桶中。这种分析在探索阶段很有用,这个阶段分析师想知道数据中是否天然存在某种模式。
4.2评估聚类方法的表现
没有真实的标签,我们无法使用前一章介绍的指标。在本技巧中,我们会介绍三种帮我们评估聚类方法有效性的指标:Davis-Bouldin、伪F(有时也称作Calinsk-Harabasz)和Silhouette值是内部评价指标。如果知道真实的标签,我们就可以使用很多指标,比如调整后的Rand指数、同质性或是完整性。
参考scikit文档中关于聚类方法的部分,对聚类方法的多种外部评价指标有一个更深的了解:
http://scikit-learn.org/stable/modules/clustering.html#clustering-performance-evaluation;
内部聚类验证方法的列表,参考http://datamining.rutgers.edu/publication/internalmeasures.pdf。
本示例需要装好pandas、NumPy和Scikit。
前面提到的三个内部评价指标,Scikit只实现了Silhouette值;为了写这本书,原作者实现了另两个。要评估你的聚类模型的表现,你可以使用helper.py文件中的printCluster Summary(...)方法:
def printClustersSummary(data, labels, centroids):
    '''
        Helper method to automate models assessment
    '''
    print('Pseudo_F: ', pseudo_F(data, labels, centroids))
    print('Davis-Bouldin: ',
        davis_bouldin(data, labels, centroids))
    print('Silhouette score: ',
        mt.silhouette_score(data, np.array(labels),
            metric='euclidean'))
原理:我们介绍第一个指标,伪F分值。Calinski-Harabasz指标是在模型上启发式地得到聚类的数目,其最大值代表最优的聚类方式。
伪F指数计算方式,是用每个聚类的中心到整个数据集的几何中心的平方距离,与聚类数减1的比值,再乘以每个聚类中观测值的数目。这个数字再除以一个比值,这个比值是用每个点和聚类中心的平方距离,除以所有观测值数与聚类数之差得到的。
 1 def pseudo_F(X, labels, centroids):
 2     '''
 3         The pseudo F statistic :
 4         pseudo F = [( [(T - PG)/(G - 1)])/( [(PG)/(n - G)])]
 5         The pseudo F statistic was suggested by
 6         Calinski and Harabasz (1974) in
 7         Calinski, T. and J. Harabasz. 1974.
 8             A dendrite method for cluster analysis.
 9             Commun. Stat. 3: 1-27.
10             http://dx.doi.org/10.1080/03610927408827101
11
12         We borrowed this code from
13         https://github.com/scampion/scikit-learn/blob/master/
14         scikits/learn/cluster/__init__.py
15
16         However, it had an error so we altered how B is
17         calculated.
18     '''
19     center = np.mean(X,axis=0)
20     u, count = np.unique(labels, return_counts=True)
21
22     B = np.sum([count[i] * ((cluster - center)**2)
23         for i, cluster in enumerate(centroids)])
24
25     X = X.as_matrix()
26     W = np.sum([(x - centroids[labels[i]])**2
27                  for i, x in enumerate(X)])
28
29     k = len(centroids)
30     n = len(X)
31
32     return (B / (k-1)) / (W / (n-k))
首先,我们计算整个数据集中心的几何坐标。从代数上讲,这不过是计算每一列的平均值。使用NumPy的.unique(...),然后统计每个聚类中观测值的数目。
往.unique(...)方法传return_counts=True时,不仅会返回标签向量中的去重值列表u,也会返回去重后每个值的个数c。
然后,我们计算每个聚类的中心到数据集中心的平方距离。使用.enumerate(...)方法遍历中心列表中的每个元素,计算每个和数据集中心的平方差,再乘以聚类中观测值的个数:c[i]。如名字所示,NumPy的.sum(...)方法,计算列表中所有元素的和。这个方法返回的是Calinski-Harabasz指数。
与伪F指数相反,Davis-Bouldin指标衡量的是最坏情况下聚类之间的异质性与聚类内部的同质性。也就是说,目标要找出使得这个指标最小的聚类数目。在后面的4.4节,我们会开发一种方法,通过最小化Davis-Bouldin指标来找到最优的聚类数目。
参考MathWorks(Matlab开发商)关于Davis-Bouldin指标的讲解:http://au.mathworks.com/help/stats/clustering.evaluation.daviesbouldinevaluation-class.html。
 1  def davis_bouldin(X, labels, centroids):
 2     '''
 3         The Davis-Bouldin statistic is an internal evaluation
 4         scheme for evaluating clustering algorithms. It
 5         encompasses the inter-cluster heterogeneity and
 6         intra-cluster homogeneity in one metric.
 7
 8         The measure was introduced by
 9         Davis, D.L. and Bouldin, D.W. in 1979.
10             A Cluster Separation Measure
11             IEEE Transactions on Pattern Analysis and
12             Machine Intelligence, PAMI-1: 2, 224--227
13
14             http://dx.doi.org/10.1109/TPAMI.1979.4766909
15     '''
16     distance = np.array([
17         np.sqrt(np.sum((x - centroids[labels[i]])**2))
18         for i, x in enumerate(X.as_matrix())])
19
20     u, count = np.unique(labels, return_counts=True)
21
22     Si = []
23
24     for i, group in enumerate(u):
25         Si.append(distance[labels == group].sum() / count[i])
26
27     Mij = []
28
29     for centroid in centroids:
30         Mij.append([
31             np.sqrt(np.sum((centroid - x)**2))
32             for x in centroids])
33
34     Rij = []
35     for i in range(len(centroids)):
36         Rij.append([
37             0 if i == j
38             else (Si[i] + Si[j]) / Mij[i][j]
39             for j in range(len(centroids))])
40
41     Di = [np.max(elem) for elem in Rij]
42
43     return np.array(Di).sum() / len(centroids)
首先,我们计算每个观测值和所属聚类的中心之间的几何距离,并统计每个聚类中观测值的数目。
Si衡量的是聚类内部的同质性,即是每个观测值到聚类中心的平均距离。Mij计算各个聚类中心之间的几何距离,量化了聚类之间的异质性。Rij衡量的是两个聚类之间切分得好不好,Di选取了最差情况下的切分。Davis-Bouldin指标是Di的平均值。
Silhouette分值(指数)是又一个聚类内部评价指标。我们没有实现计算程序(因为Scikit已经提供了实现),但我们简要描述了它的计算过程与衡量目标。一个聚类,其Silhouette分值衡量的是聚类中每个观测值与其他观测值之间的平均距离,将这个值与每个聚类内点与点之间的平均距离相比。理论上,这个指标的取值范围在-1到1之间;-1意味着所有的观测值都在不合适的聚类中,实际上,更合适的聚类可能就是临近的某个。尽管理论上可行,但实际使用中,你更可能完全不考虑负的Silhouette分值。光谱的另一端,1代表完美的切分,所有的观测值都落在合适的聚类中。这个值如果是0,代表着聚类之间一个完美重叠,意味着每个聚类都有应该归属于其他聚类的观测值,并且这些观测值的数目是相等的。
参考:对这些算法(以及其他算法)更深层次的描述,参考https://cran.r-project.org/web/packages/clusterCrit/vignettes/clusterCrit.pdf。
4.3用k均值算法聚类数据
k均值聚类算法可能是在聚类向量化数据方面最为知名的数据挖掘技术了。它基于观测察值之间的相似度,将它们分到各个聚类;决定因素就是观测值和最近一个聚类中心的欧几里得距离。
装好pandas和Scikit。
Scikit在其聚类子模块中提供了多种聚类模型。这里,我们使用.KMeans(...)来估算聚类模型(clustering_kmeans.py文件):
def findClusters_kmeans(data):
    '''
        Cluster data using k-means
    '''
    # create the classifier object
    kmeans = cl.KMeans(
        n_clusters=4,
        n_jobs=-1,
        verbose=0,
        n_init=30
    )

    # fit the data
    return kmeans.fit(da */ta)
原理:和前一章的技巧一样,我们从读取数据开始,选择我们想用来区别观测值的特征:
# the file name of the dataset
r_filename = '../../Data/Chapter04/bank_contacts.csv'

# read the data
csv_read = pd.read_csv(r_filename)

# select variables
selected = csv_read[['n_duration','n_nr_employed',
        'prev_ctc_outcome_success','n_euribor3m',
        'n_cons_conf_idx','n_age','month_oct',
        'n_cons_price_idx','edu_university_degree','n_pdays',
        'dow_mon','job_student','job_technician',
        'job_housemaid','edu_basic_6y']]
Tips:
/* The method findClusters_kmeans took 2.32 sec to run.
D:\Java2018\practicalDataAnalysis\helper.py:142: FutureWarning: Method .as_matrix will be removed in a future version. Use .values instead.
  X = X.as_matrix()
Pseudo_F:  11515.72135543927
D:\Java2018\practicalDataAnalysis\helper.py:168: FutureWarning: Method .as_matrix will be removed in a future version. Use .values instead.
  for i, x in enumerate(X.as_matrix())])
Davis-Bouldin:  1.2627990546726073
Silhouette score:  0.3198322783627837
 */
解决方案:修改X.as_matrix()为X.values
/*
The method findClusters_kmeans took 2.32 sec to run.
Pseudo_F:  11349.586839983096
Davis-Bouldin:  1.2608899499519972
 */
我们使用了与前一章相同的数据集,并只使用在分类过程中最具描述力的特征。另外,我们仍然使用@hlp.timeit装饰器来衡量估算模型的速度。
Scikit的.KMeans(...)方法有多个参数。参数n_clusters定义了期待数据中要有多少聚类,以及要返回多少聚类。在本书4.4节中,我们将写一个循环方法,为k均值算法找出最优的聚类数。
n_jobs参数是你机器上并行执行的任务数;指定-1意味着将并行执行的数目指定为处理器核的数目。你可以显式传入一个整数,比如8,来指定任务数目。
verbose参数控制着估算阶段你能看到多少信息;设置为1会打印出所有关于估算的细节。
n_init参数控制着要估算多少模型。k均值算法的每一次执行,会随机选择每个聚类的中心,循环调整这些中心,直到模型聚类之间的隔离程度和聚类内部的相似程度达到最好。.KMeans(...)方法以不同的初始条件(为各中心随机化初始种子),构建n_init参数指定的数目的模型,然后选择准则表现最好的一个。
准则衡量的是聚类内部的差异。它是聚类内部的平方和。我们将聚类内部的平方和与平方总和的比率称为解释准则。
Scikit当然不是估算k均值模型的唯一方法;我们也可以使用SciPy(clustering_kmeans_alternative.py文件):
 1 def findClusters_kmeans(data):
 2     '''
 3         Cluster data using k-means
 4     '''
 5     # whiten the observations
 6     data_w = vq.whiten(data)
 7
 8     # create the classifier object
 9     kmeans, labels = vq.kmeans2(
10         data_w,
11         k=4,
12         iter=30
13     )
14
15     # fit the data
16     return kmeans, labels
17
18 # the file name of the dataset
19 r_filename = '../../Data/Chapter04/bank_contacts.csv'
20
21 # read the data
22 csv_read = pd.read_csv(r_filename)
23
24 # select variables
25 selected = csv_read[['n_duration','n_nr_employed',
26         'prev_ctc_outcome_success','n_euribor3m',
27         'n_cons_conf_idx','n_age','month_oct',
28         'n_cons_price_idx','edu_university_degree','n_pdays',
29         'dow_mon','job_student','job_technician',
30         'job_housemaid','edu_basic_6y']]
31
32 # cluster the data
33 #centroids, labels = findClusters_kmeans(selected.as_matrix())
34 centroids, labels = findClusters_kmeans(selected.values)
35
36 hlp.printClustersSummary(selected, labels, centroids)
与使用Scikit时不同,使用SciPy时,我们需要先洗白数据。洗白类似于将数据标准化(参考本书1.14节),只不过它不删除均值;.whiten(...)将所有特征的方差统一为1。
传给.kmeans2(...)方法的第一个参数是已清洗的数据集。k参数指定了将数据应用到多少个聚类上。我们的例子中,.kmeans2(...)最多运行30个循环(iter参数);如果那时方法还没有收敛,其也会停止,并返回最后一次的估算结果。
参考,MLPy也提供了一个估算k均值模型的方法:http://mlpy.sourceforge.net/docs/3.5/cluster.html#k-means。
4.4为k均值算法找到最优的聚类数
很多时候,你不知道数据集中该有多少聚类。对于二维或三维数据,你可以画一画数据集,肉眼识别出聚类。然而,对于高维数据,在一张图表中绘制都不太可能,所以这种方法就不太可行了。
在本技巧中,我们会展示如何为k均值模型找到最优的聚类数。我们将使用Davis-Bouldin指标来评估不同聚类数下k均值模型的表现。目标是当这个指标达到一个最小值时停止。
需装好pandas、NumPy和Scikit。
为了找到最优的聚类数,我们编写了findOptimalClusterNumber(...)方法。总体而言,估算k均值模型的算法并没有改变——只不过用findOptimalClusterNumber(...)方法替换了前面使用的findClusters_kmeans(...)方法(clustering_kmeans_search.py文件):
# find the optimal number of clusters; that is, the number of
# clusters that minimizes the Davis-Bouldin criterion
optimal_n_clusters = findOptimalClusterNumber(selected)
findOptimalClusterNumber(...)方法定义如下:
 1 def findOptimalClusterNumber(
 2         data,
 3         keep_going = 1,
 4         max_iter = 30
 5     ):
 6     '''
 7         A method that iteratively searches for the
 8         number of clusters that minimizes the Davis-Bouldin
 9         criterion
10     '''
11     # the object to hold measures
12     measures = [666]
13
14     # starting point
15     n_clusters = 2
16
17     # counter for the number of iterations past the local
18     # minimum
19     #超过局部最小值的循环次数的计数器
20     keep_going_cnt = 0
21     stop = False   # flag for the algorithm stop
22
23     def checkMinimum(keep_going):
24         '''
25             A method to check if minimum found
26         '''
27         global keep_going_cnt # access global counter
28
29         # if the new measure is greater than for one of the
30         # previous runs
31         if measures[-1] > np.min(measures[:-1]):
32             # increase the counter
33             keep_going_cnt += 1
34
35             # if the counter is bigger than allowed
36             if keep_going_cnt > keep_going:
37                 # the minimum is found
38                 return True
39         # else, reset the counter and return False
40         else:
41             keep_going_cnt = 0
42
43         return False
44
45     # main loop
46     # loop until minimum found or maximum iterations(循环) reached
47     while not stop and n_clusters < (max_iter + 2):
48         # cluster the data
49         cluster = findClusters_kmeans(data, n_clusters)
50
51         # assess the clusters effectiveness
52         labels = cluster.labels_
53         centroids = cluster.cluster_centers_
54
55         # store the measures(指标)
56         measures.append(
57             hlp.davis_bouldin(data,labels, centroids)
58         )
59
60         # check if minimum found
61         stop = checkMinimum(keep_going)
62
63         # increase the iteration
64         n_clusters += 1
65
66     # once found -- return the index of the minimum
67     return measures.index(np.min(measures)) + 1
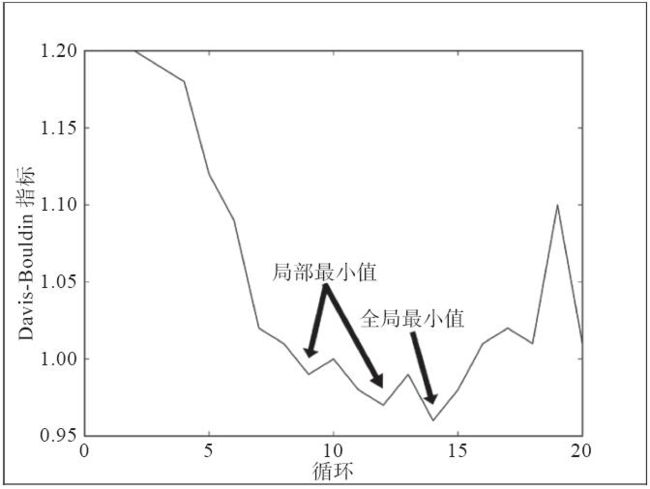
原理:使用findOptimalClusterNumber(...)方法时,传入的第一个参数是数据集:显然,没有数据时,什么模型也估算不出。keep_going参数指的是,如果当前模型的Davis-Bouldin指标比已有的最小值要大,那还要寻找多少个循环。通过这种方式,我们可以(一定程度上)避免找到局部最小值而非全局最小值的情况:
max_iter参数指定了最多构建多少个模型;我们的方法以n_clusters=2构建k均值模型开始,然后循环执行,直到找到一个全局最小值或是达到了最大的循环次数。
我们的findOptimalClusterNumber(...)方法以定义运行的参数开始。
measures列表用于存储估算模型的Davis-Bouldin指标;由于我们的目标是找到最小的Davis-Bouldin指标,我们指定了一个大数,以免这个值成了我们的最小值。
n_clusters定义了起始点:第一个k均值模型将数据分成两个聚类。
keep_going_cnt用来指定Davis-Bouldin指标比之前的最小值要大时,还要走多少个循环。以前面展示的图为例,我们的方法不会终止在某个局部最小值;尽管循环10和循环13的Davis-Bouldin指标(分别)比循环9和循环12小,但是聚类数为11和14的模型有更低的值。在这个例子中,我们在聚类数为15和16时终止,此时Davis-Bouldin指标更大。
标识变量stop用于控制主循环的执行。我们的while循环直到找到最小值或者达到了最大循环次数。
一个人读代码时,看到当不为stop并且n_clusters<(max_iter+2)时while循环不会终止,他能轻松地将代码翻译成自然语言,也能体会到Python语法之美。我觉得,这提高了代码的可读性与可维护性,同时也使代码更准确。
循环以估算预定义聚类数的模型开始:
# cluster the data
  cluster = findClusters_kmeans(data, n_clusters)
估算出模型后,我们得到估算的标签和中心,使用.davis_bouldin(...)方法计算Davis-Bouldin指标,如本章第一个技巧中那样。这个指标通过append(...)方法附到指标列表。
现在,我们要检查新估算的模型,其Davis-Bouldin指标是否比之前估算的模型都小。我们使用checkMinimum(...)方法。这个方法只能由findOptimalClusterNumber(...)方法访问:
 1 def checkMinimum(keep_going):
 2     '''
 3         A method to check if minimum found
 4     '''
 5     global keep_going_cnt # access global counter
 6
 7     # if the new measure is greater than for one of the
 8     # previous runs
 9     if measures[-1] > np.min(measures[:-1]):
10         # increase the counter
11         keep_going_cnt += 1
12
13         # if the counter is bigger than allowed
14         if keep_going_cnt > keep_going:
15             # the minimum is found
16             return True
17     # else, reset the counter and return False
18     else:
19         keep_going_cnt = 0
20
21     return False
首先,我们将keep_going_cnt定义为一个全局变量。这样我们不需要将变量传入check Minimum(...)方法,并且可以全局追踪计数器。在我看来,这样有益于代码的可读性。
然后,我们将新近估算的模型与已有的最小值比较;我们使用NumPy的.min(...)方法得到最小值。如果当前的Davis-Bouldin指标比已有的最小值大,我们就给keep_going_cnt计数器增1,并检查是否超过了keep_going这个循环次数限制——超过了就返回True。返回True意味着我们找到了全局最小值(在keep_going限制的前提下)。然而,如果新估算的Davis-Bouldin指标更小,我们先将keep_going_cnt计数器重置为0,返回False。如果没有超过keep_going的限制,我们也返回False。
知道了我们找没找到全局最小值之后,我们将n_clusters增1。
当checkMinimum(...)方法返回True或者n_clusters超过max_iter+2时循环中止。我们的算法一开始用两个聚类来估算k均值模型,所以max_iter要加上2。
一旦中止while循环,我们返回找到的最小值的索引加1这个值。要加上一个1,因为n_
一旦中止while循环,我们返回找到的最小值的索引加1这个值。要加上一个1,因为n_cluster=2时Davis-Bouldin指标的索引是1。
列表的索引值从0开始。
现在我们可以用最优的聚类数来估算模型,并打印指标:
# cluster the data
cluster = findClusters_kmeans(selected, optimal_n_clusters)

# assess the clusters effectiveness评估聚类的有效性
labels = cluster.labels_
centroids = cluster.cluster_centers_

hlp.printClustersSummary(selected, labels, centroids)
/*

The method findClusters_kmeans took 1.97 sec to run.
The method findClusters_kmeans took 0.56 sec to run.
The method findClusters_kmeans took 0.76 sec to run.
The method findClusters_kmeans took 0.90 sec to run.
The method findClusters_kmeans took 1.01 sec to run.
The method findClusters_kmeans took 1.16 sec to run.
The method findClusters_kmeans took 1.31 sec to run.
The method findClusters_kmeans took 1.34 sec to run.
The method findClusters_kmeans took 1.55 sec to run.
The method findClusters_kmeans took 1.69 sec to run.
The method findClusters_kmeans took 1.82 sec to run.
The method findClusters_kmeans took 2.08 sec to run.
The method findClusters_kmeans took 2.11 sec to run.
The method findClusters_kmeans took 2.40 sec to run.
The method findClusters_kmeans took 2.49 sec to run.
The method findClusters_kmeans took 3.03 sec to run.
The method findClusters_kmeans took 2.98 sec to run.
The method findClusters_kmeans took 3.05 sec to run.
Optimal number of clusters: 17
The method findClusters_kmeans took 2.96 sec to run.
Pseudo_F:  11493.774263351304
Davis-Bouldin:  0.9516597767023216
*/
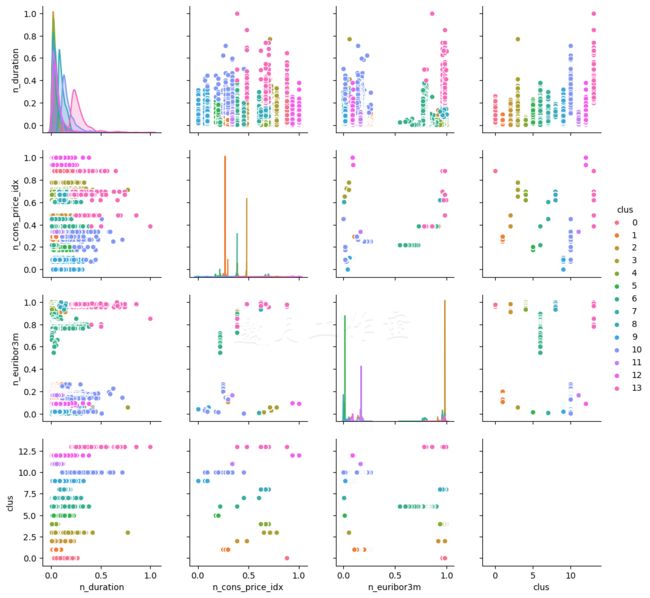
之前提到,要绘制数据的聚类并不容易,不过,探索数据可视化时,画成对的图有时会很有帮助(clustering_kmeans_search_alternative.py文件):
 1 def plotInteractions(data, n_clusters):
 2     '''
 3         Plot the interactions between variables
 4     '''
 5     # cluster the data
 6     cluster = findClusters_kmeans(data, n_clusters)
 7
 8     # append the labels to the dataset for ease of plotting
 9     data['clus'] = cluster.labels_
10
11     # prepare the plot
12     ax = sns.pairplot(selected, hue='clus')
13
14     # and save the figure
15     ax.savefig(
16         '../../Data/Chapter04/k_means_{0}_clusters.png' \
17         .format(n_clusters)
18     )
我们使用Seaborn和Matplotlib绘制互动。首先,我们用预先定义的n_clusters估算模型。然后,我们将聚类加到数据集中。使用Seaborn的.pairplot(...)方法,我们创建了一张图表,遍历每个特征,画出响应的互动。最后,我们保存这张图表。
14个聚类的结果(为了可读性,限定3个特征),看起来类似这样:
Tips:
/*
The method findClusters_kmeans took 3.43 sec to run.
D:\Java2018\practicalDataAnalysis\Codes\Chapter04\clustering_kmeans_search_alternative.py:37: SettingWithCopyWarning:
A value is trying to be set on a copy of a slice from a DataFrame.
Try using .loc[row_indexer,col_indexer] = value instead

See the caveats in the documentation: http://pandas.pydata.org/pandas-docs/stable/user_guide/indexing.html#returning-a-view-versus-a-copy
  data['clus'] = cluster.labels_
D:\tools\Python37\lib\site-packages\statsmodels\nonparametric\kde.py:487: RuntimeWarning: invalid value encountered in true_divide
  binned = fast_linbin(X, a, b, gridsize) / (delta * nobs)
D:\tools\Python37\lib\site-packages\statsmodels\nonparametric\kdetools.py:34: RuntimeWarning: invalid value encountered in double_scalars
  FAC1 = 2*(np.pi*bw/RANGE)**2
   */
关于DataFrame的loc方法:
/*
   Compare these two access methods:
In [340]: dfmi['one']['second']
Out[340]:
0    b
1    f
2    j
3    n
Name: second, dtype: object
In [341]: dfmi.loc[:, ('one', 'second')]
Out[341]:
0    b
1    f
2    j
3    n
Name: (one, second), dtype: object
 */
即使维度很低,通过肉眼要看出数据集中应该有多少聚类也不容易。对于其他数据,创建这样一张图表也许会有好处。这个方法的问题在处理离散或类别的变量时会特别明显。
使用mean shift聚类模型发现聚类
mean shift模型是一个类似于寻找中心(或最大密度)的方法。与k均值不同,这个方法不要求指定聚类数——这个模型根据数据中找到的密度中心的数目返回聚类的数目。
需装好pandas和Scikit。
我们估算的打开方式类似之前的模型——从读入数据集和限制特征数开始。然后我们用findClusters_meanShift(...)方法估算模型(clustering_meanShift.py文件):
 1 def findClusters_meanShift(data):
 2     '''
 3         Cluster data using Mean Shift method
 4         使用Mean Shift方法聚类数据
 5     '''
 6     bandwidth = cl.estimate_bandwidth(data,
 7         quantile=0.25, n_samples=500)
 8
 9     # create the classifier object
10     meanShift = cl.MeanShift(
11         bandwidth=bandwidth,
12         bin_seeding=True
13     )
14
15     # fit the data
16     return meanShift.fit(data)
/*
The method findClusters_meanShift took 20.53 sec to run.
Pseudo_F:  1512.7080324697126
Davis-Bouldin:  1.736359716302394
Silhouette score:  0.2172934930829158
*/
原理:我们首先估算带宽(estimate_bandwidth(...))。带宽会用在这个方法的RBF核中。
我们使用SVM分类技巧中的径向基函数:参考本书3.5节。
estimate_bandwidth(...)方法至少要传入数据作为参数。
由于方法中使用的算法,随着观测值数目的增长,呈二次方复杂度,所以对于有很多观测值的样本,最好限制记录数目;使用n_samples吧。
quantile参数决定了从什么地方切分传入.MeanShift(...)方法的核的样本。
quantile取0.5就意味着中位数。
现在可以估算模型了。我们传入bandwidth和(可选的)bin_seeding参数,构建模型对象。
如果bin_seeding置为True,核初始位置就设到了所有数据点的(使用bandwidth)离散化的群。这个参数置为True会加快算法,因为要初始化的核种子变少了;随着观测值成百上千地增长,这个会带来显著的加速。
谈到了估算的速度,这个方法比任何k均值都会慢得多(即便有数十个聚类)。在我们的机器上,估算会比k均值慢5到20秒:平均值在13秒左右。
要是对Mean Shift算法的原理感兴趣,作者推荐这篇文档:http://homepages.inf.ed.ac.uk/rbf/CVonline/LOCAL_COPIES/TUZEL1/MeanShift.pdf。
参考本书3.5节。
4.6
使用c均值构建模糊聚类模型
k均值和mean shift聚类算法将观测值归到截然不同的聚类:一个观测值可以且只能被归到一个相似样本的聚类中。对于离散可分的数据集,这个也许是对的,但数据如果有重叠,将它们放进同一个桶里就很困难了。毕竟,我们的世界并不是非黑即白,我们能看到无数色彩。
c均值聚类模型允许每个观测值属于不止一个聚类,各从属关系有一个权重:对每个观测值来说,它所属的所有聚类对应的权重之和必须为1。
需要pandas和Scikit-Fuzzy模块。Scikit-Fuzzy模块一般不在Anaconda发行版中,所以你需要自行安装。
>pip install Scikit-Fuzzy
/* Looking in indexes: https://pypi.tuna.tsinghua.edu.cn/simple
.......
Successfully built Scikit-Fuzzy
Installing collected packages: decorator, networkx, Scikit-Fuzzy
Successfully installed Scikit-Fuzzy-0.4.2 decorator-4.4.1 networkx-2.4
FINISHED
 */
Scikit已经提供估算c均值的算法。调用方法和之前的略有不同(clustering_cmeans.py文件):
 1 import skfuzzy.cluster as cl
 2 import numpy as np
 3
 4 @hlp.timeit
 5 def findClusters_cmeans(data):
 6     '''
 7         Cluster data using fuzzy c-means clustering
 8         algorithm
 9     '''
10     # create the classifier object
11     return cl.cmeans(
12         data,
13         c = 5,          # number of clusters 聚类数
14         m = 2,          # exponentiation factor 指数因子
15
16         # stopping criteria
17         error = 0.01,
18         maxiter = 300
19     )
原理:如同之前的技巧,我们首先载入数据,选择我们想用来估算模型的列。
然后调用findClusters_cmeans(...)方法估算模型。之前的方法都是创建一个未训练的模型,然后用.fit(...)方法应用数据,与此不同,.cmeans(...)方法是创建时就用传入的数据(及其他参数)估算模型了。
c参数指定了要应用多少个聚类,m参数指定了在每次循环时应用到成员关系函数的指数因子。
注意你要指定的聚类数,要是指定得太多,计算指标时会因为有些聚类没有成员导致错误!如果你遇到了IndexError,估算中止,那么在不丢失精确度的前提下减少聚类数吧。
我们明确了终止条件。如果当前循环与前一次循环(在成员关系函数上的变化)差异小于0.01,我们的模型就会终止循环。
这个模型返回一系列对象。centroids是五个聚类的坐标。u存着每个观测值的成员值;结构如下:
/*
The method findClusters_cmeans took 2.25 sec to run.
[[0.20158559 0.09751069 0.07842359 ... 0.16641284 0.16997486 0.18780077]
 [0.14041632 0.05272408 0.04176255 ... 0.25766411 0.13334598 0.13312636]
 [0.15019893 0.05824498 0.04623189 ... 0.14150986 0.2692789  0.14128872]
 [0.13702899 0.05074051 0.04020164 ... 0.28432326 0.27960719 0.38820815]
 [0.37077018 0.74077974 0.79338032 ... 0.15008993 0.14779308 0.14957599]]
Pseudo_F:  8340.883112129994
Davis-Bouldin:  1.3062853046748828
Silhouette score:  0.35108693925427953
 */
如果将每一行的所有列值加起来,你会发现(果然)一直是1。
剩下的返回对象我们不用太操心:u0是每个观测值的初始成员种子,d是最终的欧几里得距离矩阵,jm是目标函数的变更历史,p是估算模型所用的循环数,fpc是模糊划分系数(fuzzy partition coefficient)。
为了计算我们的指标,我们需要将聚类赋给每个观测值。我们用NumPy的.argmax(...)方法来做这事:
 # assess the clusters effectiveness
labels = [
    np.argmax(elem) for elem in u.transpose()
]
这个方法返回列表中最大元素的索引。我们的u矩阵的初始分布是u_cluster x n_sample,我们需要先用.transpose()方法转置u矩阵,以便按行循环,每一行都是我们样本中的观测值。
4.7
使用层次模型聚类数据
层次聚类模型的目标是构建聚类的分层。从概念上讲,你可以理解成是一棵聚类的决策树:基于聚类之间的相似度(或相异度),它们聚合(或切分)成更抽象(或更具体)的聚类。聚合的做法常被称作自底向上,而切分的做法被称作自顶向下。
需装好pandas、SciPy和PyLab。
>pip install pylab
/* Looking in indexes: https://pypi.tuna.tsinghua.edu.cn/simple
......
Successfully built pyusb PyVISA
Installing collected packages: pyusb, PyVISA, PyVISA-py, pylab
Successfully installed PyVISA-1.10.1 PyVISA-py-0.3.1 pylab-0.0.2 pyusb-1.0.2
FINISHED */
聚合算法的复杂度是O(n3),对于大规模的数据集来说,层次聚类可能会极慢。估算我们的模型时,我们使用的是单链接算法,其算法复杂度更好,是O(n2),不过数据集很大时依然会很慢(clustering_hierarchical.py文件):
1 import pylab as pl
2     def findClusters_link(data):
3     '''
4         Cluster data using single linkage hierarchical
5         clustering
6         使用单链接分层聚类数据
7     '''
8     # return the linkage object
9     return cl.linkage(data, method='single')
原理:代码简单之极:只需调用SciPy的.linkage(...)方法,传入数据,指定方法。
详细说来,.linkage(...)方法是基于选择的方法,根据特定的距离维度聚合(或切分)聚类;method='single'根据两个聚类之间每个点的最小距离(所以是O(n2))聚合聚类。
关于所有指标的列表,参考SciPy文档:http://docs.scipy.org/doc/scipy/reference/generated/scipy.cluster.hierarchy.linkage.html#scipy.cluster.hierarchy.linkage。
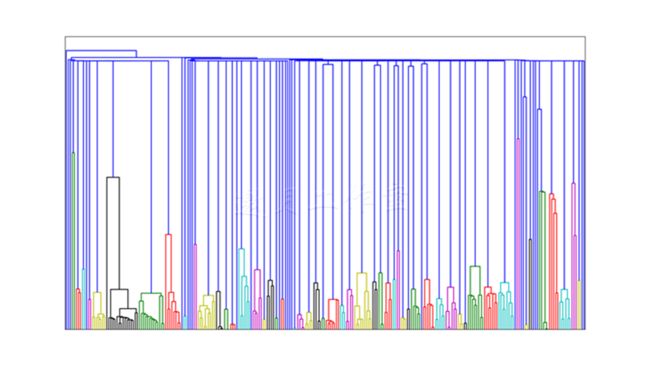
我们可以将聚合(或拆分)以树的形式具象化:
 1 ####import pylab as pl
 2 import matplotlib.pylab as pl
 3
 4 # cluster the data
 5 cluster = findClusters_ward(selected)
 6
 7 # plot the clusters
 8 fig  = pl.figure(figsize=(16,9))
 9 ax   = fig.add_axes([0.1, 0.1, 0.8, 0.8])
10 dend = cl.dendrogram(cluster, truncate_mode='level', p=20)
11 ax.set_xticks([])
12 ax.set_yticks([])
13
14 # save the figure
15 fig.savefig(
16     '../../Data/Chapter04/hierarchical_dendrogram.png',
17     dpi=300
18 )
首先,我们使用PyLab和.add_axes(...)创建一幅图。传入函数的列表是图的坐标:[x,y,width,height],数值已调整到0和1之间,1意味着100%。.dendrogram(...)方法输入所有的链接,聚类并创建图形。我们不希望输出所有的链接,所以我们在p=20层时切掉了树。我们也不需要坐标标签,所以我们使用.set_{x,y}ticks(...)方法关掉了它们。
对于我们的数据集,你的树看起来类似这样:
你可以看出来,越接近顶端,你得到的聚类越不清晰(发生了更多的聚合)。
我们也可以使用MLPy估算分层聚类模型(clustering_hierarchical_alternative.py文件):
 1 def findClusters_ward(data):
 2     '''
 3         Cluster data using Ward's hierarchical clustering
 4     '''
 5     # create the classifier object
 6     ward = ml.MFastHCluster(
 7         method='ward'
 8     )
 9
10     # fit the data
11     ward.linkage(data)
12
13     return ward
14
15 # the file name of the dataset
16 r_filename = '../../Data/Chapter04/bank_contacts.csv'
17
18 # read the data
19 csv_read = pd.read_csv(r_filename)
20
21 # select variables
22 selected = csv_read[['n_duration','n_nr_employed',
23         'prev_ctc_outcome_success','n_euribor3m',
24         'n_cons_conf_idx','n_age','month_oct',
25         'n_cons_price_idx','edu_university_degree','n_pdays',
26         'dow_mon','job_student','job_technician',
27         'job_housemaid','edu_basic_6y']]
28
29 # cluster the data
30 cluster = findClusters_ward(selected)
31
32 # assess the clusters effectiveness
33 labels = cluster.cut(20)
34 centroids = hlp.getCentroids(selected, labels)
我们使用.MFastHCluster(...)方法,传入ward作为参数。分层聚类的沃德方法使用的是沃德方差最小化算法。.linkage(...)方法可看作k均值.fit(...)方法的等价物;它将模型用到数据上,找出所有的链接。
估算完成后,我们使用.cut(...)方法在第20层剪掉这棵树,以得到可管理的聚类数。返回的对象包括数据集中每个观测值的聚类成员索引。
沃德聚类方法不返回聚类的中心(因为随着我们切树的层次不同,中心会变化),为了能使用评估方法,我们写了一个方法,可返回指定标签的中心:
 1 def getCentroids(data, labels):
 2     '''
 3         Method to get the centroids of clusters in clustering
 4         models that do not return the centroids explicitly
 5     '''
 6     # create a copy of the data
 7     data = data.copy()
 8
 9     # apply labels
10     data['predicted'] = labels
11
12     # and return the centroids
13     return np.array(data.groupby('predicted').agg('mean'))
首先,我们为数据创建一份本地的副本(因为我们不希望修改传入方法的这个对象),并创建一个新列,叫作predicted。然后为predicted列去重后的每一层计算平均值,并投射为np.array(...)。
现在有了中心,我们可以评估模型的表现了。
如果你对分层聚类感兴趣,我建议阅读这篇文章:http://www.econ.upf.edu/~michael/stanford/maeb7.pdf。
4.8使用DBSCAN和BIRCH算法发现潜在的订阅者
DBSCAN(Density-based Spatial Clustering of Applications with Noise,基于密度的空间聚类)和BIRCH(Balanced Iterative Reducing and Clustering using Hierarchies,利用层次方法的平衡迭代规约和聚类)是首批能有效处理带噪音的数据的算法。这里的噪音可以理解为,数据集中与其他部分相比,所放地方不恰当的点;DBSCAN将这种观测值放到一个未归类的桶,而BIRCH认为它们是离群值,直接挪走。
需装好pandas和Scikit。
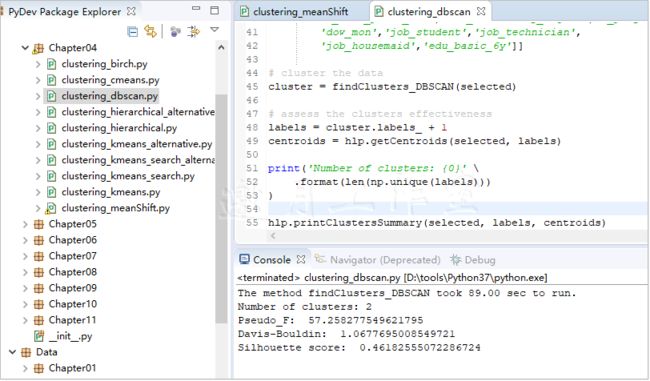
两种算法都能在Scikit中找到。要使用DBSCAN,使用clustering_dbscan.py文件中的代码:
 1 import sklearn.cluster as cl
 2 import numpy as np
 3
 4 @hlp.timeit
 5 def findClusters_DBSCAN(data):
 6     '''
 7         Cluster data using DBSCAN algorithm 使用DBScan算法 聚类数据
 8     '''
 9     # create the classifier object
10     dbscan = cl.DBSCAN(eps=1.2, min_samples=200)
11
12     # fit the data
13     return dbscan.fit(data)
14
15 # cluster the data
16 cluster = findClusters_DBSCAN(selected)
17
18 # assess the clusters effectiveness
19 labels = cluster.labels_ + 1
20 centroids = hlp.getCentroids(selected, labels)
至于BIRCH模型,查看clustering_birch.py文件中的程序:
 1 import sklearn.cluster as cl
 2 import numpy as np
 3
 4 @hlp.timeit
 5 def findClusters_Birch(data):
 6     '''
 7         Cluster data using BIRCH algorithm
 8     '''
 9     # create the classifier object
10     birch = cl.Birch(
11         branching_factor=100,
12         n_clusters=4,
13         compute_labels=True,
14         copy=True
15     )
16
17     # fit the data
18     return birch.fit(data)
19
20
21 # cluster the data
22 cluster = findClusters_Birch(selected)
23
24 # assess the clusters effectiveness
25 labels = cluster.labels_
26 centroids = hlp.getCentroids(selected, labels)
/*
The method findClusters_Birch took 0.99 sec to run.
Pseudo_F:  1733.8811847551842
Davis-Bouldin:  1.2605820279777722
*/
原理:要估算DBSCAN,我们使用Scikit的.DBSCAN(...)方法。这个方法可以接受很多参数。eps控制的是认为两个样本邻接的最大距离。min_samples参数控制的是邻接关系;一旦超过这个阈值,至少有这么多邻居的点就被当成一个核心点。
如前所述,DBSCAN中的残余值(离群值)会归到一个未归类的桶,返回时标签为-1。在可以评估聚类方法的表现前,我们需要移动标签,使它们从0开始(0是未聚类的数据点)。这个方法不返回中心的坐标,所以我们使用前一技巧中的.getCentroids(...)方法。
估算BIRCH也不费什么劲(就我们这部分来说)。我们使用Scikit的.Birch(...)方法。branching_factor参数控制的是树的父节点中最多有多少子聚类(或观测值);超过这个值时,聚类(以及子聚类)会递归拆分。n_clusters参数告诉方法我们想将数据聚成多少个类。将compute_label设置成True是让方法在结束时为每个观测值准备并存储标签。
BIRCH算法直接丢弃离群值。如果你不希望方法修改原始数据,可以将copy参数设置为True:这会复制原始数据。
参考:
DBSCAN的论文:https://www.aaai.org/Papers/KDD/1996/KDD96-037.pdf。
BIRCH的论文:http://www.cs.sfu.ca/CourseCentral/459/han/papers/zhang96.pdf。
建议也阅读.DBSCAN(...)和.Birch(...)方法的文档:
http://scikit-learn.org/stable/modules/generated/sklearn.cluster.DBSCAN.html#sklearn.cluster.DBSACN;
http://scikit-learn.org/stable/modules/generated/sklearn.cluster.Birch.html#sklearn.cluster.Birch。
第4章完。
python数据分析个人学习读书笔记-目录索引
随书源码官方下载:
http://www.hzcourse.com/web/refbook/detail/7821/92
