本系列的代码来自:https://github.com/jwyang/faster-rcnn.pytorch
大家可以去star一下,目前支持pytorch1.0系列
参考:
faster_rcnn_pytorch中的roi_pooling源码解析
ROI Pooling原理及实现
ROI POOLING原理
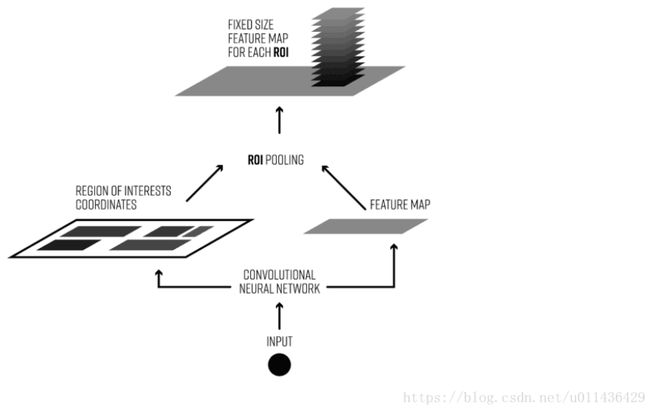
roi_pooling提出自Fast RCNN论文中,用于将selective search提取出的region proposals映射到cnn网络产生的feature map中并且处理成特定大小的输出(主要是为了之后的全连接层的输入),其思想来自于sppnet。
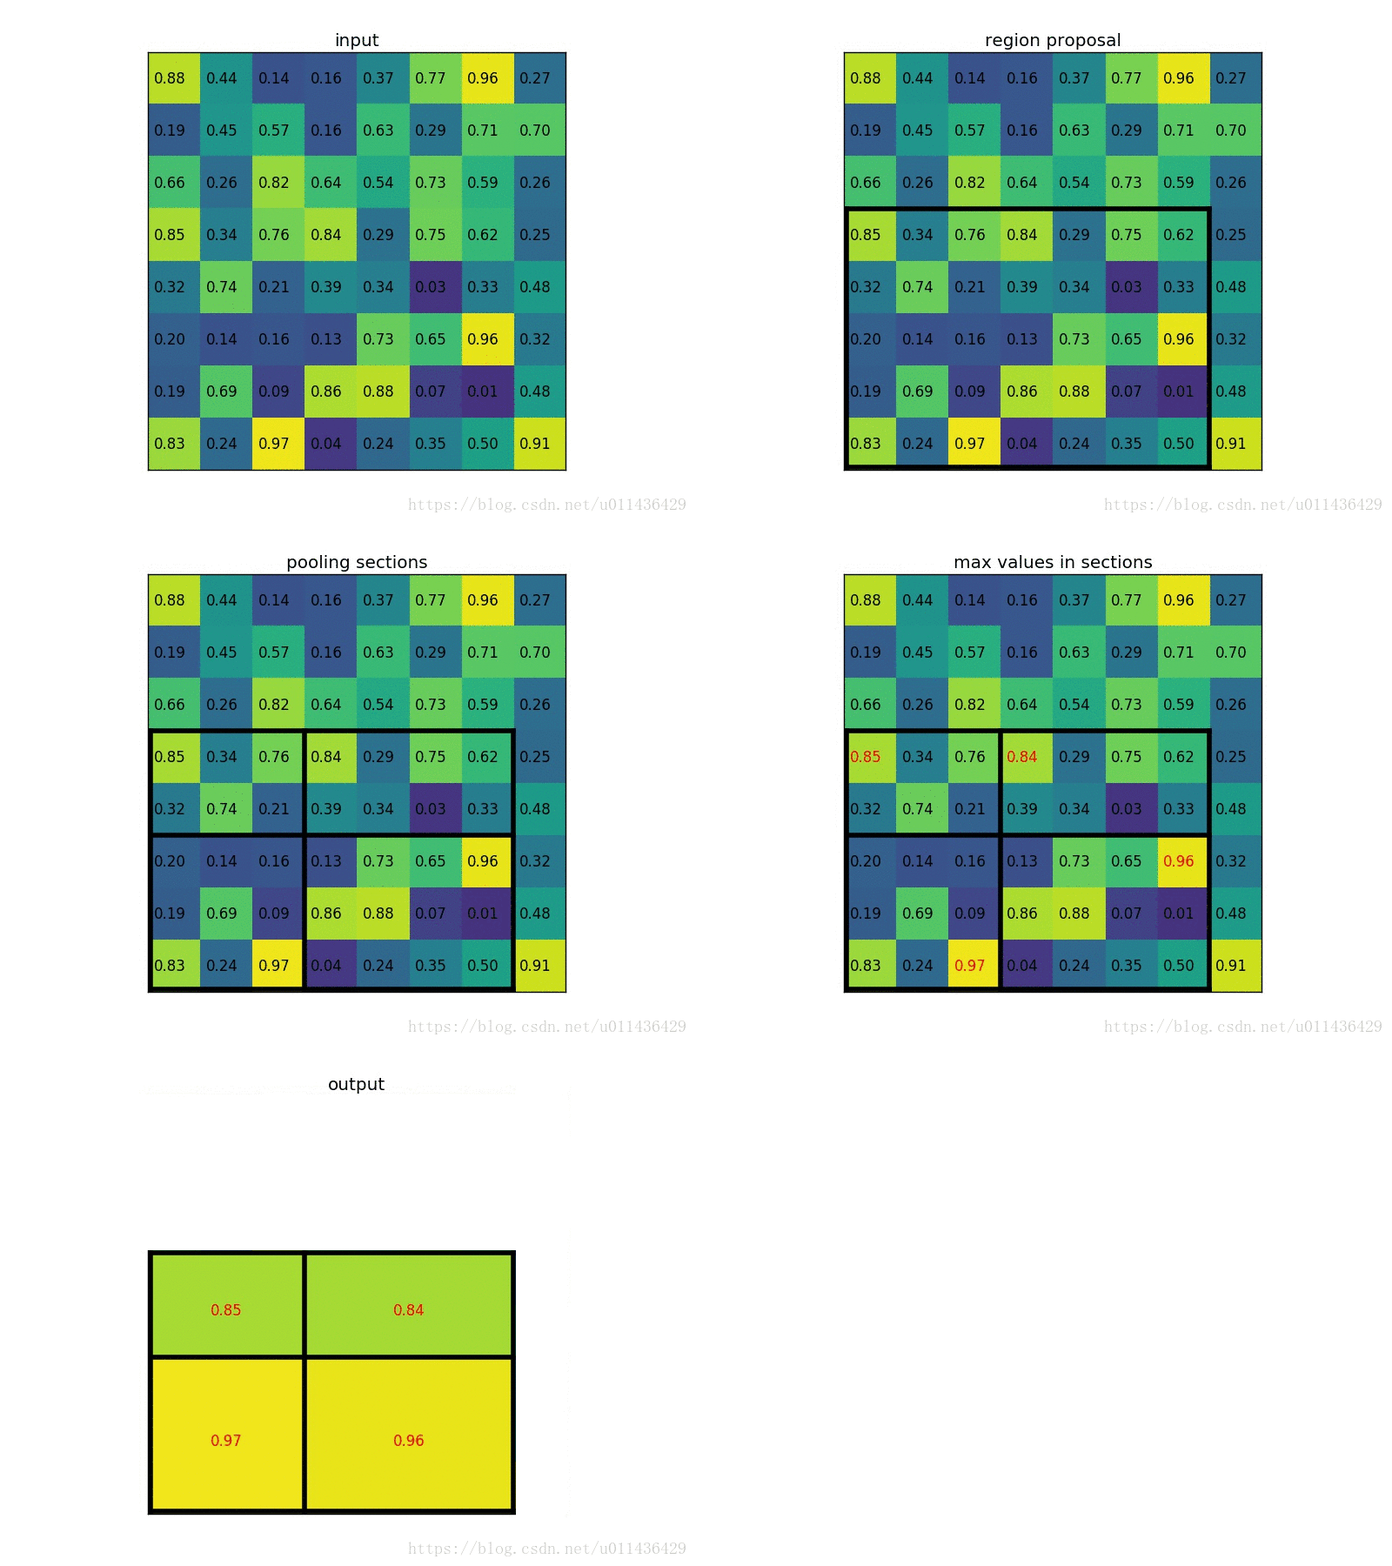
ROI pooling具体操作如下:
- 根据输入image,将ROI映射到feature map对应位置;
- 将映射后的区域划分为相同大小的sections(sections数量与输出的维度相同);
-
对每个sections进行max pooling操作;
roi_pooling代码实现
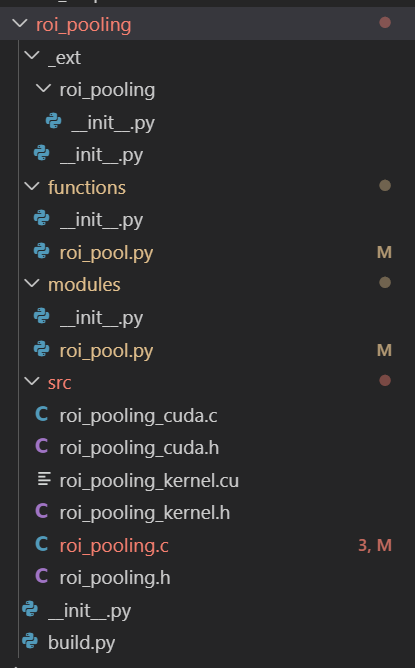
该代码中具体实现由c实现,先看roi pooling部分代码目录结构
- src文件夹下是c和cuda版本的源码,其中roi_pooling的操作的foward是c和cuda版本都有的,而backward仅写了cuda版本的代码。
- functions文件夹下的roi_pool.py是继承了torch.autograd.Function类,实现RoI层的foward和backward函数。
- modules文件夹下的roi_pool.py是继承了torch.nn.Modules类,实现了对RoI层的封装,此时RoI层就跟ReLU层一样的使用了。
- _ext文件夹下还有个roi_pooling文件夹,这个文件夹是存储src中c,cuda编译过后的文件的,编译过后就可以被funcitons中的roi_pool.py调用了。
- 这里先看cpu版本的c语言roi_pooling.c
#include // pytorch的C拓展
#include
/**
* 函数:进行roi_pooling操作
* pooled_height:pooling后的高度大小
* pooled_width:pooling后的宽度大小
* spatial_scale:下采样率
* features:特征图
* rois:rois
* output:处理后的rois
**/
int roi_pooling_forward(int pooled_height, int pooled_width, float spatial_scale,
THFloatTensor * features, THFloatTensor * rois, THFloatTensor * output)
{
// Grab the input tensor 获取输入的tensor,
// 转换为一维数组,所以需要一维一维进行处理
float * data_flat = THFloatTensor_data(features);
float * rois_flat = THFloatTensor_data(rois);
float * output_flat = THFloatTensor_data(output);
// Number of ROIs
int num_rois = THFloatTensor_size(rois, 0); // rois的数量
int size_rois = THFloatTensor_size(rois, 1); // roi的占用的大小
// batch size
int batch_size = THFloatTensor_size(features, 0);
// cpu版本,batch_size一般为1
if(batch_size != 1)
{
return 0;
}
// data height,特征图的大小
int data_height = THFloatTensor_size(features, 1);
// data width
int data_width = THFloatTensor_size(features, 2);
// Number of channels
int num_channels = THFloatTensor_size(features, 3);
// Set all element of the output tensor to -inf.
THFloatStorage_fill(THFloatTensor_storage(output), -1);
// For each ROI R = [batch_index x1 y1 x2 y2]: max pool over R
int index_roi = 0;
int index_output = 0;
int n;
for (n = 0; n < num_rois; ++n) // 对每一个ROI进行操作
{
// 获取ROI的序号及坐标
// spatial_scale:输入图像到特征图的缩放比例
int roi_batch_ind = rois_flat[index_roi + 0];
int roi_start_w = round(rois_flat[index_roi + 1] * spatial_scale);
int roi_start_h = round(rois_flat[index_roi + 2] * spatial_scale);
int roi_end_w = round(rois_flat[index_roi + 3] * spatial_scale);
int roi_end_h = round(rois_flat[index_roi + 4] * spatial_scale);
// CHECK_GE(roi_batch_ind, 0);
// CHECK_LT(roi_batch_ind, batch_size);
// 获取ROI的height和width
int roi_height = fmaxf(roi_end_h - roi_start_h + 1, 1);
int roi_width = fmaxf(roi_end_w - roi_start_w + 1, 1);
// 获得pooling时height和width方向上的分割后每格的高度和宽度
float bin_size_h = (float)(roi_height) / (float)(pooled_height);
float bin_size_w = (float)(roi_width) / (float)(pooled_width);
// 批索引*特征图图高度*特征图宽度*通道数,获得该roi对应的feature map的数据开始下标索引
int index_data = roi_batch_ind * data_height * data_width * num_channels;
//ROI pooling后的大小
const int output_area = pooled_width * pooled_height;
int c, ph, pw;
for (ph = 0; ph < pooled_height; ++ph)
{
for (pw = 0; pw < pooled_width; ++pw)
{
// 这里得到相对每个roi分割后每份的宽度和高度
int hstart = (floor((float)(ph) * bin_size_h));
int wstart = (floor((float)(pw) * bin_size_w));
int hend = (ceil((float)(ph + 1) * bin_size_h));
int wend = (ceil((float)(pw + 1) * bin_size_w));
// 这里得到相对feature map分割后每份的宽度和高度,
// 所以加上整个roi相对于feature map的左上角坐标
hstart = fminf(fmaxf(hstart + roi_start_h, 0), data_height);
hend = fminf(fmaxf(hend + roi_start_h, 0), data_height);
wstart = fminf(fmaxf(wstart + roi_start_w, 0), data_width);
wend = fminf(fmaxf(wend + roi_start_w, 0), data_width);
// pool之后的的序号,按行
const int pool_index = index_output + (ph * pooled_width + pw);
int is_empty = (hend <= hstart) || (wend <= wstart);
if (is_empty) // 一般不会有这种情况吧
{
for (c = 0; c < num_channels * output_area; c += output_area)
{
output_flat[pool_index + c] = 0;
}
}
else // 正常的情况,进行max pooling
{
int h, w, c;
for (h = hstart; h < hend; ++h) // 垂直方向
{
for (w = wstart; w < wend; ++w) // 水平方向
{
for (c = 0; c < num_channels; ++c) // 通道维数
{
// 根据坐标得到下标索引
const int index = (h * data_width + w) * num_channels + c;
// 加上index_data得到相对于整个map的下标索引
// 获取最大值进行max pooling
if (data_flat[index_data + index] > output_flat[pool_index + c * output_area])
{
output_flat[pool_index + c * output_area] = data_flat[index_data + index];
}
}
}
}
}
}
}
// Increment ROI index
// rois索引变成下一个
index_roi += size_rois;
// 输出索引变成下一个开始,即加上pooling后大小*通道数
index_output += pooled_height * pooled_width * num_channels;
}
return 1;
}
- 然后看functions下的roi_pooling.py,此处调用src实现的具体roi pooling操作
#-----------------------------------------
# 继承了torch.autograd.Function类,实现RoI层的foward和backward函数。
# modules中的roi_pool实现层的封装
#-----------------------------------------
import torch
# 对Function进行拓展,使其满足我们自己的需要,
# 而拓展就需要自定义Function的forward运算,
# 已经对应的backward运算,同时在forward中需要通过保存输入值用于backward
from torch.autograd import Function # 自定义的内容
from .._ext import roi_pooling
import pdb # python调试器
class RoIPoolFunction(Function):
def __init__(ctx, pooled_height, pooled_width, spatial_scale):
ctx.pooled_width = pooled_width
ctx.pooled_height = pooled_height
ctx.spatial_scale = spatial_scale
ctx.feature_size = None
# forward(ctx, *args, **kwargs)
# ctx: 类似于self,可以在backward中调用
def forward(ctx, features, rois):
ctx.feature_size = features.size()
batch_size, num_channels, data_height, data_width = ctx.feature_size
num_rois = rois.size(0)
output = features.new(num_rois, num_channels, ctx.pooled_height, ctx.pooled_width).zero_()
ctx.argmax = features.new(num_rois, num_channels, ctx.pooled_height, ctx.pooled_width).zero_().int()
ctx.rois = rois
if not features.is_cuda:
_features = features.permute(0, 2, 3, 1) # tensor.permute(),改变tensor的维的顺序
roi_pooling.roi_pooling_forward(ctx.pooled_height, ctx.pooled_width, ctx.spatial_scale,
_features, rois, output) # 调用_ext下的编译好的cpu版本函数
else:
roi_pooling.roi_pooling_forward_cuda(ctx.pooled_height, ctx.pooled_width, ctx.spatial_scale,
features, rois, output, ctx.argmax) #调用_ext下的编译好的gpu版本函数
return output
# backward(ctx, *grad_outputs)
def backward(ctx, grad_output):
assert(ctx.feature_size is not None and grad_output.is_cuda)
batch_size, num_channels, data_height, data_width = ctx.feature_size
grad_input = grad_output.new(batch_size, num_channels, data_height, data_width).zero_()
# 这个地方只有gpu版本
roi_pooling.roi_pooling_backward_cuda(ctx.pooled_height, ctx.pooled_width, ctx.spatial_scale,
grad_output, ctx.rois, grad_input, ctx.argmax)
return grad_input, None
- 最后是modules下的roi_pooling.py,此处我们就实现了roi_pooling层了,此处调用functions下的roi_pooling.py定义的RoIPoolFunction()函数
#-------------------------------
# 对roi_pooling层的封装,就是ROI Pooling Layer了
#-------------------------------
from torch.nn.modules.module import Module
from ..functions.roi_pool import RoIPoolFunction # 导入functions文件夹下的RoIPoolFunction
class _RoIPooling(Module):
def __init__(self, pooled_height, pooled_width, spatial_scale):
super(_RoIPooling, self).__init__()
self.pooled_width = int(pooled_width)
self.pooled_height = int(pooled_height)
self.spatial_scale = float(spatial_scale)
def forward(self, features, rois):
return RoIPoolFunction(self.pooled_height, self.pooled_width, self.spatial_scale)(features, rois)
你可能感兴趣的:(Faster RCNN源码解读(2)-roi_pooling)


