webpack 核心
核心概述
- entry 入口文件:js 代码文件,可执行的 node 模块或打包的入口文件。
- chunk 代码块:代码分割的代码块,按需加载的分块,装载多个不同模块和这些模块所依赖的模块文件经过 webpack 打包而成的代码块。
- loader 文件转换器:把匹配规则的文件资源转换成想要的结果,比如 scss-loader 把 scss 文件当作模块转成 css 文件,loader 可以串行使用。
- plugin 插件:用于扩展webpack的功能,在 webpack 构建过程中各个 hook 上扩展功能,调用 webpack API 改变输出结果。
module, chunk, bundle 之间的关系
- module 模块:代码模块,由 import, require 等模块规范导出的代码片段。
- chunk 代码块:由多个 module 组成,通常情况下 bundle 是由 chunk 对应生成。
- bundle:由多个 module 组成,通常跟 chunk 对应,包含已经过加载和编译的最终生成的源文件。
一个例子介绍 module, chunk, bundle
{
  entry: {
    foo: ["lodash.js","./src/foo.js"],
    bar: ["./src/bar.js"]
  },
  output: {
    path: "./dist",
    filename: "[name].js"
  }
}
- module:
lodash.js,./src/foo.js, 还包括 foo.js 用 require, import 等方法导入的文件和依赖+ chunk: foo, bar - bundles: foo.js, bar.js 文件
webpack 核心对象
- Tapable
与 nodejs 中的 eventEmiiter 模块类似, Compiler 和 Compilation 对象都继承于 Tapable,webpack 运行时通过 Tabpable 实例的 API 进行广播和监听
// 旧版本: 使用的 apply 和 plugin 广播和监听事件
// 广播事件
compiler.apply('eventName',params);
// 监听事件
compiler.plugin('eventName',function(params) {});
// 新版本: 使用 Hooks 进行广播和监听
const { SyncHook } = require("tapable")
let hook = new SyncHook(['自定义钩子名']);
// 订阅
hook.tap('自定义函数名', function (params) {  // todo  });
// 发布
hook.call(params);// 发布的时候触发订阅的函数 同时传入参数
参考 Tapable 的使用
Compiler
Compiler 继承 Tapable 对象,可以广播和监听 webpack 事件。
Compiler 对象是 webpack 的编译器,webpack 周期中只存在一个 Compiler 对象。
Compiler 对象在 webpack 启动时创建实例,�compiler 实例中包含 webpack 的完整配置,包括 loaders, plugins 信息。Compilation
Compilation 继承 Tapable 对象,可以广播和监听 webpack 事件。
Compilation 实例仅代表一次 webpack 构建和生成编译资源的的过程。
webpack 开发模式开启 watch 选项,每次检测到入口文件模块变化时,会创建一次新的编译: 生成一次新的编译资源和新的 compilation 对象,这个 compilation 对象包含了当前编译的模块资源 module,编译生成的资源,变化的文件,依赖的的状态
Compiler 和 Compilation 的区别在于:Compiler 代表了整个 Webpack 从启动到关闭的生命周期,而 Compilation 只是代表了一次新的编译。
webpack 构建
webpack 编译的过程有哪些阶段
webpack 是如何从 entry 开始解析整个依赖树的
laoders 在何时调用的
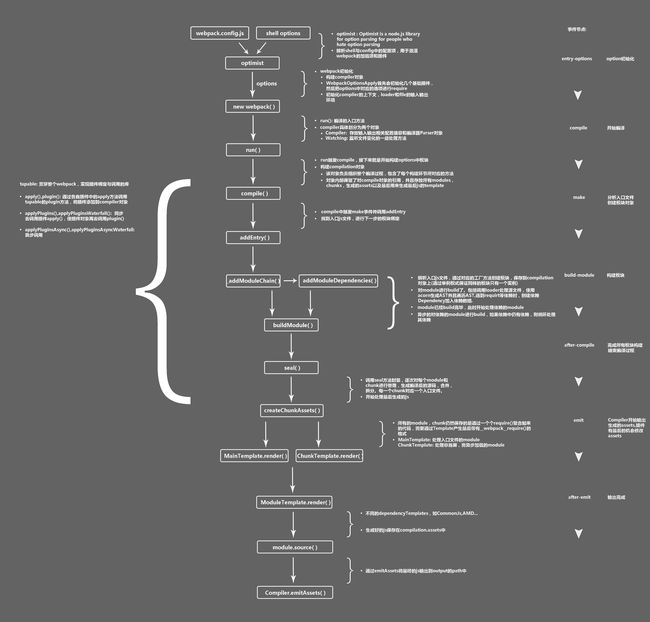
流程图
流程顺序
解析webpack配置参数,合并的命令行启动传入和 webpack.config.js 文件里配置。
- 注册插件
注册所有配置的插件,好让插件监听webpack构建生命周期的事件节点,以做出对应的反应。
从配置的entry入口文件开始解析文件构建AST语法树,找出每个文件所依赖的文件,递归下去。
在解析文件递归的过程中根据文件类型和loader配置找出合适的loader用来对文件进行转换。
递归完后得到每个文件的最终结果,根据entry配置生成代码块chunk。
输出所有chunk到文件系统。
注册插件
const webpack = (options, callback) => {
        // ...
    compiler = new Compiler(options.context);
        compiler.options = options;
        new NodeEnvironmentPlugin().apply(compiler);
        if (options.plugins && Array.isArray(options.plugins)) {
            // 加载 webpack.config.js 里的插件
            for (const plugin of options.plugins) {
                if (typeof plugin === "function") {
                    plugin.call(compiler, compiler);
                } else {
                    plugin.apply(compiler);
                }
            }
         // ...
        // 加载 webpack 自身的插件
        compiler.options = new WebpackOptionsApply().process(options, compiler);
        // ... 有watch 配置执行 compiler.watch(watchOptions, callback)
        compiler.run(callback);
    }
    return compiler;
    // ...
WebpackOptionsApply
- WebpackOptionsApply 会根据配置注册对应的 webpack 内部插件
- WebpackOptionsApply 一开始会注册一个处理 Entry 的插件
仅仅是注册了 EntryOptionPlugin 插件, 这个插件会在 make 阶段调用 compilation 的 addEntry 把入口文件通过 parse 先解析成 AST 语法树,对 AST 进行遍历收集 require、import 这些导入的模块 module。
class WebpackOptionsApply {
  process(options, compiler) {
    // ...
    // 处理一个 Entry 插件
    new EntryOptionPlugin().apply(compiler);
    // 调用 entryOption 钩子 注册 EntryOptionPlugin 插件,注册 DynamicEntryPlugin  等待 make 钩子触发执行 compilation 对象上的 addEntry
    compiler.hooks.entryOption.call(options.context, options.entry);

    // ... 加载 webpack 自身的插件
  }
}
注册的钩子 Hooks
// EntryOptionPlugin.js
module.exports = class EntryOptionPlugin {
  apply(compiler) {
    compiler.hooks.entryOption.tap("EntryOptionPlugin", (context, entry) => {
        // ...
        new DynamicEntryPlugin(context, entry).apply(compiler);
        return
    }
  }
}

// DynamicEntryPlugin.js
class DynamicEntryPlugin {
  apply(compiler) {
    // 等待触发 make 钩子进行 addEntry
    compiler.hooks.make.tapAsync('DynamicEntryPlugin', (compilation, callback) => {
      const addEntry = (entry, name) => {
        //...
        compilation.addEntry(...)
      }
    }
    // ...
    return addEntry(entry[name], name);
  }
}
compiler.run
compiler.run 才是 webpack 的编译的入口,run 会启动编译执行构建流程,在不同的生命周期执行相应的插件
- compile 开始编译
- make 从入口点分析模块及其依赖的模块,创建这些模块对象
- build-module 构建模块
- after-compile 完成构建
- seal 封装构建结果
- emit 把各个chunk输出到结果文件
- after-emit 完成输出
// Compiler.js
class Compiler extends Tapable {

  run() {
  // ...
    this.hooks.beforeRun.callAsync(this,  // beforeRun
      this.hooks.run.callAsync(this, err => { // run
    this.readRecords(err => {
      this.compile(onCompiled); // 执行 this.compile
    });
      });
    });
  }

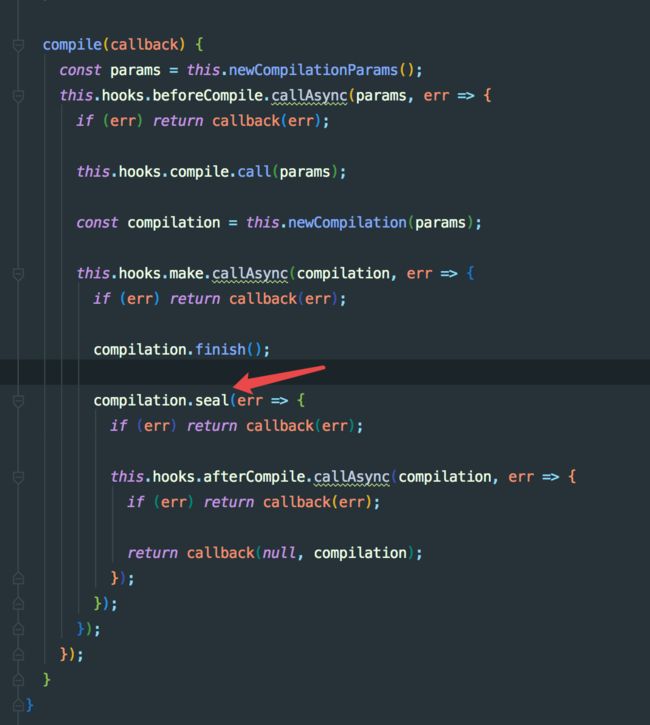
compile(callback) {
  const params = this.newCompilationParams();
    this.hooks.beforeCompile.callAsync(params, err => { // 执行 beforeCompile hook
      if (err) return callback(err);

      this.hooks.compile.call(params); // 执行 compile hook

      const compilation = this.newCompilation(params); // 创建 compilation 编译资源实例

      this.hooks.make.callAsync(compilation, err => { // 执行 mak hook
    if (err) return callback(err);

    compilation.finish();

    compilation.seal(err => { // seal hook
      if (err) return callback(err);

      this.hooks.afterCompile.callAsync(compilation, err => { // afterCompile hook
        if (err) return callback(err);
        return callback(null, compilation);
      });
    });
      });
    });
  }
}
构建 Compilation 对象
compiler.run 时会在 compiler 中 创建一个 Compilation 实例对象,compilation 对象中存放着 module, chunk, assets 还有生成文件的 template 信息。同时 compilation 代表 webpack 构建生成d编译资源的过程,还具有addEntry() , _addModuleChain() , buildModule() , seal() , createChunkAssets()等方法用于编译过程的各个阶段触发各种 hooks 来调用相应插件。先从 make 钩子开始看,是由 compiler 触发的,之前在 WebpackOptionsApply 里处理 hooks.EntyOption 到 DynamicEntryPlugin 中订阅了的 compiler.hooks.mak.tapasync() 这个 make hook。
// DynamicEntryPlugin.js
        compiler.hooks.make.tapAsync(
            "DynamicEntryPlugin",
            (compilation, callback) => {
            const addEntry = (entry, name) => {
                    const dep = DynamicEntryPlugin.createDependency(entry, name);
                    return new Promise((resolve, reject) => {
                        compilation.addEntry(this.context, dep, name, err => {
                            if (err) return reject(err);
                            resolve();
                        });
                    });
                };

                Promise.resolve(this.entry()).then(entry => {
                    if (typeof entry === "string" || Array.isArray(entry)) {
                        addEntry(entry, "main").then(() => callback(), callback);
                    } else if (typeof entry === "object") {
                        Promise.all(
                            Object.keys(entry).map(name => {
                                return addEntry(entry[name], name);
                            })
                        ).then(() => callback(), callback);
                    }
                });
            }
        );
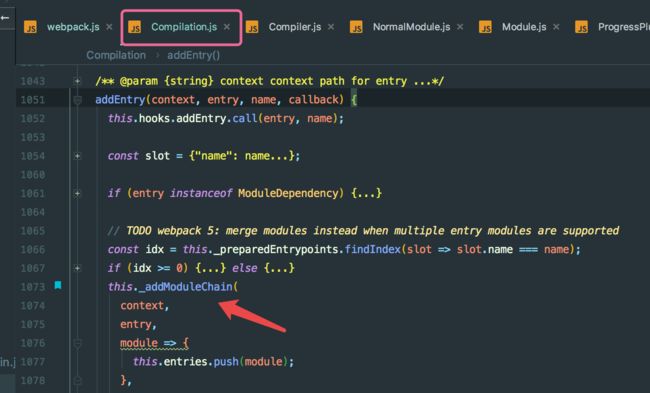
- 在 mak hook 中调用了 compilation.addEntry 方法,读取 options 中的 entry 对象找到入口文件,addEntry 中还会调用私有方法 _addModuleChain
addEntry(context, entry, name, callback) {
  this._addModuleChain(context, entry, module => this.entries.push(module), callback)
}
在创建 module 之前,Compiler 会触发 make,并调用 Compilation.addEntry 方法,通过 options 对象的 entry 字段找到我们的入口js文件。之后,在 addEntry 中调用私有方法 _addModuleChain ,这个方法主要做了两件事情。一是根据模块的类型获取对应的模块工厂并创建模块,二是构建模块。
在 module 创建之前, Compiler 实例会触发 make 钩子
// Compiler.js
class Compiler extends Tapable {
  compile() {
    // ...
     this.hook.make.callAsync(compilation, err => {})
    // ..
  }
}
之后再 addEntry 中调用私有方法 _addModuleChain
在 _addModuleChain 中根据模块的类型获取对应模块的工厂函数创建模块,构建模块
_addModuleChain(context, dependency, onModule, callback) {
  //..
  // dependency 就是传入的 entry
  const Dep = /** @type {DepConstructor} */ (dependency.constructor);
  // 找到 相应的工厂函数
  const moduleFactory = this.dependencyFactories.get(Dep);

  // ...
  moduleFactory.create( // 创建 module
    {
      contextInfo: {
        issuer: "",
    compiler: this.compiler.name
      },
      context: context,
      dependencies: [dependency]
    },
    (err, module) => {
      // ...
      // 构建模块, buildModule 调用到 NormalModule 的 build
      this.buildModule(module, false, null, null, err => { // ... })
    }
}
compilation 构建模块, buildModule 调用到 NormalModule 的 build, 执行 doBuild 对每个 require、import 的文件用对应的 loader 进行处理,最后生成 js 的 module。
// NormalModule.js
build(options, compilation, resolver, fs, callback) {
   // ...
  // 返回 doBuild
  return this.doBuild(options, compilation, resolver, fs, err => {

    const result = this.parser.parse(
      this._ast || this._source.source(), // doBuild  函数里会给环境上下文赋值后执行回调
    {
      current: this,
      module: this,
          compilation: compilation,
      options: options
    },
        (err, result) => { handleParseResult(result) }
    );
  })
}
doBuild(options, compilation, resolver, fs, callback) {
  const loaderContext = this.createLoaderContext(resolver, options, compilation, fs)
  // 进行 loader 处理
  runLoaders({ resource: this.resource, loaders: this.loaders, context: loaderContext, readResource: fs.readFile.bind(fs)
    (err, result) => {
      // ...
      this._source = this.createSource(..) // 给环境上下文赋值
      this._ast = extraInfo.webapckAST // 给环境上下文赋值
      return callback() // 执行 doBuild  回调,进行 parser.parse
    }
  },
}
调用 acorn 包把 loader 处理后文件解析成抽象语法树 AST
class Parser extends Tapable {
  parse() {
    // ...
    ast = acorn.parse(code, {
      ranges: true,
      locations: true,
      ecmaVersion: 2019,
      sourceType: "module",
      onComment: null,
      plugins: {
        dynamicImport: true
      }
  }
}
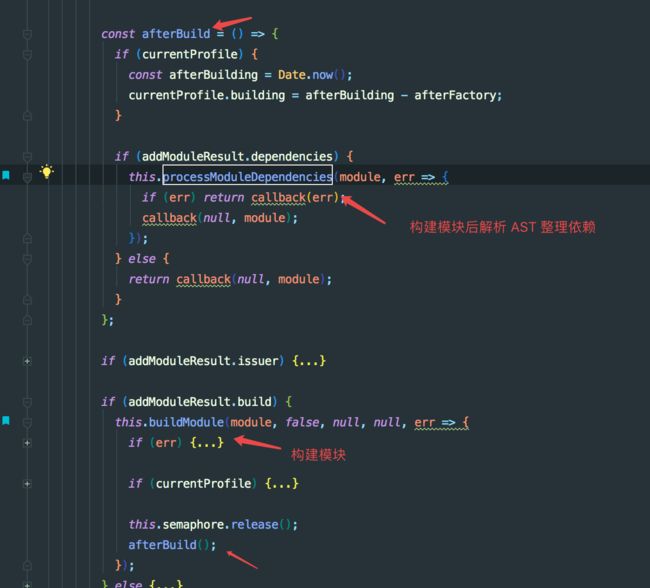
遍历 AST 构建其中模块依赖的模块,模块可能存在依赖其他模块的情况,遍历 AST 将 require、import 的模块通过 addDependency() 添加到此模块的依赖 dependenies 数组中。当前模块构建完成后,webpack 调用 processModuleDependencies 开始递归处理依赖的 module,接着就会重复之前的构建步骤。
- processModuleDependencies 方法递归执行 addDependency 进行依赖解析并收集到 module.dependenies 中
- 把模块所依赖的模块收集到 module.dependenies 后,回到 compiler.js 中的 compile 方法里调用 compilation.seal
- 在所有模块和依赖模块构建完后, seal hook 调用各插件对构建后的结果进行处理,对每个 module 和 chunk 进行整理,生成编译后的源码
seal() {
  //... 一大堆 hook 触发插件
  this.createModuleAssets()
  this.createChunkAssets() // 最终生成资源文件
  // 把 js 模块都收集到一起,entry 对应每个 chunk 比如 app.js ,使用代码分割会产生多个不同的 chunk
}
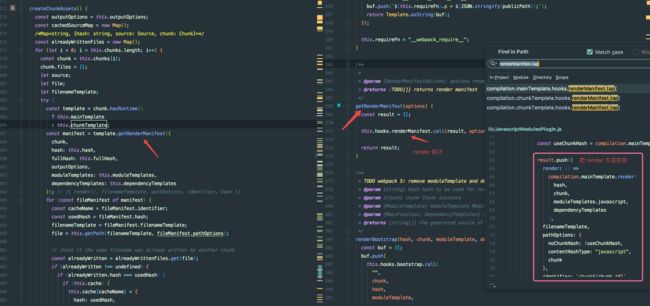
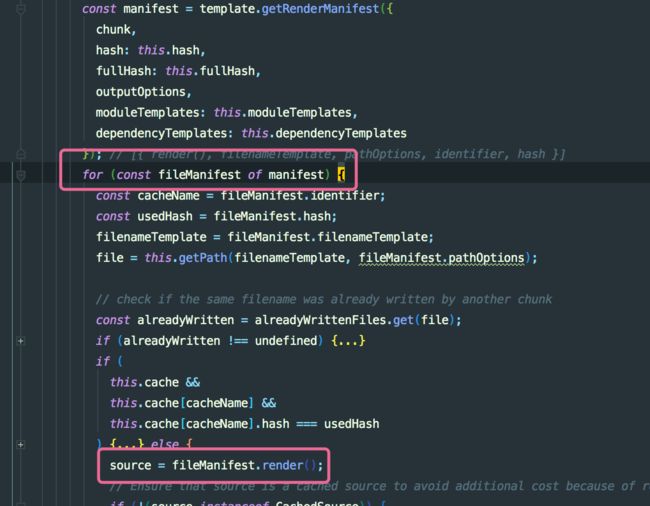
createChunkAssets 这个方法遍历 this.chunks 生成对应 entry 的数量和命名的文件内容,同时 dependencies 记录依赖的 modules。最后把 chunk 携带的依赖树一起调用 MainTemplate 中的 render 插件生成最终的代码文件。
- 把 render 方法存放在 mainfest 里
- 遍历 mainfest 最后执行 render 生成 source
最后根据 生成 budle 文件的 模板遍历 chunk 的依赖树把 module 传入生成最终的 js 文件.
总结
- webpack 实际是一个 插件的集合。
- webpack 由 tapable 控制在各个插件在 hook 的事件流上运行
- webpack 主要编译流程依赖于 compilation 和 module 两个对象
流程总结
- webpack 根据配置注册对应的插件
- 生成 compile 实例,执行 compile.run 进入编译阶段
- 第一步创建 compilation 实例,compilation 实例注册处理不同类型 module 对应的工厂 factory 插件,用于处理不同的 module
- make 阶段,根据 entry 配置处理对应的 chunk 资源:
1 调用 loaders 对模块资源进行处理(doBuild)�,转换成统一标准的 js 代码(babel-loader)的 module
2 在 parser.parse 中调用 acorn 对 AST 的 js 代码进行语法分析,收集 module 间的依赖关系,记录下来形成依赖树 - 最后在钩子 compilation.seal 进入 render 阶段,根据 module 的依赖,生成 module.source() 传入 MainTemplate 中进行 render 生成最终文件
