编写iOS应用UI的方式大概有两种,一种是Storyboard/Xib,另一种是手写代码。采用Storyboard/Xib方式组织UI,由于提供可视化的特性,只要从UI库中拖动UI控件,便可以显示结果,极大地提高开发速度。但面临一个问题就是多人协作开发,由于所有的UI都放在同一个Storyboard文件中,使用Git/SVN合并代码就会出现冲突。多人协作开发还不是主要问题,有人提出可以创建多个Storyboard来分开UI编写,而Storyboard/Xib最主要问题是代码复用性比较差。所以有些人就选择手写UI代码,这样不仅可以解决多人协作开发问题,而且通过自定义控件在多个View使用。但每次手写UI代码后都要编译、构建和运行,最后在模拟器显示,这样会拖慢开发速度。如果每次修改UI控件后,保存修改便实时在模拟器显示修改后结果,就可以极大的提高编写UI的速度。

Live Change.gif
Auto Layout
Auto Layout是什么
Auto Layout是一个基于constraint(约束)的布局系统,它根据UI元素之间约束关系来调整UI元素的位置和大小。
Auto Layout解决什么问题
更容易适配不同分辨率设备的屏幕(iPhone 6 Plus, iPhone 6, iPhone 5s/5, iPhone 4s/4)
当设备旋转时不需要做额外处理
使用constraint来描述布局逻辑,更利于理解和清晰
如何使用Auto Layout
Auto Layout中约束的类对应是NSLayoutConstraint, 而创建NSLayoutConstraint对象主要有两种方式,第一种是
+ (id)constraintWithItem:(id)view1 attribute:(NSLayoutAttribute)attribute1 relatedBy:(NSLayoutRelation)relation toItem:(id)view2 attribute:(NSLayoutAttribute)attribute2 multiplier:(CGFloat)multiplier constant:(CGFloat)constant;
上面方法主要意思是,某个view1的attribute1等于(小于或等于/大于或等于)某个view2的attribute2的multiplier倍加上constant。而attribute主要由表示位置(上/下/左/右)和大小(宽/高)的以下几个值:
typedefenum:NSInteger{NSLayoutAttributeLeft=1,NSLayoutAttributeRight,NSLayoutAttributeTop,NSLayoutAttributeBottom,NSLayoutAttributeLeading,NSLayoutAttributeTrailing,NSLayoutAttributeWidth,NSLayoutAttributeHeight,NSLayoutAttributeCenterX,NSLayoutAttributeCenterY,NSLayoutAttributeBaseline,NSLayoutAttributeNotAnAttribute=0}NSLayoutAttribute;
简化一下,使用公式可以表达为:
view1.attribute1 = view2.attribute2 * multiplier + constant
第二种方式是:
+ (NSArray*)constraintsWithVisualFormat:(NSString*)format options:(NSLayoutFormatOptions)opts metrics:(NSDictionary*)metrics views:(NSDictionary*)views;
这种方式主要是采用Visual Format Language(可视化格式语言)来描述约束布局,虽然语法比较简洁,但是可读性比较差和容易出错。
Auto Layout存在问题
虽然Auto Layout在布局view方面是非常强大和灵活,但是创建constraint的语法过于繁杂,引用Masonry一个例子:
UIView*superview =self;UIView*view1 = [[UIViewalloc] init];view1.translatesAutoresizingMaskIntoConstraints =NO;view1.backgroundColor = [UIColorgreenColor];[superview addSubview:view1];UIEdgeInsetspadding =UIEdgeInsetsMake(10,10,10,10);[superview addConstraints:@[//view1 constraints[NSLayoutConstraintconstraintWithItem:view1 attribute:NSLayoutAttributeToprelatedBy:NSLayoutRelationEqualtoItem:superview attribute:NSLayoutAttributeTopmultiplier:1.0constant:padding.top], [NSLayoutConstraintconstraintWithItem:view1 attribute:NSLayoutAttributeLeftrelatedBy:NSLayoutRelationEqualtoItem:superview attribute:NSLayoutAttributeLeftmultiplier:1.0constant:padding.left], [NSLayoutConstraintconstraintWithItem:view1 attribute:NSLayoutAttributeBottomrelatedBy:NSLayoutRelationEqualtoItem:superview attribute:NSLayoutAttributeBottommultiplier:1.0constant:-padding.bottom], [NSLayoutConstraintconstraintWithItem:view1 attribute:NSLayoutAttributeRightrelatedBy:NSLayoutRelationEqualtoItem:superview attribute:NSLayoutAttributeRightmultiplier:1constant:-padding.right], ]];
如此简单的一个例子都要编写这么多行代码,想象一下如果创建多个view的constraint时会多么痛苦啊。另一个方式是采用Visual Format Language (VFL),虽然语法比较简洁,但是可读性比较差和容易出错。
Masonry
为什么使用Masonry
Masonry是采用链式DSL(Domain-specific language)来封装NSLayoutConstraint,通过这种方式编写Auto Layout布局代码更加易读和简洁。
使用Masonry的MASConstraintMaker来表达相同constraint
UIEdgeInsets padding = UIEdgeInsetsMake(10,10,10,10);[view1 mas_makeConstraints:^(MASConstraintMaker *make) { make.top.equalTo(superview.mas_top).with.offset(padding.top); //withisan optional semantic filler make.left.equalTo(superview.mas_left).with.offset(padding.left); make.bottom.equalTo(superview.mas_bottom).with.offset(-padding.bottom); make.right.equalTo(superview.mas_right).with.offset(-padding.right);}];
甚至可以更短
[view1 mas_makeConstraints:^(MASConstraintMaker *make) { make.edges.equalTo(superview).with.insets(padding);}];
如何使用
使用Masonry创建constraint来定义布局的方式有三种:mas_makeConstraints,mas_updateConstraints,mas_remakeConstraints。
1. mas_makeConstraints
使用mas_makeConstraints创建constraint后,你可以使用局部变量或属性来保存以便下次引用它;如果创建多个constraints,你可以采用数组来保存它们。
// in public/private interface@property(nonatomic,strong) MASConstraint *topConstraint;...// when making constraints[view1 mas_makeConstraints:^(MASConstraintMaker *make) {self.topConstraint = make.top.equalTo(superview.mas_top).with.offset(padding.top); make.left.equalTo(superview.mas_left).with.offset(padding.left);}];...// then later you can call[self.topConstraint uninstall];
2. mas_updateConstraints
有时你需要更新constraint(例如,动画和调试)而不是创建固定constraint,可以使用mas_updateConstraints方法
// this is Apple's recommended place for adding/updating constraints// this method can get called multiple times in response to setNeedsUpdateConstraints// which can be called by UIKit internally or in your code if you need to trigger an update to your constraints- (void)updateConstraints { [self.growingButton mas_updateConstraints:^(MASConstraintMaker *make) { make.center.equalTo(self); make.width.equalTo(@(self.buttonSize.width)).priorityLow(); make.height.equalTo(@(self.buttonSize.height)).priorityLow(); make.width.lessThanOrEqualTo(self); make.height.lessThanOrEqualTo(self); }];//according to apple super should be called at end of method[superupdateConstraints];}
3. mas_remakeConstraints
mas_remakeConstraints与mas_updateConstraints比较相似,都是更新constraint。不过,mas_remakeConstraints是删除之前constraint,然后再添加新的constraint(适用于移动动画);而mas_updateConstraints只是更新constraint的值。
- (void)changeButtonPosition { [self.button mas_remakeConstraints:^(MASConstraintMaker *make) { make.size.equalTo(self.buttonSize);if(topLeft) { make.top.and.left.offset(10); }else{ make.bottom.and.right.offset(-10); } }];}
想了解以上三个代码片段的更多细节,可以下载Masonry iOS Examples工程查阅。
Classy
Classy简介和特性
Classy是一个能与UIKit无缝结合stylesheet(样式)系统。它借鉴CSS的思想,但引入新的语法和命名规则。
灵活内嵌的语法
{}:;这些语法符号是可选的,你可以选择适合自己的风格来表达stylesheet。
你可以使用{}:;来限定stylesheet
$main-color =#e1e1e1;MYCustomView { background-color: $main-color; title-insets:5,10,5,10; >UIProgressView.tinted { progress-tint-color: black; track-tint-color: yellow; }}^UIButton.warning,UIView.warning ^UIButton{ title-color[state:highlighted]:#e3e3e3;}
或者你使用空格来限定stylesheet
$main-color =#e1e1e1MYCustomView background-color $main-color title-insets5,10,5,10>UIProgressView.tinted progress-tint-color black track-tint-color yellow^UIButton.warning,UIView.warning ^UIButtontitle-color[state:highlighted]#e3e3e3
默认样式
Classy在应用程序Bundle默认查找文件名为stylesheet.cas的样式文件。如果你采用这个文件名,你可以不用做任何东西就能加载样式文件。
但如果你想指定其他file path(样式文件名),你可以创建[CASStyler defaultStyler]
[CASStylerdefaultStyler].filePath = [[NSBundlemainBundle] pathForResource:@"myStyles.cas"ofType:nil];
如果你还想当发生错误时,获取错误信息以便于调试,可以使用-(void)setFilePath:error:
NSError*error =nil;NSStringfilePath = [[NSBundlemainBundle] pathForResource:@"myStyles.cas"ofType:nil];[[CASStylerdefaultStyler] setFilePath:filePath error:&error];
如果你是使用Storyboard/Xib组织UI界面,那就需要在main.m的int main(int argc, char * argv[])方法设置** filePath,这样可以确保在创建UIWindow之前加载stylesheet。否则(采用手写UI代码),你在AppDelegate.m的- (BOOL)application:didFinishLaunchingWithOptions:方法设置filePath**
Live Reload
Live Reload是实时显示编写UI代码效果的关键特性,它能够实时检查stylesheet文件变化,无需重新编译、构建和运行模拟器,从而极大提高开发速度。
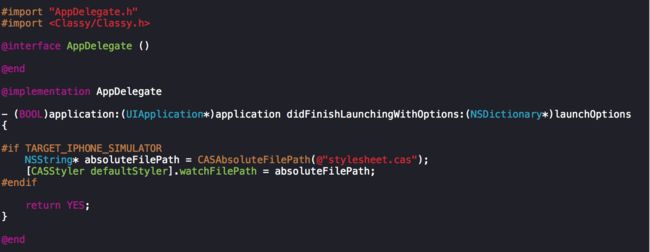
为了启用Live Reload,你需要指定stylesheet路径,并且只运行在模拟器上。
#if TARGET_IPHONE_SIMULATORNSString*absoluteFilePath =CASAbsoluteFilePath(@"../Styles/stylesheet.cas"); [CASStylerdefaultStyler].watchFilePath = absoluteFilePath;#endif
Selectors
Style Selectors是指定哪个view使用哪种样式的方式。主要有三种方法来指定目标view:
Object Class
View Hierarchy
Style Class
你可以混合使用三种方法,例子如下:
/* match views
* where class is UIButton or UIButton subclass
* and styleClass is "large"
* and superview class is UITabBar
*/UITabBar> ^UIButton.large { }
想了解具体如何使用,请查阅官网Selectors章节
为了避免与Objective-C的message selectors混淆,术语style selectors表示Classy stylesheets的selectors
Properties
Classy支持所有UIAppearance的属性和方法,也支持与UIAppearance无关的很多属性。Classy使用与UIKit相同属性命名,所以你不必考虑如何将style property映射到Objective-C的property。
UIPageControl类的属性如下:
@property(nonatomic,retain)UIColor*pageIndicatorTintColor;@property(nonatomic,retain)UIColor*currentPageIndicatorTintColor;
style property的名字采用与objective-c一样的名字
UIPageControl{ pageIndicatorTintColor black currentPageIndicatorTintColor purple}
style property的命名规则采用kebab case
UIPageControl{ page-indicator-tint-color black current-page-indicator-tint-color purple}
想了解具体如何使用,请查阅官网Properties章节
Keep it DRY(Don't Repeat Yourself)
在编程中一个很重要的原则就是避免重复,这不仅可以大量减少重复代码,并且使得代码更加容易复用和维护。Classy提供三种方式避免代码重复:grouping,nesting,variables
Grouping
如果有两个以上的style selectors共用相同的属性时
UISlider.info { minimum-track-tint-color black maximum-track-tint-color purple}UISlider.error { minimum-track-tint-color black maximum-track-tint-color purple thumb-tint-color red}
我们可以提取相同的属性到分组style selector中
UISlider.info,UISlider.error { minimum-track-tint-color black maximum-track-tint-color purple}UISlider.error { thumb-tint-color red}
Nesting
如果两个以上style selectors共用相同的view hierarchy时
UICollectionView{ background-color#a2a2a2}UICollectionView>UICollectionViewCell{ clips-to-boundsNO}UICollectionView>UICollectionViewCellUILabel{ text-color purple}UICollectionView>UICollectionViewCellUILabel.title { font20}
我们通过nesting方式将view hierarchies表达成这样方式
UICollectionView{ background-color#a2a2a2>UICollectionViewCell{ clips-to-boundsNOUILabel{ text-color purple &.title { font20} } }}
Variables
Classy让你通过定义variables来将多个相同的style property值存储以便共享。Variable命名规则如下:
必须以大小写字母或$符号开头
可以包含_,-或任何字母数字
// prefix with' $ 'tohelpdistinguish variables$brand-color =#e1e1e1// OR notinsets = 5, 10, 5, 10UIButton { background-color$brand-color contentEdgeInsets insets background-image[state:selected] bg_button insets}
最后官方还提供一个实例来解释具体如何使用:Custom Views Example
ClassyLiveLayout
ClassyLiveLayout通过结合Classy stylesheets与Masonry一起使用,能够在运行的模拟器中微调Auto Layout约束实时显示效果的工具。
ClassyLiveLayout一个核心category:UIView+ClassyLayoutProperties,在UIView定义以下属性:
@property(nonatomic,assign)UIEdgeInsetscas_margin;@property(nonatomic,assign)CGSizecas_size;// shorthand properties for setting only a single constant value@property(nonatomic,assign)CGFloatcas_sizeWidth;@property(nonatomic,assign)CGFloatcas_sizeHeight;@property(nonatomic,assign)CGFloatcas_marginTop;@property(nonatomic,assign)CGFloatcas_marginLeft;@property(nonatomic,assign)CGFloatcas_marginBottom;@property(nonatomic,assign)CGFloatcas_marginRight;
cas_margin和cas_size分别表示UI元素的位置和大小,而其余的属性都是对两个属性进一步细分。我们可以从stylesheets中访问style properties来定义constraints布局,做到将数据与代码分离,有利于修改和复用代码。
UIView.blue-box{cas_size:80100cas_margin-top:60cas_margin-left:50}UIView.red-box{cas_size-width:120cas_margin-left:20}
我们可以在updateConstraints或updateViewConstrains定义布局时引用style properties
- (void)updateViewConstraints { [superupdateViewConstraints]; [_blueBoxView mas_updateConstraints:^(MASConstraintMaker *make) { make.width.equalTo(@(_blueBoxView.cas_size.width)); make.height.equalTo(@(_blueBoxView.cas_size.height)); make.top.equalTo(@(_blueBoxView.cas_margin.top)); make.left.equalTo(@(_blueBoxView.cas_margin.left)); }]; [_redBoxView mas_updateConstraints:^(MASConstraintMaker *make) { make.width.equalTo(@(_redBoxView.cas_size.width)); make.height.equalTo(_blueBoxView); make.top.equalTo(_blueBoxView); make.left.equalTo(_blueBoxView.mas_right).with.offset(_redBoxView.cas_margin.left); }];}
当定义view layouts时,将Auto Layout的constraints都放在stylesheets中实时加载(Live reload)。如果你修改constraints,无需重新编译、构建和运行模拟器便能实时看到修改后的效果。
示例工程
配置工程
由于需要引用Masonry,Classy和ClassyLiveLayout,Podfile配置如下:
pod'Masonry','~> 0.6.1'pod'Classy','~> 0.2.4'pod'ClassyLiveLayout','~> 0.6.0'
编写代码
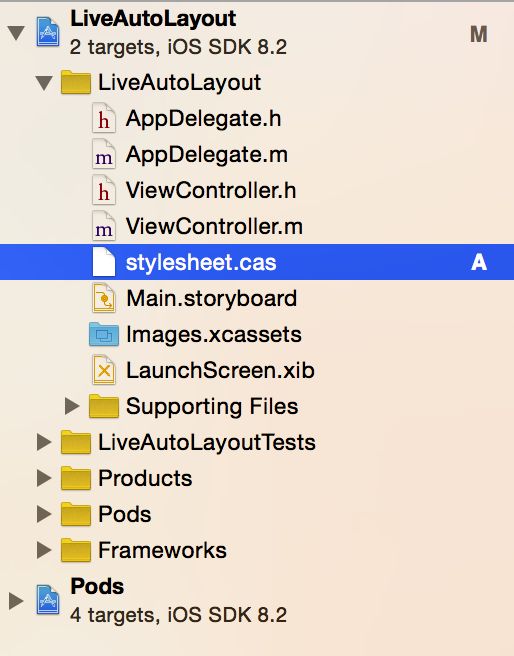
1. 添加stylesheet.cas文件到工程
当安装好Masonry,Classy和ClassyLiveLayout后,第一次运行项目会出现没有stylesheet.cas文件错误:
No stylesheet.cas file error.png
只要向工程添加空的stylesheet.cas文件即可。
Create stylesheet.cas file.png
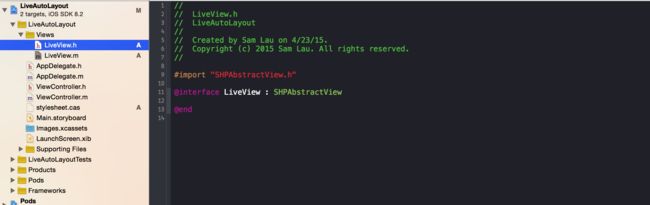
2. 创建LiveView类,该类继承SHPAbstractView。
Create LiveView inherit SHPAbstractView.png
在ViewController创建LiveView对象,然后被self.view引用。

Setup root view in ViewController.png
当编译运行时,在SHPAbstractView.h由于找不到UIView出现编译错误。
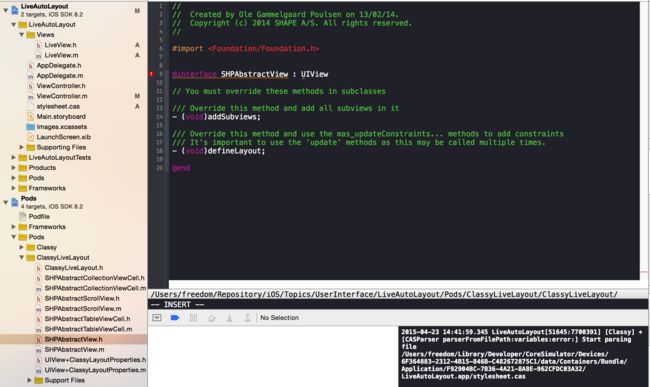
SHPAbstractView Compile error.png
只需引入UIKit便可以解决,但运行一下应用程序,出现一下错误:

Must override methods.png
主要原因是任何自定义UIView继承SHPAbstractView都需要override两个方法:- (void)addSubviews和- (void)defineLayout,我们可以查看SHPAbstractView的源码可知:
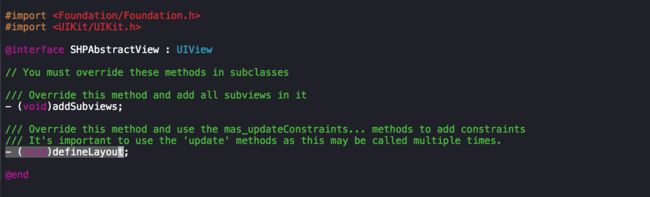
SHPAbstractView Source Code .png
所以只要在LiveView.m文件覆盖两个方法即可
#pragmamark - Add subviews anddefinelayout- (void)addSubviews{}- (void)defineLayout{}
3. LiveView类设计
LiveView主要由包含redBoxView和blueBoxView两个属性,redBoxView表示红色方块,blueBoxView表示蓝色方块。
#import"SHPAbstractView.h"@interfaceLiveView:SHPAbstractView@property(strong,nonatomic)UIView*redBoxView;@property(strong,nonatomic)UIView*blueBoxView;@end
4. LiveView类实现
由于SHPAbstractView类如何初始化View已经做了处理,暴露两个接口- (void)addSubviews和-(void)defineLayout分别处理构建view hierarchy和定义布局,子类只要覆盖SHPAbstractView这两个方法就可以创建LiveView了。
但是我们将Auto Layout的constraints都放在stylesheets中实时加载(Live reload),即放在本工程的stylesheet.cas文件,将布局数据和布局代码分离。
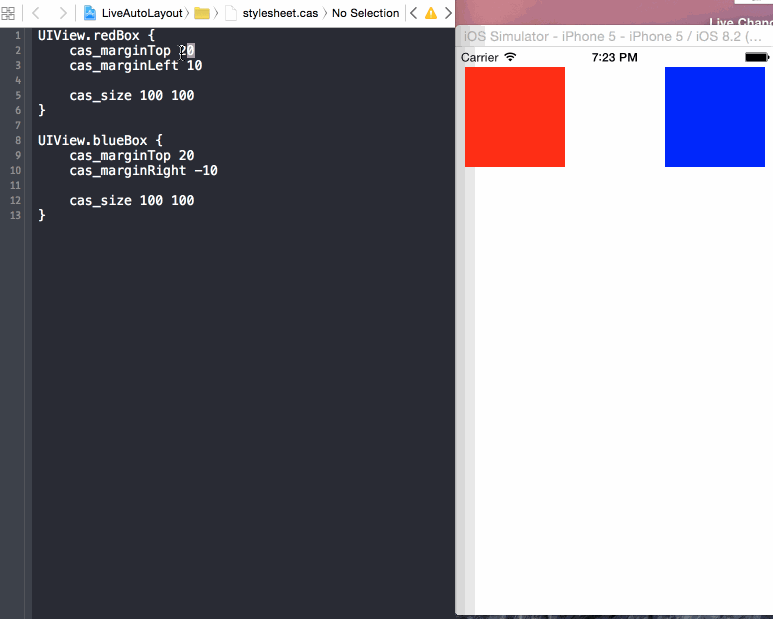
UIView.redBox { cas_marginTop50cas_marginLeft20cas_size100100}UIView.blueBox { cas_marginTop50cas_marginRight-20cas_size100100}
有了constraints数据后,便可以在代码布局:
@implementationLiveView#pragma mark - Add subviews and define layout- (void)addSubviews{self.backgroundColor = [UIColorwhiteColor]; [selfaddSubview:self.redBoxView]; [selfaddSubview:self.blueBoxView];}- (void)defineLayout{ [self.redBoxView mas_updateConstraints:^(MASConstraintMaker* make){ make.top.equalTo(@(self.redBoxView.cas_marginTop)); make.left.equalTo(@(self.redBoxView.cas_marginLeft)); make.width.equalTo(@(self.redBoxView.cas_sizeWidth)); make.height.equalTo(@(self.redBoxView.cas_sizeHeight)); }]; [self.blueBoxView mas_updateConstraints:^(MASConstraintMaker *make){ make.top.equalTo(@(self.blueBoxView.cas_marginTop)); make.right.equalTo(@(self.blueBoxView.cas_marginRight)); make.width.equalTo(@(self.blueBoxView.cas_sizeWidth)); make.height.equalTo(@(self.blueBoxView.cas_sizeHeight)); }];}#pragma mark - Lazy initialization- (UIView*)redBoxView{if(!_redBoxView) { _redBoxView = [UIViewnew]; _redBoxView.cas_styleClass =@"redBox"; _redBoxView.backgroundColor = [UIColorredColor]; }return_redBoxView;}- (UIView*)blueBoxView{if(!_blueBoxView) { _blueBoxView = [UIViewnew]; _blueBoxView.cas_styleClass =@"blueBox"; _blueBoxView.backgroundColor = [UIColorblueColor]; }return_blueBoxView;}
5. 模拟器支持Live Reload
为了启用Live Reload,你需要指定stylesheet路径,并且只运行在模拟器上。
Support Live Reload.png
此时效果:
Live Change.gif
6. 分离样式文件
由于有网友提出这样一个问题:如果所有view的样式都放在同一个stylesheet.cas文件,会让stylesheet.cas文件繁杂,并且当多个人协同开发时,不易于合并代码,所以有必要将样式文件分离到多个文件中。
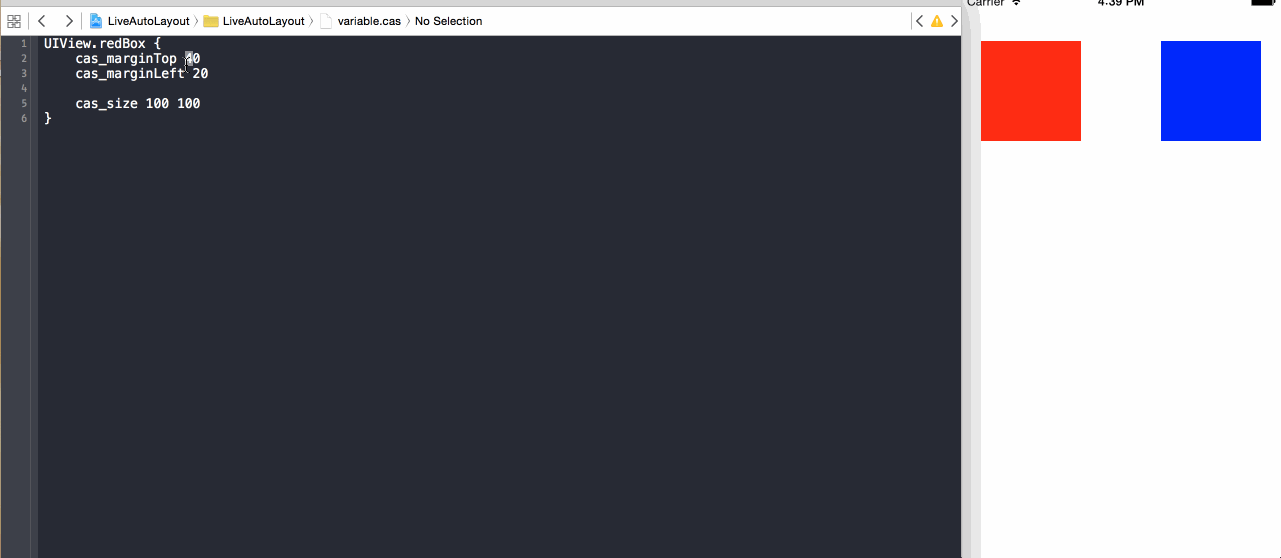
创建variable.cas文件,并将redBox对应UIView的样式放在variable.cas文件中。
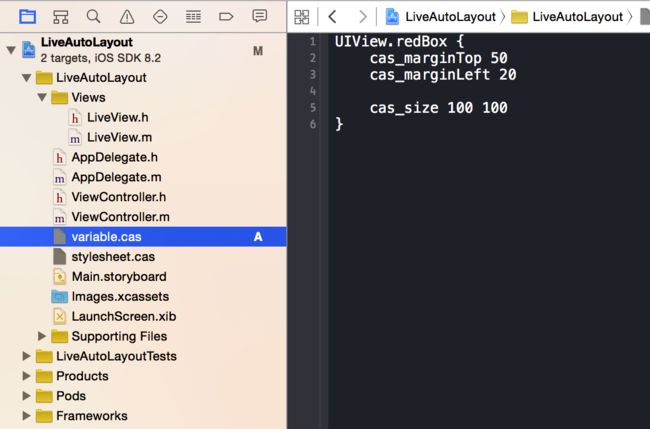
variable.cas file.png
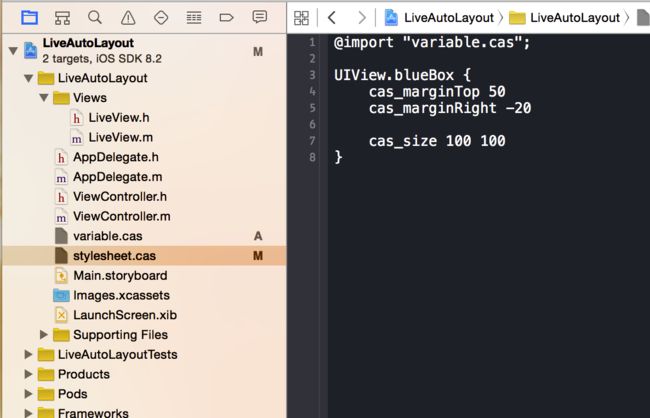
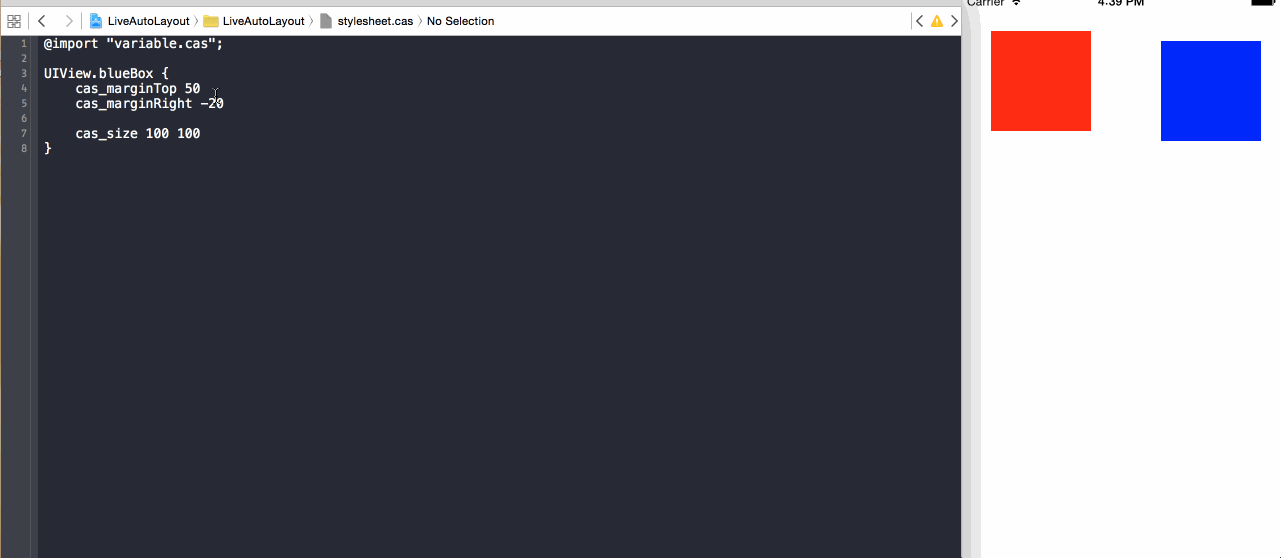
在stylesheet.cas样式文件使用@import指令引用variable.cas文件
stylesheet.cas file.png
最后效果
Live Change 1.gif
Live Change 2.gif
示例代码存放地址:LiveAutoLayout
总结
之前手写UI代码每次更改一般都要重新编译、构建和运行模拟器才能看到效果,但结合使用Masonry,Classy和ClassLiveLayout之后,告别这个费时过程,极大地提高开发速度;不仅如此,我们将Auto Layout的constraints都放在stylesheets中实时加载(Live reload),将布局数据和布局代码分离,使得代码更加复用和维护。Classy还提供三种避免重复方法:Grouping, Nestting和Variable,尽可能复用样式数据。
这是本人第一次编写技术博客,可能有很多错误和漏洞,希望大家多多指点,也希望这篇文章能够帮助到大家。
扩展阅读
Storyboard/XIB与手写代码的选择
代码手写UI,xib和StoryBoard间的博弈,以及Interface Builder的一些小技巧
iOS 开发中的争议(二)
Storyboard可视化开发
Adaptive Layout Tutorial: Getting Started
WWDC 2014 Session笔记 - 可视化开发,IB 的新时代
AutoLayout与Masonry
iOS 开发实践之 Auto Layout
深入理解Auto Layout 第一弹
Masonry介绍与使用实践
Auto Layout WWDC 视频集合
WWDC 2012: Introduction to Auto Layout for iOS and OS X
WWDC 2012: Best Practices for Mastering Auto Layout
WWDC 2012: Auto Layout by Example
WWDC 2013: Taking Control of Auto Layout in Xcode 5
作者:Sam_Lau
链接:https://www.jianshu.com/p/2ed5f7444900
來源:
著作权归作者所有。商业转载请联系作者获得授权,非商业转载请注明出处。