什么是webpack的require.context?
官网解释:
您可以使用require.context()函数创建自己的上下文。
它允许您传入一个目录进行搜索,一个标志表示是否也应该搜索子目录,以及一个正则表达式来匹配文件。
在构建时,webpack解析代码中的require.context()。
直接在项目中使用,我的webpack4+react的一个开源项目,很早之前写的移动端项目,大家有兴趣可以看看,给个Star。
gitHub地址:https://github.com/JinJieTan/react-webpack
并且这个项目还是带docker+gitHub+Travis CI的,教程在我之前写的这里:
前端工程师学Docker ? 看这篇就够了 【零基础入门;原创】
项目结构:
+ src
  + APP.jsx
  + pages
    + buy
      + index.jsx
    + home
      + index.jsx
    + person
      + index.jsx
    //...
  + index.js
//....我在src文件夹下的APP.jsx中使用webpack的require.context API
require.context('./pages', true, /\.jsx$/)require.context接受三个参数,官网解释:
It allows you to pass in a directory to search,
 a flag indicating whether subdirectories should be searched too,
  and a regular expression to match files against.
意思是:
它允许你通过一个目录进行搜索,flag指定是否搜索子目录,以及与文件匹配的正则表达式
也就是说 require.context 有三个参数:
- directory:说明需要检索的目录
- useSubdirectories:是否检索子目录
- regExp: 匹配文件的正则表达式
当我使用
require.context('./pages', true, /\.jsx$/)得到的打印返回值是:
ƒ webpackContext(req) {
  var id = webpackContextResolve(req);
  return __webpack_require__(id);
} ,"测试"
官网解释:
上下文模块导出一个(require)函数,该函数接受一个参数:请求。
导出的函数有3个属性:解析、键值、id。
resolve是一个函数,返回解析后的请求的模块id。
keys是一个函数,它返回上下文模块可以处理的所有可能请求的数组。
我按照官网示例演示,加入新的代码:
 const cache = {};

function importAll (r) {
  r.keys().forEach(key => cache[key] = r(key));
}

importAll(require.context('./pages', true, /\.jsx$/));

console.log(cache,'cache')
我得到一些模块信息:
大家可能会联想到路由结合的使用,放一个示例代码,之前我们在react中写声明式路由,集中化管理需要这样:
// rootRoute.js
const rootRoute = {
    childRoutes: [
        {
            path: '/',
            component: AppLayout,
            childRoutes: [
                require('./modules/shop/route'), //购买详情页
                require('./modules/order/route'), // 订单页
                require('./modules/login/route'), // 登录注册页
                require('./modules/service/route'), // 服务中心
                // ...
                // 其他大量新增路由
                // ...
            ]
        }
    ]
};
现在我们只需要这样,就可以实现去中心化路由管理
const rootRoute = {
    childRoutes: [
        {
            path: '/',
            component: AppLayout,
              childRoutes: (r => {
                  return r.keys().map(key => r(key));
            })(require.context('./', true, /^\.\/modules\/((?!\/)[\s\S])+\/route\.js$/))
        }
    ]
};
这里childRoutes是一个IIFE,立刻可以执行函数,传入require.context的结果,r就是初始值
修改之前的代码成这样:
const childRoutes = ((r) => {
  console.log(r.keys(), 'keys');
  return r.keys().map((key) => {
      console.log(key,'key',r(key))
    return r(key);
  });
})(require.context('./pages', true, /\.jsx$/));

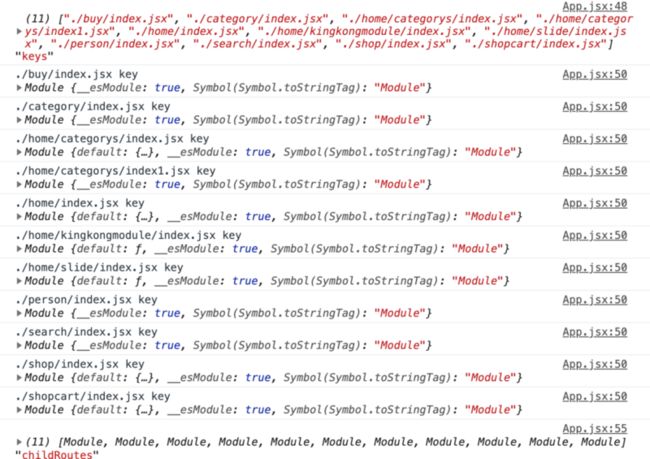
console.log(childRoutes, 'childRoutes');
看打印结果
这样每个childRoutes的子节点,就是个require进来的模块啦
优化后,新增一个业务模块,只要业务模块 route 文件遵循统一的目录结构。业务模块 route 就能被自动关联到 rootRoute 里。
如果感觉写得不错,记得点个赞,关注下:前端巅峰专栏和我的公众号


