Java 权限框架 Shiro 实战一:理论基础
Apache Shiro 官网地址:http://shiro.apache.org/
Apache Shiro is a powerful and easy-to-use Java security framework that performs authentication, authorization, cryptography, and session management. With Shiro’s easy-to-understand API, you can quickly and easily secure any application – from the smallest mobile applications to the largest web and enterprise applications.
shiro是一个强大而且简单易用的Java安全框架,主要功能有认证(就是登陆验证),授权(就是权限管理),加密(就是密码加密),session管理。适用于各种大型或者小型企业应用。和Spring Security比较而言,确实更加简单而且灵活易懂。
1. shiro中的重要概念
要理解shiro,先要理解框架的几个概念:
1) Subject: 代表当前登陆或者访问的用户;
2)Principals:一般指用户名等,唯一表明Subject身份也就是当前用户身份的东西;
3)Credentials:凭证,一般指密码,对当前登陆用户进行验证;
4)Realms:域,一般是指存储用户信息(用户名,密码,权限,角色)的数据库,也就是保存用户权限等信息的数据源;
5)SecurityManager:shiro安全管理的顶级对象。它集合或者说调用所有其它相关组件,负责所有安全和权限相关处理过程,就像一个中央集权政府;
2. shiro的子系统
上面我们说到shiro的主要功能有:认证,授权,加密,session管理等。而每一个主要功能对应于shiro的一个子系统:

下面正对每一个子系统分别介绍。
3. Authentication认证子系统
认证子系统,就是处理用户登录,验证用户登录。我们前面讲到Subject代表当前用户,而Principal和credential分别就代表用户名和密码。登录认证时,其实就是调用的 Subject.login(AuthenticationToken token)方法,AuthenticationToken是一个接口:
public interface AuthenticationToken extends Serializable {

    /**

     * Returns the account identity submitted during the authentication process.*/

    Object getPrincipal();

    /**

     * Returns the credentials submitted by the user during the authentication process that verifies

     * the submitted {@link #getPrincipal() account identity}.*/

    Object getCredentials();

}
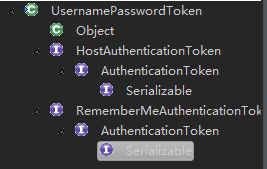
登录时就会分别调用它的实现类的 getPrincipal() 和 getCredentials() 来获得用户名(Principal:主体)和密码(Credentials:凭证)。一般实际中我们传给Subject.login()方法的是UsernamePasswordToken 类的对象,它实现了该接口:
一般我们new一个UsernamePasswordToken的对象:UsernamePasswordToken token = new UsernamePasswordToken("xxxusername", "xxxpassword");, 然后 subject.login(token); 就前去登录。相关代码一般如下:
    @RequestMapping(value="/loginController", method=RequestMethod.POST)

    public String login(String userName, String password, String rememberMe, String type, HttpServletRequest req) {

        String error = null;

        Subject subject = SecurityUtils.getSubject();

        UsernamePasswordToken token = new UsernamePasswordToken(userName, password);

        if(rememberMe != null && "true".equals(rememberMe))

            token.setRememberMe(true);    // 记住我

        try {

            subject.login(token);

        } catch (UnknownAccountException | IncorrectCredentialsException e1) {

            error = "用户名或密码错误";

        }catch(ExcessiveAttemptsException e){

            userService.lockAccountByNo(no);     // 锁定账户

            error = "超过了尝试登录的次数,您的账户已经被锁定。";

        }catch (AuthenticationException e) {    // 其他错误

            if(e.getMessage() != null)

                error = "发生错误:" + e.getMessage();

            else

                error = "发生错误,无法登录。";

        }
        // .. ...
Authentication 子系统会将password加密,然后使用username和加密之后的password和从Realm(一般是数据库)中根据usename获得的密码进行比较,相同就登录成功,不相同同就登录失败,或者用户名不存在也登录失败。就怎么简单。当然从Realm中根据用户名查找用户的过程是需要我们自己编码实现的。该功能的实现,shiro提供了抽象类 AuthenticatingRealm 专门用于从Realm中获得认证信息。所以我们可以继承 抽象类 AuthenticatingRealm,然后实现其中的抽象方法:
/**

 * A top-level abstract implementation of the Realm interface that only implements authentication support

 * (log-in) operations and leaves authorization (access control) behavior to subclasses.

 */

public abstract class AuthenticatingRealm extends CachingRealm implements Initializable {

    //TODO - complete JavaDoc

    private static final Logger log = LoggerFactory.getLogger(AuthenticatingRealm.class);


    // ... ...


    /**

     * Retrieves authentication data from an implementation-specific datasource (RDBMS, LDAP, etc) for the given

     * authentication token.

     * <p/>

     * For most datasources, this means just 'pulling' authentication data for an associated subject/user and nothing

     * more and letting Shiro do the rest.  But in some systems, this method could actually perform EIS specific

     * log-in logic in addition to just retrieving data - it is up to the Realm implementation.*/

    protected abstract AuthenticationInfo doGetAuthenticationInfo(AuthenticationToken token) throws AuthenticationException;
我们只要实现 protected abstract AuthenticationInfo doGetAuthenticationInfo(AuthenticationToken token) 方法就可以了,其它的shiro会回调该方法,进行登录认证。而实现该方法就是直接从数据源中根据 AuthenticationToken 获得数据就行了。
除了这种方法之外,其实我们也可以使用 AuthenticatingRealm 的子类 AuthorizingRealm,它本来是用于权限认证的Realm,但是因为他继承了 AuthenticatingRealm,所以实际上我们只要继承 AuthorizingRealm,然后实现它的抽象方法就行了。同时搞定 登录认证 和 权限认证(访问控制):
public class UserRealm extends AuthorizingRealm {

    @Autowired

    private UserService userService;


    @Override

    protected AuthorizationInfo doGetAuthorizationInfo(PrincipalCollection principals) {

        String userName = (String)principals.getPrimaryPrincipal();

        User user = userService.getUserByName(userName);

        SimpleAuthorizationInfo authorizationInfo = new SimpleAuthorizationInfo();

        authorizationInfo.setRoles(userService.findRolesByUserId(user.getId()));

        authorizationInfo.setStringPermissions(userService.findPermissionsByUserId(user.getId()));

        return authorizationInfo;

    }

    @Override

    protected AuthenticationInfo doGetAuthenticationInfo(AuthenticationToken token) throws AuthenticationException {

        String userName= (String)token.getPrincipal();

        User user = userService.getUserByName(userName);

        if(user == null) {

            throw new UnknownAccountException();//没找到账户

        }

        if(user.getLocked() == 0) {

            throw new LockedAccountException(); //帐号锁定

        }

        if(user.getLocked() == 2){

            throw new AuthenticationException("account was inactive");

        }


        SimpleAuthenticationInfo authenticationInfo = new SimpleAuthenticationInfo(

                user.getUserName(), // 用户名

                user.getPassword(), // 密码

                ByteSource.Util.bytes(user.getCredentialsSalt()),    // salt

                getName()  // realm name

        );

        return authenticationInfo;

    }

    @Override

    public void clearCachedAuthorizationInfo(PrincipalCollection principals) {

        super.clearCachedAuthorizationInfo(principals);

    }

    @Override

    public void clearCachedAuthenticationInfo(PrincipalCollection principals) {

        super.clearCachedAuthenticationInfo(principals);

    }

    @Override

    public void clearCache(PrincipalCollection principals) {

        super.clearCache(principals);

    }

    public void clearAllCachedAuthorizationInfo() {

        getAuthorizationCache().clear();

    }

    public void clearAllCachedAuthenticationInfo() {

        getAuthenticationCache().clear();

    }

    public void clearAllCache() {

        clearAllCachedAuthenticationInfo();

        clearAllCachedAuthorizationInfo();

    }

}
上面的 doGetAuthorizationInfo 方法,会在权限认证也就是访问控制时,被回调,而 doGetAuthenticationInfo 方法会在登录认证时被回调,返回的 AuthenticationInfo类型的对象,会和用户登录时输入的 用户名和密码(加密之后的)进行比较,相同则登录成功,反之则登录失败。
其实还有更加简单的方法,因为shiro提供了实现了 AuthorizingRealm 中的抽象方法的子类:

比如在数据库环境中,我们就可以直接使用 JdbcRealm,一是可以配置它的相关SQL语句,二是继承它,覆盖它的方法。CasRealm用户单点登录环境。
/**

 * Realm that allows authentication and authorization via JDBC calls.  The default queries suggest a potential schema

 * for retrieving the user's password for authentication, and querying for a user's roles and permissions.  The

 * default queries can be overridden by setting the query properties of the realm.

 * <p/>

 * If the default implementation

 * of authentication and authorization cannot handle your schema, this class can be subclassed and the

 * appropriate methods overridden. (usually {@link #doGetAuthenticationInfo(org.apache.shiro.authc.AuthenticationToken)},

 * {@link #getRoleNamesForUser(java.sql.Connection,String)}, and/or {@link #getPermissions(java.sql.Connection,String,java.util.Collection)}

 * <p/>

 * This realm supports caching by extending from {@link org.apache.shiro.realm.AuthorizingRealm}.*/

public class JdbcRealm extends AuthorizingRealm {

    //TODO - complete JavaDoc

    /*--------------------------------------------

    |             C O N S T A N T S             |

    ============================================*/

    /**

     * The default query used to retrieve account data for the user.

     */

    protected static final String DEFAULT_AUTHENTICATION_QUERY = "select password from users where username = ?";

    /**

     * The default query used to retrieve account data for the user when {@link #saltStyle} is COLUMN.

     */

    protected static final String DEFAULT_SALTED_AUTHENTICATION_QUERY = "select password, password_salt from users where username = ?/**

     * The default query used to retrieve the roles that apply to a user.

     */

    protected static final String DEFAULT_USER_ROLES_QUERY = "select role_name from user_roles where username = ?";

    /**

     * The default query used to retrieve permissions that apply to a particular role.

     */

    protected static final String DEFAULT_PERMISSIONS_QUERY = "select permission from roles_permissions where role_name = ?";

    private static final Logger log = LoggerFactory.getLogger(JdbcRealm.class);

    /**

     * Password hash salt configuration. <ul>

     *   <li>NO_SALT - password hashes are not salted.</li>

     *   <li>CRYPT - password hashes are stored in unix crypt format.</li>

     *   <li>COLUMN - salt is in a separate column in the database.</li>

     *   <li>EXTERNAL - salt is not stored in the database. {@link #getSaltForUser(String)} will be called

     *       to get the salt</li></ul>

     */

    public enum SaltStyle {NO_SALT, CRYPT, COLUMN, EXTERNAL};

    /*--------------------------------------------

    |    I N S T A N C E   V A R I A B L E S    |

    ============================================*/

    protected DataSource dataSource;

    protected String authenticationQuery = DEFAULT_AUTHENTICATION_QUERY;

    protected String userRolesQuery = DEFAULT_USER_ROLES_QUERY;

    protected String permissionsQuery = DEFAULT_PERMISSIONS_QUERY;

    protected boolean permissionsLookupEnabled = false;

    protected SaltStyle saltStyle = SaltStyle.NO_SALT;
我们可以对上面给出的sql语句进行配置,修改成对应于我们数据库中表的sql语句,也可以继承该类,然后覆盖doGetAuthenticationInfo, getRoleNamesForUser(), getPermissions()三个方法。
4. Authorization 授权子系统(访问控制)
上一节中我们已经介绍了如何获得用户所拥有的权限,在需要判断用户是否有某权限或者角色时,会自动回调方法 doGetAuthorizationInfo 来获得用户的角色和权限,我们只需要在 该方法中从Realm也就是数据库表中获得相关信息。我们先看一下shiro是如何表示角色和权限的,这一点比较重要:
    protected AuthorizationInfo doGetAuthorizationInfo(PrincipalCollection principals) {

        String no = (String)principals.getPrimaryPrincipal();

        User user = userService.getUserByNo(no);

        SimpleAuthorizationInfo authorizationInfo = new SimpleAuthorizationInfo();

        authorizationInfo.setRoles(userService.findRolesByUserId(user.getId()));

        authorizationInfo.setStringPermissions(userService.findPermissionsByUserId(user.getId()));

        return authorizationInfo;

    }
我们看到 doGetAuthorizationInfo 方法中使用了 SimpleAuthorizationInfo 类封装 Role 和 Permission.
/**

 * Simple POJO implementation of the {@link AuthorizationInfo} interface that stores roles and permissions as internal

 * attributes.

 * @see org.apache.shiro.realm.AuthorizingRealm

 * @since 0.9

 */

public class SimpleAuthorizationInfo implements AuthorizationInfo {

    /**

     * The internal roles collection.

     */

    protected Set<String> roles;

    /**

     * Collection of all string-based permissions associated with the account.

     */

    protected Set<String> stringPermissions;

    /**

     * Collection of all object-based permissions associaed with the account.

     */

    protected Set<Permission> objectPermissions;

    /**

     * Default no-argument constructor.

     */

    public SimpleAuthorizationInfo() {

    }
我们看到,roles 和 stringPermissions 都是 String 类型的 Set, 也就是说,它们都是使用字符串来表示你拥有某个角色或者拥有某个权限的。
1) 两种访问控制方式:
SimpleAuthorizationInfo 封装了角色和权限,其实这也说明了实现“访问控制”两种方式:一是 “基于角色的访问控制”;而是“基于资源的访问控制”。所谓的访问控制,是指对于某个资源,当前用户是否有访问的权限。基于角色的访问控制是一种比较粗粒度的访问控制方式,只要你具有了某个或某几个角色,那么你就可以访问某资源。而基于资源的访问控制,是判断你针对该资源是否有某权限,有才能访问,粒度更细,你是否有某权限,可以根据你有哪些角色,然后改角色有哪些权限来判断的,当然也可以不引入角色的概念,直接判断你是否拥有某些权限。当然两种访问方式可以单独使用,也可以混合使用。比如对于比较简单的权限控制,你可以仅仅只使用基于角色的访问控制,仅仅引入角色表,不需要权限表都可以。混合使用是指,你可以同时要求用户具有某角色并且具有某些权限,才能访问某资源。所以shiro的权限控制时极其灵活的(当然也可以不引入角色表,仅仅引入权限表)。
2)权限的字符串表示方式
上面说到 角色 和 权限 都是使用字符串来表示的,其实 shiro 提供了一套比较强大有点复杂的权限字符串表示格式(分为:分割的三个部分):
“资源:操作:对象实例ID” 表示:对那个资源的哪个实例可以进行哪些操作,支持通配符。
多个操作需要使用 “,” 逗号分割,而 “*” 放在三个位置上,分别表示:任意资源,任意操作,任意实例。
比如:"user:delete:1" 就表示 对user表的id等于1对应的数据或者对象,可以进行删除操作。其实资源表现实现可以是对象,其实最终是对应到数据库表中的记录。
在比如:"user:update,delete" 就表示 对user表(的任意实例)进行更新和删除操作。"user:update,delete" 其实就等价于 “user:update,delete:*”
所以 shiro 的访问控制可以控制到具体实例,或者说具体哪条数据库记录,也可以在表级别控制。如果省略掉 对象实例ID部分,就是在表级别控制。
3)权限相关表的设计
1> 如果对于简单的情况,可以只使用“基于角色的访问控制”粗粒度方式,不涉及到权限,仅仅只通过判断是否有某角色来判断访问控制,那么就只需要增加一个角色表(roles) 和 一个角色(roles)和用户(user)的多对多的一个中间表——用户角色表(user_role)。
2> 如果仅仅使用权限来控制访问,那么就可以仅仅只增加一个权限表(priv)和一个用户和权限的多对多的一个中间表——用户权限表(user_priv).
3> 如果既要用到角色,又要用到权限(权限根据角色推算出来),那么就要增加:角色表,用户角色表,权限表,角色权限表。
4> 其实还有一种情况:就是角色和权限没有关系,那么就可以增加:角色表,用户角色表,权限表,用户权限表。不过这种方式不同符合常规。
5. Cryptography 加密子系统
shiro提供了很完备而且十分易用的加密解密功能。该子系统分为两个部分:一是基于hash的单向加密算法;二是基于经典加密解密算法,密码是可以解密的出明文的;一般而言,对于登录用户的密码的加密都是采用单向的hash加密算法,因为如果密码可以被解密的话,一旦数据库被攻破了,那么所有用户的密码就都可以被解密成明文;但是单向的hash加密算法,没有这样的风险。单向的hash加密算法,就算你获得了数据库的中保存的密码密文,知道了密文对应的salt,甚至知道了使用的是什么hash算法,你都无法反向推算出密码的明文!因为hash是单向的,它没有对应的反向推算算法(也就是没有解密方法)。那么知道了密文,你是无法反推出密码明文的。这也是单向hash加密算法的妙处。
1)单向hash加密算法
shiro提供的单向hash加密算法的相关工具类如下:
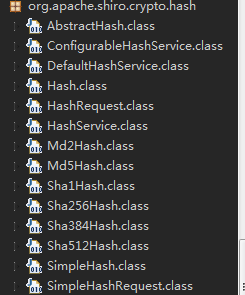
我们看到提供了 Md2, Md5, Sha1, Sha256, Sha384, Sha512 等等的hash算法。一般而言Md2/Md5系列的算法已经被证实安全性存在不足。所以一般使用Sha系列的算法。其实看下源码的话,就知道上面所有的hash算法都是继承与 SimpleHash 类,SimpleHash 才是真正的实现者,而其他的比如 Sha256Hash 不过是传入本算法需要的参数,然后调用了 SimpleHash 中hash加密算法而已,看下源码:
public class Sha256Hash extends SimpleHash {

    public static final String ALGORITHM_NAME = "SHA-256";

    public Sha256Hash() {

        super(ALGORITHM_NAME);

    }

    public Sha256Hash(Object source) {

        super(ALGORITHM_NAME, source);

    }

    public Sha256Hash(Object source, Object salt) {

        super(ALGORITHM_NAME, source, salt);

    }

    public Sha256Hash(Object source, Object salt, int hashIterations) {

        super(ALGORITHM_NAME, source, salt, hashIterations);

    }

    public static Sha256Hash fromHexString(String hex) {

        Sha256Hash hash = new Sha256Hash();

        hash.setBytes(Hex.decode(hex));

        return hash;

    }

    public static Sha256Hash fromBase64String(String base64) {

        Sha256Hash hash = new Sha256Hash();

        hash.setBytes(Base64.decode(base64));

        return hash;

    }

}
我们看到都是使用 super() 调用父类的方法。根据上面截图中提高的相关类,可以有三种方法来实现密码锁需要的hash加密过程:
1> 直接使用 Sha256Hash/Md5Hash 等类,比如:
String sha256 = new Sha256Hash("admin", "11d23ccf28fc1e8cbab8fea97f101fc1d", 2).toString();
根据Sha256Hash的构造函数,"admin" 为需要加密的密码明文,"11d23ccf28fc1e8cbab8fea97f101fc1d" 为加密需要的salt, 2 是迭代次数,也就是hash次数。最后调用 .toString() 就获得了密文。很简单。
2> 使用 Sha256Hash/Md5Hash 等类 父类 SimpleHash ,比如:
sha1 = new SimpleHash("sha-256", "admin", "11d23ccf28fc1e8cbab8fea97f101fc1d", 2).toString();
看到,我们传入了hash算法的名称 "sha-256", 剩下的参数和 Sha256Hash 的一样。
3> 使用 DefaultHashService 和 HashRequest 二者结合来加密:
        DefaultHashService hashService = new DefaultHashService();

//        hashService.setHashAlgorithmName("SHA-256");

//        hashService.setPrivateSalt(new SimpleByteSource("123"));

//        hashService.setGeneratePublicSalt(false);

//        hashService.setRandomNumberGenerator(new SecureRandomNumberGenerator());

//        hashService.setHashIterations(2); //


        HashRequest hashRequest = new HashRequest.Builder()

        .setSource(ByteSource.Util.bytes("admin112358"))

        .setSalt("11d23ccf28fc1e8cbab8fea97f101fc1d")

        .setAlgorithmName("SHA-256")

        .setIterations(2).build();

        System.out.println(hashService.computeHash(hashRequest).toHex());
我们看到 HashRequest 类专门提供各种加密需要的参数,密码明文,salt, hash算法,迭代次数。这里有个坑,不要调用DefaultHashService的方法来设置各种加密需要的参数(特别是salt相关的参数),而使用专门的类 HashRequest来提供各种参数,因为使用 DefaultHashService 你是无法设置对 salt 的,也无法获得 salt ,而最终我们是需要将 salt 存放入数据库的,DefaultHashService只能设置 privateSalt, 它hash时最终使用的salt是privateSlat 和 自动生成的 publicSalt,二者合成得到的,合成的结果并没有提供方法来使我们获得它。另外DefaultHashService有一个坑:如果你调用方法hashService.setPrivateSalt(new SimpleByteSource("123"));设置了privateSalt, 即使你调用了hashService.setGeneratePublicSalt(false);方法,它还是会随机生成publicSalt的。另外 HashRequest 中提供的参数会覆盖DefaultHashService设置的相应参数。
相比较而言,肯定是直接使用 Sha256Hash/Md5Hash 等类来得最简单而直接。
2)双向经典加密/解密算法
主要提供了 AES 和 Blowfish两种加密解密算法。
1> AES:
        AesCipherService aesCipherService = new AesCipherService();

        aesCipherService.setKeySize(128); // 设置key长度

        // 生成key

        Key key = aesCipherService.generateNewKey();
        // 加密

        String encrptText = aesCipherService.encrypt(text.getBytes(), key.getEncoded()).toHex();

        // 解密

        String text2 = new String(aesCipherService.decrypt(Hex.decode(encrptText), key.getEncoded()).getBytes());

        System.out.println(text2.equals(text));
Key 表示 秘钥,就相当于 Hash 算法中的 salt,秘钥不同,最终的密文也就不同。不同的是解密时是需要使用加密时相同的秘钥才能解密成功。
2> Blowfish:
        BlowfishCipherService blowfishService = new BlowfishCipherService();

        blowfishService.setKeySize(128);

        Key bKey = blowfishService.generateNewKey();

        String encrpt = blowfishService.encrypt("admin".getBytes(), bKey.getEncoded()).toHex();

        String dec = new String(blowfishService.decrypt(Hex.decode(encrpt), bKey.getEncoded()).getBytes());

        System.out.println("admin".equals(dec));
3> 使用 DefaultBlockCipherService 实现加密解密:
        //使用Java的JCA(javax.crypto.Cipher)加密API,常见的如 AES, Blowfish

        DefaultBlockCipherService cipherService = new DefaultBlockCipherService("AES");

        cipherService.setKeySize(128);

        //生成key

        bKey = cipherService.generateNewKey();

        text = "admin";

        //加密

        encrptText = cipherService.encrypt(text.getBytes(), key.getEncoded()).toHex();

        //解密

        text2 = new String(cipherService.decrypt(Hex.decode(encrptText), key.getEncoded()).getBytes());

        System.out.println(text.equals(text2));
DefaultBlockCipherService(BlockCipher)是分组加密的意思,分组是指加密的过程是先进行分组,然后加密。AES 和 Blowfish都是分组加密算法。
3) 密码加密和密码验证
注册时一般涉及到密码加密,登录时涉及到密码验证。通过上面介绍的 加密算法,完全可以自己实现密码加密和密码验证。但是其实shiro也提供了相应的类:
DefaultPasswordService 和 HashedCredentialsMatcher。虽然提供了,其实 DefaultPasswordService 卵用都没有,因为他没有提供获取或者设置 salt 的方法,而 salt 是我们需要存入数据库的。所以密码加密我们是不使用 DefaultPasswordService 的,而是根据前面的介绍自己写。至于密码验证我们应该继承 HashedCredentialsMatcher,然后重写它的 doCredentialsMatch() 方法即可:
public class RetryLimitHashedCredentialsMatcher extends HashedCredentialsMatcher {

    private Cache<String, AtomicInteger> passwordRetryCache;

    public RetryLimitHashedCredentialsMatcher(CacheManager cacheManager) {

        passwordRetryCache = cacheManager.getCache("passwordRetryCache");

    }

    @Override

    public boolean doCredentialsMatch(AuthenticationToken token, AuthenticationInfo info) {

        String username = (String)token.getPrincipal();

        AtomicInteger retryCount = passwordRetryCache.get(username);

        if(retryCount == null) {

            retryCount = new AtomicInteger(0);

            passwordRetryCache.put(username, retryCount);

        }

        if(retryCount.incrementAndGet() > 5) {

            throw new ExcessiveAttemptsException("超过了尝试登录的次数,您的账户已经被锁定。");

        }

        boolean matches = super.doCredentialsMatch(token, info);

        if(matches) {

            passwordRetryCache.remove(username);

        }

        return matches;

    }

}
super.doCredentialsMatch(token, info)调用了父类的方法:
    public boolean doCredentialsMatch(AuthenticationToken token, AuthenticationInfo info) {

        Object tokenHashedCredentials = hashProvidedCredentials(token, info);

        Object accountCredentials = getCredentials(info);

        return equals(tokenHashedCredentials, accountCredentials);

    }
    protected Object hashProvidedCredentials(AuthenticationToken token, AuthenticationInfo info) {

        Object salt = null;

        if (info instanceof SaltedAuthenticationInfo) {

            salt = ((SaltedAuthenticationInfo) info).getCredentialsSalt();

        } else {

            //retain 1.0 backwards compatibility:

            if (isHashSalted()) {

                salt = getSalt(token);

            }

        }

        return hashProvidedCredentials(token.getCredentials(), salt, getHashIterations());

    }
我们看到 AuthenticationToken token 加密时需要的 salt 来自于 AuthenticationInfo info:
salt = ((SaltedAuthenticationInfo) info).getCredentialsSalt();
AuthenticationToken token 是登录时页面传过来的用户名,明文密码等参数,AuthenticationInfo info却是从数据库中获得的用户名密码密文,salt等参数。equals(tokenHashedCredentials, accountCredentials); 验证: 明文密码使用相同的salt加密之后,获得的密文是否和数据库中的密码密文一致。一致,则密码验证通过。
6. Session Management会话管理子系统
shiro中session的最大不同时,它可以使用再非web环境中。对于JavaSE的环境也可以使用session的功能,因为他实现了一套不依赖于web容器的session机制。shiro提供了三个默认的实现:
1> DefaultSessionManager: DefaultSecurityManager使用的默认实现,用于JavaSE环境;
2> ServletContainerSessionManager: DefaultWebSecurityManager使用的默认实现,用于web环境,其直接使用Servlet容器的会话;
3> DefaultWebSessionManager: 用于web环境的实现,可以替代ServletContainerSessionManager,自己维护会话,直接替代Servlet容器的会话管理;
在web环境中默认使用的是 ServletContainerSessionManager,其使用的就是Servlet容器的会话,这一点,我们可以从它的源码中可以看出来:
public class ServletContainerSessionManager implements WebSessionManager {
//TODO - read session timeout value from web.xml

    public ServletContainerSessionManager() {

    }

    public Session start(SessionContext context) throws AuthorizationException {

        return createSession(context);

    }

    public Session getSession(SessionKey key) throws SessionException {

        if (!WebUtils.isHttp(key)) {

            String msg = "SessionKey must be an HTTP compatible implementation.";

            throw new IllegalArgumentException(msg);

        }

        HttpServletRequest request = WebUtils.getHttpRequest(key);

        Session session = null;

        HttpSession httpSession = request.getSession(false);

        if (httpSession != null) {

            session = createSession(httpSession, request.getRemoteHost());

        }

        return session;

    }

    protected Session createSession(SessionContext sessionContext) throws AuthorizationException {

        if (!WebUtils.isHttp(sessionContext)) {

            String msg = "SessionContext must be an HTTP compatible implementation.";

            throw new IllegalArgumentException(msg);

        }

        HttpServletRequest request = WebUtils.getHttpRequest(sessionContext);

        HttpSession httpSession = request.getSession();

        //SHIRO-240: DO NOT use the 'globalSessionTimeout' value here on the acquired session.

        //see: https://issues.apache.org/jira/browse/SHIRO-240

        String host = getHost(sessionContext);

        return createSession(httpSession, host);

    }

    public boolean isServletContainerSessions() {

        return true;

    }

}
DefaultWebSecurityManager默认使用的是ServletContainerSessionManager:
/**

 * Default {@link WebSecurityManager WebSecurityManager} implementation used in web-based applications or any

 * application that requires HTTP connectivity (SOAP, http remoting, etc).

 * @since 0.2

 */

public class DefaultWebSecurityManager extends DefaultSecurityManager implements WebSecurityManager {

    //TODO - complete JavaDoc

    private static final Logger log = LoggerFactory.getLogger(DefaultWebSecurityManager.class);

    @Deprecated

    public static final String HTTP_SESSION_MODE = "http";

    @Deprecated

    public static final String NATIVE_SESSION_MODE = "native";

    /**

     * @deprecated as of 1.2.  This should NOT be used for anything other than determining if the sessionMode has changed.

     */

    @Deprecated

    private String sessionMode;

    public DefaultWebSecurityManager() {

        super();

        ((DefaultSubjectDAO) this.subjectDAO).setSessionStorageEvaluator(new DefaultWebSessionStorageEvaluator());

        this.sessionMode = HTTP_SESSION_MODE;

        setSubjectFactory(new DefaultWebSubjectFactory());

        setRememberMeManager(new CookieRememberMeManager());

        setSessionManager(new ServletContainerSessionManager());

    }
从 setSessionManager(new ServletContainerSessionManager()); 看到答案。