HOW TO: Synchronize changes when completing a P2V or V2V with VMware vCenter Converter Standalone 5.1
http://ituda.com/vmware-p2v-converter-best-practices/
HOW TO: Synchronize changes when completing a P2V or V2V with VMware vCenter Converter Standalone 5.1
OR
"Poor Man's Replication of a Physical or Virtual machine to a VMware vSphere Hypervisor Host (ESXi) for FREE"
I have already written three Experts Exchange articles on the use of VMware vCenter Converter Standalone 5.x. If you have missed these articles, they are listed here for your convenience.
HOW TO: P2V, V2V for FREE - VMware vCenter Converter Standalone 5.1
HOW TO: P2V, V2V for FREE - VMware vCenter Converter Standalone 5.0
HOW TO: Improve the transfer rate of a Physical to Virtual (P2V), Virtual to Virtual Conversion (V2V) using VMware vCenter Converter Standalone 5.0
VMware vCenter Converter Standalone primary function is to create physical to virtual copies or conversions of physical computers, we often abbreviate this to P2V. VMware vCenter Converter Standalone can also be used on computers that have already been converted to virtual computers, or virtual computers that already exist in a "Cloud Space", so we can create copies or conversions of an existing virtual computer, we often abbreviate this to V2V
VMware vCenter Converter Standalone is an excellent FREE software tool for creating P2Vs or V2Vs, but there is another often "hidden function" which is rarely used by VMware Administrators. The function is called Synchronize. This function can be used to Synchronize changes between a physical or virtual computer, which has already been P2Ved (V2Ved) to another virtual machine on another VMware vSphere Hypervisor (ESXi) host. The same function can be used, to help unattended "cut over times" when completing a P2V (V2V) in Production, you could create the original P2V (V2V) at 9.00am, and then using synchronize, finally sync all changes made during the day, and "cut over" to the virtual machine out of hours, at 23.00pm.
Some of our clients use this software and function, as a free alternative to replication to a second DR site and ESXi host. The ESXi host could be using the FREE VMware vSphere Hypervisor.
see my other Expert Exchange articles here
HOW TO: Install and Configure VMware vSphere Hypervisor 5.1 (ESXi 5.1)
HOW TO: Connect to the VMware vSphere Hypervisor 5.1 (ESXi 5.1) using the vSphere Client
In this article, I'll show you HOW TO: Synchronize changes when completing a P2V or V2V with VMware vCenter Converter Standalone 5.1. In the example below I'll be using a virtual machine, creating a V2V and then synchronizing additional changes made to the source virtual machine to the destination VM (our DR copy).
- 1
-
Install VMware vCenter Converter Standalone 5.1
Install VMware vCenter Converter Standalone 5.1 on the computer to be synchronized. In this example, I will be installing VMware vCenter Converter Standalone 5.1 on the virtual machine.
- VMware vCenter Converter Standalone 5.1 - Installing
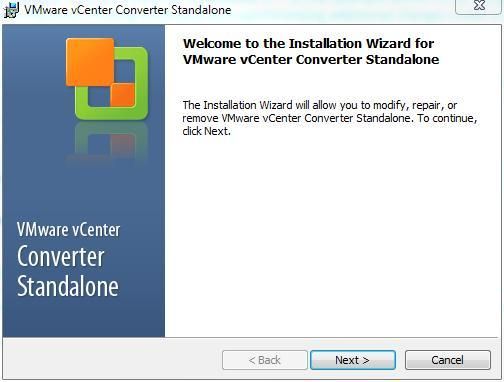
It is a very easy installation, click Next and follow the wizard, agreeing to the terms of the license agreement, select the default installation folder, and select Local installation
- VMware vCenter Converter Standalone 5.1 - Local Installation
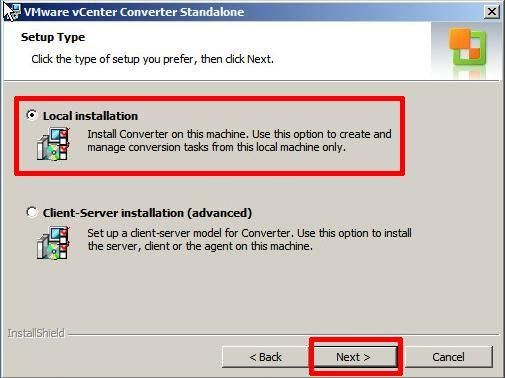
Click Next, and follow the installation wizard to the end, and Click Finish.
- VMware vCenter Converter Standalone 5.1 - Finish
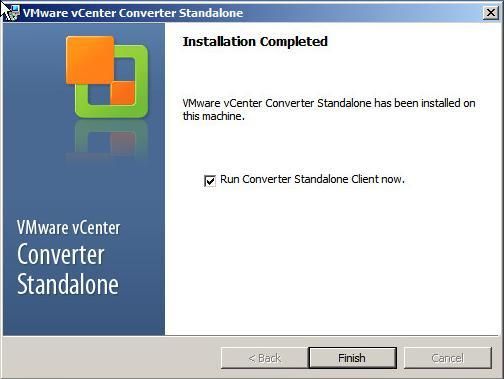
If you left the Tick in the Box for Run Converter Standalone Client now. VMware vCenter Converter Standalone will start, otherwise you will need to click the icon on your desktop.
- 2
-
Creating a P2V (V2V in this example) for synchronization
- VMware vCenter Converter Standalone 5.1 - Welcome Screen
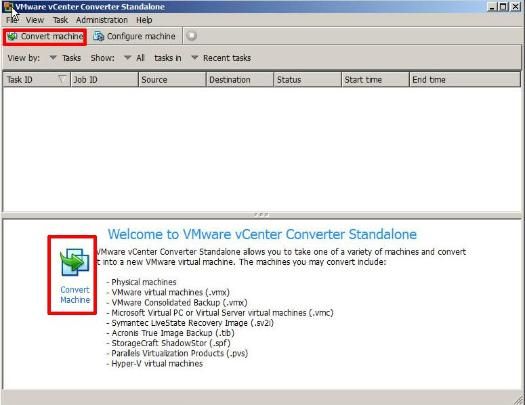
At the Welcome to VMware vCenter Converter Standalone, welcome screen click theConvert machine button. (This machine could be a physical or virtual machine, VMware vCenter Converter Standalone does not care what machine type it is.)
- VMware vCenter Converter Standalone 5.1 - Convert Machine
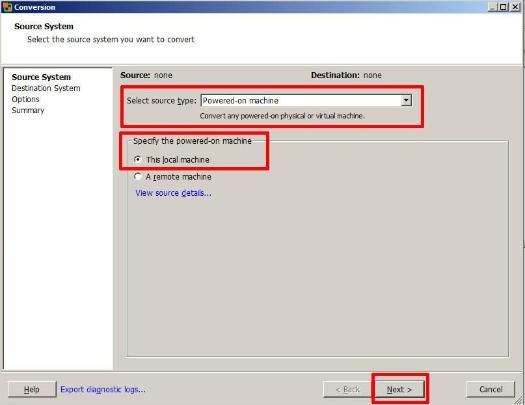
Select the Default option
Select source type: Powered-on-machine
Specify the powered-on machine: This local machine
followed by Next to continue, converter will identify the source machine.
- VMware vCenter Converter Standalone 5.1 - Specify vCenter Server
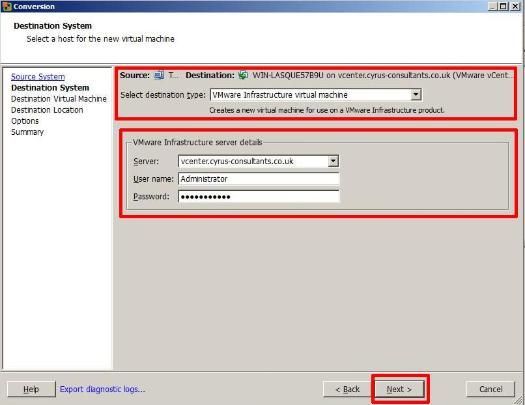
Select destination type: VMware Infrastructure machine
Enter the destination server, username and password, in this example, I'm using our VMware vSphere vCenter server details, but if you wanted to synchronize/replicate to a standalone VMware vSphere Hypervisor (ESXi) host, you would enter the VMware vSphere Hypervisor (ESXi) host details here, e.g. root username and password.
- VMware vCenter Converter Standalone 5.1 - Specify Destination Machine name
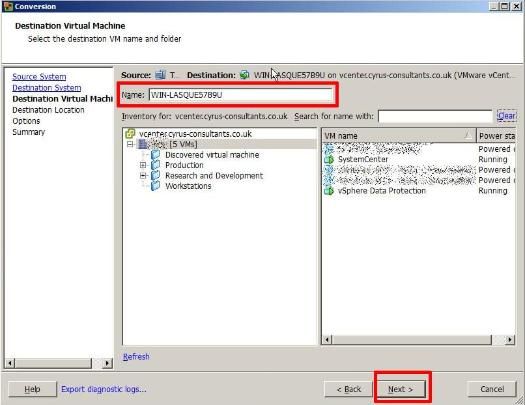
Specify the destination name of the machine followed by Next
- VMware vCenter Converter Standalone 5.1 - Specify Destination Location
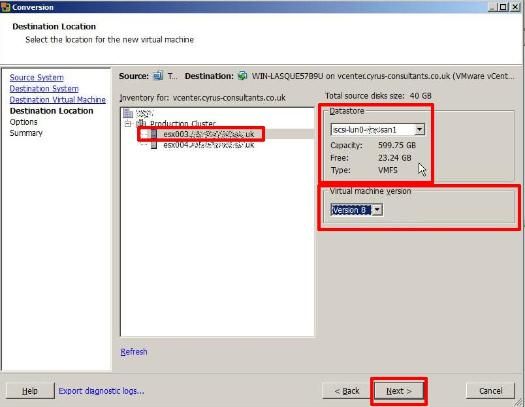
Specify the destination location for the machine followed by Next, if you are using a VMware vSphere vCenter Server and have a VMware Cluster created, you will have additional options to specify which VMware vSphere Hypervisor (ESXi) host to create the new virtual machine, also specify the datastore location. Ensure the virtual machine version matches the original VM, in this example v8.0.
- VMware vCenter Converter Standalone 5.1 - Enable Synchronize
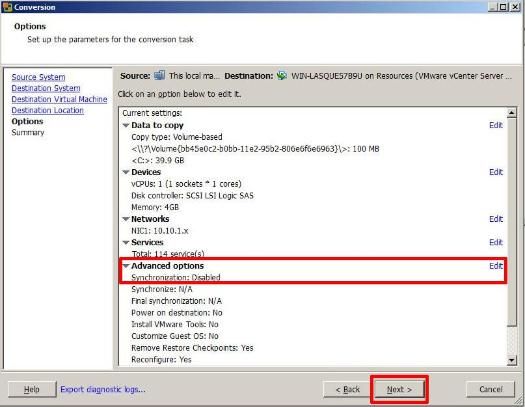
If you click Next at this point, the P2V (V2V) will complete as normal.
To enable the Synchronize function, you MUST select Edit
- VMware vCenter Converter Standalone 5.1 - Enable Synchronise
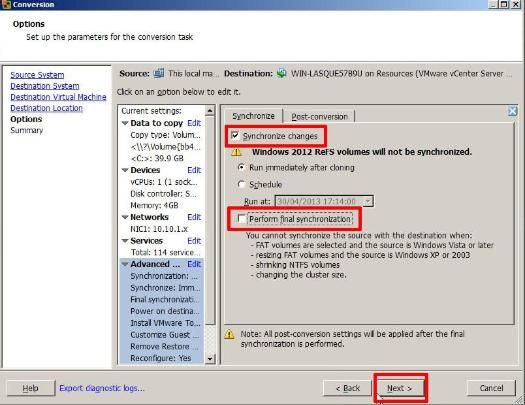
Ensure Synchronize changes is selected and ticked.
Ensure Perform final synchronization is Un-ticked.
If you wanted to perform, a Scheduled Synchronize, select and set the Schedule Option. Select Next to continue, review the Summary screen, and select Finish.
- VMware vCenter Converter Standalone 5.1 - Summary Screen
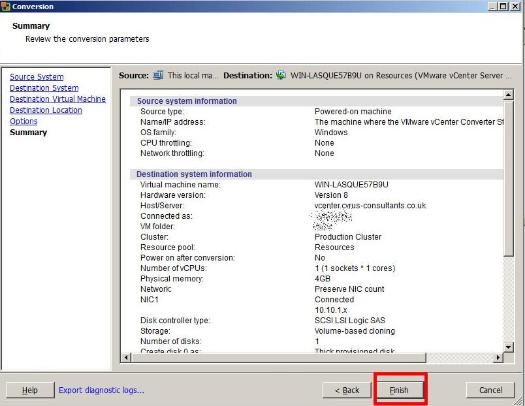
A P2V job will be submitted and the P2V conversion will start.
- VMware vCenter Converter Standalone 5.1 - P2V Job Submitted
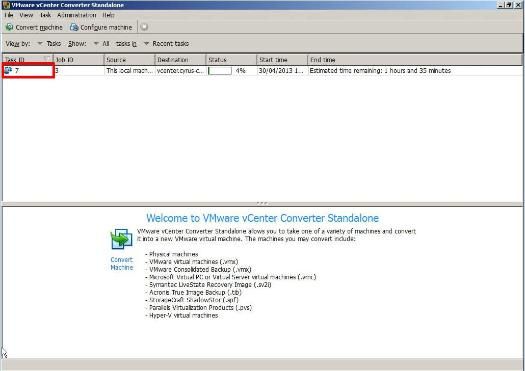
If you click the Task Id, you can check on the Task Progress.
- VMware vCenter Converter Standalone 5.1 - Task Progress
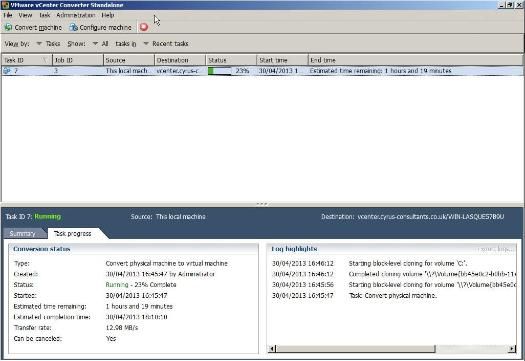
If you are finding conversions time are long, see my EE Article, on how to imporve transfer times.
HOW TO: Improve the transfer rate of a Physical to Virtual (P2V), Virtual to Virtual Conversion (V2V) using VMware vCenter Converter Standalone 5.0
- 3
-
Synchronize Changes
Once the initial P2V (V2V) conversion has completed, or "seeded" a new virtual machine, you can use the Synchronize function to replicate any changes that occur on the source machine to the virtual machine, the source machine could be a physical or virtual machine. (You can check the virtual machine by disconnecting networking, and powering up the virtual machine).
- VMware vCenter Converter Standalone 5.1 - Job Status
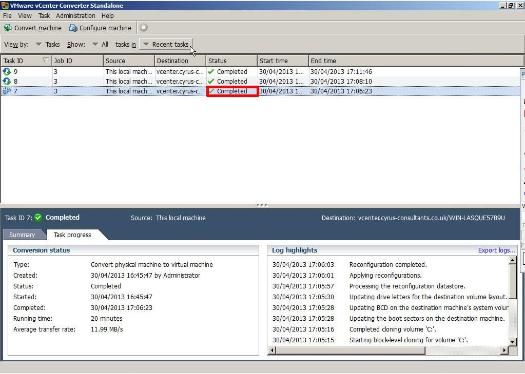
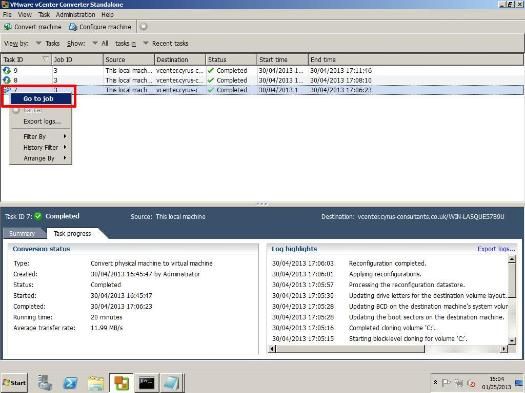
The Job Status should state Completed. Right Click the Task Id and select Go to job
- VMware vCenter Converter Standalone 5.1 - Go to Job
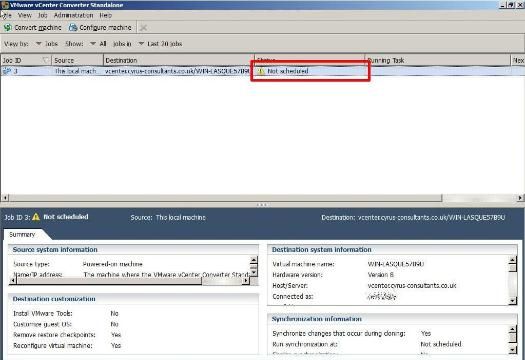
You will notice that the Status states Not Scheduled, this is because we did not set a schedule.
- VMware vCenter Converter Standalone 5.1 - Not Scheduled
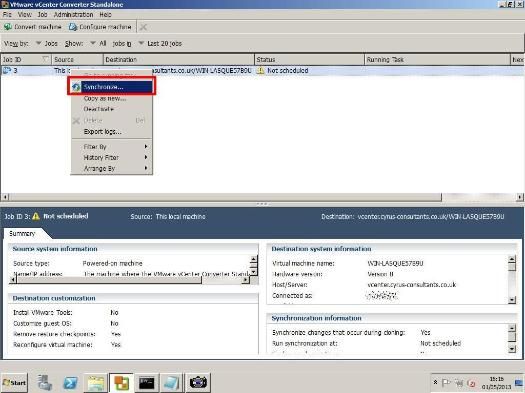
Right Click the Job Id, and select Synchronize.
- VMware vCenter Converter Standalone 5.1 - Synchronize
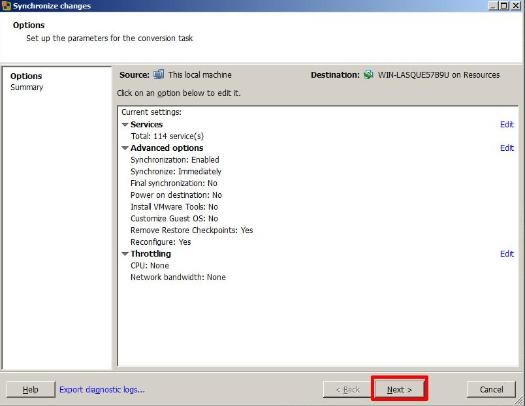
Click Next
- VMware vCenter Converter Standalone 5.1 - Synchronize changes
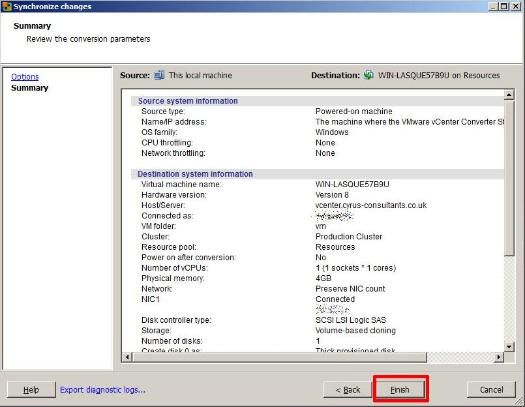
Check the Summary page and Click Finish
- VMware vCenter Converter Standalone 5.1 - Finish
Click the View by Jobs
- VMware vCenter Converter Standalone 5.1 - Synchronize Task Progress
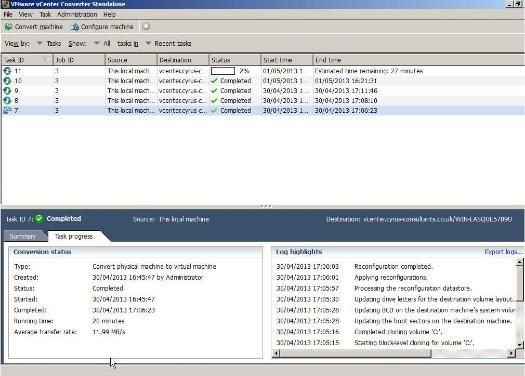
You will notice your Synchronize Job is Running, and it will have a new Synchronize icon, next to the job. All changes in the source machine will be synchronized or replicated to the virtual machine.
Congratulations you have successfully created a P2V (V2V) and Synchronized (replicated) your machine to a virtual machine.
****************************************************************************
Thank you for reading my article, please leave valuable feedback. If you liked my VMware article and would like to see more Articles from me, please click the Yes button near the: Was this article helpful? at the bottom of this article just below and to the right of this information. Thank You. Do not forget if you have a question about this article or another VMware, Virtualisation, Windows Server 2012 question, why not post a Question for me and the other Experts Exchange Experts in the VMware, Virtualisation, Windows 2008, Windows 2012 Zones. I look forward to hearing from you. - Andy
****************************************************************************