图像滤镜特效(反色、浮雕、雕刻、怀旧、冰冻、暗调)(一)
对图像进行滤镜(PS中的叫法)特效处理完全是导师的要求,现把工作整理出来(效果图见最后)。
一、反色特效
反色特效原理比较简单,就是分别把RGB通道的像素值取反即可。

下面是反色特效VC++程序:
/*************************************************************************
*
* 函数名称:
*   Negative(LPBYTE lpDIBBits, LPSTR lpDIB, LONG lWidth, LONG lHeight)
*
* 参数:
*   lpDIBBits            - 原始图像的像素指针
*   lWidth               - 原始图像的宽度
*   lHeight              - 原始图像的高度
*
*
* 说明:
*   实现图像的反色效果。
*
************************************************************************/
BOOL WINAPI Negative(LPBYTE lpDIBBits, LPSTR lpDIB, LONG lWidth, LONG lHeight)
{
	// 颜色表中的颜色数目
	DWORD wNumColors;//DWORD位32位无符号整型

	// 获取DIB中颜色表中的颜色数目
	//DIBNumColors()该函数返回DIB中调色板的颜色的种数。对于单色位图,返回2,对于16色位图,返回16,
	// 对于256色位图,返回256;对于真彩色位图(24位),没有调色板,返回0。
	wNumColors = ::DIBNumColors(lpDIB);

	unsigned char *lpSrc;
	LONG i, j;
	int buf;
	if (wNumColors == 256)
	{
		LONG lLineBytes = WIDTHBYTES(lWidth * 8);

		for (i = lHeight; i >= 1; i--)
		{
			for (j = lWidth; j >= 0; j--)
			{
				buf = 255 - *((unsigned char*)lpDIBBits + lLineBytes*(lHeight - i) + j);
				lpSrc = (unsigned char*)lpDIBBits + lLineBytes*(lHeight - i) + j;
				*lpSrc = (unsigned char)buf;
			}
		}
	}
	else if (wNumColors == 0)
	{
		LONG lLineBytes = WIDTHBYTES(lWidth * 24);

		for (i = lHeight; i >= 1; i--)
		{
			for (j = lWidth * 3; j >= 0; j--)
			{
				buf = 255 - *((unsigned char*)lpDIBBits + lLineBytes*(lHeight - i) + j);
				lpSrc = (unsigned char*)lpDIBBits + lLineBytes*(lHeight - i) + j;
				*lpSrc = (unsigned char)buf;
			}
		}
	}
	else
	{
		MessageBox(NULL, TEXT("不支持此类型位图!"), TEXT("系统提示"), MB_ICONINFORMATION | MB_YESNO);
	}

	return TRUE;
}
二、浮雕特效
浮雕图像效果是指图像的前景前向凸出背景。所谓的“浮雕”处理是指图像上的一个像素和它左上方的那个像素之间的差值的一种处理过程,为了使图像保持一定的亮度并呈现灰色,在处理过程中为这个差值加上一个数值为128的常量,需要注意的是,当设置一个像素值的时候,它和它的左上方的像素都要被用到,为了避免用到已经设置过的像素,应该从图像的右下方的像素开始处理,这样还会出现一个问题就是图像最左方和最上方的没有得到处理,这里我把它们的像素值设为128。
下面是浮雕特效VC++程序:
/*************************************************************************
*
* 函数名称:
*   Emboss(LPBYTE lpDIBBits, LPSTR lpDIB, LONG lWidth, LONG lHeight)
*
* 参数:
*   lpDIBBits            - 原始图像的像素指针
*   lWidth               - 原始图像的宽度
*   lHeight              - 原始图像的高度
*
*
* 说明:
*   实现图像的浮雕效果。
*
************************************************************************/
BOOL WINAPI Emboss(LPBYTE lpDIBBits, LPSTR lpDIB, LONG lWidth, LONG lHeight)
{
	// 颜色表中的颜色数目
	DWORD wNumColors;//DWORD位32位无符号整型

	// 获取DIB中颜色表中的颜色数目
	//DIBNumColors()该函数返回DIB中调色板的颜色的种数。对于单色位图,返回2,对于16色位图,返回16,
	// 对于256色位图,返回256;对于真彩色位图(24位),没有调色板,返回0。
	wNumColors = ::DIBNumColors(lpDIB);

	unsigned char *lpSrc;
	LONG i, j;
	int buf;
	if (wNumColors == 256)
	{
		LONG lLineBytes = WIDTHBYTES(lWidth * 8);//24表示24位真彩色图像

		for (i = lHeight; i >= 2; i--)
		{
			for (j = lWidth; j >= 2; j--)
			{
				buf = *((unsigned char*)lpDIBBits + lLineBytes*(lHeight - i) + j) -
					*((unsigned char*)lpDIBBits + lLineBytes*(lHeight - i + 1) + j - 1) + 128;  //j - 3
				if (buf<0) {
					buf = 0;
				}
				if (buf>255) {
					buf = 255;
				}
				lpSrc = (unsigned char*)lpDIBBits + lLineBytes*(lHeight - i) + j;
				*lpSrc = (unsigned char)buf;
			}
		}
		for (i = 0; i < lWidth; i++)
		{
			lpSrc = (unsigned char*)lpDIBBits + lLineBytes*(lHeight - 1 - 0) + i;
			*lpSrc = 128;
		}
		for (i = 0; i < lHeight; i++)
		{
			lpSrc = (unsigned char*)lpDIBBits + lLineBytes*(lHeight - 1 - i) + 0;
			*lpSrc = 128;
			lpSrc = (unsigned char*)lpDIBBits + lLineBytes*(lHeight - 1 - i) + 1;
			*lpSrc = 128;
		}
	}
	else if (wNumColors == 0)
	{
		LONG lLineBytes = WIDTHBYTES(lWidth * 24);//24表示24位真彩色图像

		for (i = lHeight; i >= 2; i--)
		{
			for (j = lWidth * 3; j >= 2; j--)

			{
				buf = *((unsigned char*)lpDIBBits + lLineBytes*(lHeight - i) + j) -
					*((unsigned char*)lpDIBBits + lLineBytes*(lHeight - i + 1) + j - 3) + 128;
				if (buf<0) {
					buf = 0;
				}
				if (buf>255) {
					buf = 255;
				}
				lpSrc = (unsigned char*)lpDIBBits + lLineBytes*(lHeight - i) + j;
				*lpSrc = (unsigned char)buf;
			}
		}
		for (i = 0; i < lWidth * 3; i++)
		{
			lpSrc = (unsigned char*)lpDIBBits + lLineBytes*(lHeight - 1 - 0) + i;
			*lpSrc = 128;
		}
		for (i = 0; i < lHeight; i++)
		{
			lpSrc = (unsigned char*)lpDIBBits + lLineBytes*(lHeight - 1 - i) + 0;
			*lpSrc = 128;
			lpSrc = (unsigned char*)lpDIBBits + lLineBytes*(lHeight - 1 - i) + 1;
			*lpSrc = 128;
			lpSrc = (unsigned char*)lpDIBBits + lLineBytes*(lHeight - 1 - i) + 2;
			*lpSrc = 128;
		}
	}
	else
	{
		MessageBox(NULL, TEXT("不支持此类型位图!"), TEXT("系统提示"), MB_ICONINFORMATION | MB_YESNO);
	}

	return TRUE;
}
三、雕刻特效
雕刻效果与浮雕效果类似,不同之处是雕刻效果的处理过程是取一个像素和它右下方的像素之间的差值再加上一个常数128,这时的图像的前景凹陷进背景之中,同样需要注意的是为了避免重复使用处理过的图像像素,处理图像时要从图像的左上方的像素开始处理,而且把没有处理过的像素值设为128。
下面是雕刻特效VC++程序:
/*************************************************************************
*
* 函数名称:
*   Engrave(LPBYTE lpDIBBits, LPSTR lpDIB, LONG lWidth, LONG lHeight)
*
* 参数:
*   lpDIBBits            - 原始图像的像素指针
*   lWidth               - 原始图像的宽度
*   lHeight              - 原始图像的高度
*
*
* 说明:
*   实现图像的雕刻效果。
*
************************************************************************/
BOOL WINAPI Engrave(LPBYTE lpDIBBits, LPSTR lpDIB, LONG lWidth, LONG lHeight)
{
	// 颜色表中的颜色数目
	DWORD wNumColors;//DWORD位32位无符号整型

	// 获取DIB中颜色表中的颜色数目
	//DIBNumColors()该函数返回DIB中调色板的颜色的种数。对于单色位图,返回2,对于16色位图,返回16,
	// 对于256色位图,返回256;对于真彩色位图(24位),没有调色板,返回0。
	wNumColors = ::DIBNumColors(lpDIB);

	unsigned char *lpSrc;
	LONG i, j;
	int buf;
	if (wNumColors == 256)
	{
		LONG lLineBytes = WIDTHBYTES(lWidth * 8);//24表示24位真彩色图像

		for (i = 0; i <= lHeight - 2; i++)
		{
			for (j = 0; j <= (lWidth - 2) * 1; j++)
			{
				buf = *((unsigned char*)lpDIBBits + lLineBytes*(lHeight - 1 - i) + j) -
					*((unsigned char*)lpDIBBits + lLineBytes*(lHeight - 1 - i - 1) + j + 1) + 128;
				if (buf<0) {
					buf = 0;
				}
				if (buf>255) {
					buf = 255;
				}
				lpSrc = (unsigned char*)lpDIBBits + lLineBytes*(lHeight - 1 - i) + j;
				*lpSrc = (unsigned char)buf;
			}
		}
		for (i = 0; i < lWidth; i++)
		{
			lpSrc = (unsigned char*)lpDIBBits + lLineBytes * 0 + i;
			*lpSrc = 128;
		}
		for (i = 0; i < lHeight; i++)
		{
			lpSrc = (unsigned char*)lpDIBBits + lLineBytes*(lHeight - 1 - i) + lWidth - 1;
			*lpSrc = 128;
		}
	}
	else if (wNumColors == 0)
	{
		LONG lLineBytes = WIDTHBYTES(lWidth * 24);//24表示24位真彩色图像

		for (i = 0; i <= lHeight - 2; i++)
		{
			for (j = 0; j <= (lWidth - 2) * 3; j++)
			{
				buf = *((unsigned char*)lpDIBBits + lLineBytes*(lHeight - 1 - i) + j) -
					*((unsigned char*)lpDIBBits + lLineBytes*(lHeight - 1 - i - 1) + j + 3) + 128;
				if (buf<0) {
					buf = 0;
				}
				if (buf>255) {
					buf = 255;
				}
				lpSrc = (unsigned char*)lpDIBBits + lLineBytes*(lHeight - 1 - i) + j;
				*lpSrc = (unsigned char)buf;
			}
		}
		for (i = 0; i < lWidth * 3; i++)
		{
			lpSrc = (unsigned char*)lpDIBBits + lLineBytes * 0 + i;
			*lpSrc = 128;
		}
		for (i = 0; i < lHeight; i++)
		{
			lpSrc = (unsigned char*)lpDIBBits + lLineBytes*(lHeight - 1 - i) + (lWidth * 3 - 1);
			*lpSrc = 128;
			lpSrc = (unsigned char*)lpDIBBits + lLineBytes*(lHeight - 1 - i) + (lWidth * 3 - 2);
			*lpSrc = 128;
			lpSrc = (unsigned char*)lpDIBBits + lLineBytes*(lHeight - 1 - i) + (lWidth * 3 - 3);
			*lpSrc = 128;
			lpSrc = (unsigned char*)lpDIBBits + lLineBytes*(lHeight - 1 - i) + (lWidth * 3 - 4);
			*lpSrc = 128;
			lpSrc = (unsigned char*)lpDIBBits + lLineBytes*(lHeight - 1 - i) + (lWidth * 3 - 5);
			*lpSrc = 128;
			lpSrc = (unsigned char*)lpDIBBits + lLineBytes*(lHeight - 1 - i) + (lWidth * 3 - 6);
			*lpSrc = 128;
		}
	}
	else
	{
		MessageBox(NULL, TEXT("不支持此类型位图!"), TEXT("系统提示"), MB_ICONINFORMATION | MB_YESNO);
	}

	return TRUE;
}
四、怀旧特效
怀旧特效的原理直接用下面公式表示:

下面是怀旧特效VC++程序:
/*************************************************************************
*
* 函数名称:
*   ReAncient(LPBYTE lpDIBBits, LONG lWidth, LONG lHeight)
*
* 参数:
*   lpDIBBits            - 原始图像的像素指针
*   lWidth               - 原始图像的宽度
*   lHeight              - 原始图像的高度
*
*
* 说明:
*   实现图像的怀旧效果。
*
************************************************************************/
BOOL ReAncient(LPBYTE lpDIBBits, LONG lWidth, LONG lHeight)
{
	unsigned char *lpSrc;
	LONG i, j, n;
	LONG lLineBytes = WIDTHBYTES(lWidth * 24);
	int* buf;
	buf = new int[lHeight * lWidth * 3];
	unsigned char* lpRed;
	unsigned char* lpGreen;
	unsigned char* lpBlue;
	for (i = 0; i < lHeight; i++)
	{
		for (j = 0; j < lWidth * 3; j += 3)
		{
			lpRed = (unsigned char*)lpDIBBits + lLineBytes * (lHeight - 1 - i) + j + 2;//顺序为BGR
			lpGreen = (unsigned char*)lpDIBBits + lLineBytes * (lHeight - 1 - i) + j + 1;
			lpBlue = (unsigned char*)lpDIBBits + lLineBytes * (lHeight - 1 - i) + j;

			buf[i*lWidth * 3 + j + 2] = (int)(0.393*(*lpRed) + 0.769*(*lpGreen) + 0.189*(*lpBlue));
			buf[i*lWidth * 3 + j + 1] = (int)(0.349*(*lpRed) + 0.686*(*lpGreen) + 0.168*(*lpBlue));
			buf[i*lWidth * 3 + j + 0] = (int)(0.272*(*lpRed) + 0.534*(*lpGreen) + 0.131*(*lpBlue));

			if (buf[i*lWidth * 3 + j + 2]>255)
			{
				buf[i*lWidth * 3 + j + 2] = 255;
			}
			if (buf[i*lWidth * 3 + j + 2]<0)
			{
				buf[i*lWidth * 3 + j + 2] = 0;
			}
			if (buf[i*lWidth * 3 + j + 1]>255)
			{
				buf[i*lWidth * 3 + j + 1] = 255;
			}
			if (buf[i*lWidth * 3 + j + 1]<0)
			{
				buf[i*lWidth * 3 + j + 1] = 0;
			}
			if (buf[i*lWidth * 3 + j + 0]>255)
			{
				buf[i*lWidth * 3 + j + 0] = 255;
			}
			if (buf[i*lWidth * 3 + j + 0]<0)
			{
				buf[i*lWidth * 3 + j + 0] = 0;
			}
		}
	}
	for (i = 0; i < lHeight; i++)
	{
		for (j = 0; j < lWidth * 3; j++)
		{
			lpSrc = (unsigned char*)lpDIBBits + lLineBytes*(lHeight - 1 - i) + j;
			*lpSrc = buf[i*lWidth * 3 + j];
		}
	}
	return TRUE;
}
四、冰冻特效
冰冻特效的原理直接用下面公式表示:
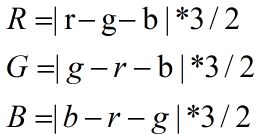
下面是冰冻特效VC++程序:
/*************************************************************************
*
* 函数名称:
*   Freeze(LPBYTE lpDIBBits, LONG lWidth, LONG lHeight)
*
* 参数:
*   lpDIBBits            - 原始图像的像素指针
*   lWidth               - 原始图像的宽度
*   lHeight              - 原始图像的高度
*
*
* 说明:
*   实现图像的冰冻效果。
*
************************************************************************/
BOOL Freeze(LPBYTE lpDIBBits, LONG lWidth, LONG lHeight)
{
	unsigned char *lpSrc;
	LONG i, j, n;
	LONG lLineBytes = WIDTHBYTES(lWidth * 24);
	int buf1, buf2, buf3;
	unsigned char* lpRed;
	unsigned char* lpGreen;
	unsigned char* lpBlue;
	for (i = 0; i < lHeight; i++)
	{
		for (j = 0; j < lWidth * 3; j += 3)
		{
			lpRed = (unsigned char*)lpDIBBits + lLineBytes * (lHeight - 1 - i) + j + 2;//顺序为BGR
			lpGreen = (unsigned char*)lpDIBBits + lLineBytes * (lHeight - 1 - i) + j + 1;
			lpBlue = (unsigned char*)lpDIBBits + lLineBytes * (lHeight - 1 - i) + j;

			buf1 = (int)((*lpRed) - (*lpGreen) - (*lpBlue));
			buf1 = buf1 * 3 / 2;
			if (buf1<0)
			{
				buf1 = -buf1;//将buf取反后buf有可能大于255,所以要将判断小于0放在判断大于255前面
			}
			if (buf1>255)
			{
				buf1 = 255;
			}

			buf2 = (int)((*lpGreen) - (*lpRed) - (*lpBlue));
			buf2 = buf2 * 3 / 2;
			if (buf2<0)
			{
				buf2 = -buf2;
			}
			if (buf2>255)
			{
				buf2 = 255;
			}

			buf3 = (int)((*lpBlue) - (*lpGreen) - (*lpRed));
			buf3 = buf3 * 3 / 2;
			if (buf3<0)
			{
				buf3 = -buf3;
			}
			if (buf3>255)
			{
				buf3 = 255;
			}

			lpSrc = (unsigned char*)lpDIBBits + lLineBytes*(lHeight - 1 - i) + j;
			*lpSrc = buf3;
			lpSrc = (unsigned char*)lpDIBBits + lLineBytes*(lHeight - 1 - i) + j + 1;
			*lpSrc = buf2;
			lpSrc = (unsigned char*)lpDIBBits + lLineBytes*(lHeight - 1 - i) + j + 2;
			*lpSrc = buf1;
		}
	}
	return TRUE;
}
五、暗调特效
暗调特效就是亮度调整的一种特殊方法。它主要通过降低图像色彩各分量中的亮度,使整幅图像变得深暗。公式如下:

下面是暗调特效VC++程序:
/*************************************************************************
*
* 函数名称:
*   Shade(LPBYTE lpDIBBits, LONG lWidth, LONG lHeight)
*
* 参数:
*   lpDIBBits            - 原始图像的像素指针
*   lWidth               - 原始图像的宽度
*   lHeight              - 原始图像的高度
*
*
* 说明:
*   实现图像的暗调效果。
*
************************************************************************/
BOOL Shade(LPBYTE lpDIBBits, LONG lWidth, LONG lHeight)
{
	unsigned char *lpSrc;
	LONG i, j, n;
	LONG lLineBytes = WIDTHBYTES(lWidth * 24);
	int buf1, buf2, buf3;
	unsigned char* lpRed;
	unsigned char* lpGreen;
	unsigned char* lpBlue;
	for (i = 0; i < lHeight; i++)
	{
		for (j = 0; j < lWidth * 3; j += 3)
		{
			lpRed = (unsigned char*)lpDIBBits + lLineBytes * (lHeight - 1 - i) + j + 2;//顺序为BGR
			lpGreen = (unsigned char*)lpDIBBits + lLineBytes * (lHeight - 1 - i) + j + 1;
			lpBlue = (unsigned char*)lpDIBBits + lLineBytes * (lHeight - 1 - i) + j;

			buf1 = (int)((*lpBlue)*(*lpBlue) / 300);
			buf2 = (int)((*lpGreen)*(*lpGreen) / 300);
			buf3 = (int)((*lpRed)*(*lpRed) / 300);

			lpSrc = (unsigned char*)lpDIBBits + lLineBytes*(lHeight - 1 - i) + j;
			*lpSrc = buf1;
			lpSrc = (unsigned char*)lpDIBBits + lLineBytes*(lHeight - 1 - i) + j + 1;
			*lpSrc = buf2;
			lpSrc = (unsigned char*)lpDIBBits + lLineBytes*(lHeight - 1 - i) + j + 2;
			*lpSrc = buf3;
		}
	}
	return TRUE;
}
原图:

一、反色特效:

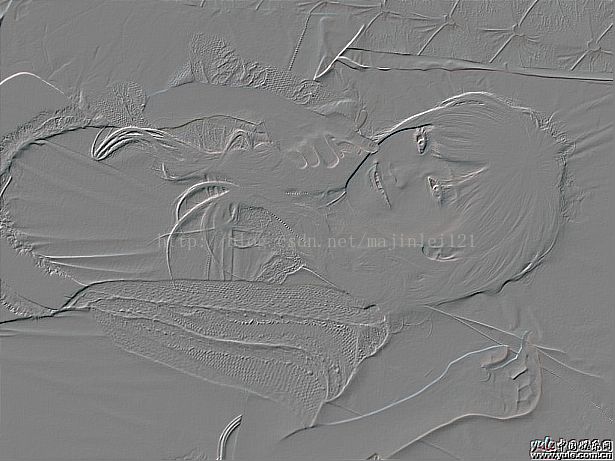
二、浮雕特效:

三、雕刻特效:
四、怀旧特效:

五、冰冻特效:

六、暗调特效:
