S32K148----SDK笔记----LPUART_含printf支持
文章目录
- 前言
- 建立工程
- ProcessorExpert配置
- 发送一条消息
- printf支持
- 接收中断
- 完整工程下载
前言
S32K148自带3路LPUART(0/1/2), 除此之外, 还有FLEXIO中的两路(两对收发, 或者4收, 或者4发?), 从某宝淘了个最小系统板和Jlink V9, 本文就用它们做一个LPUART的笔记:

左边是Jlink V9, 支持虚拟串口(没有的话试试 J-Link Commander 软件中输入 vcom enable 打开虚拟串口), 右边是S32K148的最小系统板, 连接关系如下:
| J-Link | S32K148 |
|---|---|
| 3V3 | 3V3 |
| GND | GND |
| TMS(SWDIO) | PTA4(TMS) |
| TCK(SWCLK) | PTC4(TCK) |
| RXD | PTA9(LPUART2_TX) |
| TXD | PTA8(LPUART2_RX) |
使用J-Link直接供3.3V电, 双线SWD调试, 然后LPUART2接到J-Link的串口上.
建立工程
步骤:
- File -> New -> S32DS Application Project
- Processors 选择 S32K148, Project Name 填你自己的工程名
- Select SDK: SDKs 选择 S32K148_SDK 3.0.0, Debugger选择J-Link, Finish.

ProcessorExpert配置
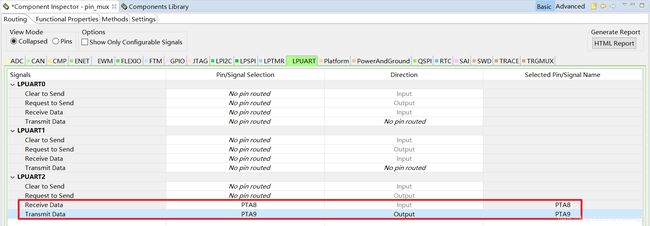
双击工程名, 点击Components窗口Components目录下的 pin_mux:PinSetting, LPUART中选择PTA8/PTA9, 并设置发送为Output:
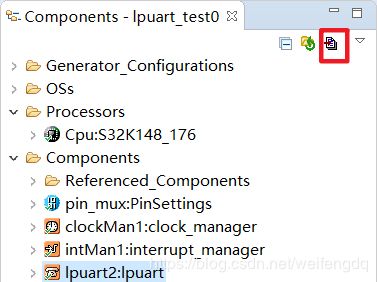
Component Library中双击添加lpuart组件:

配置lpuart, 选择LPUART2, 波特率115200:

点击生成代码:
发送一条消息
先是系统时钟和引脚的:
  /* Write your code here */
  /* For example: for(;;) { } */
    CLOCK_SYS_Init(g_clockManConfigsArr, CLOCK_MANAGER_CONFIG_CNT,
                   g_clockManCallbacksArr, CLOCK_MANAGER_CALLBACK_CNT);
    CLOCK_SYS_UpdateConfiguration(0U, CLOCK_MANAGER_POLICY_AGREEMENT);
    PINS_DRV_Init(NUM_OF_CONFIGURED_PINS, g_pin_mux_InitConfigArr);
然后是串口LPUART2的初始化, 并发送一条消息:
	LPUART_DRV_Init(INST_LPUART2, &lpuart2_State, &lpuart2_InitConfig0);
	#define helloMsg "Hello, this message comes from S32K148 LPUART2!\r\n"
    LPUART_DRV_SendDataBlocking(INST_LPUART2, (uint8_t *)helloMsg, strlen(helloMsg), 100U);
    while(1) {
    }
顶部添加一些字符操作的头文件:
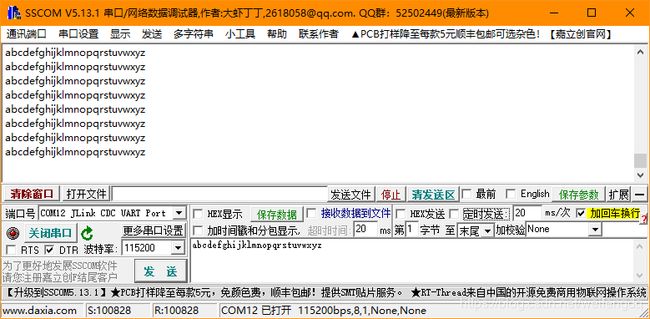
#include 调试运行, 就可以看到串口助手中打印出了这条消息, 注意串口的波特率是115200:

printf支持
此处对printf支持的代码, 是直接从文章 EXAMPLE: S32k144 UART printf/scanf under FreeRTOS - S32DS 参考复制过来的, 验证可用:
#include 注意其中的 INST_LPUART2 是因为我用了LPUART2, 如果是0或1, 需要自己手动更改, 对文本, 浮点数等的支持都有, main中继续添加:
    float pi = 3.1415926;
    printf(helloMsg);
    printf("xixiheheheihei\r\n");
    printf("pi = %.7f\r\n", pi);
    while(1) {
    }
调试运行, 可以看到printf有效:

接收中断
添加中断支持, 开启一字节接收中断:
	LPUART_DRV_InstallRxCallback(INST_LPUART2, rxCallback, NULL);
	/* Receive and store data byte by byte until new line character is received,
	 * or the buffer becomes full (256 characters received)
	 */
	LPUART_DRV_ReceiveData(INST_LPUART2, buffer, 1U);
补全中断接收函数 rxCallback, 中断函数的样式在 SDK/platform/devices/callbacks.h 中有提到 typedef void (*uart_callback_t)(void *driverState, uart_event_t event, void *userData);, 我们只需要实现它即可:
/* Receive buffer size */
#define BUFFER_SIZE 256U
/* Buffer used to receive data from the console */
uint8_t buffer[BUFFER_SIZE];
uint8_t bufferIdx;
/* UART rx callback for continuous reception, byte by byte */
void rxCallback(void *driverState, uart_event_t event, void *userData)
{
    /* Unused parameters */
    (void)driverState;
    (void)userData;

    /* Check the event type */
    if (event == UART_EVENT_RX_FULL)
    {
        /* The reception stops when newline is received or the buffer is full */
        if ((buffer[bufferIdx] != '\n') && (bufferIdx != (BUFFER_SIZE - 2U)))
        {
            /* Update the buffer index and the rx buffer */
            bufferIdx++;
            LPUART_DRV_SetRxBuffer(INST_LPUART2, &buffer[bufferIdx], 1U);
        }
    }
}
把接收到的数据都放到Buffer里面.
while中判断是否接收完成并开启新的接收中断:
    status_t status;
    /* Declare a buffer used to store the received data */
    uint32_t bytesRemaining;
    while(1) {
    	if(LPUART_DRV_GetReceiveStatus(INST_LPUART2, &bytesRemaining) != STATUS_BUSY) {
			status = LPUART_DRV_GetReceiveStatus(INST_LPUART2, &bytesRemaining);
			if(status == STATUS_SUCCESS) {
				/* Append string terminator to the received data */
				bufferIdx++;
				buffer[bufferIdx] = 0U;
				LPUART_DRV_SendDataBlocking(INST_LPUART2, buffer, bufferIdx, TIMEOUT);
				/* Reset the buffer index to start a new reception */
				bufferIdx = 0U;
				LPUART_DRV_ReceiveData(INST_LPUART2, buffer, 1U);
			} else {
				//error handle
				LPUART_DRV_ReceiveData(INST_LPUART2, buffer, 1U);
			}
    	}
    }
这里并未进行错误处理, 调试运行, 先清掉初始化发送的几条信息, 然后勾选自动发送, 每5ms发送26个小写英文字母加回车换行:

可以看到, 下面的S比R多了33字节, 说明中间有错误产生, 实际用官方例程测试中间也会有错误, 我们把发送速率调低一些, 可以看到好一些了:
关于缓冲的处理办法有很多, 怎么优化再努力吧…
完整工程下载
https://download.csdn.net/download/weifengdq/11907943