引言
之前的一篇介绍IO 模型的文章IO 模型知多少 | 理论篇
比较偏理论,很多同学反应不是很好理解。这一篇咱们换一个角度,从代码角度来分析一下。
socket 编程基础
开始之前,我们先来梳理一下,需要提前了解的几个概念:
socket: 直译为“插座”,在计算机通信领域,socket 被翻译为“套接字”,它是计算机之间进行通信的一种约定或一种方式。通过 socket 这种约定,一台计算机可以接收其他计算机的数据,也可以向其他计算机发送数据。我们把插头插到插座上就能从电网获得电力供应,同样,应用程序为了与远程计算机进行数据传输,需要连接到因特网,而 socket 就是用来连接到因特网的工具。
同步阻塞IO
先回顾下概念:阻塞IO是指,应用进程中线程在发起IO调用后至内核执行IO操作返回结果之前,若发起系统调用的线程一直处于等待状态,则此次IO操作为阻塞IO。
public static void Start()
{
    //1. 创建Tcp Socket对象
    var serverSocket = new Socket(AddressFamily.InterNetwork, SocketType.Stream, ProtocolType.Tcp);
    var ipEndpoint = new IPEndPoint(IPAddress.Loopback, 5001);
    //2. 绑定Ip端口
    serverSocket.Bind(ipEndpoint);
    //3. 开启监听,指定最大连接数
    serverSocket.Listen(10);
    Console.WriteLine($"服务端已启动({ipEndpoint})-等待连接...");

    while (true)
    {
        //4. 等待客户端连接
        var clientSocket = serverSocket.Accept();//阻塞
        Console.WriteLine($"{clientSocket.RemoteEndPoint}-已连接");
        Span buffer = new Span(new byte[512]);
        Console.WriteLine($"{clientSocket.RemoteEndPoint}-开始接收数据...");
        int readLength = clientSocket.Receive(buffer);//阻塞
        var msg = Encoding.UTF8.GetString(buffer.ToArray(), 0, readLength);
        Console.WriteLine($"{clientSocket.RemoteEndPoint}-接收数据:{msg}");
        var sendBuffer = Encoding.UTF8.GetBytes($"received:{msg}");
        clientSocket.Send(sendBuffer);
    }
}
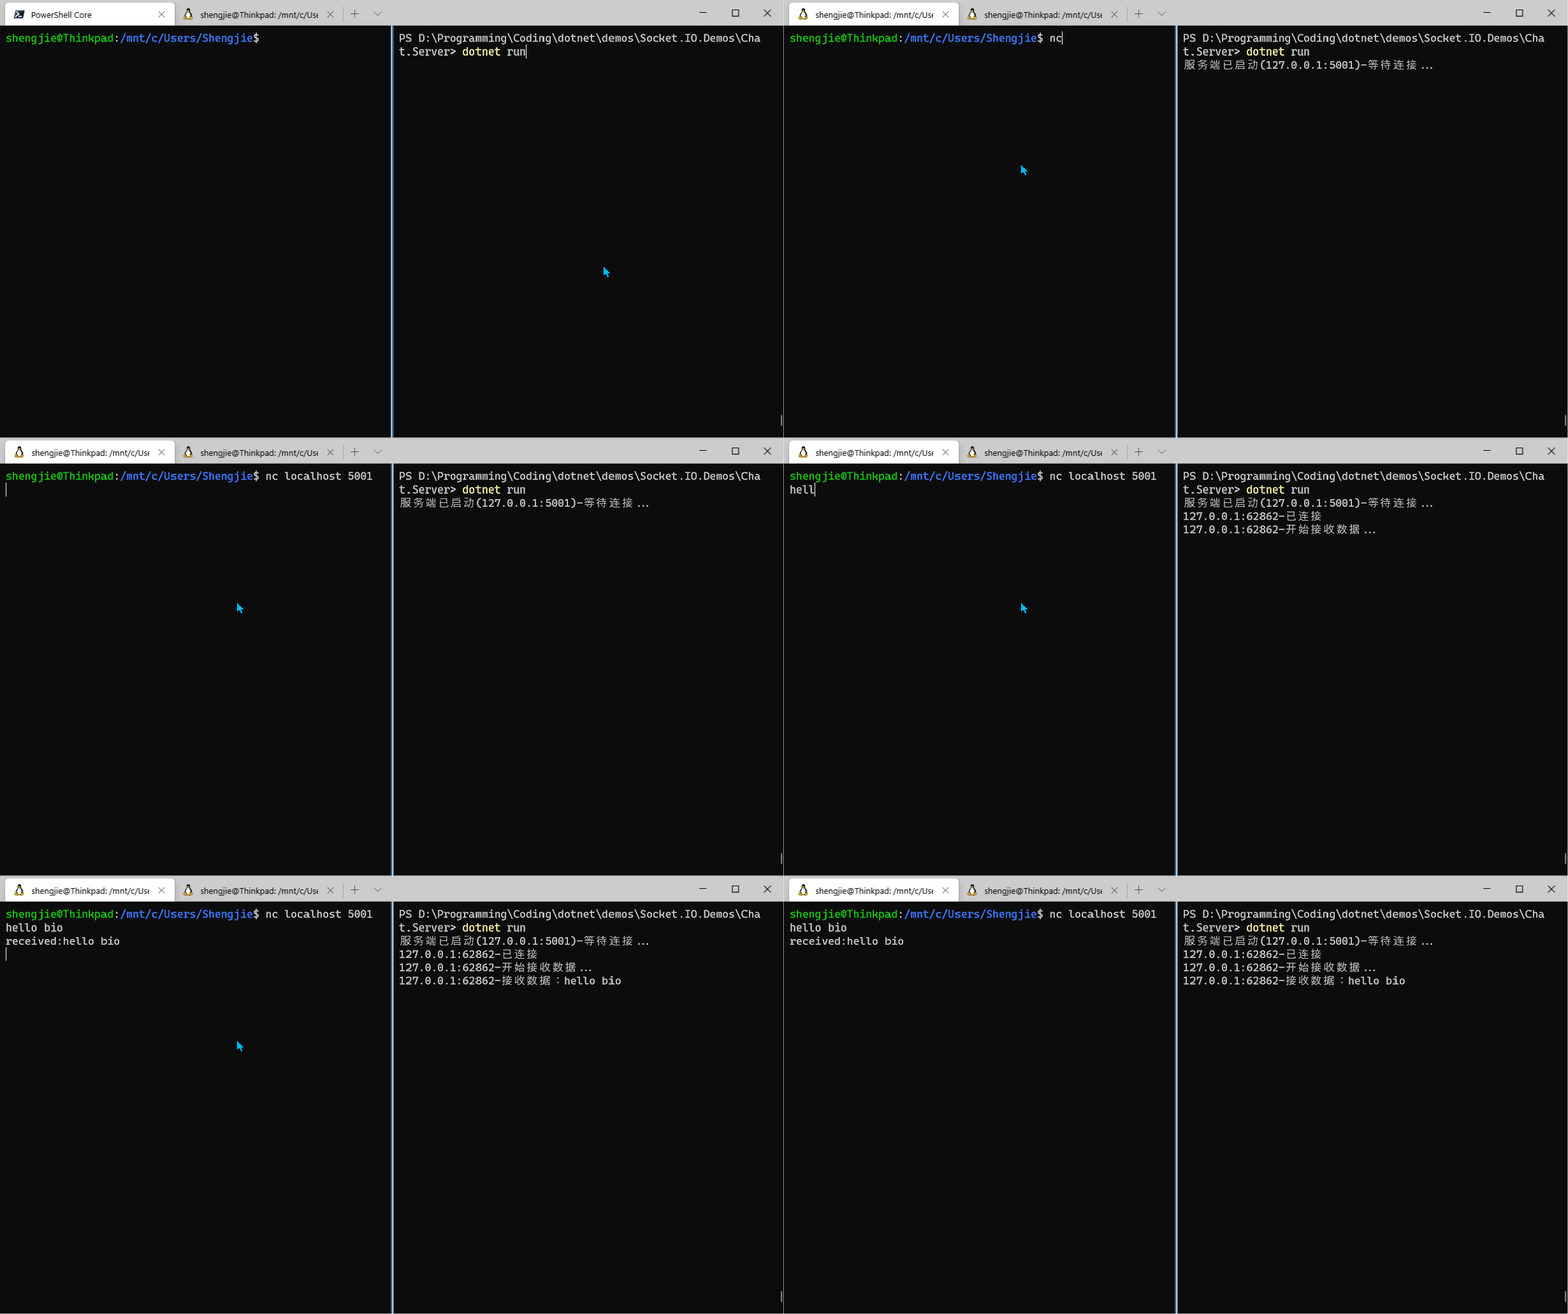
代码很简单,直接看注释就OK了,运行结果如上图所示,但有几个问题点需要着重说明下:
- 等待连接处
serverSocket.Accept(),线程阻塞! - 接收数据处
clientSocket.Receive(buffer),线程阻塞!
会导致什么问题呢:
- 只有一次数据读取完成后,才可以接受下一个连接请求
- 一个连接,只能接收一次数据
同步非阻塞IO
看完,你可能会说,这两个问题很好解决啊,创建一个新线程去接收数据就是了。于是就有了下面的代码改进。
public static void Start2()
{
    //1. 创建Tcp Socket对象
    var serverSocket = new Socket(AddressFamily.InterNetwork, SocketType.Stream, ProtocolType.Tcp);
    var ipEndpoint = new IPEndPoint(IPAddress.Loopback, 5001);
    //2. 绑定Ip端口
    serverSocket.Bind(ipEndpoint);
    //3. 开启监听,指定最大连接数
    serverSocket.Listen(10);
    Console.WriteLine($"服务端已启动({ipEndpoint})-等待连接...");

    while (true)
    {
        //4. 等待客户端连接
        var clientSocket = serverSocket.Accept();//阻塞
        Task.Run(() => ReceiveData(clientSocket));
    }
}

private static void ReceiveData(Socket clientSocket)
{
    Console.WriteLine($"{clientSocket.RemoteEndPoint}-已连接");
    Span buffer = new Span(new byte[512]);

    while (true)
    {
        if (clientSocket.Available == 0) continue;
        Console.WriteLine($"{clientSocket.RemoteEndPoint}-开始接收数据...");
        int readLength = clientSocket.Receive(buffer);//阻塞
        var msg = Encoding.UTF8.GetString(buffer.ToArray(), 0, readLength);
        Console.WriteLine($"{clientSocket.RemoteEndPoint}-接收数据:{msg}");
        var sendBuffer = Encoding.UTF8.GetBytes($"received:{msg}");
        clientSocket.Send(sendBuffer);
    }
}
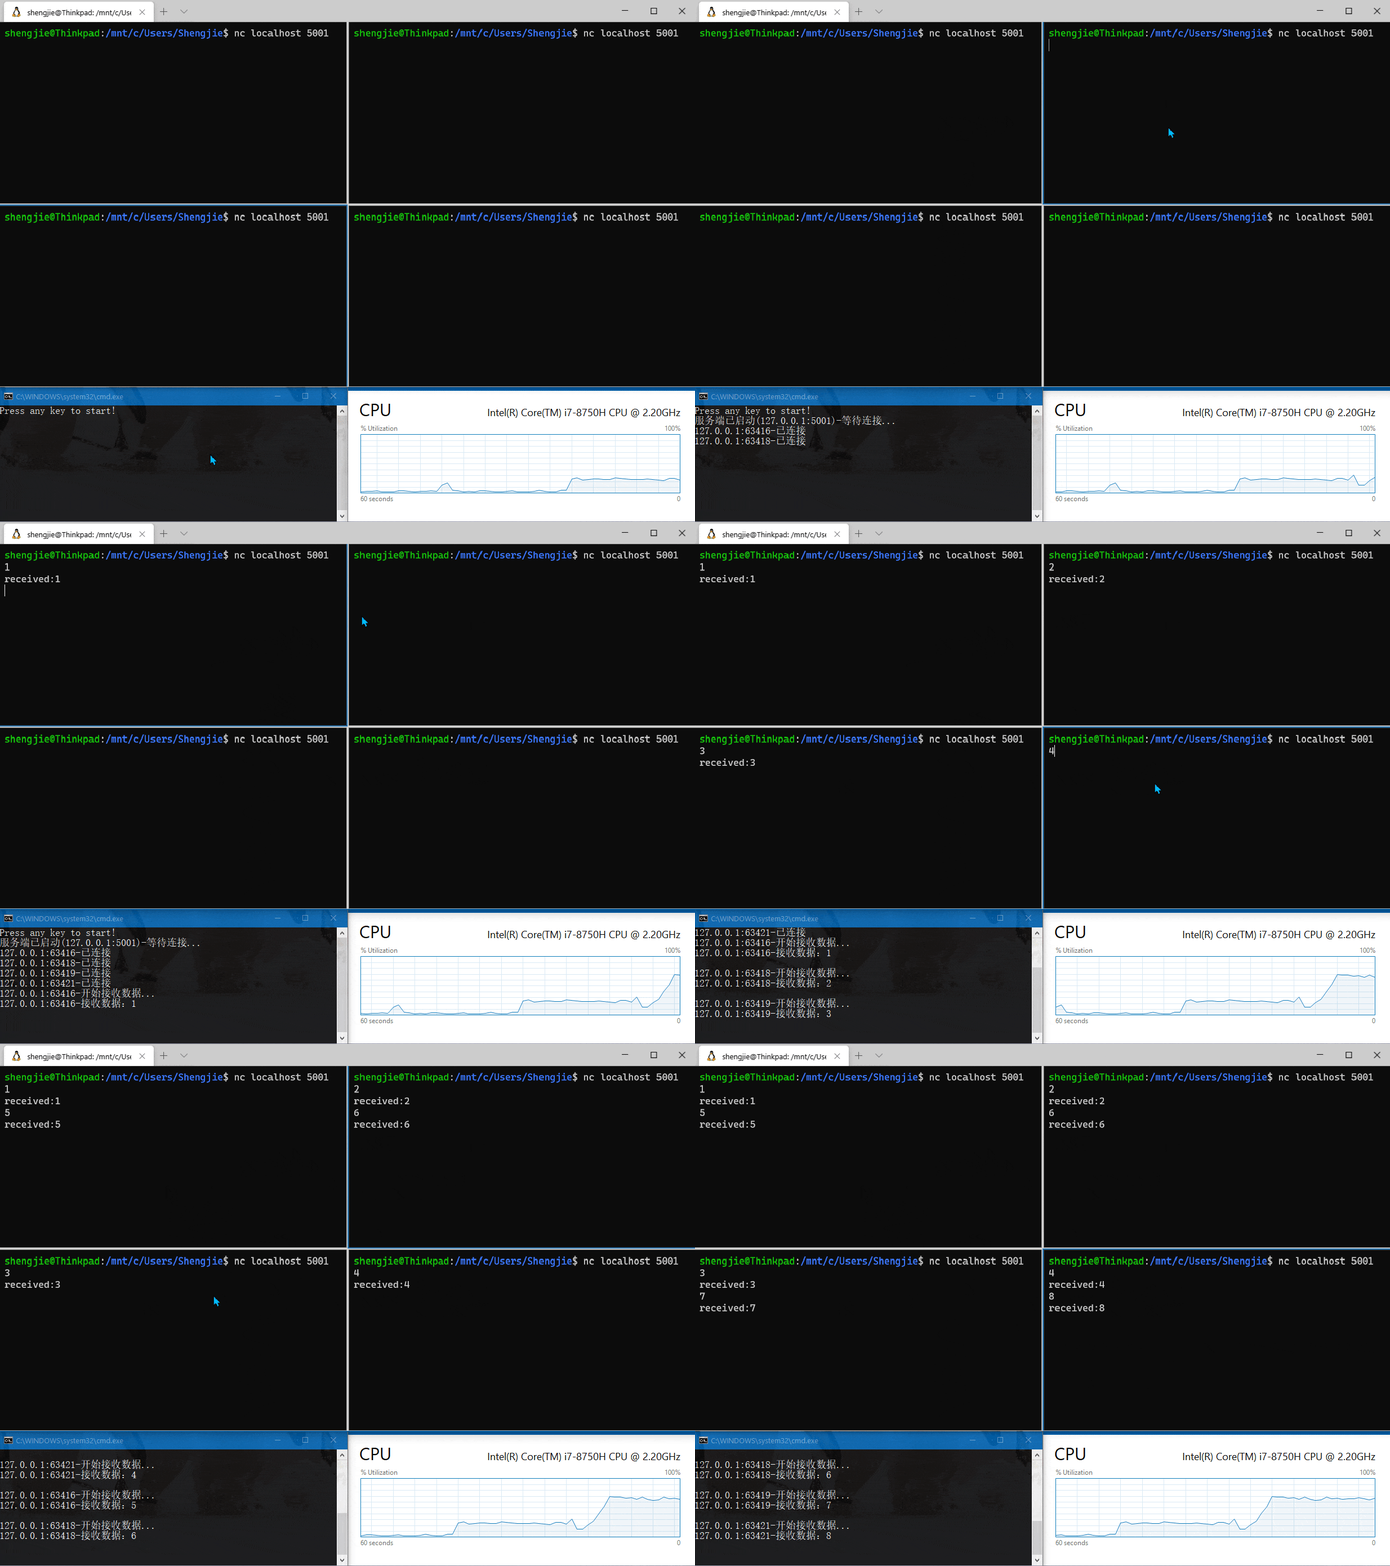
是的,多线程解决了上述的问题,但如果你观察以上动图后,你应该能发现个问题:才建立4个客户端连接,CPU的占用率就开始直线上升了。
而这个问题的本质就是,服务端的IO模型为阻塞IO模型,为了解决阻塞导致的问题,采用重复轮询,导致无效的系统调用,从而导致CPU持续走高。
IO多路复用
既然知道原因所在,咱们就来予以改造。适用异步方式来处理连接、接收和发送数据。
public static class NioServer
{
    private static ManualResetEvent _acceptEvent = new ManualResetEvent(true);
    private static ManualResetEvent _readEvent = new ManualResetEvent(true);
    public static void Start()
    {
        //1. 创建Tcp Socket对象
        var serverSocket = new Socket(AddressFamily.InterNetwork, SocketType.Stream, ProtocolType.Tcp);
        // serverSocket.Blocking = false;//设置为非阻塞
        var ipEndpoint = new IPEndPoint(IPAddress.Loopback, 5001);
        //2. 绑定Ip端口
        serverSocket.Bind(ipEndpoint);
        //3. 开启监听,指定最大连接数
        serverSocket.Listen(10);
        Console.WriteLine($"服务端已启动({ipEndpoint})-等待连接...");

        while (true)
        {
            _acceptEvent.Reset();//重置信号量
            serverSocket.BeginAccept(OnClientConnected, serverSocket);
            _acceptEvent.WaitOne();//阻塞
        }
    }

    private static void OnClientConnected(IAsyncResult ar)
    {
        _acceptEvent.Set();//当有客户端连接进来后,则释放信号量
        var serverSocket = ar.AsyncState as Socket;
        Debug.Assert(serverSocket != null, nameof(serverSocket) + " != null");

        var clientSocket = serverSocket.EndAccept(ar);
        Console.WriteLine($"{clientSocket.RemoteEndPoint}-已连接");

        while (true)
        {
            _readEvent.Reset();//重置信号量
            var stateObj = new StateObject { ClientSocket = clientSocket };
            clientSocket.BeginReceive(stateObj.Buffer, 0, stateObj.Buffer.Length, SocketFlags.None, OnMessageReceived, stateObj);
            _readEvent.WaitOne();//阻塞等待
        }
    }

    private static void OnMessageReceived(IAsyncResult ar)
    {
        var state = ar.AsyncState as StateObject;
        Debug.Assert(state != null, nameof(state) + " != null");
        var receiveLength = state.ClientSocket.EndReceive(ar);

        if (receiveLength > 0)
        {
            var msg = Encoding.UTF8.GetString(state.Buffer, 0, receiveLength);
            Console.WriteLine($"{state.ClientSocket.RemoteEndPoint}-接收数据:{msg}");

            var sendBuffer = Encoding.UTF8.GetBytes($"received:{msg}");
            state.ClientSocket.BeginSend(sendBuffer, 0, sendBuffer.Length, SocketFlags.None,
                SendMessage, state.ClientSocket);
        }
    }

    private static void SendMessage(IAsyncResult ar)
    {
        var clientSocket = ar.AsyncState as Socket;
        Debug.Assert(clientSocket != null, nameof(clientSocket) + " != null");
        clientSocket.EndSend(ar);
        _readEvent.Set(); //发送完毕后,释放信号量
    }
}

public class StateObject
{
    // Client  socket.
    public Socket ClientSocket = null;
    // Size of receive buffer.
    public const int BufferSize = 1024;
    // Receive buffer.
    public byte[] Buffer = new byte[BufferSize];
}
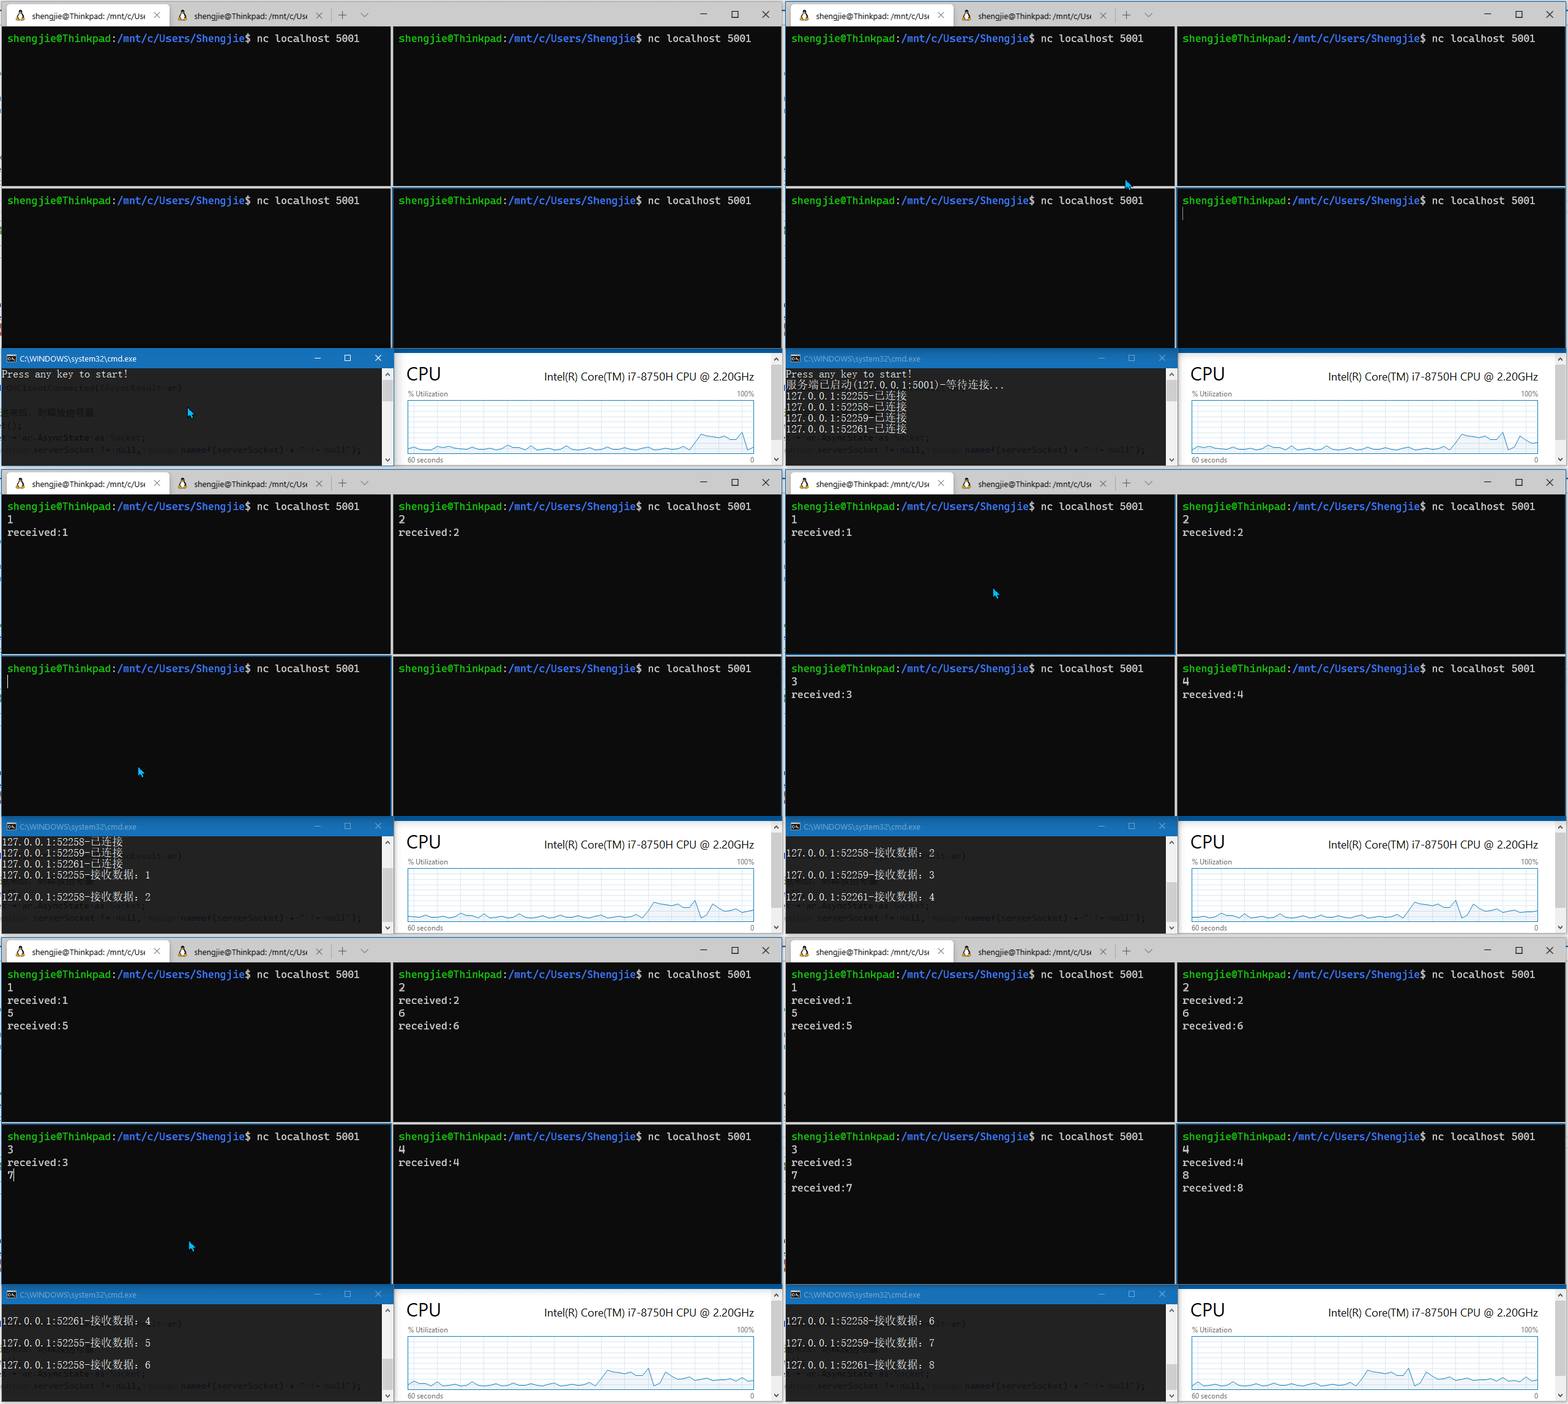
首先来看运行结果,从下图可以看到,除了建立连接时CPU出现抖动外,在消息接收和发送阶段,CPU占有率趋于平缓,且占用率低。
分析代码后我们发现:
- CPU使用率是下来了,但代码复杂度上升了。
- 使用异步接口处理客户端连接:
BeginAccept和EndAccept - 使用异步接口接收数据:
BeginReceive和EndReceive - 使用异步接口发送数据:
BeginSend和EndSend - 使用
ManualResetEvent进行线程同步,避免线程空转
那你可能好奇,以上模型是何种IO多路复用模型呢?
好问题,我们来一探究竟。
验证I/O模型
要想验证应用使用的何种IO模型,只需要确定应用运行时发起了哪些系统调用即可。对于Linux系统来说,我们可以借助strace命令来跟踪指定应用发起的系统调用和信号。
验证同步阻塞I/O发起的系统调用
可以使用VSCode Remote 连接到自己的Linux系统上,然后新建项目Io.Demo,以上面非阻塞IO的代码进行测试,执行以下启动跟踪命令:
shengjie@ubuntu:~/coding/dotnet$ ls
Io.Demo
shengjie@ubuntu:~/coding/dotnet$ strace -ff -o Io.Demo/strace/io dotnet run --project Io.Demo/
Press any key to start!
服务端已启动(127.0.0.1:5001)-等待连接...
127.0.0.1:36876-已连接
127.0.0.1:36876-开始接收数据...
127.0.0.1:36876-接收数据:1
另起命令行,执行nc localhost 5001模拟客户端连接。
shengjie@ubuntu:~/coding/dotnet/Io.Demo$ nc localhost 5001
1
received:1
使用netstat 命令查看建立的连接。
shengjie@ubuntu:/proc/3763$ netstat -natp | grep 5001
(Not all processes could be identified, non-owned process info
 will not be shown, you would have to be root to see it all.)
tcp        0      0 127.0.0.1:5001          0.0.0.0:*               LISTEN      3763/Io.Demo
tcp        0      0 127.0.0.1:36920         127.0.0.1:5001          ESTABLISHED 3798/nc
tcp        0      0 127.0.0.1:5001          127.0.0.1:36920         ESTABLISHED 3763/Io.Demo
另起命令行,执行 ps -h | grep dotnet 抓取进程Id。
shengjie@ubuntu:~/coding/dotnet/Io.Demo$ ps -h | grep dotnet
 3694 pts/1    S+     0:11 strace -ff -o Io.Demo/strace/io dotnet run --project Io.Demo/
 3696 pts/1    Sl+    0:01 dotnet run --project Io.Demo/
 3763 pts/1    Sl+    0:00 /home/shengjie/coding/dotnet/Io.Demo/bin/Debug/netcoreapp3.0/Io.Demo
 3779 pts/2    S+     0:00 grep --color=auto dotnet
shengjie@ubuntu:~/coding/dotnet$ ls Io.Demo/strace/ # 查看生成的系统调用文件
io.3696  io.3702  io.3708  io.3714  io.3720  io.3726  io.3732  io.3738  io.3744  io.3750  io.3766  io.3772  io.3782  io.3827
io.3697  io.3703  io.3709  io.3715  io.3721  io.3727  io.3733  io.3739  io.3745  io.3751  io.3767  io.3773  io.3786  io.3828
io.3698  io.3704  io.3710  io.3716  io.3722  io.3728  io.3734  io.3740  io.3746  io.3752  io.3768  io.3774  io.3787
io.3699  io.3705  io.3711  io.3717  io.3723  io.3729  io.3735  io.3741  io.3747  io.3763  io.3769  io.3777  io.3797
io.3700  io.3706  io.3712  io.3718  io.3724  io.3730  io.3736  io.3742  io.3748  io.3764  io.3770  io.3780  io.3799
io.3701  io.3707  io.3713  io.3719  io.3725  io.3731  io.3737  io.3743  io.3749  io.3765  io.3771  io.3781  io.3800
有上可知,进程Id为3763,依次执行以下命令可以查看该进程的线程和产生的文件描述符:
shengjie@ubuntu:~/coding/dotnet/Io.Demo$ cd /proc/3763 # 进入进程目录
shengjie@ubuntu:/proc/3763$ ls
attr        cmdline          environ  io         mem         ns             pagemap      sched      smaps_rollup  syscall        wchan
autogroup   comm             exe      limits     mountinfo   numa_maps      patch_state  schedstat  stack         task
auxv        coredump_filter  fd       loginuid   mounts      oom_adj        personality  sessionid  stat          timers
cgroup      cpuset           fdinfo   map_files  mountstats  oom_score      projid_map   setgroups  statm         timerslack_ns
clear_refs  cwd              gid_map  maps       net         oom_score_adj  root         smaps      status        uid_map
shengjie@ubuntu:/proc/3763$ ll task # 查看当前进程启动的线程
total 0
dr-xr-xr-x 9 shengjie shengjie 0 5月  10 16:36 ./
dr-xr-xr-x 9 shengjie shengjie 0 5月  10 16:34 ../
dr-xr-xr-x 7 shengjie shengjie 0 5月  10 16:36 3763/
dr-xr-xr-x 7 shengjie shengjie 0 5月  10 16:36 3765/
dr-xr-xr-x 7 shengjie shengjie 0 5月  10 16:36 3766/
dr-xr-xr-x 7 shengjie shengjie 0 5月  10 16:36 3767/
dr-xr-xr-x 7 shengjie shengjie 0 5月  10 16:36 3768/
dr-xr-xr-x 7 shengjie shengjie 0 5月  10 16:36 3769/
dr-xr-xr-x 7 shengjie shengjie 0 5月  10 16:36 3770/
shengjie@ubuntu:/proc/3763$ ll fd 查看当前进程系统调用产生的文件描述符
total 0
dr-x------ 2 shengjie shengjie  0 5月  10 16:36 ./
dr-xr-xr-x 9 shengjie shengjie  0 5月  10 16:34 ../
lrwx------ 1 shengjie shengjie 64 5月  10 16:37 0 -> /dev/pts/1
lrwx------ 1 shengjie shengjie 64 5月  10 16:37 1 -> /dev/pts/1
lrwx------ 1 shengjie shengjie 64 5月  10 16:37 10 -> 'socket:[44292]'
lr-x------ 1 shengjie shengjie 64 5月  10 16:37 100 -> /dev/random
lrwx------ 1 shengjie shengjie 64 5月  10 16:37 11 -> 'socket:[41675]'
lr-x------ 1 shengjie shengjie 64 5月  10 16:37 13 -> 'pipe:[45206]'
l-wx------ 1 shengjie shengjie 64 5月  10 16:37 14 -> 'pipe:[45206]'
lr-x------ 1 shengjie shengjie 64 5月  10 16:37 15 -> /home/shengjie/coding/dotnet/Io.Demo/bin/Debug/netcoreapp3.0/Io.Demo.dll
lr-x------ 1 shengjie shengjie 64 5月  10 16:37 16 -> /home/shengjie/coding/dotnet/Io.Demo/bin/Debug/netcoreapp3.0/Io.Demo.dll
lr-x------ 1 shengjie shengjie 64 5月  10 16:37 17 -> /usr/share/dotnet/shared/Microsoft.NETCore.App/3.0.0/System.Runtime.dll
lr-x------ 1 shengjie shengjie 64 5月  10 16:37 18 -> /usr/share/dotnet/shared/Microsoft.NETCore.App/3.0.0/System.Console.dll
lr-x------ 1 shengjie shengjie 64 5月  10 16:37 19 -> /usr/share/dotnet/shared/Microsoft.NETCore.App/3.0.0/System.Threading.dll
lrwx------ 1 shengjie shengjie 64 5月  10 16:37 2 -> /dev/pts/1
lr-x------ 1 shengjie shengjie 64 5月  10 16:37 20 -> /usr/share/dotnet/shared/Microsoft.NETCore.App/3.0.0/System.Runtime.Extensions.dll
lrwx------ 1 shengjie shengjie 64 5月  10 16:37 21 -> /dev/pts/1
lr-x------ 1 shengjie shengjie 64 5月  10 16:37 22 -> /usr/share/dotnet/shared/Microsoft.NETCore.App/3.0.0/System.Text.Encoding.Extensions.dll
lr-x------ 1 shengjie shengjie 64 5月  10 16:37 23 -> /dev/urandom
lr-x------ 1 shengjie shengjie 64 5月  10 16:37 24 -> /usr/share/dotnet/shared/Microsoft.NETCore.App/3.0.0/System.Net.Sockets.dll
lr-x------ 1 shengjie shengjie 64 5月  10 16:37 25 -> /usr/share/dotnet/shared/Microsoft.NETCore.App/3.0.0/System.Net.Primitives.dll
lr-x------ 1 shengjie shengjie 64 5月  10 16:37 26 -> /usr/share/dotnet/shared/Microsoft.NETCore.App/3.0.0/Microsoft.Win32.Primitives.dll
lr-x------ 1 shengjie shengjie 64 5月  10 16:37 27 -> /usr/share/dotnet/shared/Microsoft.NETCore.App/3.0.0/System.Diagnostics.Tracing.dll
lr-x------ 1 shengjie shengjie 64 5月  10 16:37 28 -> /usr/share/dotnet/shared/Microsoft.NETCore.App/3.0.0/System.Threading.Tasks.dll
lrwx------ 1 shengjie shengjie 64 5月  10 16:37 29 -> 'socket:[43429]'
lr-x------ 1 shengjie shengjie 64 5月  10 16:37 3 -> 'pipe:[42148]'
lr-x------ 1 shengjie shengjie 64 5月  10 16:37 30 -> /usr/share/dotnet/shared/Microsoft.NETCore.App/3.0.0/System.Threading.ThreadPool.dll
lrwx------ 1 shengjie shengjie 64 5月  10 16:37 31 -> 'socket:[42149]'
lr-x------ 1 shengjie shengjie 64 5月  10 16:37 32 -> /usr/share/dotnet/shared/Microsoft.NETCore.App/3.0.0/System.Memory.dll
l-wx------ 1 shengjie shengjie 64 5月  10 16:37 4 -> 'pipe:[42148]'
lr-x------ 1 shengjie shengjie 64 5月  10 16:37 42 -> /dev/urandom
lrwx------ 1 shengjie shengjie 64 5月  10 16:37 5 -> /dev/pts/1
lrwx------ 1 shengjie shengjie 64 5月  10 16:37 6 -> /dev/pts/1
lrwx------ 1 shengjie shengjie 64 5月  10 16:37 7 -> /dev/pts/1
lr-x------ 1 shengjie shengjie 64 5月  10 16:37 9 -> /usr/share/dotnet/shared/Microsoft.NETCore.App/3.0.0/System.Private.CoreLib.dll
lr-x------ 1 shengjie shengjie 64 5月  10 16:37 99 -> /dev/urandom
从上面的输出来看,.NET Core控制台应用启动时启动了多个线程,并在10、11、29、31号文件描述符启动了socket监听。那哪一个文件描述符监听的是5001端口呢。
shengjie@ubuntu:~/coding/dotnet/Io.Demo$ cat /proc/net/tcp | grep 1389 # 查看5001端口号相关的tcp链接(0x1389 为5001十六进制)
   4: 0100007F:1389 00000000:0000 0A 00000000:00000000 00:00000000 00000000  1000        0 43429 1 0000000000000000 100 0 0 10 0
  12: 0100007F:9038 0100007F:1389 01 00000000:00000000 00:00000000 00000000  1000        0 44343 1 0000000000000000 20 4 30 10 -1
  13: 0100007F:1389 0100007F:9038 01 00000000:00000000 00:00000000 00000000  1000        0 42149 1 0000000000000000 20 4 29 10 -1
从中可以看到inode为[43429]的socket监听在5001端口号,所以可以找到上面的输出行lrwx------ 1 shengjie shengjie 64 5月 10 16:37 29 -> 'socket:[43429]',进而判断监听5001端口号socket对应的文件描述符为29。
当然,也可以从记录到strace目录的日志文件找到线索。在文中我们已经提及,socket服务端编程的一般流程,都要经过socket->bind->accept->read->write流程。所以可以通过抓取关键字,查看相关系统调用。
shengjie@ubuntu:~/coding/dotnet/Io.Demo$ grep 'bind' strace/ -rn
strace/io.3696:4570:bind(10, {sa_family=AF_UNIX, sun_path="/tmp/dotnet-diagnostic-3696-327175-socket"}, 110) = 0
strace/io.3763:2241:bind(11, {sa_family=AF_UNIX, sun_path="/tmp/dotnet-diagnostic-3763-328365-socket"}, 110) = 0
strace/io.3763:2949:bind(29, {sa_family=AF_INET, sin_port=htons(5001), sin_addr=inet_addr("127.0.0.1")}, 16) = 0
strace/io.3713:4634:bind(11, {sa_family=AF_UNIX, sun_path="/tmp/dotnet-diagnostic-3713-327405-socket"}, 110) = 0
从上可知,在主线程也就是io.3763线程的系统调用文件中,将29号文件描述符与监听在127.0.0.1:5001的socket进行了绑定。同时也明白了.NET Core自动建立的另外2个socket是与diagnostic相关。
接下来咱们重点看下3763号线程产生的系统调用。
shengjie@ubuntu:~/coding/dotnet/Io.Demo$ cd strace/
shengjie@ubuntu:~/coding/dotnet/Io.Demo/strace$ cat io.3763 # 仅截取相关片段
socket(AF_INET, SOCK_STREAM|SOCK_CLOEXEC, IPPROTO_TCP) = 29
setsockopt(29, SOL_SOCKET, SO_REUSEADDR, [1], 4) = 0
bind(29, {sa_family=AF_INET, sin_port=htons(5001), sin_addr=inet_addr("127.0.0.1")}, 16) = 0
listen(29, 10)
write(21, "\346\234\215\345\212\241\347\253\257\345\267\262\345\220\257\345\212\250(127.0.0.1:500"..., 51) = 51
accept4(29, {sa_family=AF_INET, sin_port=htons(36920), sin_addr=inet_addr("127.0.0.1")}, [16], SOCK_CLOEXEC) = 31
write(21, "127.0.0.1:36920-\345\267\262\350\277\236\346\216\245\n", 26) = 26
write(21, "127.0.0.1:36920-\345\274\200\345\247\213\346\216\245\346\224\266\346\225\260\346"..., 38) = 38
recvmsg(31, {msg_name=NULL, msg_namelen=0, msg_iov=[{iov_base="1\n", iov_len=512}], msg_iovlen=1, msg_controllen=0, msg_flags=0}, 0) = 2
write(21, "127.0.0.1:36920-\346\216\245\346\224\266\346\225\260\346\215\256\357\274\2321"..., 34) = 34
sendmsg(31, {msg_name=NULL, msg_namelen=0, msg_iov=[{iov_base="received:1\n", iov_len=11}], msg_iovlen=1, msg_controllen=0, msg_flags=0}, 0) = 11
accept4(29, 0x7fecf001c978, [16], SOCK_CLOEXEC) = ? ERESTARTSYS (To be restarted if SA_RESTART is set)
--- SIGWINCH {si_signo=SIGWINCH, si_code=SI_KERNEL} ---
从中我们可以发现几个关键的系统调用:
- socket
- bind
- listen
- accept4
- recvmsg
- sendmsg
通过命令man命令可以查看下accept4和recvmsg系统调用的相关说明:
shengjie@ubuntu:~/coding/dotnet/Io.Demo/strace$ man accept4
If no pending connections are present on the queue, and the socket is not marked as nonblocking, accept() blocks the caller until a
       connection  is  present.

shengjie@ubuntu:~/coding/dotnet/Io.Demo/strace$ man recvmsg
If  no  messages are available at the socket, the receive calls wait for a message to arrive, unless the socket is nonblocking (see fcntl(2))
也就是说accept4和recvmsg是阻塞式系统调用。
验证I/O多路复用发起的系统调用
同样以上面I/O多路复用的代码进行验证,验证步骤类似:
shengjie@ubuntu:~/coding/dotnet$ strace -ff -o Io.Demo/strace2/io dotnet run --project Io.Demo/
Press any key to start!
服务端已启动(127.0.0.1:5001)-等待连接...
127.0.0.1:37098-已连接
127.0.0.1:37098-接收数据:1

127.0.0.1:37098-接收数据:2

shengjie@ubuntu:~/coding/dotnet/Io.Demo$ nc localhost 5001
1
received:1
2
received:2

shengjie@ubuntu:/proc/2449$ netstat -natp | grep 5001
(Not all processes could be identified, non-owned process info
 will not be shown, you would have to be root to see it all.)
tcp        0      0 127.0.0.1:5001          0.0.0.0:*               LISTEN      2449/Io.Demo
tcp        0      0 127.0.0.1:5001          127.0.0.1:56296         ESTABLISHED 2449/Io.Demo
tcp        0      0 127.0.0.1:56296         127.0.0.1:5001          ESTABLISHED 2499/nc

shengjie@ubuntu:~/coding/dotnet/Io.Demo$ ps -h | grep dotnet
 2400 pts/3    S+     0:10 strace -ff -o ./Io.Demo/strace2/io dotnet run --project Io.Demo/
 2402 pts/3    Sl+    0:01 dotnet run --project Io.Demo/
 2449 pts/3    Sl+    0:00 /home/shengjie/coding/dotnet/Io.Demo/bin/Debug/netcoreapp3.0/Io.Demo
 2516 pts/5    S+     0:00 grep --color=auto dotnet


shengjie@ubuntu:~/coding/dotnet/Io.Demo$ cd /proc/2449/
shengjie@ubuntu:/proc/2449$ ll task
total 0
dr-xr-xr-x 11 shengjie shengjie 0 5月  10 22:15 ./
dr-xr-xr-x  9 shengjie shengjie 0 5月  10 22:15 ../
dr-xr-xr-x  7 shengjie shengjie 0 5月  10 22:15 2449/
dr-xr-xr-x  7 shengjie shengjie 0 5月  10 22:15 2451/
dr-xr-xr-x  7 shengjie shengjie 0 5月  10 22:15 2452/
dr-xr-xr-x  7 shengjie shengjie 0 5月  10 22:15 2453/
dr-xr-xr-x  7 shengjie shengjie 0 5月  10 22:15 2454/
dr-xr-xr-x  7 shengjie shengjie 0 5月  10 22:15 2455/
dr-xr-xr-x  7 shengjie shengjie 0 5月  10 22:15 2456/
dr-xr-xr-x  7 shengjie shengjie 0 5月  10 22:15 2459/
dr-xr-xr-x  7 shengjie shengjie 0 5月  10 22:15 2462/
shengjie@ubuntu:/proc/2449$ ll fd
total 0
dr-x------ 2 shengjie shengjie  0 5月  10 22:15 ./
dr-xr-xr-x 9 shengjie shengjie  0 5月  10 22:15 ../
lrwx------ 1 shengjie shengjie 64 5月  10 22:16 0 -> /dev/pts/3
lrwx------ 1 shengjie shengjie 64 5月  10 22:16 1 -> /dev/pts/3
lrwx------ 1 shengjie shengjie 64 5月  10 22:16 10 -> 'socket:[35001]'
lr-x------ 1 shengjie shengjie 64 5月  10 22:16 100 -> /dev/random
lrwx------ 1 shengjie shengjie 64 5月  10 22:16 11 -> 'socket:[34304]'
lr-x------ 1 shengjie shengjie 64 5月  10 22:16 13 -> 'pipe:[31528]'
l-wx------ 1 shengjie shengjie 64 5月  10 22:16 14 -> 'pipe:[31528]'
lr-x------ 1 shengjie shengjie 64 5月  10 22:16 15 -> /home/shengjie/coding/dotnet/Io.Demo/bin/Debug/netcoreapp3.0/Io.Demo.dll
lr-x------ 1 shengjie shengjie 64 5月  10 22:16 16 -> /home/shengjie/coding/dotnet/Io.Demo/bin/Debug/netcoreapp3.0/Io.Demo.dll
lr-x------ 1 shengjie shengjie 64 5月  10 22:16 17 -> /usr/share/dotnet/shared/Microsoft.NETCore.App/3.0.0/System.Runtime.dll
lr-x------ 1 shengjie shengjie 64 5月  10 22:16 18 -> /usr/share/dotnet/shared/Microsoft.NETCore.App/3.0.0/System.Console.dll
lr-x------ 1 shengjie shengjie 64 5月  10 22:16 19 -> /usr/share/dotnet/shared/Microsoft.NETCore.App/3.0.0/System.Threading.dll
lrwx------ 1 shengjie shengjie 64 5月  10 22:16 2 -> /dev/pts/3
lr-x------ 1 shengjie shengjie 64 5月  10 22:16 20 -> /usr/share/dotnet/shared/Microsoft.NETCore.App/3.0.0/System.Runtime.Extensions.dll
lrwx------ 1 shengjie shengjie 64 5月  10 22:16 21 -> /dev/pts/3
lr-x------ 1 shengjie shengjie 64 5月  10 22:16 22 -> /usr/share/dotnet/shared/Microsoft.NETCore.App/3.0.0/System.Text.Encoding.Extensions.dll
lr-x------ 1 shengjie shengjie 64 5月  10 22:16 23 -> /dev/urandom
lr-x------ 1 shengjie shengjie 64 5月  10 22:16 24 -> /usr/share/dotnet/shared/Microsoft.NETCore.App/3.0.0/System.Net.Sockets.dll
lr-x------ 1 shengjie shengjie 64 5月  10 22:16 25 -> /usr/share/dotnet/shared/Microsoft.NETCore.App/3.0.0/System.Net.Primitives.dll
lr-x------ 1 shengjie shengjie 64 5月  10 22:16 26 -> /usr/share/dotnet/shared/Microsoft.NETCore.App/3.0.0/Microsoft.Win32.Primitives.dll
lr-x------ 1 shengjie shengjie 64 5月  10 22:16 27 -> /usr/share/dotnet/shared/Microsoft.NETCore.App/3.0.0/System.Diagnostics.Tracing.dll
lr-x------ 1 shengjie shengjie 64 5月  10 22:16 28 -> /usr/share/dotnet/shared/Microsoft.NETCore.App/3.0.0/System.Threading.Tasks.dll
lrwx------ 1 shengjie shengjie 64 5月  10 22:16 29 -> 'socket:[31529]'
lr-x------ 1 shengjie shengjie 64 5月  10 22:16 3 -> 'pipe:[32055]'
lr-x------ 1 shengjie shengjie 64 5月  10 22:16 30 -> /usr/share/dotnet/shared/Microsoft.NETCore.App/3.0.0/System.Threading.ThreadPool.dll
lr-x------ 1 shengjie shengjie 64 5月  10 22:16 31 -> /usr/share/dotnet/shared/Microsoft.NETCore.App/3.0.0/System.Collections.Concurrent.dll
lrwx------ 1 shengjie shengjie 64 5月  10 22:16 32 -> 'anon_inode:[eventpoll]'
lr-x------ 1 shengjie shengjie 64 5月  10 22:16 33 -> 'pipe:[32059]'
l-wx------ 1 shengjie shengjie 64 5月  10 22:16 34 -> 'pipe:[32059]'
lrwx------ 1 shengjie shengjie 64 5月  10 22:16 35 -> 'socket:[35017]'
lr-x------ 1 shengjie shengjie 64 5月  10 22:16 36 -> /usr/share/dotnet/shared/Microsoft.NETCore.App/3.0.0/System.Memory.dll
lr-x------ 1 shengjie shengjie 64 5月  10 22:16 37 -> /dev/urandom
lr-x------ 1 shengjie shengjie 64 5月  10 22:16 38 -> /usr/share/dotnet/shared/Microsoft.NETCore.App/3.0.0/System.Diagnostics.Debug.dll
l-wx------ 1 shengjie shengjie 64 5月  10 22:16 4 -> 'pipe:[32055]'
lrwx------ 1 shengjie shengjie 64 5月  10 22:16 5 -> /dev/pts/3
lrwx------ 1 shengjie shengjie 64 5月  10 22:16 6 -> /dev/pts/3
lrwx------ 1 shengjie shengjie 64 5月  10 22:16 7 -> /dev/pts/3
lr-x------ 1 shengjie shengjie 64 5月  10 22:16 9 -> /usr/share/dotnet/shared/Microsoft.NETCore.App/3.0.0/System.Private.CoreLib.dll
lr-x------ 1 shengjie shengjie 64 5月  10 22:16 99 -> /dev/urandom
shengjie@ubuntu:/proc/2449$ cat /proc/net/tcp | grep 1389
   0: 0100007F:1389 00000000:0000 0A 00000000:00000000 00:00000000 00000000  1000        0 31529 1 0000000000000000 100 0 0 10 0
   8: 0100007F:1389 0100007F:DBE8 01 00000000:00000000 00:00000000 00000000  1000        0 35017 1 0000000000000000 20 4 29 10 -1
  12: 0100007F:DBE8 0100007F:1389 01 00000000:00000000 00:00000000 00000000  1000        0 28496 1 0000000000000000 20 4 30 10 -1
过滤strace2 目录日志,抓取监听在localhost:5001socket对应的文件描述符。
shengjie@ubuntu:~/coding/dotnet/Io.Demo$ grep 'bind' strace2/ -rn
strace2/io.2449:2243:bind(11, {sa_family=AF_UNIX, sun_path="/tmp/dotnet-diagnostic-2449-23147-socket"}, 110) = 0
strace2/io.2449:2950:bind(29, {sa_family=AF_INET, sin_port=htons(5001), sin_addr=inet_addr("127.0.0.1")}, 16) = 0
strace2/io.2365:4568:bind(10, {sa_family=AF_UNIX, sun_path="/tmp/dotnet-diagnostic-2365-19043-socket"}, 110) = 0
strace2/io.2420:4634:bind(11, {sa_family=AF_UNIX, sun_path="/tmp/dotnet-diagnostic-2420-22262-socket"}, 110) = 0
strace2/io.2402:4569:bind(10, {sa_family=AF_UNIX, sun_path="/tmp/dotnet-diagnostic-2402-22042-socket"}, 110) = 0
从中可以看出同样是29号文件描述符,相关系统调用记录中io.2449文件中,打开文件,可以发现相关系统调用如下:
shengjie@ubuntu:~/coding/dotnet/Io.Demo$ cat strace2/io.2449 # 截取相关系统调用
socket(AF_INET, SOCK_STREAM|SOCK_CLOEXEC, IPPROTO_TCP) = 29
setsockopt(29, SOL_SOCKET, SO_REUSEADDR, [1], 4) = 0
bind(29, {sa_family=AF_INET, sin_port=htons(5001), sin_addr=inet_addr("127.0.0.1")}, 16) = 0
listen(29, 10)
accept4(29, 0x7fa16c01b9e8, [16], SOCK_CLOEXEC) = -1 EAGAIN (Resource temporarily unavailable)
epoll_create1(EPOLL_CLOEXEC)            = 32
epoll_ctl(32, EPOLL_CTL_ADD, 29, {EPOLLIN|EPOLLOUT|EPOLLET, {u32=0, u64=0}}) = 0
accept4(29, 0x7fa16c01cd60, [16], SOCK_CLOEXEC) = -1 EAGAIN (Resource temporarily unavailable)
从中我们可以发现accept4直接返回-1而不阻塞,监听在127.0.0.1:5001的socket对应的29号文件描述符最终作为epoll_ctl的参数关联到epoll_create1创建的32号文件描述符上。最终32号文件描述符会被epoll_wait阻塞,以等待连接请求。我们可以抓取epoll相关的系统调用来验证:
shengjie@ubuntu:~/coding/dotnet/Io.Demo$ grep 'epoll' strace2/ -rn
strace2/io.2459:364:epoll_ctl(32, EPOLL_CTL_ADD, 35, {EPOLLIN|EPOLLOUT|EPOLLET, {u32=1, u64=1}}) = 0
strace2/io.2462:21:epoll_wait(32, [{EPOLLIN, {u32=0, u64=0}}], 1024, -1) = 1
strace2/io.2462:42:epoll_wait(32, [{EPOLLOUT, {u32=1, u64=1}}], 1024, -1) = 1
strace2/io.2462:43:epoll_wait(32, [{EPOLLIN|EPOLLOUT, {u32=1, u64=1}}], 1024, -1) = 1
strace2/io.2462:53:epoll_wait(32,
strace2/io.2449:3033:epoll_create1(EPOLL_CLOEXEC)            = 32
strace2/io.2449:3035:epoll_ctl(32, EPOLL_CTL_ADD, 33, {EPOLLIN|EPOLLET, {u32=4294967295, u64=18446744073709551615}}) = 0
strace2/io.2449:3061:epoll_ctl(32, EPOLL_CTL_ADD, 29, {EPOLLIN|EPOLLOUT|EPOLLET, {u32=0, u64=0}}) = 0
因此我们可以断定同步非阻塞I/O的示例使用的时IO多路复用的epoll模型。
关于epoll相关命令,man命令可以查看下epoll_create1、epoll_ctl和、epoll_wait系统调用的相关说明:
shengjie@ubuntu:~/coding/dotnet/Io.Demo/strace$ man epoll_create
DESCRIPTION
       epoll_create() creates a new epoll(7) instance.  Since Linux 2.6.8, the size argument is ignored, but must be
       greater than zero; see NOTES below.

       epoll_create() returns a file descriptor referring to the new epoll instance.  This file descriptor  is  used
       for  all  the subsequent calls to the epoll interface.

shengjie@ubuntu:~/coding/dotnet/Io.Demo/strace$ man epoll_ctl
DESCRIPTION
       This  system  call  performs  control  operations on the epoll(7) instance referred to by the file descriptor
       epfd.  It requests that the operation op be performed for the target file descriptor, fd.

       Valid values for the op argument are:

       EPOLL_CTL_ADD
              Register the target file descriptor fd on the epoll instance referred to by the file  descriptor  epfd
              and associate the event event with the internal file linked to fd.

       EPOLL_CTL_MOD
              Change the event event associated with the target file descriptor fd.

       EPOLL_CTL_DEL
              Remove  (deregister)  the  target file descriptor fd from the epoll instance referred to by epfd.  The
              event is ignored and can be NULL (but see BUGS below).

shengjie@ubuntu:~/coding/dotnet/Io.Demo/strace$ man epoll_wait
DESCRIPTION
       The  epoll_wait()  system  call  waits for events on the epoll(7) instance referred to by the file descriptor
       epfd.  The memory area pointed to by events will contain the events that will be available  for  the  caller.
       Up to maxevents are returned by epoll_wait().  The maxevents argument must be greater than zero.

       The  timeout  argument  specifies  the number of milliseconds that epoll_wait() will block.  Time is measured
       against the CLOCK_MONOTONIC clock.  The call will block until either:

       *  a file descriptor delivers an event;

       *  the call is interrupted by a signal handler; or

       *  the timeout expires.
简而言之,epoll通过创建一个新的文件描述符来替换旧的文件描述符来完成阻塞工作,当有事件或超时时通知原有文件描述符进行处理,以实现非阻塞的线程模型。
总结
写完这篇文章,对I/O模型的理解有所加深,但由于对Linux系统的了解不深,所以难免有纰漏之处,大家多多指教。
同时也不仅感叹Linux的强大之处,一切皆文件的设计思想,让一切都有迹可循。现在.NET 已经完全实现跨平台了,那么Linux操作系统大家就有必要熟悉起来了。


