Java后台框架--Spring与远程方法调用
org.springframework.remoting.httpinvoker.HttpInvokerServiceExporter 实现远程服务调用
(1)httpinvoker方式 服务器客户端都是spring时推荐这种方式
服务端 必须要实现 bean实体类 service接口类 serviceImpl服务实现类
客户端只需拷贝 bean 实体类 service接口类(注意 ,客户端 bean,service类要和服务端bean,service类包路径相同,比如都是
com.hlzt.csm.model.DataPlatFormCountBean,不然会报找不到类,而且 bean要序列化 public class DataPlatFormCount implements Serializable;
如果服务端有 序列化的private static final long serialVersionUID = 1L号,客户端也必须有,如果服务端没有此id,客户端也不要有此id,不然会出错。service类的包路径也要相同,最好服务端写好后直接把实体类和service服务接口类打包,拷贝到客户端,以免造成两端不同。
)
服务器端要在spring-mvc配置文件 spring-mvc-servlet.xml中加入以下(注意是在spring-mvc的配置文件中,不是spring的配置文件)
- <beans xmlns="http://www.springframework.org/schema/beans"
- xmlns:context="http://www.springframework.org/schema/context"
- xmlns:mvc="http://www.springframework.org/schema/mvc" xmlns:xsi="http://www.w3.org/2001/XMLSchema-instance"
- xsi:schemaLocation="
- http://www.springframework.org/schema/beans
- http://www.springframework.org/schema/beans/spring-beans-3.0.xsd
- http://www.springframework.org/schema/context
- http://www.springframework.org/schema/context/spring-context-3.0.xsd
- http://www.springframework.org/schema/mvc
- http://www.springframework.org/schema/mvc/spring-mvc-3.0.xsd">
- <mvc:annotation-driven />
- <context:component-scan base-package="com.hlzt.csm" />
- <mvc:default-servlet-handler/>
- <bean id="csmDataCountService" name="/CsmDataCountSer.shtm" class="org.springframework.remoting.httpinvoker.HttpInvokerServiceExporter">
- <property name="service" ref="csmDataCountSerImpl">property>
- <property name="serviceInterface" value="com.hlzt.csm.service.CsmDataCountSer">
- property>
- bean>
- <bean
- class="org.springframework.web.servlet.handler.SimpleUrlHandlerMapping">
- <property name="mappings">
- <props>
- <prop key="/CsmDataCountSer.shtm">csmDataCountServiceprop>
- props>
- property>
- bean>
- beans>
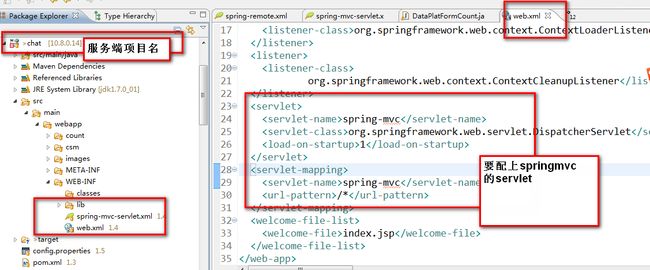
服务端 web.xml的配置
客户端配置
客户端 spring的xml文件配置
- xml version="1.0" encoding="UTF-8"?>
- <beans xmlns="http://www.springframework.org/schema/beans" xmlns:xsi="http://www.w3.org/2001/XMLSchema-instance"
- xmlns:aop="http://www.springframework.org/schema/aop" xmlns:context="http://www.springframework.org/schema/context"
- xmlns:p="http://www.springframework.org/schema/p"
- xsi:schemaLocation="
- http://www.springframework.org/schema/beans http://www.springframework.org/schema/beans/spring-beans-3.1.xsd
- http://www.springframework.org/schema/aop http://www.springframework.org/schema/aop/spring-aop-3.1.xsd
- http://www.springframework.org/schema/context http://www.springframework.org/schema/context/spring-context-3.1.xsd"
- default-lazy-init="true">
- <bean id="csmDataCountSer" name="csmDataCountSer" class="org.springframework.remoting.httpinvoker.HttpInvokerProxyFactoryBean">
- <property name="serviceUrl">
- <value>http://localhost:80/chat/CsmDataCountSer.shtmvalue>
- property>
- <property name="serviceInterface">
- <value>com.hlzt.csm.service.CsmDataCountServalue>
- property>
- bean>
- beans>
注意的是 id="csmDataCountSer" 本人测试结果是 此实例不能在java中通过 rource 或Autowired自动注入,而要通过手工载入方式获得
ApplicationContext context =new ClassPathXmlApplicationContext("/spring/spring-remote.xml");
CsmDataCountSer csmDataCountSer=(CsmDataCountSer)context.getBean("csmDataCountSer");
(2)spring RMI方式
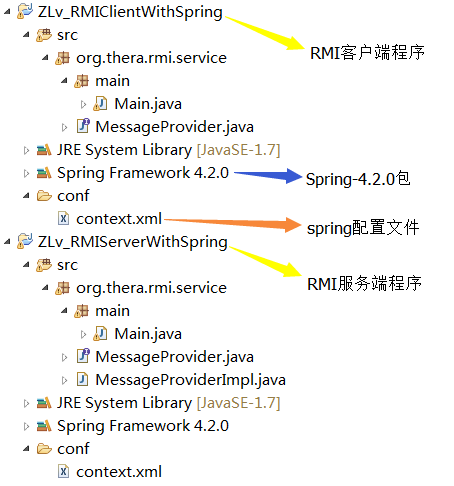
首先看下实例程序目录结构:
Spring中发布RMI服务(ZLv_RMIServerWithSpring):
(1) 定义接口MessageProvider及接口中供调用的方法(MessageProvider.java):
|
1
2
3
4
5
|
package
org.thera.rmi.service;
public
interface
MessageProvider {
public
String queryForMessage(String name);
}
|
(2) 实现MessageProvider接口(MessageProviderImpl.java):
|
1
2
3
4
5
6
7
8
9
10
|
package
org.thera.rmi.service;
public
class
MessageProviderImpl
implements
MessageProvider {
@Override
public
String queryForMessage(String name) {
return
"Hello, "
+ name;
}
}
|
做好了上述准备,下面我们就可以通过Spring中集成RMI,方便的发布RMI服务端
(3) Spring配置文件作如下配置(context.xml):
|
1
2
3
4
5
6
7
8
9
10
11
12
13
14
15
16
17
18
19
20
21
|
<
beans
xmlns
=
"http://www.springframework.org/schema/beans"
xmlns:p
=
"http://www.springframework.org/schema/p"
xmlns:xsi
=
"http://www.w3.org/2001/XMLSchema-instance"
xsi:schemaLocation="http://www.springframework.org/schema/beans
http://www.springframework.org/schema/beans/spring-beans.xsd">
<
bean
id
=
"messageService"
class
=
"org.thera.rmi.service.MessageProviderImpl"
>
<
bean
class
=
"org.springframework.remoting.rmi.RmiServiceExporter"
>
<
property
name
=
"serviceName"
value
=
"MessageService"
/>
<
property
name
=
"service"
ref
=
"messageService"
/>
<
property
name
=
"serviceInterface"
value
=
"org.thera.rmi.service.MessageProvider"
/>
<
property
name
=
"registryPort"
value
=
"1199"
/>
|
(4) 加载Spring容器,发布RMI服务(Main.java):
|
1
2
3
4
5
6
7
8
9
10
11
|
package
org.thera.rmi.service.main;
import
org.springframework.context.ApplicationContext;
import
org.springframework.context.support.FileSystemXmlApplicationContext;
public
class
Main {
public
static
void
main(String[] args) {
ApplicationContext ctx =
new
FileSystemXmlApplicationContext(
"conf/context.xml"
);
System.out.println(
"已成功发布RMI服务类"
);
}
}
|
到这里,RMI的服务端已经发布成功,运行结果如下截图:
Spring中客户端调用RMI服务(ZLv_RMIClientWithSpring):
(1) 移植服务端服务接口文件MessageProvider.java;
(2) Spring配置文件做如下配置:
|
1
2
3
4
5
6
7
8
9
10
11
12
|
<
beans
xmlns
=
"http://www.springframework.org/schema/beans"
xmlns:p
=
"http://www.springframework.org/schema/p"
xmlns:xsi
=
"http://www.w3.org/2001/XMLSchema-instance"
xsi:schemaLocation="http://www.springframework.org/schema/beans
http://www.springframework.org/schema/beans/spring-beans.xsd">
<
bean
id
=
"messageService"
class
=
"org.springframework.remoting.rmi.RmiProxyFactoryBean"
>
<
property
name
=
"serviceUrl"
value
=
"rmi://192.168.1.100:1199/MessageService"
/>
<
property
name
=
"serviceInterface"
value
=
"org.thera.rmi.service.MessageProvider"
/>
|
(3) 加载Spring容器,调用RMI服务端(Main.java):
|
1
2
3
4
5
6
7
8
9
10
11
12
13
14
15
16
|
package
org.thera.rmi.service.main;
import
org.springframework.context.ApplicationContext;
import
org.springframework.context.support.FileSystemXmlApplicationContext;
import
org.thera.rmi.service.MessageProvider;
public
class
Main {
public
static
void
main(String[] args) {
ApplicationContext ctx =
new
FileSystemXmlApplicationContext(
"conf/context.xml"
);
System.out.println(
"加载Spring容器,并初始化RMI客户端"
);
MessageProvider client = (MessageProvider)ctx.getBean(
"messageService"
);
String temp = client.queryForMessage(
"LvSantorini"
);
System.out.println(
"返回结果: "
+ temp);
}
}
|
运行Main.java,结果如下图:
四种方式总结
1. Spring Remote Service Overview
RPC调用类似于调用本地对象的方法,都是同步的操作,调用代码将被阻塞,直到被调用过程完成为止。
本地调用就是execute process在同一个应用的两个代码块中交换。RPC就是execute process从一个应用通过网络传递给另外一个应用。
Spring RemoteService支持这几种模式:RMI, Hessian, Burlap, HTTP invoker和JAX-RPC。
在Server端,Spring可以通过相应的RemoteExporter将一个Bean的发布成一个remote service。
2. RMI in Spring
RMI缺点:RMI在有防火墙的环境下运行会有困难,而且RMI要求客户端和服务器端都必须用Java编写。
3. Hessian和Burlap
Hession和Burlap都是Caucho Technology的框架,基于HTTP的轻量级remote service。
Hessian使用binary消息来建立客户端和服务器端之间的交流,因为基于binary所以对通迅带宽的占用小。所以不依赖于语言可以被Java之外的语言所用。
Burlap是基于XML的技术,消息可读性比较好,而且Burlap相比其他基于XML的技术比如SOAP来说,Burlap的消息结构比较简单,不需要WSDL之类的东西额外定义。
使用Hessian(客户端代码)
和RMI类似,Spring使用HessianProxyFactoryBean来创建一个指向Hessian服务的proxy。
由此可见,当使用Spring时,可以很简单的在各种Spring所支持的remote技术之间切换,而仅仅需要更改很少的配置。
输出Hessian服务
- 使用HessianServiceExporter
将POJO的public方法公开成Hessian服务。HessianServiceExporter是一个Spring MVC controller,接收Hessian的请求然后翻译成对POJO的方法调用。
输出Burlap服务
Burlap服务的输出几乎和Hessian是一样的,不同的地方就是使用org.springframework.remoting.caucho.BurlapServiceExporter。也需要为它配置URL handler和DispatcherServlet。
4. HTTP invoker
RMI使用Java标准的序列化机制,但是很难穿过防火墙;Hessian/Burlap能穿越防火墙但是使用自己私有的一套系列化机制。
因此HTTP invoker应运而生,使用HTTP协议能通过防火墙,并且使用Java序列化机制。
使用HTTP invoker
和RMI,Hessian等相同,HTTP invoker也是通过HttpInvokerProxyFactoryBean。
输出HTTP invoker服务
和Hessian相同,不同的地方就是使用org.springframework.remoting.httpinvoder.HttpInvokerServiceExporter。也需要为它配置URL handler和DispatcherServlet。
HTTP invoder的限制就是客户端和服务器端必须使用Spring。


