跨namespace通信
1、net namespace :
可以做到容器的网络隔离,不同的namespace网络协议栈(网络设备、路由表、iptables/netfilter等)是各自 独立的。
用到的命令:ip netns (管理namespace),ip link (网络设备),ip addr (设备上的协议地址)
在namespace 中操作每次需要加前缀:“ip netns exec + namespace名”再加相对应操作的命令。也可以用:ip netns exec namespace名 bash,来进入相对应的命名空间,以后每次操作就不需要加“ip netns exec + namespace名”这个前缀,但是缺点是没有提示,你最后可能会无法知道自己到底在哪个命名空间。
- namespace有六种:网络、进程(同一个进程,在不同的命名空间进程号不同)、挂载(隔离文件目录)、ipc(隔离进程间通信:进程间交互方法)、UTS(让容器拥有独立的主机名和域名)、用户命名空间
2、veth pair:
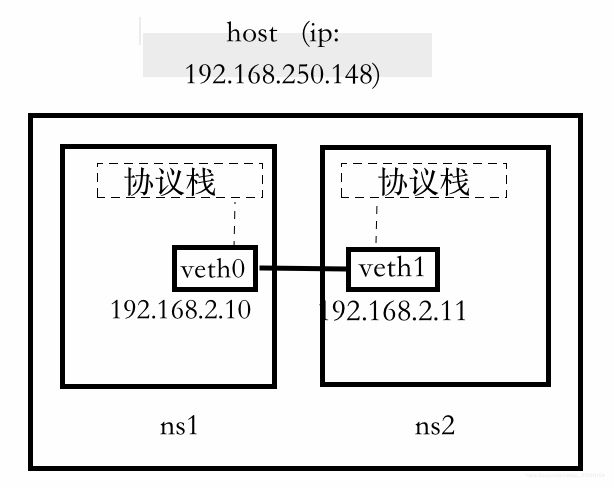
可以让两个不同的net namespace之间通信。veth(veth0)有两端,一端连接协议栈,另一端连接设备(veth1)。
它的报文流动方向是:用ping来举例子,ping目的ip是会有一个ARP请求,先去协议栈选择一条合适的路由,然后从源网卡发到目的网卡。目的网卡接收到请求后,发到协议栈看能否匹配到本地路由表,如果可以的话会返回一个回复报文。

创建veth pair
[root@localhost zh]# ip link add veth0 type veth peer name veth1
创建net namespace
[root@localhost zh]# ip netns add ns2
[root@localhost zh]# ip netns add ns1
将veth添加到net namespace中去:
[root@localhost zh]# ip link set veth0 netns ns1
[root@localhost zh]# ip link set veth1 netns ns2
在namespcae中启动新创建的veth pair 否则不能用,在ns2中也是同样操作
[root@localhost zh]# ip netns exec ns1 ip link set veth0 up
[root@localhost zh]# ip netns exec ns1 ifconfig    //查看namespace中的veth
 veth0: flags=4099  mtu 1500
        ether 12:6a:2e:c7:62:c0  txqueuelen 1000  (Ethernet)
        RX packets 8  bytes 656 (656.0 B)
        RX errors 0  dropped 0  overruns 0  frame 0
        TX packets 8  bytes 656 (656.0 B)
        TX errors 0  dropped 0 overruns 0  carrier 0  collisions 0
给veth配置ip
[root@localhost zh]# ip netns exec ns2 ip addr add 192.168.2.10/24 dev  veth0
[root@localhost zh]# ip netns exec ns1 ip addr add 192.168.2.11/24 dev  veth1
然后再ping,ping成功之后,两个不同namespace之间就可以通信了
[root@localhost zh]# ip netns exec ns2 ping 192.168.2.10
PING 192.168.2.10 (192.168.2.10) 56(84) bytes of data.
64 bytes from 192.168.2.10: icmp_seq=1 ttl=64 time=0.236 ms
64 bytes from 192.168.2.10: icmp_seq=2 ttl=64 time=0.074 ms
64 bytes from 192.168.2.10: icmp_seq=3 ttl=64 time=0.074 ms
64 bytes from 192.168.2.10: icmp_seq=4 ttl=64 time=0.073 ms
^C
--- 192.168.2.10 ping statistics ---
6 packets transmitted, 6 received, 0% packet loss, time 5005ms
rtt min/avg/max/mdev = 0.073/0.101/0.236/0.060 ms
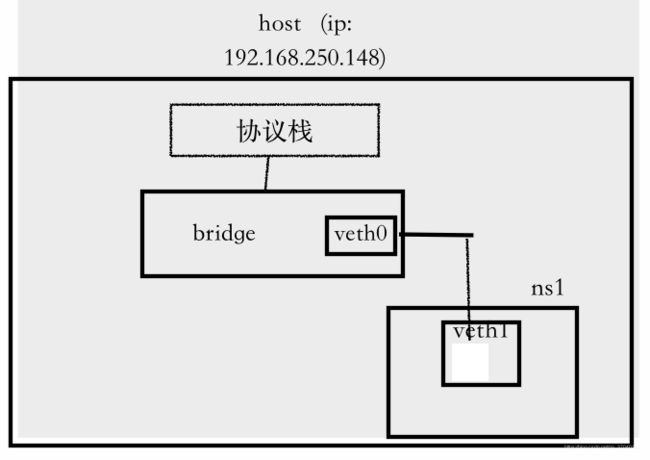
如果要namespace能ping通宿主机,需要在veth pair(veth0,veth1)中间加bridge。veth0接入bridge,veth1接入namespace。如果ping不通,可通过"route -n"查看路由表,看有没有通往目的ip的路由表项,如果没有就不能ping通,需要手动添加(ip route add 目的ip dev 网卡)
ping通宿主机的重点是路由表,可以不加bridge, veth pair可以做到
[root@localhost zh]# route -n
Kernel IP routing table
Destination     Gateway         Genmask         Flags Metric Ref    Use Iface
0.0.0.0         192.168.250.2   0.0.0.0         UG    100    0        0 ens33
192.168.2.0     0.0.0.0         255.255.255.0   U     0      0        0 veth0//看有没有本条路由

[root@localhost zh]# ip netns exec ns1 route -n
Kernel IP routing table
Destination     Gateway         Genmask         Flags Metric Ref    Use Iface
192.168.2.0     0.0.0.0         255.255.255.0   U     0      0        0 veth1//这儿也一样,是否存在这条记录
3、bridge:
和veth pair一起解决多个namespace之间的通信
bridge有多个端口,其中一端连接协议栈,其余的连接设备。它的从设备没有mac和ip,被弱化成了端口,数据包在bridge中进行转发等操作,选择数据包从哪个端口(网卡)流出。
创建bridge:
[root@localhost zh]# ip link add br0 type bridge
并启动:
[root@localhost zh]# ip link set br0 up
将veth pair其中的一个关联到bridge上,将veth启动起来,并配置ip
移除添加到bridge的网卡:brctl delif br0 veth
[root@localhost zh]# ip link set veth0 master br0
可以通过“bridge link”查看bridge上关联的设备
[root@localhost zh]# bridge link
4: virbr0-nic state DOWN :  mtu 1500 master virbr0 state disabled priority 32 cost 100
11: veth0 state DOWN @(null):  mtu 1500 master br0 state disabled priority 32 cost 2
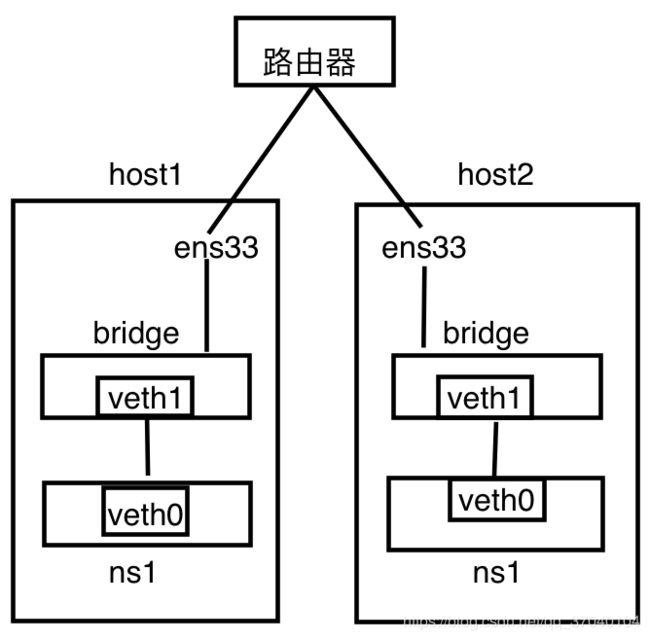
创建一个namespace,将veth pair的另一个添加到这个空间,启动起来,并配置ip,就可以ping成功了 。上面演示的是两个namespace可以ping成功,多个namespace通信就是创建namespace将veth pair的一个添加到命名空间,将另一个添加到bridge,在进行上述同样的一系列操作,就能多个namespace之间通信。
4.让命名空间能够访问外网
[root@localhost zh]# ip netns exec ns1 route -n
 Kernel IP routing table
 Destination     Gateway         Genmask         Flags Metric Ref    Use Iface
0.0.0.0         192.168.2.1     0.0.0.0         UG    0      0        0 veth1
192.168.2.0     0.0.0.0         255.255.255.0   U     0      0        0 veth1//查看有没有这两条路由,192.168.2.1是网桥ip(veth添加到网桥上就失去了ip,所以直接将ip配置在网桥上)
在宿主机添加iptables规则:
sudo iptables -t filter -A FORWARD -i br0 ! -o br0 -j ACCEPT
sudo iptables -t filter -A FORWARD -i br0 -o br0 -j ACCEPT
sudo iptables -t filter -A FORWARD -o br0 -m conntrack --ctstate RELATED,ESTABLISHED -j ACCEPT
sudo iptables -t nat -A POSTROUTING -s 192.168.2.0/16 ! -o br-demo -j MASQUERADE
添加完了之后 就ping 外网了
5.跨主机访问命名空间
在192.168.250.148这台开启一个简单的httpserver
[root@localhost zh]# python -m SimpleHTTPServer
Serving HTTP on 0.0.0.0 port 8000 ...
[root@localhost zh]#curl -I 192.168.2.2:8000//在本机上就可以访问了
从别的机器访问本机namespace需要在本机设置
sudo iptables -t nat -A PREROUTING -p tcp -m tcp --dport 8088 -j DNAT --to-destination 192.168.2.2:8000
sudo iptables -t filter -A FORWARD -p tcp -m tcp --dport 8000 -j ACCEPT(这样设置之后,DNAT做目的IP转换,从192.168.250.148:8088转换成192.168.2.2:8000)
//这是在另一台
 [root@localhost zh]# curl -I 192.168.250.148:8088
 HTTP/1.0 200 OK
 Server: SimpleHTTP/0.6 Python/2.7.5
 Date: Thu, 10 Jan 2019 09:36:35 GMT
 Content-type: text/html; charset=UTF-8
 Content-Length: 1074

