Canny算法实现车道线检测
算法基于Python3.6实现
Python库
- opencv-python
- matplotlib
- numpy
- 输入图片并将其转换为灰度图
- 通过高斯滤波平滑图片去噪
- 使用Canny算法检测边缘
- 提取感兴趣候选区域
- 霍夫变换,直线检测
- 直线拟合得到车道线
图像处理
Candy算法介绍可以参考:https://blog.csdn.net/sc944201630/article/details/81272154
import cv2
import numpy as np
import matplotlib.pyplot as plt

# 读取图片
def load_image(path, show_img=False):
	img = cv2.imread(path)
	if(show_img):
		cv2.imshow("original img", img)
		cv2.waitKey(-1)  # 按下任意键继续
	return img

# 对图片进行灰度化,能加速边缘检测
def image_gray(img, show_gray=False, save_gray_img=False):
	img_gray = cv2.cvtColor(img, cv2.COLOR_RGB2GRAY)
	if show_gray:
		cv2.imshow("gray_image", img_gray)
		cv2.waitKey(-1)
	if save_gray_img:
		cv2.imwrite("./gray_img.jpg", img_gray)
	return img_gray

# canny 算法,边缘检测
# cv2.Canny()参数:分别是输入图片,较小阈值和较大阈值
def canny_edge(img, g_kernel, g_dev, lth, hth, show_img=False, save_img=False):
	# 高斯滤波
	# (g_kernel, g_kernel) 高斯滤波的大小设置
	# g_dev: 高斯滤波的标准差,如果设置为0.0即自动生成
	# 滤波效果由标准差来决定
	img_gaussian = cv2.GaussianBlur(img, (g_kernel, g_kernel), g_dev)
	img_edge = cv2.Canny(img_gaussian, lth, hth)
	if save_img:
		cv2.imwrite("./img_edge.jpg", img_edge)
	if show_img:
		cv2.imshow("img_edge", img_edge)
		cv2.waitKey(-1)
	return img_edge
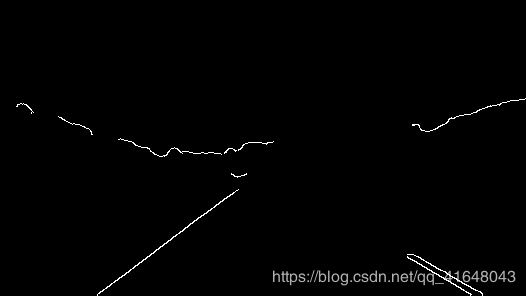
我们得到的边缘信息图片如下:

边缘处理
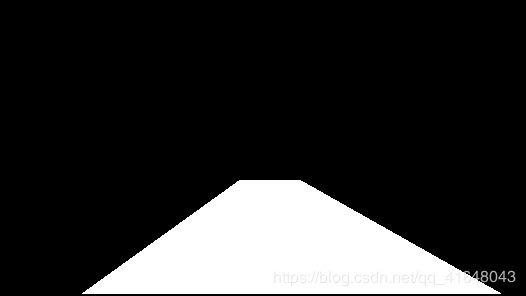
得到边缘信息之后我们需要提取感兴趣候选区域,感兴趣候选区域可通过代码自动提取,但这里我们是手动提取感兴趣候选区域。
# 提取感兴趣候选区域
# 显示图片,获取车道线坐标
# plt.imshow(img)
# plt.show()

# 提取区域,创建掩膜
def get_mask(img, show_img=False, save_img=False):
	mask = np.zeros_like(img)
	# 两条车道线的顶点(每条线两个顶点)
	vertices = np.array([[82,293], [239, 180],[300, 180], [500, 293]])
	cv2.fillPoly(mask, [vertices], 255)
	if save_img:
		cv2.imwrite("./mask.jpg", mask)
	if show_img:
		cv2.imshow("mask", mask)
		cv2.waitKey(-1)
	return mask

# 对掩膜和边缘图片进行与操作得到感兴趣候选区域(roi)
def bitwise(img_edge, mask, show_img=False, save_img=False):
	img_edge_roi = cv2.bitwise_and(img_edge, mask)
	if save_img:
		cv2.imwrite("./img_edge_roi.jpg", img_edge_roi)
	if show_img:
		cv2.imshow("img_edge_roi", img_edge_roi)
		cv2.waitKey(-1)
	return img_edge_roi

# 直线检测, 霍夫变换
# 参数: 输入图片 直线最小角度 最小距离 阈值 最短直线长度 直线间的最大间距
def hough_lines(roi, threshold, min_angle, min_d, min_length, max_gap, save_line=False):
    lines = cv2.HoughLinesP(roi, threshold, min_angle, min_d, minLineLength=min_length, maxLineGap=max_gap)
    # print(lines)
    # print(lines.shape)

    img_line = np.zeros_like(roi)
    for line in lines:
        for x1, y1, x2, y2 in line:
            cv2.line(img_line, (x1,y1),(x2,y2),[0,0,255],2)
    if save_line:
        cv2.imwrite("./img_lane.jpg", img_line)
    cv2.imshow("img_line", img_line)
    cv2.waitKey(-1)
    return lines
掩膜:

霍夫直线检测结果:

直线拟合
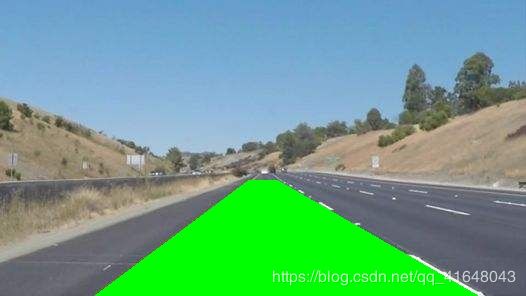
最后,通过直线拟合得到车道线。
主要有以下三个步骤:
- 根据正负斜率将线段划分为左右车道线
- 计算左右车道线斜率的平均值,并计算斜率和均值的差值,舍去差值最大的车道线
- 直线拟合,求得车道线端点。(通过最小二乘法实现)
def clean_lines(lines, threshold):
    # 迭代计算斜率均值,排除掉与差值差异较大的数据
    slope = [(y2 - y1) / (x2 - x1) for line in lines for x1, y1, x2, y2 in line]
    while len(lines) > 0:
        mean = np.mean(slope)
        diff = [abs(s - mean) for s in slope]
        idx = np.argmax(diff)
        if diff[idx] > threshold:
            slope.pop(idx)
            lines.pop(idx)
        else:
            break

def least_squares_fit(point_list, ymin, ymax):
    # 最小二乘法拟合
    x = [p[0] for p in point_list]
    y = [p[1] for p in point_list]
    # polyfit第三个参数为拟合多项式的阶数,所以1代表线性
    fit = np.polyfit(y, x, 1)
    fit_fn = np.poly1d(fit)  # 获取拟合的结果
    xmin = int(fit_fn(ymin))
    xmax = int(fit_fn(ymax))
    return [(xmin, ymin), (xmax, ymax)]

def draw_lane(img, lines, color=[255,0,0],thickness=8):
    # 划分左右车道
    left_lines, right_lines = [], []
    for line in lines:
        for x1,y1,x2,y2 in line:
            k = (y2-y1)/(x2-x1)
            if k<0:
                left_lines.append(line)
            else:
                right_lines.append(line)

    assert len(left_lines)>0 and len(right_lines)>0, "line error, no left or no right"
    # NMS清理直线
    clean_lines(left_lines, 0.1)
    clean_lines(right_lines, 0.1)

    # 得到左右车道线点的集合,拟合直线
    left_points = [(x1, y1) for line in left_lines for x1, y1, x2, y2 in line]
    left_points.extend([(x2, y2) for line in left_lines for x1, y1, x2, y2 in line])
    right_points = [(x1, y1) for line in right_lines for x1, y1, x2, y2 in line]
    right_points.extend([(x2, y2) for line in right_lines for x1, y1, x2, y2 in line])
    left_results = least_squares_fit(left_points, 180, img.shape[0])
    right_results = least_squares_fit(right_points, 180, img.shape[0])

    vtxs = np.array([[left_results[1], left_results[0], right_results[0], right_results[1]]])
    # 填充车道区域
    cv2.fillPoly(img, vtxs, (0, 255, 0))
    cv2.imwrite("./result.jpg", img)
    cv2.imshow("img_lane", img)
    cv2.waitKey(-1)
    # 或者画车道线
    # cv2.line(img, left_results[0], left_results[1], (0, 0, 255), thickness)
    # cv2.line(img, right_results[0], right_results[1], (0, 0, 255), thickness)
视频处理
视频处理我采用了opencv-python作为视频处理库
# 为了方便请注释掉图片处理时所有的图片显示代码
# hough_lines里面有画霍夫变换的结果
# draw_lane里面有显示最终图片结果代码
def process_an_image(img):
    # img = load_image("./test.jpg")
    # video = cv2.VideoCapture("./highway1.avi")
    # _, img = video.read()
    # plt.imshow(img)
    # plt.show()  # 视频的掩膜区域与图片不同,需重新标定
    gray_img = image_gray(img)
    img_edge = canny_edge(gray_img, 11, 0.0, 90, 180, show_img=False)
    mask = get_mask(img_edge, show_img=False)
    roi = bitwise(img_edge, mask, show_img=False)
    lines = hough_lines(roi, 1, np.pi/180, 20, 10, 10)
    draw_lane(img, lines)

if __name__=="__main__":
    output_test = "./highway_result.mp4"
    video = cv2.VideoCapture("./highway1.avi")
    fps = video.get(cv2.CAP_PROP_FPS)
    # frameCount = video.get(cv2.CAP_PROP_FRAME_COUNT)
    size = (int(video.get(cv2.CAP_PROP_FRAME_WIDTH)), int(video.get(cv2.CAP_PROP_FRAME_HEIGHT)))
    videoWriter = cv2.VideoWriter(output_test, cv2.VideoWriter_fourcc(*'MP4V'), fps, size)
    success, img = video.read()
    while success:
        process_an_image(img)
        videoWriter.write(img)
        success, img = video.read()
    print("success")
视频帧处理时可能遇到没有左车道线或没有右车道线的情况,可以将代码里的断言改为return,遇到这种帧直接返回。
opencv-python库读写视频可以参考:https://blog.csdn.net/weixin_42527719/article/details/85694544
参考:https://www.cnblogs.com/gezhuangzhuang/p/10738496.html
