小程序的WXML动态模板语法详解
WXML动态模板语法详解
对于WXML的动态语法,简单的分类为:
- 数据绑定
- 条件渲染
- 列表渲染
- 事件处理
数据绑定
- 基础数据绑定
- 组件值数属性绑定:插值表达式的信息可以插入到属性中
- 插值表达式内部支持计算
- 对象操作: 访问对象中的属性值(对象名称.属性名称)
这是wxml的相关代码:
你好, {{uname}}
测试属性
这是wxss的相关代码:
.data-uid{
  width:200rpx;
  height: 150px;
  background:red;
}
这是js的相关代码:
只看data部分即可
// pages/jichu/jichu.js
Page({

  /**
   * 页面的初始数据
   */
  data: {
    background: ['red', 'pink', '#ccc'],
    indicatorDots: true,
    vertical: false,
    autoplay: false,
    interval: 2000,
    duration: 500,
    uname: '张阳光',
    cls: 'data-uid',
    info: { age: 23, gender:'按钮'}
  },

  changeIndicatorDots() {
    this.setData({
      indicatorDots: !this.data.indicatorDots
    })
  },

  changeAutoplay() {
    this.setData({
      autoplay: !this.data.autoplay
    })
  },

  intervalChange(e) {
    this.setData({
      interval: e.detail.value
    })
  },

  durationChange(e) {
    this.setData({
      duration: e.detail.value
    })
  },
  /**
   * 生命周期函数--监听页面加载
   */
  onLoad: function (options) {

  },

  /**
   * 生命周期函数--监听页面初次渲染完成
   */
  onReady: function () {

  },

  /**
   * 生命周期函数--监听页面显示
   */
  onShow: function () {

  },

  /**
   * 生命周期函数--监听页面隐藏
   */
  onHide: function () {

  },

  /**
   * 生命周期函数--监听页面卸载
   */
  onUnload: function () {

  },

  /**
   * 页面相关事件处理函数--监听用户下拉动作
   */
  onPullDownRefresh: function () {

  },

  /**
   * 页面上拉触底事件的处理函数
   */
  onReachBottom: function () {

  },

  /**
   * 用户点击右上角分享
   */
  onShareAppMessage: function () {
    return {
      title: 'swiper',
      path: 'page/component/pages/swiper/swiper'
    }

  }
})
条件渲染、
- wx-if
- wx-elif
- wx-else
本质上用法和vue的v-if v-if else 和 v-else 一样,当对应的分支的值为true就显示
wxml相关代码:
{ {cls}}">优秀
{ {cls}}">良好
{ {cls}}">一般
{ {cls}}">just so so
wxss相关代码:
.container{
  width:  730rpx;
  height: 450rpx;
  margin: 10rpx auto;
  padding: 5rpx;
  border-radius: 20rpx;
  background-color: #ccc;
}
.data-uid{
  margin: 150rpx auto;
  width:200rpx;
  height: 50px;
  background:red;
  text-align: center;
  line-height: 100rpx;
  color: #ccc;
}
js相关代码:
Page({

  /**
   * 页面的初始数据
   */
  data: {
    score: 40,
    cls:'data-uid'
  },


})
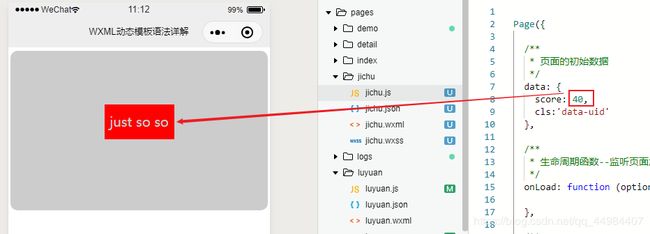
效果:
分数小于60的:

良好的,就是数字在90到80之间:

其它数值只需要改data对应的值就好了。显示效果一样。、
相关补冲:
当你需要同时控制好几个标签一起显示隐藏的时候,可以通过 block 内放置 wx:if ,因为在微信小程序中,block标签类似于vue的template标签不会进行渲染]
hidden属性和wx:if的区别
- 类似于vue中的中v-if和v-show的区别
- 内置组件都有一个hidden属性:如果值为false就显示,为true就不显示
- 通过hidden控制标签渲染的话,无论是否显示内容,实际上都进行了渲染,类似于vue中的v-show
- 应用场景:如果要频繁的控制组件的显示或者隐藏,那么推荐使用hidden
列表渲染
- wx:for
- wx:key 的作用:保证兄弟节点被唯一区分,主要用于提高性能
wx:for和vue的v-for一样
都是基于数据对标签进行对应的重复渲染,数据多少标签渲染多少,对象和数组都可以渲染
<view class="container" wx:for='{{examination}}' wx:key='{{index}}'>
  <view  class="{{cls}}">{{index}} {{item}}</view>
<!-- 默认item表示其中一项数据 -->
<!-- 默认index表示数据项的索引 -->
</view>
可以对 index 和item起别名:
- wx:for-index 给索引起别名为num
- wx:for-item 给数据项起别名为 name
<view wx:for-index='num' wx:for-item='name' wx:key='{{index}}' wx:for='{{list}}'>
  {{num}} {{name}}
</view>
.container{
  width:  730rpx;
  height: 450rpx;
  margin: 10rpx auto;
  padding: 5rpx;
  border-radius: 20rpx;
  background-color: #ccc;
}
.data-uid{
  margin: 150rpx auto;
  width:200rpx;
  height: 50px;
  background:red;
  text-align: center;
  line-height: 100rpx;
  color: #ccc;
}
Page({

  /**
   * 页面的初始数据
   */
  data: {
    score:85,
    cls:'data-uid',
    examination: ['优秀', '良好', '一般','just so so']
  },


})
事件处理
支持的事件类型
事件的绑定方式:bind:【事件名称】, bindchange=“changeAutoplay”
js文件中定义事件的处理函数
<view class="tab">
<!-- bandleChange 表示 change事件   tap是事件名称 -->
  <view class="title" bind:tap='handleChange'>
    <button wx:key='{{item.id}}' wx:for='{{tabData}}' data-id='{{item.id}}' class="{{currentId === item.id? 'bj active': ''}}">{{item.name}}</button>
  </view>
<view   wx:key='{{item.id}}' wx:for='{{tabData}}' class=" content {{currentId === item.id?'active container': 'show'}}">
  <view  class="{{cls}}">{{item.content}}</view>
<!-- 默认item表示其中一项数据 -->
<!-- 默认index表示数据项的索引 -->
</view>
  <!-- <view wx:key='{{item.id}}' wx:for='{{tabData}}' class="content {{currentId === item.id?'active': ''}}">{{item.content}}</view> -->
</view>
.title{
  display: flex;
}
button{
  flex: 1;
}
.bj{
  background: #ccc;
}
.show{
  display: none;
}
.container{
  width:  730rpx;
  height: 450rpx;
  margin: 10rpx auto;
  padding: 5rpx;
  border-radius: 20rpx;
  background-color: #ccc;
}
.data-uid{
  margin: 150rpx auto;
  width:200rpx;
  height: 50px;
  background:pink;
  text-align: center;
  line-height: 100rpx;

}
Page({

  /**
   * 页面的初始数据
   */
  data: {
    score:85,
    cls:'data-uid',
    examination: ['优秀', '良好', '一般','just so so'],
    // 选项卡当前选中的ID
    currentId: '1',
    tabData: [{
      id: '1',
      name: '张阳光',
      content: '优秀'
    }, {
      id: '2',
      name: 'tom',
        content: '良好'
    }, {
      id: '3',
      name: 'spike',
        content: '一般'
    }, {
      id: '4',
      name: 'kitty',
      content: 'just so so'
    }]
  },
  handleChange(e) {
    // console.log(e.target.dataset.id)
    this.setData({
      // 通过自定义属性获取按钮的id,进而更新当前的选中状态,进而影响类名的变化
      currentId: e.target.dataset.id
    })
  },


})
- bind 事件绑定不会阻止冒泡事件向上冒泡
- catch 事件绑定可以阻止冒泡事件向上冒泡
<!-- 事件冒泡 -->
<!-- <view bindtap='handleParent'>
  <view bindtap='handleChild'>点击</view>
</view> -->
<!-- <view bindtap='handleParent'>
  <view catchtap='handleChild'>点击</view>
</view> -->
控制事件捕获
- capture-bind 不阻止捕获事件向内部传递
- capture-catch 阻止捕获事件向内部传递
<!-- 处理事件捕获 -->
<!-- 必须添加冒号进行绑定 -->
<!-- <view capture-bind:tap='handleParent'>
  <view capture-bind:tap='handleChild'>点击</view>
</view> -->
<!-- 如何阻止捕获 -->
<view capture-catch:tap='handleParent'>
  <view capture-bind:tap='handleChild'>点击</view>
</view>
事件对象:可以通过事件函数获取
- currentTarget和target的区别:
- 如果是事件源的话,currentTarget和target相同
- 需要区分事件源和冒泡发生的事件行为
- target表示事件源,就是实际触发事件的组件
- currentTarget表示当前触发事件的组件,有可能是冒泡触发的事件
- 如果要获取触发组件的data-数据,要使用event.target.dataset获取属性的数据


