《ELK日志架构》——第二部分:ELK架构环境搭建
上篇文章中 《ELK日志架构》——第一部分:ELK日志架构学习,学习了ELK的基本理念。本篇开始讲述ELK实战搭建。
搭建环境:
阿里云的ECS(为了重新演示,被我初始化掉了)。操作系统:CentOS Linux release 7.4.1708 (Core)
搭建前提
1.干净的操作系统
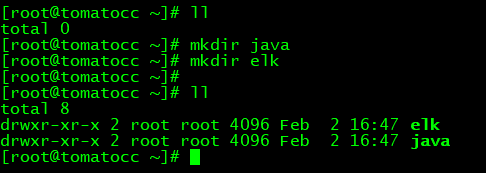
2.创建两个目录java和elk
3.将jdl安装到java目录中,安装JDK1.8,安装教程:
《阿里云服务器搭建》------ 安装jdk
一、安装Elasticsearch
0.进入官网
1.选择Elasticsearch,点击进入

2.点击Download

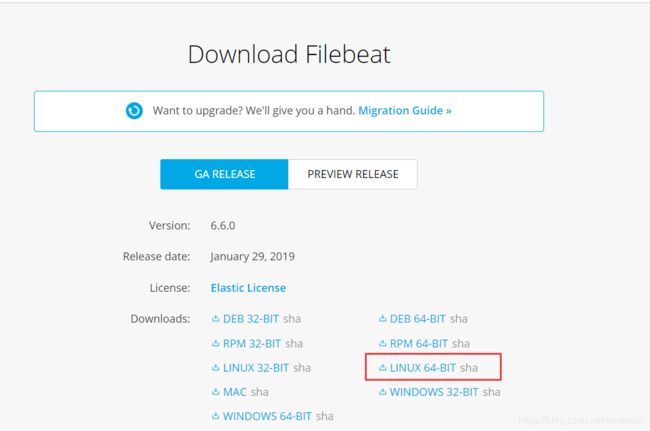
3.然后我们选择Linux操作系统,进行下载(也可以用Docker搭建)
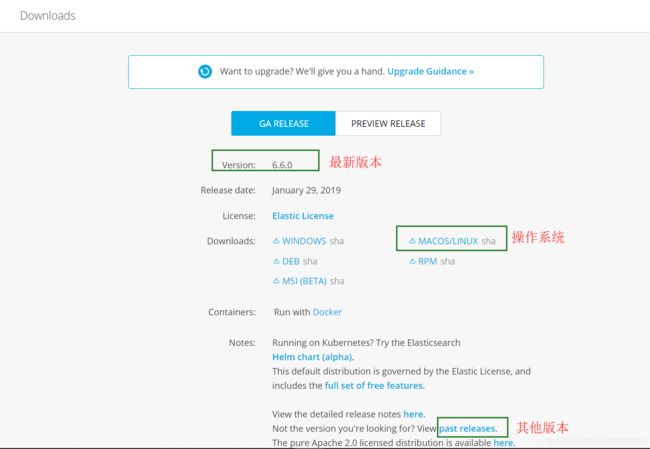
4.然后将下载好的tar包上传到我们的服务器
![]()
5.对elasticsearch.tar包进行解压,解压到elk目录中。
[root@tomatocc elk]# tar -zxvf elasticsearch-6.6.0.tar.gz
6.然后进入到安装目录下。
[root@tomatocc elk]# cd elasticsearch-6.6.0
[root@tomatocc elasticsearch-6.6.0]# bin/elasticsearch

很不幸,第一次启动失败了。报错原因为:由于elasticsearch5.0默认分配jvm空间大小为2g,这里我们修改jvm空间分配即可。
1)打开jvm配置文件。
[root@tomatocc elasticsearch-6.6.0]# vim config/jvm.options

2)将上图的1g改为512m。然后wq!保存。

8.然后重新执行第七步骤,竟然还是错误。(没有java环境。)

但是执行java -version后是存在jdk的。

然后我们打开,/etc/profile 文件,这是配置的java_home

将JAVA_HOME的jdk路径在加一个/。然后source /etc/profile,刷新配置

9.接着继续执行第7步!!还是报错。。该错误原因为由于安全问题elasticsearch禁止早root用户下运行。

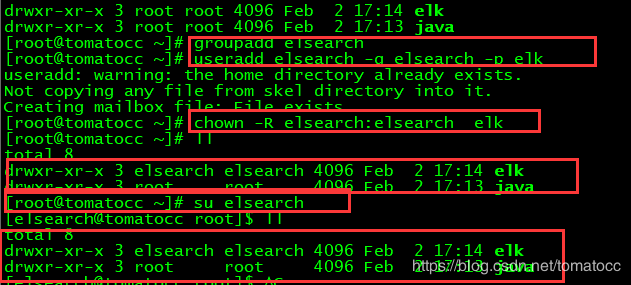
那么,我么就需要为这个elasticsearch单独创建一个用户了。
1> 创建elsearch用户组,并创建一个elsearch的用户,目录为elk
[root@tomatocc ~]# groupadd elsearch
[root@tomatocc ~]# useradd elsearch -g elsearch -p elk
2>更改elk文件夹及内部文件的所属用户及组为elsearch
[root@tomatocc ~]# chown -R elsearch:elsearch elk
3> 然后我们切换到elsearch用户下。
[root@tomatocc ~]# su elsearch
[root@tomatocc ~]# cd elk/elasticsearch-6.6.0/
5>继续执行第七步骤,重启!

已经在启动中!!!!

当出现,下图中的started,则标识启动成功!!

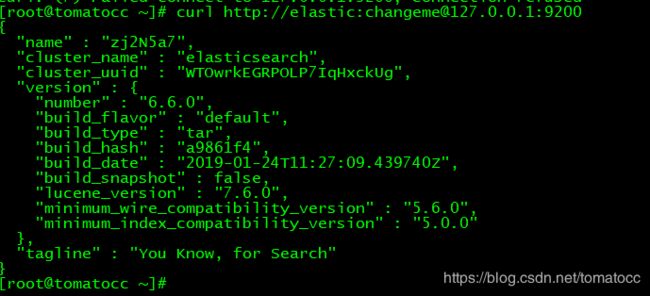
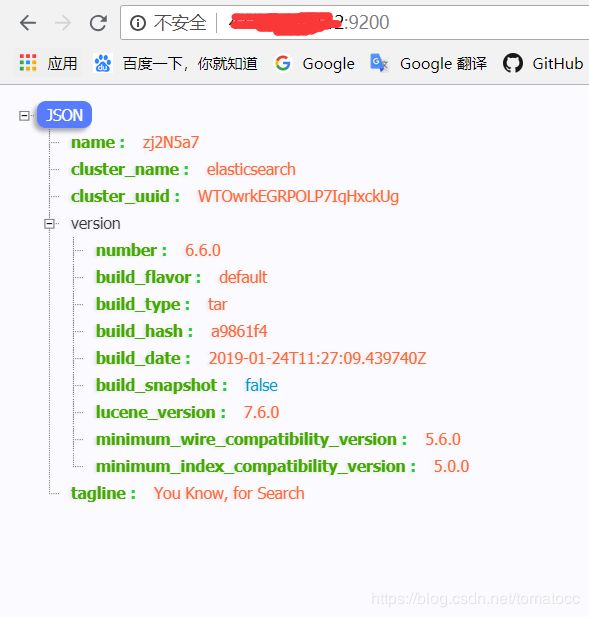
9.验证Elasticsearch是否安装成功。执行下面的命令(ip和端口是默认的,可以自行修改)
[root@tomatocc ~]# curl http://elastic:changeme@127.0.0.1:9200
参数说明:
name: 当前node的名字(可以自己修改配置)
cluster_name:当前集群的名字
cluster_uuid:集群的uuid
version number: 版本号
build系列都是构建方式
技能扩展:使用真实ip来外网访问Elasticsearch
上面,我们启动了Elasticsearch,但是使用的都是默认配置,即ip为localhost,那么,我们只能在linux服务器中才能进行访问。那么如何在自己浏览器进行访问?下面将进行演示操作。
1.先开放9200端口给外网。操作方式参加我的另一篇五文章中部分步骤
《阿里云服务器搭建》------ 安装MySql,这里只需要将3306改为9200端口即可。

2.端口开放好之后,进行配置文件修改。(有时间喜欢研究的,可以先不修改,启动报错后自己一个个找解决方案来进行修改即可,本人花了数个小时才挨个修改完毕,因此建议先修改配置,后启动。)
- 2.1
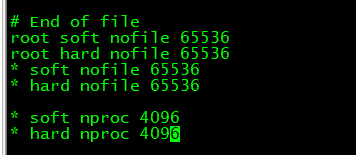
配置系统最大文件数。打开limits.conf进行修改。
[root@tomatocc ~]# vim /etc/security/limits.conf
root soft nofile 65536
root hard nofile 65536
* soft nofile 65536
* hard nofile 65536

* soft nproc 4096
* hard nproc 4096
- 2.2
调整虚拟内存最大map数量,默认是65536,调整最大的文件数量
[root@tomatocc ~]# vi /etc/sysctl.conf
vm.max_map_count=655360
fs.file-max=65536
- 2.3 修改最大线程数。先进入到修改线程的目录下
[root@tomatocc ~]# cd /etc/security/limits.d/
然后打开 xx-nproc.conf 配置文件(有的是90开头,有的是20),将*的线程数修改

修改结果如下。

*          soft    nproc     65536
root       soft    nproc     unlimited
- 2.4 修改elasticsearch.yml配置文件,先cd到elasticsearch目录下的config目录下。
[elsearch@tomatocc root]$ cd elk/elasticsearch-6.6.0/config/
修改elasticsearch.yml配置文件。将配置内容增加到文件末尾。
[elsearch@tomatocc root]$ vim elasticsearch.yml
# my elasticsearch config
network.host: 服务器ip
discovery.zen.ping.unicast.hosts: ["服务器ip"]
bootstrap.memory_lock: false
bootstrap.system_call_filter: false
- 2.5 到这里为止。整个可以供外网访问的elasticsearch就可以访问了!
- 2.6 然后我们切换到
elsearch用户下启动elasticsearch。 - 2.7 然后再浏览器中输入ip和端口,就可以看到效果
备注:上面的配置主要是解决下面三个报错:
1.max file descriptors [4096] for elasticsearch process is too low, increase to at least [65536]
2.max number of threads [2048] for user [elsearch] is too low, increase to at least [4096]
3.max virtual memory areas vm.max_map_count [65530] is too low, increase to at least [262144]
1.1 Elasticsearch配置说明
-
配置文件位于config目录中
- elasticsearch.yml es的相关配置
- jvm.options jvm的相关参数
- log4j2.properties 日志相关配置(elasticsearch使用的是log4j的框架)
-
elasticsearch.yml 关键配置说明
- cluster.name 集群名称,以此作为是否同一集群的判断条件
- node.name 节点名称,以此作为集群中不同节点的区分条件
- network.host/http.port 网络地址和端口,用于http和transport服务使用
- path.data 数据存储地址
- path.log 日志存储地址

-
Development与Production模式说明
- 以transport的地址是否绑定在localhost为判断标准netwrk.host
- Development模式下在启动时会以warning的方式提示配置检查异常
- Production模式下在启动时会以error的方式提示配置检查异常并退出- 参数修改的第二种方式(命令)
- bin/elasticsearch -Ehttp.port=19200 (将端口改为19200)
- 参数修改的第二种方式(命令)
1.2 Elasticsearch本地快速搭建集群
1.先启动默认的elasticsearch。
[elsearch@tomatocc elasticsearch-6.6.0]$ bin/elasticsearch
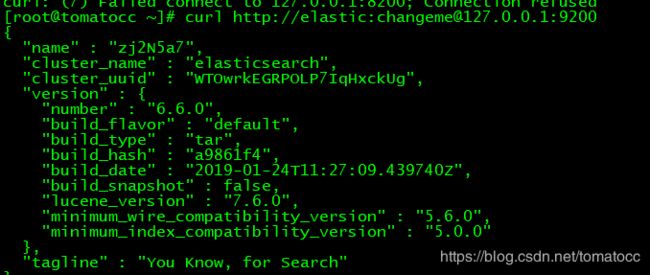
输入以下命令进行验证,如果又输出,则成功启动
[root@tomatocc ~]# curl http://elastic:changeme@127.0.0.1:9200
[elsearch@tomatocc elasticsearch-6.6.0]$ bin/elasticsearch -Ehttp.port=8200 -Epath.data=node2
![]()
输入以下命令进行验证,如果又输出,则成功启动
[root@tomatocc ~]# curl http://elastic:changeme@127.0.0.1:8200
3.那么怎么验证上面的两个节点已经组成了一个集群呢?我们可以通过官方的api来查看。
[root@tomatocc ~]# [root@tomatocc ~]# curl http://elastic:changeme@127.0.0.1:8200/_cat/nodes
可以看到,当前的集群下包含了两个节点。

也可以在后面加上?v 会显示的比较详细
[root@tomatocc ~]# [root@tomatocc ~]# curl http://elastic:changeme@127.0.0.1:8200/_cat/nodes?v
ip代表当前ip。
heap.percent堆的百分比
ram.percent内存百分比
cpu代表cpu
load_ 加载情况
master : 主节点情况(*号为主节点,默认第一个启动的为主节点)
如果需要更详细的信息,可以执行下面的命令
[root@tomatocc ~]# [root@tomatocc ~]# [root@tomatocc ~]# curl http://elastic:changeme@127.0.0.1:8200/_cluster/stats
二、Kibana安装与运行
0.进入官网下载
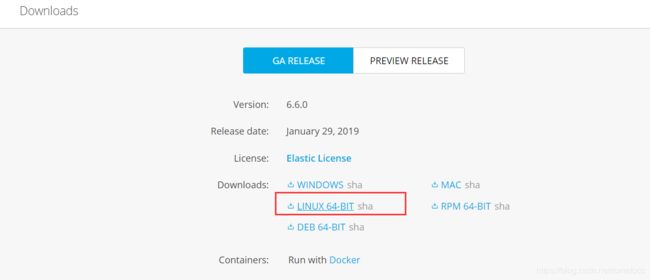
1.选择linux版本即可。
2.将下载好的tar包上传到服务器。
3.对kibana-.tar包进行解压,解压到elk目录中。
[root@tomatocc elk]# tar -zxvf kibana-6.6.0-linux-x86_64.tar.gz
解压后如下图所示。

4.cd到Kibana安装目录下的config,修改kibana.yml配置文件,修改elasticsearch.url地址。
这是默认的elasticsearch.url地址是localhost:9200

我们将可通过外网访问的elasticsearch配置进来。在最后一行加入下面配置
server.port: 5601
server.host: "服务器ip"
elasticsearch.url: "http://服务器ip:9200"
server.port 指的是kibana的端口号
server.host 指的是kibana的ip地址
elasticsearch.url 指的是elasticsearch地址
- 运行kibana。(运行之前请先启动elasticsearch)
[root@tomatocc kibana-6.6.0-linux-x86_64]# bin/kibana
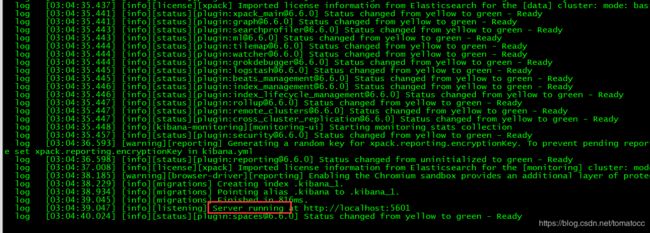
启动成功截图如下
6.然后再浏览器中访问。http://ip:5601 出现下图图标,就访问成功了。(记得增加外网端口)

2.1 Kibana常用功能说明
- Discover数据搜索查看
- Visualize 图表制作
- Dashboard 仪表盘制作
- Timelion 时序数据的高级可视化分析
- DevTools 开发者工具
- Management 配置
2.2 Elasticsearch 常用术语
- Document 文档数据
- Index 索引
- Type 是索引中的数据类型
- Field 字段,文档的属性(必须姓名、年龄等)
- Query DSL 查询语法
2.3 Elasticsearch CRUD
- Creat 创建文档
- Read 读取文档
- Update 更新文档
- Delete 删除文档
三、Kibana与Elasticsearch 的简单操作
1. Elasticsearch 文档操作
- 1 创建一个Elasticsearch Creat
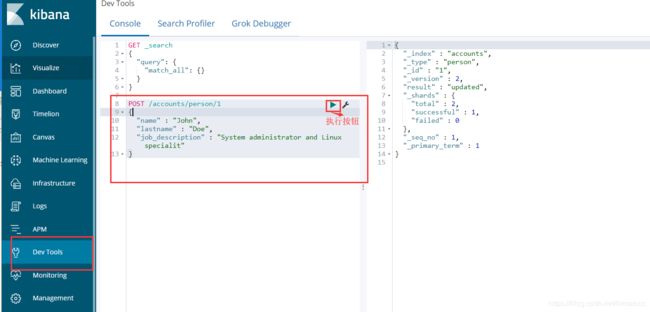
1 )下图是创建一个文档。
含义为:用post方式创建一个Index是accounts ,该index中的type为person,id是1的文档,文档的具体内容为括号中的json。

2)然后打开Kibana,进入到Dev Tools中,将上图内容写入并执行。
POST /accounts/person/1
{
  "name" : "John",
  "lastname" : "Doe",
  "job_description" : "System administrator and Linux specialit"
}
执行后的结果含义:
index:索引
type:类型
id:id
version: 版本号
result: 执行结果,这里表示更新成功
_seq_no : 和sequence id一样
- 2 创建后,然后读取上面创建的文档
GET accounts/person/1
- 3 然后更新上面的文档._update表示进行更新操作。doc表示更新这个文档,{}中的内容为该文档中的某个字段和值
 POST /accounts/person/1/_update
{
  "doc": {
    "name" : "tomatocc"
  }
}
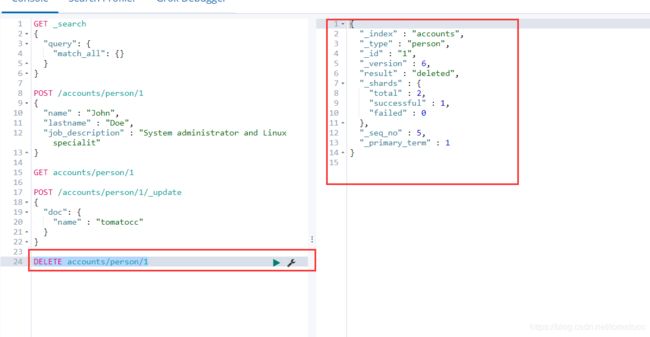
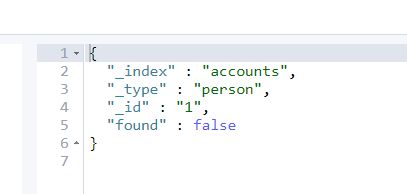
- 4 删除这个文档 . 删除accounts索引下type为person,id为1的文档。
DELETE accounts/person/1
2. Elasticsearch Query
- Query String
GET /accounts/person/_search?q=john - Query DSL
GET  /accounts/person/_search
{
"query" : {
     "match" : {
       "name:" "john"
       }
    }
}
- 首先我们创建两个文档
    POST /accounts/person/1
    {
      "name" : "John",
      "lastname" : "Doe",
      "job_description" : "System administrator and Linux specialit"
    }

    POST /accounts/person/2
    {
      "name" : "tom",
      "lastname" : "jack",
      "job_description" : " i am woker"
    }

2.然后通过Query String的方式进行查询

3.通过Query DSL方式进行查询(组装报文)。通过某个字段的值进行查询。
GET /accounts/person/_search
{
  "query": {
    "term": {
      "name": {
        "value": "tom"
      }
    }
  }
}
四、FileBeat搭建
首先,安装nginx,用于后面的日志收集。
1.通过yum安装nginx。
[root@tomatocc ~]# yum install epel-release
[root@tomatocc ~]# yum install nginx
2.输入命令,验证是否安装成功
[root@tomatocc ~]# nginx -v
![]()
3.修改nginx配置。进到nginx目录下,使用vim打开nginx的配置文件 vi nginx.conf
[root@tomatocc ~]#cd  /etc/nginx
[root@tomatocc nginx]# vi nginx.conf

4.将user nginx 改为user root

5.然后启动nginx。
[root@tomatocc ~]# sudo nginx -c /etc/nginx/nginx.conf
[root@tomatocc ~]# nginx -s reload
6.然后进入到nginx的默认日志路径下,找我我们接下来需要收集的日志。
[root@tomatocc ~]# cd /var/log/nginx
接下来,安装filebate,收集日志
[root@tomatocc elk]# tar -zxvf filebeat-6.6.0-linux-x86_64.tar.gz
3.然后将提前写好的nginx.yml配置文件放到filbeat目录下。(内容如下)
#=========================== Filebeat prospectors =============================
filebeat.prospectors:
- input_type: log
  paths:
    - /var/log/nginx/*.log
#================================ Outputs =====================================

# Configure what outputs to use when sending the data collected by the beat.
# Multiple outputs may be used.

output.console:
    pretty: true
4.解析来通过filebeat来收集nginx日志。(指定nginx.yml配置文件即可)
[root@tomatocc filebeat-6.6.0-linux-x86_64]# ./filebeat -e -c nginx.yml
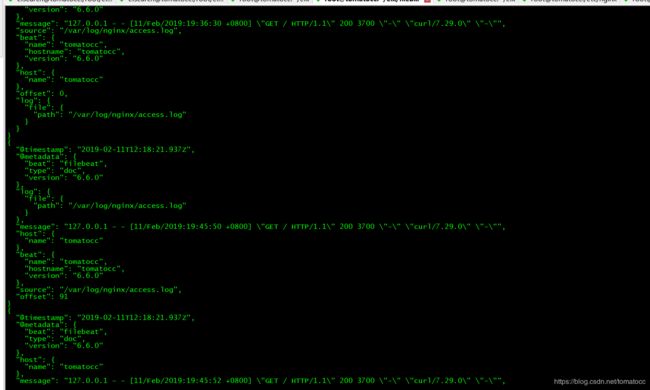
可以看到,filebeat已经将nginx里面的日志进行收集。
{
  "@timestamp": "2019-02-11T12:18:21.937Z",
  "@metadata": {
    "beat": "filebeat",
    "type": "doc",
    "version": "6.6.0"
  },
  "host": {
    "name": "tomatocc"
  },
  "message": "127.0.0.1 - - [11/Feb/2019:19:45:52 +0800] \"GET / HTTP/1.1\" 200 3700 \"-\" \"curl/7.29.0\" \"-\"",
  "source": "/var/log/nginx/access.log",
  "offset": 182,
  "log": {
    "file": {
      "path": "/var/log/nginx/access.log"
    }
  },
  "beat": {
    "hostname": "tomatocc",
    "version": "6.6.0",
    "name": "tomatocc"
  }
}
timestamp表示收集的时间,转换为北京时间则+8小时
metadata: 表示一些meta信息
host:
message:则为nginx每行日志内容
source:日志源路径
五、Logstash搭建
Logstash是开源的服务器端数据处理管道,能够同时从多个来源采集数据,转换数据,然后将数据发送到您最喜欢的 “存储库” 中。(我们的存储库当然是 Elasticsearch。)----摘自官网
Logstash的处理流程:Input表示输入Logstash的输入源,Filter为Logstash自身的处理方式,Output表示Logstash的输出源
安装filebate
[root@tomatocc elk]# tar -zxvf logstash-6.6.0.tar.gz
- 然后cd到logstash目录中,直接启动(
快速启动,标准输入输出作为input和output,没有filter)
[root@tomatocc logstash-6.6.0]# ./bin/logstash -e 'input { stdin {} } output { stdout {} }'
然后出现了下图错误(因为logstash是基于jvm的,所以这里就内存不足!!!)

解决方案:
1)先打开logstash,看到默认内存为1g
[root@tomatocc logstash-6.6.0]# vim config/jvm.options

## JVM configuration

# Xms represents the initial size of total heap space
# Xmx represents the maximum size of total heap space

-Xms1g
-Xmx1g

2)然后将其改为512m,并保存。
3)重新启动即可
到这里为止。ELK的架构基本上搭建完毕(其实还差数据库做缓存,后续补充),包含
-
日志采集用的FileBeat
-
日志收集、处理和输出的Logstash
-
提供搜集、分析、存储数据三大功能的Elasticsearch
-
提供分析和可视化工具可的Kibana
参考资料
《Elasticsearch 权威指南》中文版
Kibana 用户手册
Elastic 官方中文社区
Logstash 最佳实践手册
Logstash官方文档
博客:Logstash简单介绍
## 【ELK日志处理环境搭建】系列教程
《ELK日志架构》——第一部分:ELK日志架构学习
《ELK日志架构》——第二部分:ELK架构环境搭建
欢迎关注本人个人公众号,交流更多技术信息

