vue-element-admin 二次开发需注意事项
目录
- ElementUI
- 待处理问题
ElementUI
- 添加Iconfont的svg图形
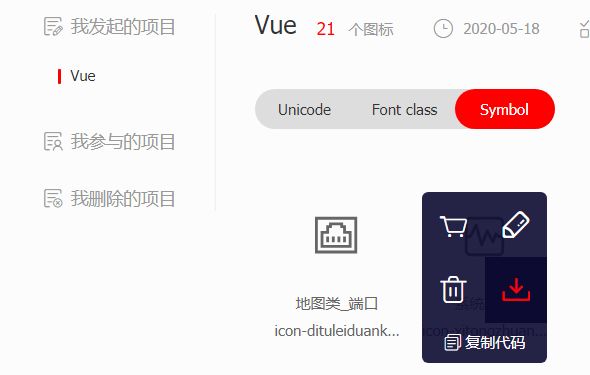
在阿里巴巴矢量图标库中将选中的图标添加进库,如下图
需要选中是Symbol类型,然后去下载需要的svg代码。拷贝进项目的时候需要在svg代码中需要去除 fill/stroke给矢量图像添加颜色相关的代码 - 三级/四级路由嵌套
<template>
  <router-view />
template>
...
{
	path: 'parent',
	...
	children: [
		{
			path: 'sub-parent',
			component: () => import('@/sub-parent/index') // 嵌套路由
			...
			children: [
				{
					path: 'sub-sub-parent',
					component: () => import('@/sub-sub-parent/index'),
					...
				}
			]
		}
	]
}
解决:修改package.json element-ui 的版本号大于2.8.0
## 查看可以版本
npm view element-ui version

## 修改package.json 中element-ui版本为最新

## 更新element-ui
npm update element-ui
- 多个上传组件
el-upload无法确定操作的是哪一个
修改源码
在element-ui/lib目录下修改element-ui.common.js和upload.js两个文件实际上前者包含了后者
element-ui 版本2.12.0
// element-ui.common.js 在29461行 给props添加一个属性 temp
temp: Object;
// methods 方法里面和this.onChange相关的函数末尾都添加 this.temp参数 如下
this.onChange(file, this.uploadFiles, this.temp);

//upload.js还是和上面的一样 在1043行开始

//这样的话父组件中只要绑定 temp,然后就可以在on-change时间的参数中添加 标识的参数了
<div v-for="items in addProblems" :key="items.key" class="show-pic">
   <el-upload
      :ref="items.ref"
      :action="uploadURL"
      :temp="items"
      list-type="picture-card"
      accept=".jpg, .png, .gif"
      :auto-upload="false"
      :on-preview="handlePictureCardPreview"
      :on-change="handleChange"
   >
     <i class="el-icon-plus" />
  </el-upload>
  <el-dialog :visible.sync="items.dialogVisible">
  	<img width="100%" :src="items.dialogImageUrl" alt="">
  </el-dialog>
</div>

//js
handleChange(file, fileList, temp) {
      const isLt10M = file.size / 1024 / 1024 < 10
      const isExcel = /\.(png|jpg|gif)$/.test(file.name)

      if (!isExcel) {
        this.$message.error('上传文件只能是图片!')
      }
      if (!isLt10M) {
        this.$message.error('上传图片大小不能超过 10MB!')
      }

      if (!isExcel || !isLt10M) {
        fileList.splice(fileList.length - 1, 1)
      }
	//就可以区别是在哪一个上操作了
      temp.images = fileList
    }

	// 多个上传组件的上传
	this.addProblems.forEach(item => {
        this.$refs[item.ref][0].submit()
      })

	// 相关的一些代码
	handleAddProblem() {
      ++this.addProblemsId //默认 0
      var val = this.addProblemsId
      this.addProblems.push({
        id: val,
        ref: 'upload' + val,
        description: '',
        severity: '',
        images: [],
        violate: '',
        dialogImageUrl: '',
        dialogVisible: false
      })
    },
- elementUI table组件表头未对齐
/* fix table Misaligned */
.el-table th.gutter{
  display: table-cell!important;
}
- Tree 水平和垂直滚动条及样式
<el-card class="tree">
  <el-tree
    :data="dataTree"
    node-key="id"
    :default-expanded-keys="[0]"
    :props="defaultProps"
    @node-click="handleNodeClick"
  />
el-card>
.tree {
  width: 100%;
  max-height: 600px;
  overflow: auto;
}

.el-tree>.el-tree-node {
  min-width: 100%;
  display: inline-block !important;
}
 /*滚动条样式*/
.tree::-webkit-scrollbar {
  /* 宽度和高度 */
  width: 4px;
  height: 4px;
}
.tree::-webkit-scrollbar-thumb {
  border-radius: 10px;
  box-shadow: inset 0 0 5px rgba(0,0,0,0.2);
  background: rgba(0,0,0,0.2);
}
.tree::-webkit-scrollbar-track {
  box-shadow: inset 0 0 5px rgba(0,0,0,0.2);
  border-radius: 0;
  background: rgba(0,0,0,0.1);
}
- el-dialog组建中使用el-tree组件,显示影藏el-dialog组件的时候,tree中节点的checked属性的设置
// 树种必须设置node-key属性
 this.dialogFormVisible = true
 // DOM还没更新
 this.$nextTick(() => {
   // DOM 更新了。this自动绑定到调用他的实例上
   this.$refs.dataTree.setCheckedKeys([.....id])
   this.$refs['dataForm'].clearValidate()
 })
- 自定义面包屑组件 CustomBreadcrumbItem ,主要解决当前页Table钻取时的同一表格路径的问题
当前页面Table钻取时,显示Table钻取的路径
<template>
  <span class="el-breadcrumb__item">
    <span
      ref="link"
      :class="['el-breadcrumb__inner', 'is-link']"
      role="link"
    >
      <slot />
    span>
    <i v-if="separatorClass" class="el-breadcrumb__separator" :class="separatorClass" />
    <span v-else class="el-breadcrumb__separator" role="presentation">{{ separator }}span>
  span>
template>
<script>
export default {
  name: 'CustomBreadcrumbItem',
  props: {
    to: {
      type: Object,
      default: function() {}
    }
  },
  data() {
    return {
      separator: '',
      separatorClass: ''
    }
  },

  inject: ['elBreadcrumb'],

  mounted() {
    this.separator = this.elBreadcrumb.separator
    this.separatorClass = this.elBreadcrumb.separatorClass
    const link = this.$refs.link
    link.setAttribute('role', 'link')
    link.addEventListener('click', _ => {
      const { to } = this
      this.$emit('handle', to)
    })
  }
}
script>
页面的部分关键代码
<template>
	...
	<el-breadcrumb separator-class="el-icon-arrow-right" class="filter-item" style="margin-right: 20px">
        <transition-group name="breadcrumb">
          <custom-breadcrumb-item v-for="item in breadArray" :key="item.tree_id" :to="item" @handle="breadClick">
            <svg-icon :icon-class="item.type | deviceTypeImg" />
            {{ item.label }}
          custom-breadcrumb-item>
        transition-group>
      el-breadcrumb>
	...
template>
<script>
export default {
	...
	methods: {
		...
		cellClick(row) {
		  // 动态修改路由
	      this.breadArray.push({
	        tree_id: row.tree_id,
	        label: row.label,
	        type: row.type
	      })
	      this.listQuery.tree_id = row.tree_id
	      this.getList()
	    },
	    breadClick(to) {
	      const len = this.breadArray.length
	      for (let i = 0; i < len; i++) {
	        if (to['tree_id'] === this.breadArray[i].tree_id) {
	          this.breadArray = this.breadArray.splice(0, i + 1)
	        } else {
	          continue
	        }
	      }
	      this.listQuery.tree_id = to['tree_id']
	      this.getList()
	    }
	}
 script>
- 表格排序,挺简单的 反正改了一下就做个笔记了
<template>
	...
	<el-table
      :key="tableKey"
      v-loading="listLoading"
      :data="list"
      border
      fit
      highlight-current-row
      style="width: 100%;"
      :default-sort="{prop: 'alarm_level', order: 'descending'}"
      @sort-change="sortChange"
    >
    <el-table-column label="对象" prop="label" sortable="custom" min-width="110" align="left" :class-name="getSortClass('label')">...el-table-column>
    <el-table-column label="更新时间" prop="update_time" sortable="custom" width="180" align="center" :class-name="getSortClass('update_time')">el-table-column>
	...
template>
<script>
...
	methods: {
		sortChange(data) {
	      const { prop, order } = data
	      this.sortBy(prop, order)
	    },
	    sortBy(prop, order) {
	      if (order === 'ascending') {
	        this.listQuery.orderBy = '+' + prop
	      } else {
	        this.listQuery.orderBy = '-' + prop
	      }
	      this.handleFilter()
	    },
	    getSortClass: function(key) {
	      const sort = this.listQuery.orderBy
	      return sort === `+${key}` ? 'ascending' : sort === `-${key}` ? 'descending' : ''
	    },
	}
...
script>
- el-chebox 绑定选中和非选中状态下对应点的值时,需要动态的绑定相关的属性
当一个组件没有声明任何 prop 时,这里会包含所有父作用域的绑定 (class 和 style 除外),并且可以通过 v-bind="$attrs" 传入内部组件
在Vue2.4.0,可以在组件定义中添加inheritAttrs:false,组件将不会把未被注册的props呈现为普通的HTML属性。但是在组件里我们可以通过其$attrs可以获取到没有使用的注册属性,如果需要,我们在这也可以往下继续传递。
<el-checkbox v-model="row.isAlarm" :true-label="1" :false-label="0" />
- 修复el-table中最后一列fixed时,表格的边框不显示
// scss
.el-table__row {
 td{
   &:last-child {
     border-left: 1px solid #dfe6ec;
   }
 }
}
.el-table__fixed-header-wrapper {
 z-index: 4;

 th {
   &:last-child{
     border-left: 1px solid #dfe6ec;
   }
 }
}
- 密码RSA加解密
npm install jsencrypt --save
// RSA 加密
// main.js 直接导入就好了,源码中实现的部分代码是这样写的
/** window.JSEncrypt = JSEncrypt
  * exports.JSEncrypt = JSEncrypt
  * exports.default= JSEncrypt
  */
import 'jsencrypt/bin/jsencrypt'

// 某个需要的文件调用
import { publicKey, privateKey } from '......'
let encryptor = new JSEncrypt()
encryptor.setPublicKey(publicKey)
let rsaPassword = encryptor.encrypt('加密的内容') // 加密后的内容

// 解密
let decryptor = new JSEncrypt()
decryptor .setPublicKey(privateKey)
let rsaPassword = decryptor .decrypt('被加密的内容') // 解密后的内容
- el-checkbox-group绑定的值有刷新,但是页面效果没刷新
页面大致的结构是这样的,弹窗dialog,内部是一个tabs,根据不同条件显示不同的el-tab-pane。
但当在某一个条件下显示的el-tab-pane,需要在el-form中去验证el-checkbox-group时,点击时绑定的值发生了修改,但是el-checkbox-group没显示出来,进行多选的时候,会在最原始绑定的值上只添加最后一次点击的值。只能点击一次切换一下el-tab-pane才会显示 勾选的结果。所以在el-chexkbox-group 的change事件上做了下面的事。每次在B上点击一下,切换一下,来刷新当前选中的结果。

我在codepen去尝试了是没任何问题的代码示例
changeRole(val) {
  this.activeName = 'A'
  this.activeName = 'B'
},
- el-tree组件的事件,check-change、check
当去选择某一个子树的时候,在不使用严格模式的时候,从你选择的当前节点的最上层父节点和子层的节点总共有几个节点选中,就触发几次事假
check事件 每次选择时,第一个参数是当前节点对象 - 密码验证

原本打算用正则的,结果发现有点复杂,先用别的方式来处理一下
/**
 * @param {string} str
 * @returns {Boolean}
 */
export function validPassword(str) {
  let i = 0
  if (/[^\w~!#\$%\^&*\(\)<>]/.test(str)) {
    return false
  }
  if (/\d/.test(str)) {
    ++i
  }
  if (/[a-zA-Z]/.test(str)) {
    ++i
  }
  if (/[_!@#]/.test(str)) {
    ++i
  }
  return i >= 2
}
正则
待续
- history 模式下打包发布到Tomcat
// src/router/index 中修改
const createRouter = () => new Router({
  mode: 'history', // require service support
  base: '/webProj',
  scrollBehavior: () => ({ y: 0 }),
  routes: constantRoutes
})

// vue.config.js中设置
  publicPath: '/webProj',
  outputDir: 'webProj',

// public目录下 创建WEB-INF/web.xml
<?xml version="1.0" encoding="UTF-8"?>
<web-app xmlns:xsi="http://www.w3.org/2001/XMLSchema-instance"
    xmlns="http://xmlns.jcp.org/xml/ns/javaee" xsi:schemaLocation="http://xmlns.jcp.org/xml/ns/javaee http://xmlns.jcp.org/xml/ns/javaee/web-app_3_1.xsd" id="WebApp_ID" version="3.1">
    <display-name>historyMode</display-name>
    <error-page>
        <error-code>404</error-code>
        <location>/index.html</location>
    </error-page>
</web-app>

// tomcat/conf/server.xml
<Context path="" docBase="/webProj" reloadable="true" />
待处理问题
- 弹窗中展示table时,编辑table中某一行中密码时(点击眼睛显示密码),保存还是撤销都无法还原到之前密码影藏的状态
分析
点击眼睛显示按钮的时候是,elementUI是操作当前input元素的type属性从password到text