POSIX线程详解
经过一个星期的复习,终于动手写下来,作为专栏的第一篇文章,本文主要对POSIX 线程进行一个提纲挈领的贯穿讲解,具体有些细节大家可以参考《UNP》,《APUE》等书籍。
本文参考IBM的系列文章 https://www.ibm.com/developerworks/cn/linux/thread/posix_thread1/index.html,
http://www.ilovecpp.com/2018/11/29/condition/#more
特此感谢。
本文主要分为三个部分:
- 第一部分简要介绍线程的概念及其使用
- 第二部分主要介绍互斥锁及条件变量的使用(重点探讨pthread_cond_wait)
- 第三部分参考运行IBM的多线程工作代码作为应用。
一、线程简介及使用
正确的使用线程是一个优秀程序员必备的素质。线程类似于进程,单处理器系统中内核通过时间片轮转模拟线程的并发运行。那么,对于大多数合作任务,为什么多线程比多进程优越呢?
这是因为,线程共享相同的内存空间,不同线程之间可以共享内存中的全局变量。使用fork()写过子进程的同学都会意识到多线程的重要性。为什么呢?虽然fork()允许创建多个进程,但它会带来进程之间的通信问题:各个进程都有各自独立的内存空间,需要使用某种IPC(进程间通信)进行通信,但它们都遇到两个重要障碍:
- 强加了某种形式的额外内核开销,从而降低性能。
- 对于大多数情形,IPC 不是对于代码的“自然”扩展。通常极大地增加了程序的复杂性。
POSIX多线程不必使用诸如管道、套接字等长距离通信,这些通信方式开销大、复杂,由于所有线程都驻留在同一内存空间,因此只需要考虑同步问题即可。
线程是快捷的
与标准fork()相比,线程开销较少。无需单独复制进程的内存空间或文件描述符等等,大大节省CPU时间,创建速度比进程创建快到10-100倍,那么可以大量使用线程而无需担心CPU或内存不足。
同时,线程能够充分利用多处理器的CPU,特定类型线程(CPU密集型)的性能随处理器数目线性提高。如果编写的是CPU密集型程序,则绝对要在代码中使用多线程,无需使用繁琐的IPC及其他复杂通信机制。
线程是可移植的
fork()的底层系统调用是__clone(),新的子进程根据该系统调用的参数有选择的共享父进程的执行环境(内存空间,文件描述符等),但__clone()也有不好的一面,__clone()是特定于Linux平台的,不使用于实现可移植程序。而Linux的POSIX线程是可移植的,代码运行于Solaris、FreeBSD、Linux 和其它平台。
代码:
#include 该程序非常简单,但是也有我们需要学习的地方:
1)线程id的类型为pthread_t,可以认为它是一种句柄,后续的使用都是利用它完成的
2)线程创建函数需要依次指定线程属性、回调函数以及线程传参(简单变量或结构体),返回值考虑
3)线程创建后两个线程如何运行,子线程结束后如何处理
对于第三个问题:
子线程创建后,POSIX线程标准将它们视为相同等级的线程,子线程开始执行的同时,主线程继续向下执行(其实这里已经没有像进程那样的父子概念了,这里只是为了更好的区分),二者并没有一定的先后顺序,CPU时间片的分配取决于内核和线程库。
子线程结束时的处理,当子线程的默认joinable属性时,由主线程对其进行清理;当子线程为detached属性时,由系统进程对其清理。如果未对线程进行正确清理,最终会导致 pthread_create() 调用失败。
代码2:
#include 输出:

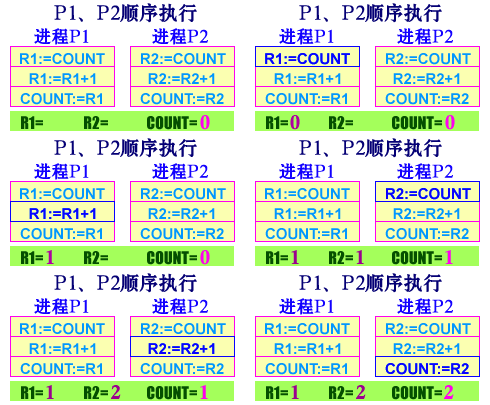
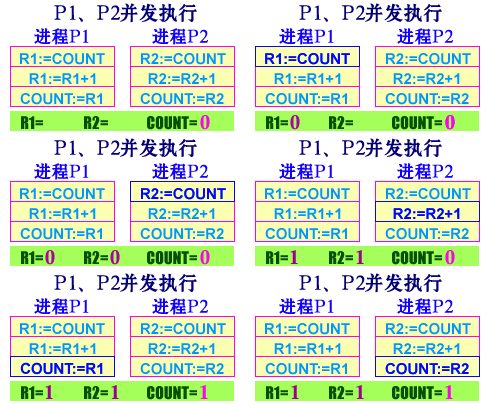
非常意外吧,主线程和子线程各自对myglobal进行20次加1操作,程序结束时myglobal应当为40,然而myglobal的输出为21,这里面肯定有问题。究竟是为什么呢?
核心原因就是:对全局变量的修改并不是原子操作,假设子线程读取全局变量到寄存器,寄存器内部完成加1,之后即将重新赋值给全局变量前的时刻。主线程开始读取全局变量完成操作,那么此时就覆盖了子线程的这一环节操作,该操作也就成了无效操作。


解决这一问题就需要互斥操作了,见第二部分。
二、互斥锁及条件变量的使用
通过互斥锁 (mutex)完成对临界资源的锁操作,能够保证各个线程对其的唯一访问。
互斥对象的工作原理:
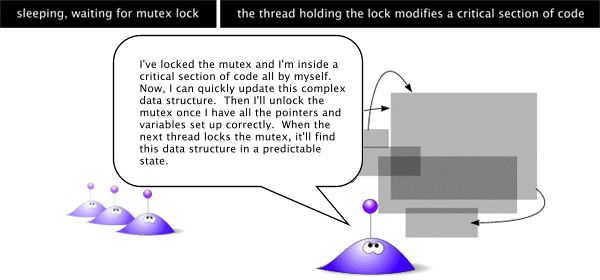
如果线程 a 试图锁定一个互斥对象,而此时线程 b 已锁定了同一个互斥对象时,线程 a 就将进入睡眠状态。一旦线程 b 释放了互斥对象(通过 pthread_mutex_unlock() 调用),线程 a 就能够锁定这个互斥对象(换句话说,线程 a 就将从 pthread_mutex_lock() 函数调用中返回,同时互斥对象被锁定)。同样地,其他对已锁定的互斥对象上调用 pthread_mutex_lock() 的所有线程都将进入睡眠状态,这些睡眠的线程将“排队”访问这个互斥对象。

看到了吗?其他试图访问已被锁定互斥对象的线程都会排队睡眠的:)
代码修改:
#include 此时pthread_mutex_lock() 和 pthread_mutex_unlock() 函数调用,如同“在施工中”标志一样,将正在修改和读取的某一特定共享数据包围起来。其他线程访问时继续睡眠,直到该线程完成对其的操作。
等待条件之POSIX条件变量
互斥对象是线程程序必需的工具,但它们并非万能的。例如,如果线程正在等待共享数据内某个条件出现,那会发生什么呢?
1)使用忙查询的方法非常浪费时间和资源,效率非常低。代码可以反复对互斥对象锁定和解锁,以检查值的任何变化。同时,还要快速将互斥对象解锁,以便其它线程能够进行任何必需的更改。这是一种非常可怕的方法,因为线程需要在合理的时间范围内频繁地循环检测变化。
2)解决这个问题的最好方法是使用pthread_cond_wait() 调用来等待特殊条件发生。当线程在等待满足某些条件时使线程进入睡眠状态。一旦条件满足,还需要一种方法以唤醒因等待满足特定条件而睡眠的线程。如果能够做到这一点,线程代码将是非常高效的,并且不会占用宝贵的互斥对象锁。这正是 POSIX 条件变量能做的事!
了解 pthread_cond_wait() 的作用非常重要 – 它是 POSIX 线程信号发送系统的核心,也是最难以理解的部分。
条件变量的概念
通常在程序里,我们使用条件变量来表示等待”某一条件”的发生。虽然名叫”条件变量”,但是它本身并不保存条件状态,本质上条件变量仅仅是一种通讯机制:当有一个线程在等待(pthread_cond_wait)某一条件变量的时候,会将当前的线程挂起,直到另外的线程发送信号(pthread_cond_signal)通知其解除阻塞状态。
由于要用额外的共享变量保存条件状态(这个变量可以是任何类型比如bool),由于这个变量会同时被不同的线程访问,因此需要一个额外的mutex保护它。
《Linux系统编程手册》也有这个问题的介绍:
A condition variable is always used in conjunction with a mutex. The mutex provides mutual exclusion for accessing the shared variable, while the condition variable is used to signal changes in the variable’s state.
条件变量总是结合mutex使用,条件变量就共享变量的状态改变发出通知,mutex就是用来保护这个共享变量的。
cpp官网描述
pthread_cond_wait实现步骤
首先,我们使用条件变量的接口实现一个简单的生产者-消费者模型,avail就是保存条件状态的共享变量,它对生产者线程、消费者线程均可见。不考虑错误处理,先看生产者实现:
pthread_mutex_lock(&mutex);
avail++;
pthread_mutex_unlock(&mutex);

pthread_cond_signal(&cond); /* Wake sleeping consumer */
因为avail对两个线程都可见,因此对其修改均应该在mutex的保护之下,再来看消费者线程实现:
for (;;)
{
    pthread_mutex_lock(&mutex);
    while (avail == 0)
        pthread_cond_wait(&cond, &mutex);

    while (avail > 0)
    {
        /* Do something */
        avail--;
    }
    pthread_mutex_unlock(&mutex);
}
当”avail==0”时,消费者线程会阻塞在pthread_cond_wait()函数上。如果pthread_cond_wait()仅需要一个pthread_cond_t参数的话,此时mutex已经被锁,要是不先将mutex变量解锁,那么其他线程(如生产者线程)永远无法访问avail变量,也就无法继续生产,消费者线程会一直阻塞下去。
因此pthread_cond_wait()对mutex解锁,然后进入睡眠状态,等待cond以接收POSIX 线程“信号”。一旦接收到“信号”(加引号是因为我们并不是在讨论传统的 UNIX 信号,而是来自pthread_cond_signal() 或 pthread_cond_broadcast() 调用的信号),它就会苏醒。但 pthread_cond_wait() 没有立即返回 – 它还要做一件事:重新锁定 mutex。
理解后提问:调用 pthread_cond_wait() 之 前,互斥对象必须处于什么状态?pthread_cond_wait() 调用返回之后,互斥对象处于什么状态?这两个问题的答案都是“锁定”。
综上,pthread_cond_wait()函数大致会分为3个部分:
1.解锁互斥量mutex
2.阻塞调用线程,直到当前的条件变量收到通知
3.重新锁定互斥量mutex
其中1和2是原子操作,也就是说在pthread_cond_wait()调用线程陷入阻塞之前其他的线程无法获取当前的mutex,也就不能就该条件变量发出通知。
虚假唤醒
前面判断条件状态的时候avail > 0放在了while循环中,而不是if中,这是因为pthread_cond_wait()阻塞在条件变量上的时候,即使其他的线程没有就该条件变量发出通知(pthread_cond_signal()/pthread_cond_broadcast()),条件变量也有可能会自己醒来(pthread_cond_wait()函数返回),因此需要重新检查一下共享变量上的条件成不成立,确保条件变量是真的收到了通知,否则继续阻塞等待。关于虚假唤醒的相关介绍,可以戳这里查看维基百科下面的几个引用:https://en.wikipedia.org/wiki/Spurious_wakeup。
三、工作队列的实现
这里摘抄IBM第三部分应用实现代码:
在这个方案中,我们创建了许多工作程序线程。每个线程都会检查 wq(“工作队列”),查看是否有需要完成的工作。如果有需要完成的工作,那么线程将从队列中除去一个节点,执行这些特定工作,然后等待新的工作到达。
与此同时,主线程负责创建这些工作程序线程、将工作添加到队列,然后在它退出时收集所有工作程序线程。您将会遇到许多 C 代码,好好准备吧!
队列
需要队列是出于两个原因。首先,需要队列来保存工作作业。还需要可用于跟踪已终止线程的数据结构。还记得前几篇文章(请参阅本文结尾处的 参考资料)中,我曾提到过需要使用带有特定进程标识的 pthread_join 吗?使用“清除队列”(称作 “cq”)可以解决无法等待 任何已终止线程的问题(稍后将详细讨论这个问题)。以下是标准队列代码。将此代码保存到文件 queue.h 和 queue.c:
queue.h
/* queue.h
** Copyright 2000 Daniel Robbins, Gentoo Technologies, Inc.
** Author: Daniel Robbins
** Date: 16 Jun 2000
*/
typedef struct node {
  struct node *next;
} node;
typedef struct queue {
  node *head, *tail;
} queue;
void queue_init(queue *myroot);
void queue_put(queue *myroot, node *mynode);
node *queue_get(queue *myroot);
queue.c
/* queue.c
** Copyright 2000 Daniel Robbins, Gentoo Technologies, Inc.
** Author: Daniel Robbins
** Date: 16 Jun 2000
**
** This set of queue functions was originally thread-aware. I
** redesigned the code to make this set of queue routines
** thread-ignorant (just a generic, boring yet very fast set of queue
** routines). Why the change? Because it makes more sense to have
** the thread support as an optional add-on. Consider a situation
** where you want to add 5 nodes to the queue. With the
** thread-enabled version, each call to queue_put() would
** automatically lock and unlock the queue mutex 5 times -- that's a
** lot of unnecessary overhead. However, by moving the thread stuff
** out of the queue routines, the caller can lock the mutex once at
** the beginning, then insert 5 items, and then unlock at the end.
** Moving the lock/unlock code out of the queue functions allows for
** optimizations that aren't possible otherwise. It also makes this
** code useful for non-threaded applications.
**
** We can easily thread-enable this data structure by using the
** data_control type defined in control.c and control.h. */
#include data_control 代码
我编写的并不是线程安全的队列例程,事实上我创建了一个“数据包装”或“控制”结构,它可以是任何线程支持的数据结构。看一下 control.h:
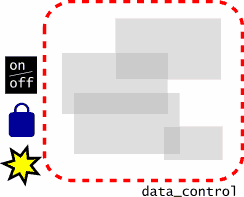
#include 现在您看到了 data_control 结构定义,以下是它的视觉表示:
所使用的 data_control 结构

图像中的锁代表互斥对象,它允许对数据结构进行互斥访问。黄色的星代表条件变量,它可以睡眠,直到所讨论的数据结构改变为止。on/off 开关表示整数 “active”,它告诉线程此数据是否是活动的。在代码中,我使用整数 active 作为标志,告诉工作队列何时应该关闭。以下是 control.c:
control.c
/* control.c
** Copyright 2000 Daniel Robbins, Gentoo Technologies, Inc.
** Author: Daniel Robbins
** Date: 16 Jun 2000
**
** These routines provide an easy way to make any type of
** data-structure thread-aware.  Simply associate a data_control
** structure with the data structure (by creating a new struct, for
** example).  Then, simply lock and unlock the mutex, or
** wait/signal/broadcast on the condition variable in the data_control
** structure as needed.
**
** data_control structs contain an int called "active".  This int is
** intended to be used for a specific kind of multithreaded design,
** where each thread checks the state of "active" every time it locks
** the mutex.  If active is 0, the thread knows that instead of doing
** its normal routine, it should stop itself.  If active is 1, it
** should continue as normal.  So, by setting active to 0, a
** controlling thread can easily inform a thread work crew to shut
** down instead of processing new jobs.  Use the control_activate()
** and control_deactivate() functions, which will also broadcast on
** the data_control struct's condition variable, so that all threads
** stuck in pthread_cond_wait() will wake up, have an opportunity to
** notice the change, and then terminate.
*/

#include "control.h"

int control_init(data_control *mycontrol) {
  int mystatus;
  if (pthread_mutex_init(&(mycontrol->mutex),NULL))
    return 1;
  if (pthread_cond_init(&(mycontrol->cond),NULL))
    return 1;
  mycontrol->active=0;
  return 0;
}

int control_destroy(data_control *mycontrol) {
  int mystatus;
  if (pthread_cond_destroy(&(mycontrol->cond)))
    return 1;
  if (pthread_cond_destroy(&(mycontrol->cond)))
    return 1;
  mycontrol->active=0;
  return 0;
}
int control_activate(data_control *mycontrol) {
  int mystatus;
  if (pthread_mutex_lock(&(mycontrol->mutex)))
    return 0;
  mycontrol->active=1;
  pthread_mutex_unlock(&(mycontrol->mutex));
  pthread_cond_broadcast(&(mycontrol->cond));
  return 1;
}

int control_deactivate(data_control *mycontrol) {
  int mystatus;
  if (pthread_mutex_lock(&(mycontrol->mutex)))
    return 0;
  mycontrol->active=0;
  pthread_mutex_unlock(&(mycontrol->mutex));
  pthread_cond_broadcast(&(mycontrol->cond));
  return 1;
}
调试时间
在开始调试之前,还需要一个文件。以下是 dbug.h:
#define dabort() \
 {  printf("Aborting at line %d in source file %s\n",__LINE__,__FILE__); abort(); }
此代码用于处理工作组代码中的不可纠正错误。
工作组代码
说到工作组代码,以下就是:
workcrew.c
#include 代码初排
现在来快速初排代码。定义的第一个结构称作 “wq”,它包含了 data_control 和队列头。data_control 结构用于仲裁对整个队列的访问,包括队列中的节点。下一步工作是定义实际的工作节点。要使代码符合本文中的示例,此处所包含的都是作业号。
接着,创建清除队列。注释说明了它的工作方式。好,现在让我们跳过 threadfunc()、join_threads()、create_threads() 和 initialize_structs() 调用,直接跳到 main()。所做的第一件事就是初始化结构 – 这包括初始化 data_controls 和队列,以及激活工作队列。
有关清除的注意事项
现在初始化线程。如果看一下 create_threads() 调用,似乎一切正常 – 除了一件事。请注意,我们正在分配清除节点,以及初始化它的线程号和 TID 组件。我们还将清除节点作为初始自变量传递给每一个新的工作程序线程。为什么这样做?
因为当某个工作程序线程退出时,它会将其清除节点连接到清除队列,然后终止。那时,主线程会在清除队列中检测到这个节点(利用条件变量),并将这个节点移出队列。因为 TID(线程标识)存储在清除节点中,所以主线程可以确切知道哪个线程已终止了。然后,主线程将调用 pthread_join(tid),并联接适当的工作程序线程。如果没有做记录,那么主线程就需要按任意顺序联接工作程序线程,可能是按它们的创建顺序。由于线程不一定按此顺序终止,那么主线程可能会在已经联接了十个线程时,等待联接另一个线程。您能理解这种设计决策是如何使关闭代码加速的吗(尤其在使用几百个工作程序线程的情况下)?
创建工作
我们已启动了工作程序线程(它们已经完成了执行 threadfunc(),稍后将讨论此函数),现在主线程开始将工作节点插入工作队列。首先,它锁定 wq 的控制互斥对象,然后分配 16000 个工作包,将它们逐个插入队列。完成之后,将调用 pthread_cond_broadcast(),于是所有正在睡眠的线程会被唤醒,并开始执行工作。此时,主线程将睡眠两秒钟,然后释放工作队列,并通知工作程序线程终止活动。接着,主线程会调用 join_threads() 函数来清除所有工作程序线程。
threadfunc()
现在来讨论 threadfunc(),这是所有工作程序线程都要执行的代码。当工作程序线程启动时,它会立即锁定工作队列互斥对象,获取一个工作节点(如果有的话),然后对它进行处理。如果没有工作,则调用 pthread_cond_wait()。您会注意到这个调用在一个非常紧凑的 while() 循环中,这是非常重要的。当从 pthread_cond_wait() 调用中苏醒时,决不能认为条件肯定发生了 – 它 可能发生了,也可能没有发生。如果发生了这种情况,即错误地唤醒了线程,而列表是空的,那么 while 循环将再次调用 pthread_cond_wait()。
如果有一个工作节点,那么我们只打印它的作业号,释放它并退出。然而,实际代码会执行一些更实质性的操作。在 while() 循环结尾,我们锁定了互斥对象,以便检查 active 变量,以及在循环顶部检查新的工作节点。如果执行完此代码,就会发现如果 wq.control.active 是 0,while 循环就会终止,并会执行 threadfunc() 结尾处的清除代码。
工作程序线程的清除代码部件非常有趣。首先,由于 pthread_cond_wait() 返回了锁定的互斥对象,它会对 work_queue 解锁。然后,它锁定清除队列,添加清除代码(包含了 TID,主线程将使用此 TID 来调用 pthread_join()),然后再对清除队列解锁。此后,它发信号给所有 cq 等待者 (pthread_cond_signal(&cq.control.cond)),于是主线程就知道有一个待处理的新节点。我们不使用 pthread_cond_broadcast(),因为没有这个必要 – 只有一个线程(主线程)在等待清除队列中的新节点。当它调用 join_threads() 时,工作程序线程将打印关闭消息,然后终止,等待主线程发出的 pthread_join() 调用。
join_threads()
如果要查看关于如何使用条件变量的简单示例,请参考 join_threads() 函数。如果还有工作程序线程,join_threads() 会一直执行,等待清除队列中新的清除节点。如果有新节点,我们会将此节点移出队列、对清除队列解锁(从而使工作程序可以添加清除节点)、联接新的工作程序线程(使用存储在清除节点中的 TID)、释放清除节点、减少“现有”线程的数量,然后继续。

