车道线检测-python实现
这里的车道检测是基础版本,需要满足几个先决条件:(1)无人车保持在同车道的高速路中行驶(2)车道线清晰可见(3)无人车与同车道内前车保持足够远的距离。
我们先要找一张图片,对其进行检测
import matplotlib.image as mplimg
import matplotlib.pyplot as plt
img = mplimg.imread('lane.jpg')
plt.imshow(img)
plt.show()
Gray Scale Transformation:将RGB图片转换成灰度图片,用来作为Canny Edge Detection的输入。
import matplotlib.image as mplimg
import matplotlib.pyplot as plt
import cv2
img = mplimg.imread('lane.jpg')
gray = cv2.cvtColor(img, cv2.COLOR_RGB2GRAY)
plt.imshow(gray)
plt.show()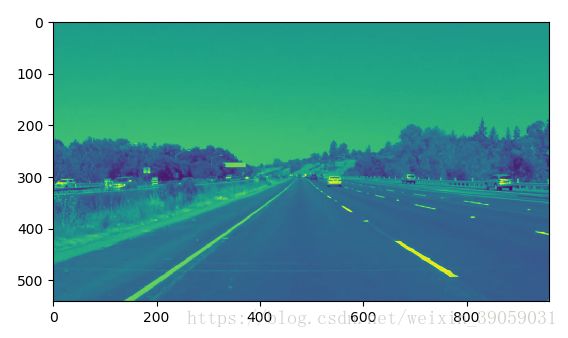
Gaussian Smoothing:Gaussian Smoothing是对图片apply一个Gaussian Filter,可以起到模糊图片和消除噪声的效果。其基本原理是重新计算图片中每个点的值,计算时取该点及其附近点的加权平均,权重符合高斯分布。Gaussian Filter是一种低通过滤器,能够抑制图片中的高频部分,而让低频部分顺利通过。
import matplotlib.image as mplimg
import matplotlib.pyplot as plt
import cv2
blur_ksize = 5  # Gaussian blur kernel size
img = mplimg.imread('lane.jpg')
gray = cv2.cvtColor(img, cv2.COLOR_RGB2GRAY)
blur_gray = cv2.GaussianBlur(gray, (blur_ksize, blur_ksize), 0, 0)
plt.imshow(blur_gray)
plt.show()
Canny Edge Detection:John F. Canny在1986年发明了Canny Edge Detection技术,其基本原理是对图片中各个点求gradient,gradient较大的地方往往是edge。Canny Edge Detection精妙的地方在于它有两个参数:low_threshold和high_threshold。算法先比较gradient与这两个threshold的关系,如果gradient > high_threshold,就承认这是一个edge point;如果gradient < low_threshold,就断定这不是edge point;对于其他的点,如果与edge point相连接,那么这个点被认为也是edge point,否则不是。
import matplotlib.image as mplimg
import matplotlib.pyplot as plt
import cv2
blur_ksize = 5  # Gaussian blur kernel size
canny_lthreshold = 50  # Canny edge detection low threshold
canny_hthreshold = 150  # Canny edge detection high threshold
img = mplimg.imread('lane.jpg')
gray = cv2.cvtColor(img, cv2.COLOR_RGB2GRAY)
blur_gray = cv2.GaussianBlur(gray, (blur_ksize, blur_ksize), 0, 0)
edges = cv2.Canny(blur_gray, canny_lthreshold, canny_hthreshold)
plt.imshow(edges)
plt.show()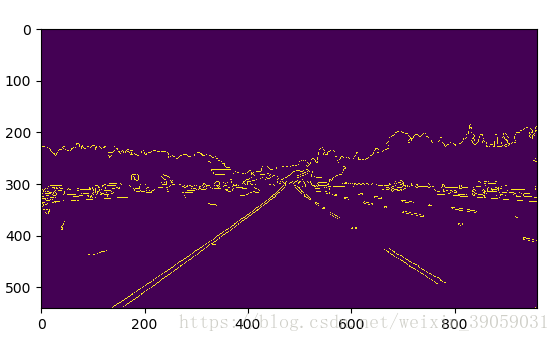
ROI Based Edge Filtering:经过了Canny Edge Detection,我们发现物体的轮廓都被检测到了!但是似乎东西有点儿太多了… 没关系,还有一个重要的条件没有用:camera相对于车是固定的,而无人车相对于车道的左右位置也是基本固定的,所以车道在camera视频中基本保持在一个固定区域内!据此我们可以画出一个大概的Region of Interest (ROI),过滤掉ROI之外的edges。
import matplotlib.image as mplimg
import matplotlib.pyplot as plt
import numpy as np
import cv2
blur_ksize = 5  # Gaussian blur kernel size
canny_lthreshold = 50  # Canny edge detection low threshold
canny_hthreshold = 150  # Canny edge detection high threshold
def roi_mask(img, vertices):
  mask = np.zeros_like(img)
  mask_color = 255
  cv2.fillPoly(mask, vertices, mask_color)
  masked_img = cv2.bitwise_and(img, mask)
  return masked_img
img = mplimg.imread('lane.jpg')
gray = cv2.cvtColor(img, cv2.COLOR_RGB2GRAY)
blur_gray = cv2.GaussianBlur(gray, (blur_ksize, blur_ksize), 0, 0)
edges = cv2.Canny(blur_gray, canny_lthreshold, canny_hthreshold)
roi_vtx = np.array([[(0, img.shape[0]), (460, 325),
                     (520, 325), (img.shape[1], img.shape[0])]])
roi_edges = roi_mask(edges, roi_vtx)
plt.imshow(roi_edges)
plt.show()
Hough Transformation:目前看起来我们似乎已经得到了车道线了呢,然而…并没有! 因为最终目标是得到exactly两条直线!而目前现在图中不仅有多条线,还有一些点状和块状区域,Hough Transformation的目的就是找到图中的线。
import matplotlib.image as mplimg
import matplotlib.pyplot as plt
import numpy as np
import cv2
blur_ksize = 5  # Gaussian blur kernel size
canny_lthreshold = 50  # Canny edge detection low threshold
canny_hthreshold = 150  # Canny edge detection high threshold
# Hough transform parameters
rho = 1
theta = np.pi / 180
threshold = 15
min_line_length = 40
max_line_gap = 20

def roi_mask(img, vertices):
  mask = np.zeros_like(img)
  mask_color = 255
  cv2.fillPoly(mask, vertices, mask_color)
  masked_img = cv2.bitwise_and(img, mask)
  return masked_img
def draw_lines(img, lines, color=[255, 0, 0], thickness=2):
  for line in lines:
    for x1, y1, x2, y2 in line:
      cv2.line(img, (x1, y1), (x2, y2), color, thickness)

def hough_lines(img, rho, theta, threshold,
                min_line_len, max_line_gap):
  lines = cv2.HoughLinesP(img, rho, theta, threshold, np.array([]),
                          minLineLength=min_line_len,
                          maxLineGap=max_line_gap)
  line_img = np.zeros((img.shape[0], img.shape[1], 3), dtype=np.uint8)
  draw_lines(line_img, lines)
  return line_img
img = mplimg.imread('lane.jpg')
gray = cv2.cvtColor(img, cv2.COLOR_RGB2GRAY)
blur_gray = cv2.GaussianBlur(gray, (blur_ksize, blur_ksize), 0, 0)
edges = cv2.Canny(blur_gray, canny_lthreshold, canny_hthreshold)
roi_vtx = np.array([[(0, img.shape[0]), (460, 325),
                     (520, 325), (img.shape[1], img.shape[0])]])
roi_edges = roi_mask(edges, roi_vtx)
line_img = hough_lines(roi_edges, rho, theta, threshold,
                       min_line_length, max_line_gap)
plt.imshow(line_img)
plt.show()

Lane Extrapolation:Almost there! 现在我们要根据得到的线计算出左车道和右车道,一种可以采用的步骤是:
- 根据斜率正负划分某条线属于左车道或右车道
- 分别对左右车道线移除outlier:迭代计算各条线的斜率与斜率均值的差,逐一移除差值过大的线
- 分别对左右车道线的顶点集合做linear regression,得到最终车道。
import matplotlib.image as mplimg
import matplotlib.pyplot as plt
import numpy as np
import cv2
blur_ksize = 5  # Gaussian blur kernel size
canny_lthreshold = 50  # Canny edge detection low threshold
canny_hthreshold = 150  # Canny edge detection high threshold
# Hough transform parameters
rho = 1
theta = np.pi / 180
threshold = 15
min_line_length = 40
max_line_gap = 20

def roi_mask(img, vertices):
  mask = np.zeros_like(img)
  mask_color = 255
  cv2.fillPoly(mask, vertices, mask_color)
  masked_img = cv2.bitwise_and(img, mask)
  return masked_img
def draw_lines(img, lines, color=[255, 0, 0], thickness=2):
  for line in lines:
    for x1, y1, x2, y2 in line:
      cv2.line(img, (x1, y1), (x2, y2), color, thickness)

def hough_lines(img, rho, theta, threshold,
                min_line_len, max_line_gap):
  lines = cv2.HoughLinesP(img, rho, theta, threshold, np.array([]),
                          minLineLength=min_line_len,
                          maxLineGap=max_line_gap)
  line_img = np.zeros((img.shape[0], img.shape[1], 3), dtype=np.uint8)
  # draw_lines(line_img, lines)
  draw_lanes(line_img, lines)
  return line_img
def draw_lanes(img, lines, color=[255, 0, 0], thickness=8):
    left_lines, right_lines = [], []
    for line in lines:
        for x1, y1, x2, y2 in line:
            k = (y2 - y1) / (x2 - x1)
            if k < 0:
                left_lines.append(line)
            else:
                right_lines.append(line)

    if (len(left_lines) <= 0 or len(right_lines) <= 0):
        return img
    clean_lines(left_lines, 0.1)
    clean_lines(right_lines, 0.1)
    left_points = [(x1, y1) for line in left_lines for x1, y1, x2, y2 in line]
    left_points = left_points + [(x2, y2) for line in left_lines for x1, y1, x2, y2 in line]
    right_points = [(x1, y1) for line in right_lines for x1, y1, x2, y2 in line]
    right_points = right_points + [(x2, y2) for line in right_lines for x1, y1, x2, y2 in line]
    left_vtx = calc_lane_vertices(left_points, 325, img.shape[0])
    right_vtx = calc_lane_vertices(right_points, 325, img.shape[0])
    cv2.line(img, left_vtx[0], left_vtx[1], color, thickness)
    cv2.line(img, right_vtx[0], right_vtx[1], color, thickness)

def clean_lines(lines, threshold):
    slope = [(y2 - y1) / (x2 - x1) for line in lines for x1, y1, x2, y2 in line]
    while len(lines) > 0:
        mean = np.mean(slope)
        diff = [abs(s - mean) for s in slope]
        idx = np.argmax(diff)
        if diff[idx] > threshold:
            slope.pop(idx)
            lines.pop(idx)
        else:
            break
def calc_lane_vertices(point_list, ymin, ymax):
    x = [p[0] for p in point_list]
    y = [p[1] for p in point_list]
    fit = np.polyfit(y, x, 1)
    fit_fn = np.poly1d(fit)
    xmin = int(fit_fn(ymin))
    xmax = int(fit_fn(ymax))
    return [(xmin, ymin), (xmax, ymax)]
img = mplimg.imread('lane.jpg')
gray = cv2.cvtColor(img, cv2.COLOR_RGB2GRAY)
blur_gray = cv2.GaussianBlur(gray, (blur_ksize, blur_ksize), 0, 0)
edges = cv2.Canny(blur_gray, canny_lthreshold, canny_hthreshold)
roi_vtx = np.array([[(0, img.shape[0]), (460, 325),
                     (520, 325), (img.shape[1], img.shape[0])]])
roi_edges = roi_mask(edges, roi_vtx)
line_img = hough_lines(roi_edges, rho, theta, threshold,
                       min_line_length, max_line_gap)

plt.imshow(line_img)
plt.show()

最最后,我们将结果和原图叠加:
import matplotlib.image as mplimg
import matplotlib.pyplot as plt
import numpy as np
import cv2
blur_ksize = 5  # Gaussian blur kernel size
canny_lthreshold = 50  # Canny edge detection low threshold
canny_hthreshold = 150  # Canny edge detection high threshold
# Hough transform parameters
rho = 1
theta = np.pi / 180
threshold = 15
min_line_length = 40
max_line_gap = 20

def roi_mask(img, vertices):
  mask = np.zeros_like(img)
  mask_color = 255
  cv2.fillPoly(mask, vertices, mask_color)
  masked_img = cv2.bitwise_and(img, mask)
  return masked_img
def draw_lines(img, lines, color=[255, 0, 0], thickness=2):
  for line in lines:
    for x1, y1, x2, y2 in line:
      cv2.line(img, (x1, y1), (x2, y2), color, thickness)

def hough_lines(img, rho, theta, threshold,
                min_line_len, max_line_gap):
  lines = cv2.HoughLinesP(img, rho, theta, threshold, np.array([]),
                          minLineLength=min_line_len,
                          maxLineGap=max_line_gap)
  line_img = np.zeros((img.shape[0], img.shape[1], 3), dtype=np.uint8)
  # draw_lines(line_img, lines)
  draw_lanes(line_img, lines)
  return line_img
def draw_lanes(img, lines, color=[255, 0, 0], thickness=8):
    left_lines, right_lines = [], []
    for line in lines:
        for x1, y1, x2, y2 in line:
            k = (y2 - y1) / (x2 - x1)
            if k < 0:
                left_lines.append(line)
            else:
                right_lines.append(line)

    if (len(left_lines) <= 0 or len(right_lines) <= 0):
        return img
    clean_lines(left_lines, 0.1)
    clean_lines(right_lines, 0.1)
    left_points = [(x1, y1) for line in left_lines for x1, y1, x2, y2 in line]
    left_points = left_points + [(x2, y2) for line in left_lines for x1, y1, x2, y2 in line]
    right_points = [(x1, y1) for line in right_lines for x1, y1, x2, y2 in line]
    right_points = right_points + [(x2, y2) for line in right_lines for x1, y1, x2, y2 in line]
    left_vtx = calc_lane_vertices(left_points, 325, img.shape[0])
    right_vtx = calc_lane_vertices(right_points, 325, img.shape[0])
    cv2.line(img, left_vtx[0], left_vtx[1], color, thickness)
    cv2.line(img, right_vtx[0], right_vtx[1], color, thickness)

def clean_lines(lines, threshold):
    slope = [(y2 - y1) / (x2 - x1) for line in lines for x1, y1, x2, y2 in line]
    while len(lines) > 0:
        mean = np.mean(slope)
        diff = [abs(s - mean) for s in slope]
        idx = np.argmax(diff)
        if diff[idx] > threshold:
            slope.pop(idx)
            lines.pop(idx)
        else:
            break
def calc_lane_vertices(point_list, ymin, ymax):
    x = [p[0] for p in point_list]
    y = [p[1] for p in point_list]
    fit = np.polyfit(y, x, 1)
    fit_fn = np.poly1d(fit)
    xmin = int(fit_fn(ymin))
    xmax = int(fit_fn(ymax))
    return [(xmin, ymin), (xmax, ymax)]
img = mplimg.imread('lane.jpg')
gray = cv2.cvtColor(img, cv2.COLOR_RGB2GRAY)
blur_gray = cv2.GaussianBlur(gray, (blur_ksize, blur_ksize), 0, 0)
edges = cv2.Canny(blur_gray, canny_lthreshold, canny_hthreshold)
roi_vtx = np.array([[(0, img.shape[0]), (460, 325),
                     (520, 325), (img.shape[1], img.shape[0])]])
roi_edges = roi_mask(edges, roi_vtx)
line_img = hough_lines(roi_edges, rho, theta, threshold,
                       min_line_length, max_line_gap)
res_img = cv2.addWeighted(img, 0.8, line_img, 1, 0)
plt.imshow(res_img)
plt.show()

参考文章:
https://blog.csdn.net/Young_Gy/article/details/75194914
https://zhuanlan.zhihu.com/p/25354571
我的微信公众号名称:深度学习与先进智能决策
微信公众号ID:MultiAgent1024
公众号介绍:主要研究强化学习、计算机视觉、深度学习、机器学习等相关内容,分享学习过程中的学习笔记和心得!期待您的关注,欢迎一起学习交流进步!