DataNode数据处理中心DataXceiver
前言
最近在CSDN的首页上看到了hadoop十周年的文章,不禁感慨这真是一个伟大的系统啊.在这十年间,hadoop自身进行了许多演化和大的改变,而在其下,也孵化出了许多子项目,围绕着hadoop的生态圈现在变得越来越丰富了.所以作为一个出色的分布式系统,他有很多地方值得我们学习,最近本人在研究DataXceiver方面的代码,此篇文章算是这几天学习的一个总结吧.
为什么选择学习DataXceiver?
我们从大的层面往小说,你就知道他有多重要了.我们使用Hadoop系统,最看重的是什么,2个字,存储,存储的过程中,什么又是最看着的呢,那当然是数据了.而这些数据都是存在于各个DataNode之上的.所以掌握了解DataNode的读写操作原理就显得尤为重要了.而这个控制中心就在DataXceiver中.
DataXceiver的定义
DataXceiver是干什么用的呢,很多人只知DataNode,而不知另外一个很重要的线程DataXceiver.在Hadoop中对于DataXceiver中的注释解释如下:
/**
 * Thread for processing incoming/outgoing data stream.
 */
class DataXceiver extends Receiver implements Runnable {
...DataXceiver的结构
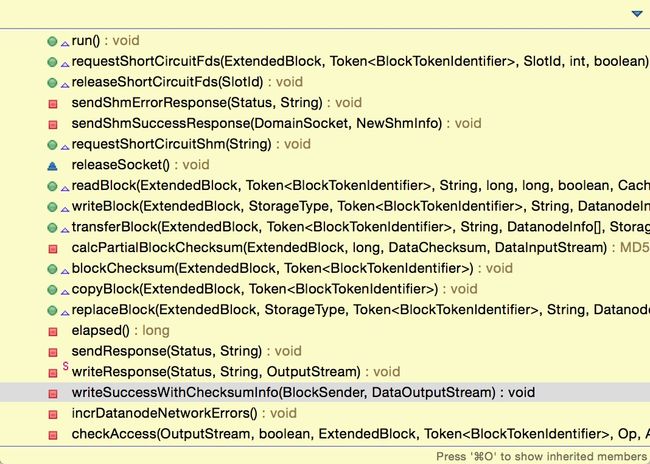
为了我们更好的去理解这个"数据处理中心",我们需要去了解这个类的整体结构,在此之前不妨去了解一下其中的内部方法:
首先,这是一个线程服务,执行入口一定是run方法,执行run方法,就可以找到与这些方法相关的联系.
/**
   * Read/write data from/to the DataXceiverServer.
   */
  @Override
  public void run() {
    int opsProcessed = 0;
    Op op = null;

      ...

      // We process requests in a loop, and stay around for a short timeout.
      // This optimistic behaviour allows the other end to reuse connections.
      // Setting keepalive timeout to 0 disable this behavior.
      do {
        updateCurrentThreadName("Waiting for operation #" + (opsProcessed + 1));

        try {
          if (opsProcessed != 0) {
            assert dnConf.socketKeepaliveTimeout > 0;
            peer.setReadTimeout(dnConf.socketKeepaliveTimeout);
          } else {
            peer.setReadTimeout(dnConf.socketTimeout);
          }
          op = readOp();
        } catch (InterruptedIOException ignored) {
          // Time out while we wait for client rpc
          break;
        } catch (IOException err) {
          // Since we optimistically expect the next op, it's quite normal to get EOF here.
          if (opsProcessed > 0 &&
              (err instanceof EOFException || err instanceof ClosedChannelException)) {
            if (LOG.isDebugEnabled()) {
              LOG.debug("Cached " + peer + " closing after " + opsProcessed + " ops");zhu
            }
          } else {
            incrDatanodeNetworkErrors();
            throw err;
          }
          break;
        }

        // restore normal timeout
        if (opsProcessed != 0) {
          peer.setReadTimeout(dnConf.socketTimeout);
        }

        opStartTime = monotonicNow();
        processOp(op);
        ++opsProcessed;
      } while ((peer != null) &&
          (!peer.isClosed() && dnConf.socketKeepaliveTimeout > 0));
.../** Read an Op. It also checks protocol version. */
protected final Op readOp() throws IOException {
final short version = in.readShort();
if (version != DataTransferProtocol.DATA_TRANSFER_VERSION) {
throw new IOException( "Version Mismatch (Expected: " +
DataTransferProtocol.DATA_TRANSFER_VERSION +
", Received: " + version + " )");
}
return Op.read(in);
} /** Process op by the corresponding method. */
protected final void processOp(Op op) throws IOException {
switch(op) {
case READ_BLOCK:
opReadBlock();
break;
case WRITE_BLOCK:
opWriteBlock(in);
break;
case REPLACE_BLOCK:
opReplaceBlock(in);
break;
case COPY_BLOCK:
opCopyBlock(in);
break;
case BLOCK_CHECKSUM:
opBlockChecksum(in);
break;
case TRANSFER_BLOCK:
opTransferBlock(in);
break;
case REQUEST_SHORT_CIRCUIT_FDS:
opRequestShortCircuitFds(in);
break;
case RELEASE_SHORT_CIRCUIT_FDS:
opReleaseShortCircuitFds(in);
break;
case REQUEST_SHORT_CIRCUIT_SHM:
opRequestShortCircuitShm(in);
break;
default:
throw new IOException("Unknown op " + op + " in data stream");
}
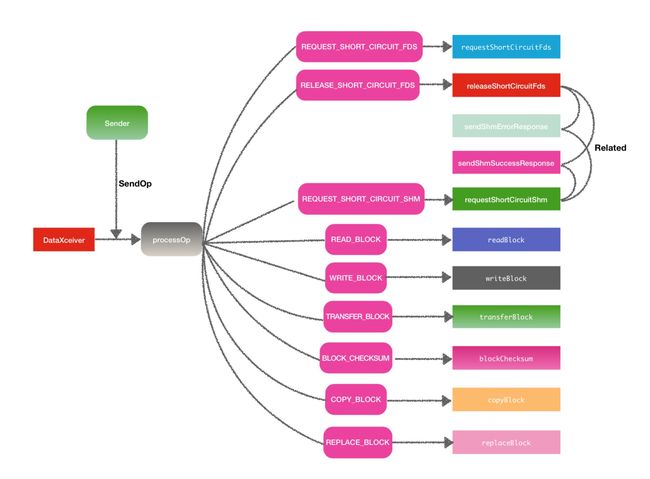
}左上方的Sender是什么意思在后面会解释,可以先忽略.
DataXceiver下游处理方法
从上一小节中的结构图已经看到了处理相应码的9个方法另加2个response回复方法.这个9个方法可以大致分为2大类方法:
1.普通读写block块操作方法.
划分到普通读写block块方法的有readBlock,writeBlock,transferBlock,copyBlock,replaceBlock,blockChecksum,剩下的待ShortCircuit的方法就是属于shortCircuit读相关的方法.下面对具体的这些方法做场景分析.
1.readBlock
方法名就已经体现了这个方法的操作了,自然是读取block信息操作,一般用于远程读或或者本地读操作.
2.writeBlock
写block块操作,将参数传入的数据块写入目标节点列表中.
3.transferBlock
传输指定副本到目标节点列表中,官方注释如下:
Transfer a replica to the datanode targets.拷贝块信息数据,与readBlock原理类似,都用到了BlockSender.send方法.
5.replaceBlock
replaceBlock在DataXceiver中更接近的意思其实是moveBlock,此操作一般会在数据Balance的时候会做.
6.blockChecksum
从文件元信息头部读取校验和数据.
HDFS中的ShortCircuit读机制
这里要特地将shortCircuit读的几个方法单独分到一个模块中,因为shortCircuit读机制是HDFS在后面的版本中才引入的概念,可能有些人还不了解,这里给大家普及一下这方面的知识.
ShortCircuit的缘来
在早些时候,hadoop为了能让数据处理的更加的高效,都尽可能的让数据维持在本地,以此来避免大量的远程读操作,本地读的专业术语就是"Local Read".但是渐渐的到了后面,尽管本地读的比例确实提升了,但是好像还不是最优.因为虽说数据是在本地,但是每次客户端读取数据,还是需要走DataNode这一层,在其间还是会走网络通信的1块,能不能以类似于直接读取本地文件系统的方式去读本地的数据,而shortCircuit读就是源自于这个想法而诞生的.
shortCircuit本地读的实现
shortCircuit读俗称"短路读",后来采用了Linux操作系统中一种计数来实现这个功能,"Unix Domain Socket".他是一种进程间通信的方式,他很重要的一点是可以在进程间传递文件描述符,借此来进行进程间的通信.关于shortCircuit本地读的更细节的文章可以读此原文How Improved Short-Circuit Local Reads Bring Better Performance and Security to Hadoop.
shortCircuit机制
在HDFS中用的是short-circuit memory segments来实现数据的读操作.DfsClient客户端通过shortCircuit实现本地读的简要过程如下:
1.DfsClient客户端从DataNode请求shared memory segments共享内存片段.
2.ShortCircuitRegistry注册对象会产生并管理这些内存对象对象.
3.在本地读之前,DfsClient客户端会向DataNode请求需要的文件描述符,对应的就是requestShortCircuitFds方法.
4.block块在此期间的状态跟踪用的是slot表示.
5.如果一次本度读数据完成之后,相应的会执行释放操作.
给出源码中的官方解释:
/**
 * Manages client short-circuit memory segments on the DataNode.
 *
 * DFSClients request shared memory segments from the DataNode.  The
 * ShortCircuitRegistry generates and manages these segments.  Each segment
 * has a randomly generated 128-bit ID which uniquely identifies it.  The
 * segments each contain several "slots."
 *
 * Before performing a short-circuit read, DFSClients must request a pair of
 * file descriptors from the DataNode via the REQUEST_SHORT_CIRCUIT_FDS
 * operation.  As part of this operation, DFSClients pass the ID of the shared
 * memory segment they would like to use to communicate information about this
 * replica, as well as the slot number within that segment they would like to
 * use.  Slot allocation is always done by the client.
 *
 * Slots are used to track the state of the block on the both the client and
 * datanode. When this DataNode mlocks a block, the corresponding slots for the
 * replicas are marked as "anchorable".  Anchorable blocks can be safely read
 * without verifying the checksum.  This means that BlockReaderLocal objects
 * using these replicas can skip checksumming.  It also means that we can do
 * zero-copy reads on these replicas (the ZCR interface has no way of
 * verifying checksums.)
 *
 * When a DN needs to munlock a block, it needs to first wait for the block to
 * be unanchored by clients doing a no-checksum read or a zero-copy read. The
 * DN also marks the block's slots as "unanchorable" to prevent additional
 * clients from initiating these operations in the future.
 *
 * The counterpart of this class on the client is {@link DfsClientShmManager}.
 */
DataXceiver的上游调用
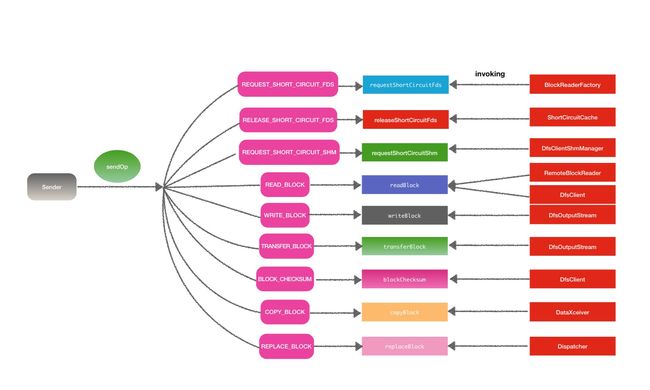
DataXceiver的上游调用其实就是Op操作码的输入方,通过寻找Op,XX的调用位置可以找到都是来自于同一个对象类,Sende.其中输入Op.COPY_BLOCK的例子:
@Override
  public void copyBlock(final ExtendedBlock blk,
      final Token blockToken) throws IOException {
    OpCopyBlockProto proto = OpCopyBlockProto.newBuilder()
      .setHeader(DataTransferProtoUtil.buildBaseHeader(blk, blockToken))
      .build();

    send(out, Op.COPY_BLOCK, proto);
} DataXceiver与DataXceiverServer
提到DataXceiver,就不得不提DataXceiverServer.在DataXceiverServer会保存记录每次新启动的DataXceiver线程.在他的主循环方法中,会进行DataXceiver的创建
@Override
  public void run() {
    Peer peer = null;

    while (datanode.shouldRun && !datanode.shutdownForUpgrade) {
      try {
        peer = peerServer.accept();

        // Make sure the xceiver count is not exceeded
        int curXceiverCount = datanode.getXceiverCount();
        if (curXceiverCount > maxXceiverCount) {
          throw new IOException("Xceiver count " + curXceiverCount
              + " exceeds the limit of concurrent xcievers: "
              + maxXceiverCount);
        }

        new Daemon(datanode.threadGroup,
            DataXceiver.create(peer, datanode, this))
            .start();
} catch (SocketTimeoutException ignored) { /**
* Read/write data from/to the DataXceiverServer.
*/
@Override
public void run() {
int opsProcessed = 0;
Op op = null;
try {
dataXceiverServer.addPeer(peer, Thread.currentThread(), this);
...synchronized void addPeer(Peer peer, Thread t, DataXceiver xceiver)
throws IOException {
if (closed) {
throw new IOException("Server closed.");
}
peers.put(peer, t);
peersXceiver.put(peer, xceiver);
}补充
添加一下额外的补充,最近阅读了DataXceiver的源码,发现里面的代码比较乱,多处异常日志级别输出不准确,都是INFO级别,不利于发现异常日志记录,于是向社区提交Issue, HDFS-9727.
相关链接
Issue链接: https://issues.apache.org/jira/browse/HDFS-9727
Github patch链接: https://github.com/linyiqun/open-source-patch/tree/master/hdfs/HDFS-9727


