Watershed Algorithm(图像分割)——分水岭算法的原理及实现 OpenCV (四)
分水岭算法实现(C++、opencv)
1.作用:
通常用于分割图像,主要实现以临近像素间的相似性作为重要的参考依据,从而将在空间位置上相近并且灰度值相近的像素点互相连接起来构成一个封闭的轮廓,封闭性是分水岭算法的一个重要特征。 相对于基于阈值的图像分割,边缘检测等都不会考虑像素在空间关系上的相似性和封闭性这一概念,彼此像素间互相独立,没有统一性。分水岭算法较其他分割方法更具有思想性,更符合人眼对图像的印象。
2.实现:
#include
#include
#include
#include
#include
#include
#include
#include "opencv2/calib3d/calib3d.hpp"
#include
#include
#include
#include
#include
#include
#include "time.h"
#include
#include

using namespace std;
using namespace cv;

Vec3b RandomColor(int value)    //生成随机颜色函数
{
	value = value % 255;  //生成0~255的随机数
	RNG rng;
	int aa = rng.uniform(0, value);
	int bb = rng.uniform(0, value);
	int cc = rng.uniform(0, value);
	return Vec3b(aa, bb, cc);
}

int main(int argc, char** argv) {

	cv::Mat rgb_image = cv::imread("../example/timg.jpg", CV_LOAD_IMAGE_UNCHANGED);
	cv::Mat rgb_image_blur;
	GaussianBlur(rgb_image, rgb_image_blur, Size(5, 5), 0, 0);
	cv::Mat rgb_image_canny;
	Canny(rgb_image_blur, rgb_image_canny, 10, 120, 3, false);

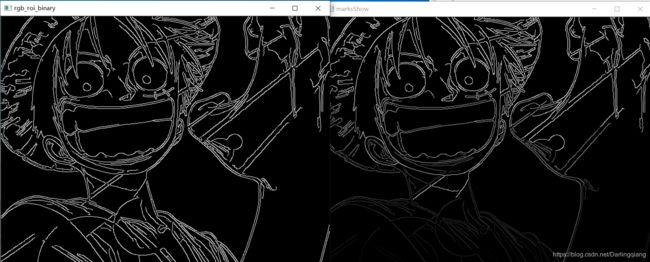
	cv::imshow("rgb_roi_binary", rgb_image_canny);

	vector>contours;
	vectorhierarchy;
	findContours(rgb_image_canny, contours, hierarchy, RETR_LIST, CHAIN_APPROX_SIMPLE, Point());
	Mat imageContours = Mat::zeros(rgb_image.size(), CV_8UC1);  //轮廓
	Mat marks(rgb_image.size(), CV_32S);   //Opencv分水岭第二个矩阵参数
	marks = Scalar::all(0);
	int index = 0;
	int compCount = 0;
	for (; index >= 0; index = hierarchy[index][0], compCount++)
	{
		//对marks进行标记,对不同区域的轮廓进行编号,相当于设置注水点,有多少轮廓,就有多少注水点
		drawContours(marks, contours, index, Scalar::all(compCount + 1), 1, 8, hierarchy);
		drawContours(imageContours, contours, index, Scalar(255), 1, 8, hierarchy);
	}

	//我们来看一下传入的矩阵marks里是什么东西
	Mat marksShows;
	convertScaleAbs(marks, marksShows);
	imshow("marksShow", marksShows);
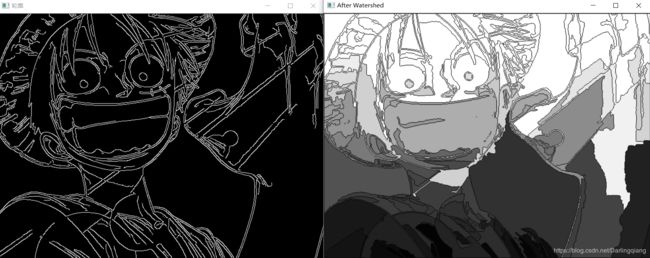
	imshow("轮廓", imageContours);
	cv::watershed(rgb_image, marks);

	Mat afterWatershed;
	convertScaleAbs(marks, afterWatershed);
	imshow("After Watershed", afterWatershed);

	//对每一个区域进行颜色填充
	Mat PerspectiveImage = Mat::zeros(rgb_image.size(), CV_8UC3);
	for (int i = 0; i < marks.rows; i++)
	{
		for (int j = 0; j < marks.cols; j++)
		{
			int index = marks.at(i, j);
			if (marks.at(i, j) == -1)
			{
				PerspectiveImage.at(i, j) = Vec3b(255, 255, 255);
			}
			else
			{
				PerspectiveImage.at(i, j) = RandomColor(index);
			}
		}
	}
	imshow("After ColorFill", PerspectiveImage);

	//分割并填充颜色的结果跟原始图像融合
	Mat wshed;
	addWeighted(rgb_image, 0.4, PerspectiveImage, 0.6, 0, wshed);
	imshow("AddWeighted Image", wshed);

	cv::waitKey(0);
	return 0;
}
3.效果
4.函数原型
void watershed( InputArray image, InputOutputArray markers );
第一个参数 image,必须是一个8bit 3通道彩色图像矩阵序列。第二个参数 markers,根据Opencv官方文档主要可分为以下几步:
step 1:图像灰度化、滤波、Canny边缘检测、二值化等一系列戏台学操作,保证下一步输入可以正常传入findContours即可。
参数markers它应该包含不同区域的轮廓,每个轮廓有一个自己唯一的编号,轮廓的定位可以cv::findContours(输入时二值化图像或者灰度图)方法,这个是执行分水岭之前的要求。
step2:查找轮廓,并且把轮廓信息按照不同的编号绘制到watershed的第二个入参merkers上,相当于标记注水点。
算法会根据markers传入的轮廓作为种子(注水点),对图像上其他的像素点根据分水岭算法规则进行判断,并对每个像素点的区域归属进行划定,直到处理完图像上所有像素点。而区域与区域之间的分界处的值被置为“-1”,以做区分。
step3:watershed分水岭运算,绘制分割出来的区域,视觉控还可以使用随机颜色填充,或者跟原始图像融合以下,以得到更好的显示效果。
就是说第二个入参markers必须包含了种子点信息。Opencv官方例程中使用鼠标划线标记,其实就是在定义种子,只不过需要手动操作,而使用findContours可以自动标记种子点。而分水岭方法完成之后并不会直接生成分割后的图像,还需要进一步的显示处理。
5.原理
将上述三个步骤对应到三维空间中,findContours发现的轮廓值就是分水岭的“ling”,在三维空间中,在该处滴上一滴水,这滴水会滑向最小值平面,轮廓中间就是最小值点,也即注水点。
实际上, 在真实图像中,由于噪声点或者其它干扰因素的存在,使用分水岭算法常常存在过度分割的现象,这是因为很多很小的局部极值点的存在。为了解决过度分割的问题,可以使用基于标记(mark)图像的分水岭算法,就是通过先验知识,来指导分水岭算法,以便获得更好的图像分段效果。通常的mark图像,都是在某个区域定义了一些灰度层级,在这个区域的洪水淹没过程中,水平面都是从定义的高度开始的,这样可以避免一些很小的噪声极值区域的分割。
6.参考
【1】 https://docs.opencv.org/3.4.9/d7/d1b/group__imgproc__misc.html#ga3267243e4d3f95165d55a618c65ac6e1
【2】https://blog.csdn.net/dcrmg/article/details/52498440
【3】https://www.cnblogs.com/mikewolf2002/p/3304118.html


