大数据项目之ip条数统计 nginx flume kafka hive
一.项目目的
对日志中ip条数进行统计统计
二.项目流程
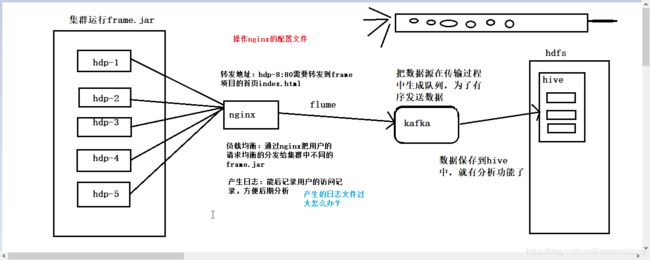
图片出自:https://blog.csdn.net/lucasmaluping/article/details/102685434
三.项目操作
1.frame打成jar包上传到linux集群
通过java -jar,测试是否 运行成功:hdp-1:8889
2.修改配置文件,自定义ngnix输出日志的格式
修改配置文件 cd /usr/local/nginx/conf vi nginx.conf
#user  nobody;
worker_processes  1;

#error_log  logs/error.log;
#error_log  logs/error.log  notice;
#error_log  logs/error.log  info;

#pid        logs/nginx.pid;


events {
    worker_connections  1024;
}


http {
    include       mime.types;
    default_type  application/octet-stream;
##ngnix输出日志的格式
    log_format main '{ time:"$time_iso8601", '
                'ip:$remote_addr", '
                'referer":"$http_referer", '
                'request:"$request", '
                'status": $status, '
                'bytes":$body_bytes_sent, '
                'agent": "$http_user_agent", '
                'x_forwarded:"$http_x_forwarded_for", }';

    #access_log  logs/access.log  main;

    sendfile        on;
    #tcp_nopush     on;

    #keepalive_timeout  0;
    keepalive_timeout  65;

    #gzip  on;
##指明nginx转发地址
upstream frame-tomcat {
         server hdp-1:8889;
    }
##nginx的服务地址
    server {
        listen       80;
        server_name  hdp-1;

        #charset koi8-r;
##输出生成的日志文件的路径和格式
        access_log  logs/frame.access.log  main;
##代理传递(转发)
        location / {
            # root   html;
            # index  index.html index.htm;
            proxy_pass http://frame-tomcat;
        }

        #error_page  404              /404.html;

        # redirect server error pages to the static page /50x.html
        #
        error_page   500 502 503 504  /50x.html;
        location = /50x.html {
            root   html;
        }

        # proxy the PHP scripts to Apache listening on 127.0.0.1:80
        #
        #location ~ \.php$ {
        #    proxy_pass   http://127.0.0.1;
        #}

        # pass the PHP scripts to FastCGI server listening on 127.0.0.1:9000
        #
        #location ~ \.php$ {
        #    root           html;
        #    fastcgi_pass   127.0.0.1:9000;
        #    fastcgi_index  index.php;
        #    fastcgi_param  SCRIPT_FILENAME  /scripts$fastcgi_script_name;
        #    include        fastcgi_params;
        #}

        # deny access to .htaccess files, if Apache's document root
        # concurs with nginx's one
        #
        #location ~ /\.ht {
        #    deny  all;
        #}
    }


    # another virtual host using mix of IP-, name-, and port-based configuration
    #
    #server {
    #    listen       8000;
    #    listen       somename:8080;
    #    server_name  somename  alias  another.alias;

    #    location / {
    #        root   html;
    #        index  index.html index.htm;
    #    }
    #}


    # HTTPS server
    #
    #server {
    #    listen       443;
    #    server_name  localhost;

    #    ssl                  on;
    #    ssl_certificate      cert.pem;
    #    ssl_certificate_key  cert.key;

    #    ssl_session_timeout  5m;

    #    ssl_protocols  SSLv2 SSLv3 TLSv1;
    #    ssl_ciphers  HIGH:!aNULL:!MD5;
    #    ssl_prefer_server_ciphers   on;

    #    location / {
    #        root   html;
    #        index  index.html index.htm;
    #    }
    #}

}
3.编写flume采集nginx日志数据下沉到kafka的topic配置文件
cd apps/flume-1.6.0/conf vi nginxtokafka.conf
a1.sources = source1
a1.sinks = k1
a1.channels = c1
##指明数据源来自于一个可执行指令
a1.sources.source1.type = exec
##可执行指令,跟踪一个文件中的内容
a1.sources.source1.command = tail -F /usr/local/nginx/logs/frame.access.log
# Describe the sink
a1.sinks.k1.type = org.apache.flume.sink.kafka.KafkaSink
a1.sinks.k1.topic = animal
a1.sinks.k1.brokerList = hdp-1:9092,hdp-2:9092,hdp-3:9092
a1.sinks.k1.requiredAcks = 1
a1.sinks.k1.batchSize = 20

# Use a channel which buffers events in memory
a1.channels.c1.type = memory
a1.channels.c1.capacity = 1000
a1.channels.c1.transactionCapacity = 100

# Bind the source and sink to the channel
a1.sources.source1.channels = c1
a1.sinks.k1.channel = c14.编写flume采集kafka下沉到hive配置文件
cd apps/flume-1.6.0/conf vi kafkatohive.conf
#Name the components on this agent
a1.sources = r1
a1.sinks = k1
a1.channels = c1

a1.sources.r1.type=org.apache.flume.source.kafka.KafkaSource
a1.sources.r1.zookeeperConnect=hdp-1:2181,hdp-2:2181,hdp-3:2181
a1.sources.r1.kafka.bootstrap.servers=hdp-1:9092,hdp-2:9092,hdp-3:9092
a1.sources.r1.batchSize=10
##自己的topic
a1.sources.r1.topic=animal
a1.sources.r1.channels=c1
a1.sources.r1.consumer.timeout.ms=1000


# Describe the sink
a1.sinks.k1.type = hdfs
# 收集到hdfs的地址
a1.sinks.k1.hdfs.path = hdfs://hdp-1:9000/kafka/log/
a1.sinks.k1.hdfs.writeFormat = Text
a1.sinks.k1.hdfs.fileType = DataStream
a1.sinks.k1.hdfs.rollInterval = 10
a1.sinks.k1.hdfs.rollSize = 0
a1.sinks.k1.hdfs.rollCount = 0
a1.sinks.k1.hdfs.filePrefix = %Y-%m-%d-%H-%M-%S
a1.sinks.k1.hdfs.useLocalTimeStamp = true

# Use a channel which buffers events in file
a1.channels.c1.type = file
a1.channels.c1.checkpointDir = /home/hadoop/flume/checkpoint
a1.channels.c1.dataDirs = /home/hadoop/flume/data

# Bind the source and sink to the channel
a1.sources.r1.channels = c1
a1.sinks.k1.channel = c1
5.Hive中创建数据库和表
首先启动zookeeper 然后启动hive,在hive中建外部表
字段名与类型与nginx日志输出的格式一样
create external table t_access(time String,ip String,referer String,request String,status Int,bytes String,agent String,x_forwarded String)row format delimited
fields terminated by ','
location '/kafka/log';
6.启动hdfs
在hdp-1上执行脚本:start-all.sh
7.启动kafka
在hdp-1上执行脚本:./start-kafka-cluster.sh
8.启动nginx
在hdp-1上执行:cd /usr/local/nginx/sbin ./nginx
9.启动flume采集nginx日志数据下沉到kafka的topic
在hdp-1上执行:cd apps/flume-1.6.0/bin/
./flume-ng agent -c conf -n a1 -f ../conf/nginxtokafka.conf -Dflume.root.logger=DEBUG,console
注意:这里可以开启一个consumer来消费消息,验证这一步是否下沉成功
cd apps/kafka_2.12-2.2.0/bin/
启动消费者
./kafka-console-consumer.sh --bootstrap-server hdp-1:9092,hdp-2:9092,hdp-3:9092 --topic animal --from-beginning
10.启动flume采集kafka下沉到hive
在hdp-1上执行:cd apps/flume-1.6.0/bin/
./flume-ng agent -c conf -n a1 -f ../conf/kafkatohive.conf -Dflume.root.logger=DEBUG,console
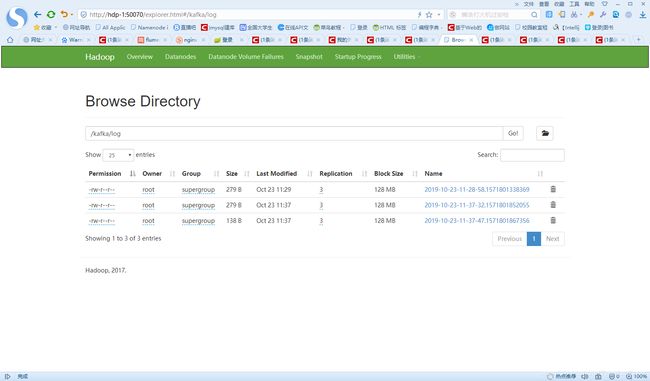
11.查看数据是否下沉到hive中
数据下沉成功,查询到数据。
12.使用聚合函数查看ip的总条数
完成!查询到ip条数为3


