Centos 7.6 下使用移远EC20/EC25 GobiNet拨号上网
文章目录
- 准备
- 环境
- 模块信息
- 编译内核源码
- 解压源码
- 编译命令
- 编译加载GobiNet驱动
- 编译拨号软件
- 修改源码
- 编译源码
- 服务化拨号工具
准备
环境
系统为Cento 7.6 64bit,基本环境为Basic Web Server安装(理论上与安装环境模式无关,最小安装也可以)。需要下载内核源码,Centos 7.6的内核版本为3.10.0-957,源码可在此链接下载。另外还需要厂家提供的GobiNet网卡驱动及拨号工具源码,一张能4G上网的手机卡或物联网卡,接好模块天线。
模块信息
接上模块后,在Centos下执行lsusb命令,查看模块VID和PID信息:

编译内核源码
解压源码
将下载好的源码,解压到看到linux-3.10.0-957.21.3.el7.tar.xz文件,将其放到/usr/src/kernels文件夹下,并执行如下命令:
$ tar xvf linux-3.10.0-957.21.3.el7.tar.xz // 解压内核源码文件
$ mv linux-3.10.0-957.21.3.el7 3.10.0-957.el7.x86_64 // 重命名文件夹
之所以要更改文件夹名称,是因为厂家的GobiNet驱动源码,Makefile文件中根据uname -r的结果来设置KDIR和OUTPUTDIR目录:
obj-m := GobiNet.o
GobiNet-objs := GobiUSBNet.o QMIDevice.o QMI.o

PWD := $(shell pwd)
OUTPUTDIR=/lib/modules/`uname -r`/kernel/drivers/net/usb/

ifeq ($(ARCH),)
ARCH := $(shell uname -m)
endif
ifeq ($(CROSS_COMPILE),)
CROSS_COMPILE :=
endif
ifeq ($(KDIR),)
KDIR := /lib/modules/$(shell uname -r)/build
ifeq ($(ARCH),i686)
ifeq ($(wildcard $KDIR/arch/$ARCH),)
ARCH=i386
endif
endif
endif

$(shell rm -rf usbnet.h)
ifneq ($(wildcard $(KDIR)/drivers/usb/net/usbnet.h),)
$(shell ln -s $(KDIR)/drivers/usb/net/usbnet.h usbnet.h)
endif
ifneq ($(wildcard $(KDIR)/drivers/net/usb/usbnet.h),)
$(shell ln -s $(KDIR)/drivers/net/usb/usbnet.h usbnet.h)
endif

default:
	ln -sf makefile Makefile
	$(MAKE) ARCH=${ARCH} CROSS_COMPILE=${CROSS_COMPILE} -C $(KDIR) M=$(PWD) modules

install: default
	mkdir -p $(OUTPUTDIR)
	cp -f GobiNet.ko $(OUTPUTDIR)
	depmod
	modprobe -r GobiNet
	modprobe GobiNet

clean:
	rm -rf Makefile usbnet.h
	rm -rf *.o *~ core .depend .*.cmd *.ko *.mod.c .tmp_versions Module.* modules.order
如果为其他版本的系统,将文件夹对应修改为uname -r得到的名称即可。
编译命令
执行如下命令开始编译源码,对应的线程数字按照实际机器进行配置,这个过程会比较慢。
$ make -j 8
$ make modules_install
如果有其他错误提示,则安装对应的软件包依赖即可,这里编译后不进行安装,因为内核是一样的,编译内核只是为了编译驱动时能找到一些相关依赖。
编译加载GobiNet驱动
这里采用的是单独编译的方式,主要是为了在不动原来内核的情况下使用,以防其他软件的运行受影响。我的驱动版本为V1.6.1,cd到驱动目录下,并执行如下命令:
$ make # 编译驱动
$ insmod GobiNet.ko # 手动加载编译后的驱动文件
正常编译安装的话,不会有其他的警告或者错误,驱动成功后,按道理可以看到新的网卡,一般是ethX这种格式。但我执行ifconfig命令,发现没有看到新的网口:
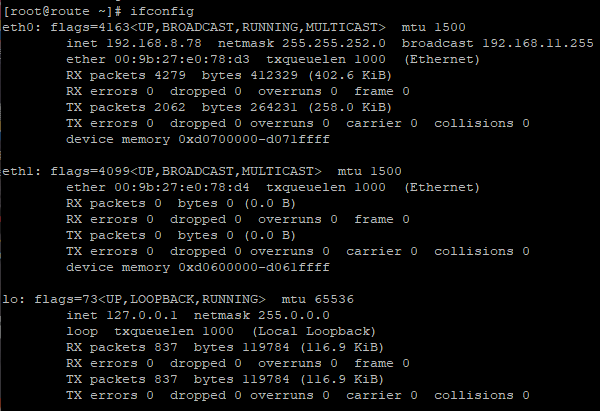
这里我的设备是双网口,自带有eth0和eth1两个网络接口,如果驱动成功,应该会得到eth2,但是没有。执行nmcli命令,发现有一个wwan0网络连接,带有Quectel字眼:

执行lsusb -t查看当前的驱动方式为:
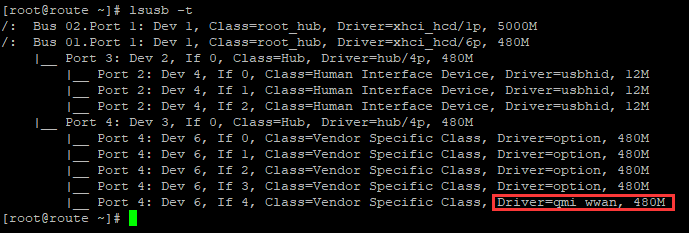
可以看到,默认用的是qmi_wwan驱动方式,这是linux内核3.4之后就自动集成的,为此需要先卸载该驱动,命令如下:
$ rmmod qmi_wwan
$ rmmod GobiNet # 刚刚加载过驱动,需要先卸载后再加载一遍
$ insmod GobiNet.ko # 再次加载GobiNet驱动
我的执行结果反馈如下:
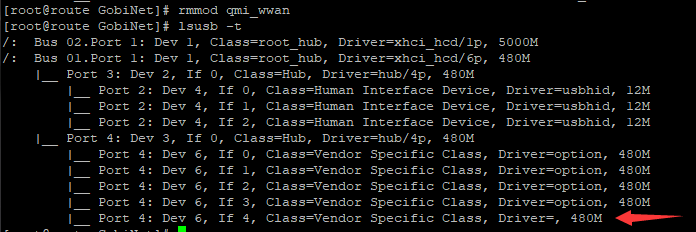
卸载驱动后,模块的Driver项内容变为空。
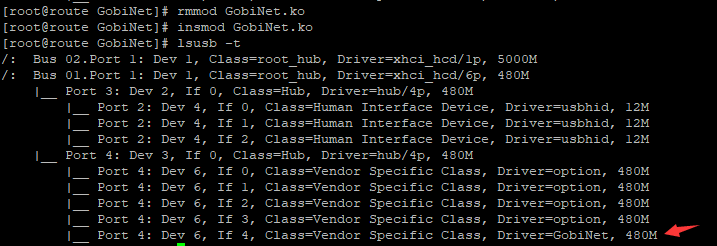
这里可以看到,已经成功用GobiNet驱动模块。再次执行ifconfig命令得到驱动后的新网络链接eth2:
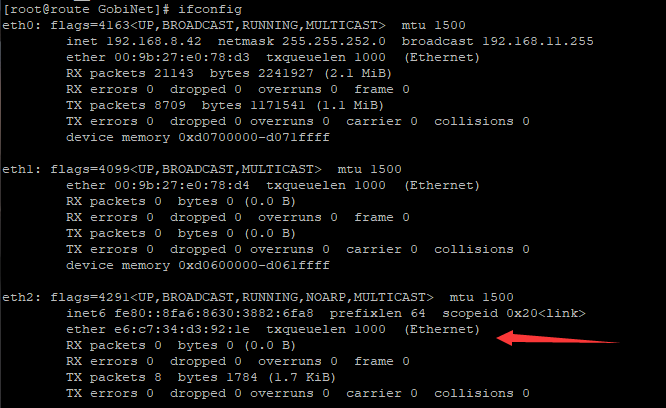
在/dev目录下,可以看到qcqmiX格式设备,我这里的设备名称是qcqmi2。

编译拨号软件
修改源码
由于我这里采用NetworkManager进行网络连接管理,所以需要注释掉拨号软件获取IP的有关代码。首先在udhcpc.c文件中,找到udhcpc_start函数,将busybox、dhclient获取分配IP的代码注释,我使用的拨号工具版本为1.5.5,修改如下:
void udhcpc_start(PROFILE_T *profile) {
    char *ifname = profile->usbnet_adapter;
    char shell_cmd[128];

    ql_set_driver_link_state(profile, 1);

    if (profile->qmapnet_adapter) {
        ifname = profile->qmapnet_adapter;
    }

    if (profile->rawIP && profile->ipv4.Address && profile->ipv4.Mtu) {
        ql_set_mtu(ifname, (profile->ipv4.Mtu));
    }

    if (strcmp(ifname, profile->usbnet_adapter)) {
        snprintf(shell_cmd, sizeof(shell_cmd), "ifconfig %s up", profile->usbnet_adapter);
        ql_system(shell_cmd);
    }

    snprintf(shell_cmd, sizeof(shell_cmd), "ifconfig %s up", ifname);
    ql_system(shell_cmd);

#if 1 //for bridge mode, only one public IP, so do udhcpc manually
    if (ql_bridge_mode_detect(profile)) {
        return;
    }
#endif

// 从这里往下的代码注释或删除
... // 由于篇幅较大,这部分被注释代码省略
// 结束代码注释
}
在udhcpc.c文件中,找到udhcpc_stop函数,将关闭网卡后,设置dns的代码也注释,具体如下:
void udhcpc_stop(PROFILE_T *profile) {
    char *ifname = profile->usbnet_adapter;
    char shell_cmd[128];

    ql_set_driver_link_state(profile, 0);

    if (profile->qmapnet_adapter) {
        ifname = profile->qmapnet_adapter;
    }

#ifdef USE_DHCLIENT
    if (dhclient_alive) {
        system("killall dhclient");
        dhclient_alive = 0;
    }
#endif
    if (dibbler_client_alive) {
        system("killall dibbler-client");
        dibbler_client_alive = 0;
    }

    snprintf(shell_cmd, sizeof(shell_cmd), "ifconfig %s down", ifname);
    ql_system(shell_cmd);

    // 注释掉设置DNS操作,否则会导致网卡没有正常down
    //snprintf(shell_cmd, sizeof(shell_cmd), "ifconfig %s 0.0.0.0", ifname);
    //ql_system(shell_cmd);
}
编译源码
执行如下命令编译拨号工具
$ make # 编译
$ ./quectel-CM & # 后台执行拨号工具
如果拨号成功,可以看到对应的网卡会获取到IP地址(NetworkManager自动管理),并正常上网,如下所示:

服务化拨号工具
可以使用systemctl管理拨号工具,新建一个文件Quectel-CM.service,并写入如下内容(脚本路径更改为实际路径):
 [Unit]
Description=Quectel-CM Service
After=network.target

[Service]
Type=simple
User=root
Restart=always
RestartSec=5s
ExecStart=/home/Quectel/Quectel-CM/Quectel-CM.sh

[Install]
WantedBy=multi-user.target
Quectel-CM.sh脚本内容如下:
#!/bin/bash

# 卸载qmi_wwan驱动
rmmod qmi_wwan
# 对应文件目录根据实际目录修改
insmod /home/Quectel/GobiNet.ko
/home/Quectel/Quectel-CM/quectel-CM
执行以下命令可配置服务并设置开机自启动:
$ cp Quectel-CM.service /usr/lib/systemd/system/ # 拷贝服务文件到系统目录
$ systemctl daemon-reload # 重新检测加载服务,使其被系统识别到
$ systemctl start Quectel-CM.service # 手动启动服务
$ systemctl enable Quectel-CM.service # 配置开机自启动
至此,在Centos 7.6上就可以自动配置EC20/EC25 4G模块拨号上网。如果卡被停用后再启用,也不需要重新启动机器,会自动重新拨号。