JavaWeb之SSM整合实现网站增删改查功能(详解+代码实现)
文章目录
- 一、项目介绍
- 二、知识储备
- 三、具体步骤
- 1、设计Mysql数据库表
- 2、在Idea中创建动态JavaWeb项目
- 3、配置项目结构
- 4、配置web.xml
- 5、配置数据库连接相关内容
- 6、配置SpringMVC的配置文件
- 7、配置MyBatis的配置文件
- 8、配置MyBatis的配置文件
- 9、配置SSM整合的配置文件
- 10、创建关于数据库表的类
- 11、编写展示内容的接口,并配置相关文件
- 12、配置Service层服务
- 13、配置首页显示内容
- 14、配置控制层,实现数据传输展示
- 15、配置展示页面
- 四、效果展示
- 五、项目总结
一、项目介绍
今天给大家带来的是SSM框架的基本使用,我会在下面按步骤介绍,这里的知识是三个框架的整合,包括:Spring、SpringMVC、MyBatis,使用Tomcat服务器,如有需要我会在后面的博客带来这三个框架的介绍,首先来说今天这个项目。其中包括简单的mysql数据库设计,包括实现增删改查,由于篇幅有限,我今天暂时先带来数据库中数据的显示,我后面会补坑,带来JavaWeb的登录功能,并实现增删改查,由于大部分教程都是基于MyEclipse,我今天带来的是Idea的学习,整体不变,只是有些细节需要注意。
二、知识储备
- Mysql数据库相关知识
- Spring
- SpringMVC
- MyBatis
- JDBC相关知识
- JSP相关知识
- XML相关知识
- Java基础(尤其是注解的使用)
- Idea的使用
- Tomcat的熟练使用
三、具体步骤
1、设计Mysql数据库表
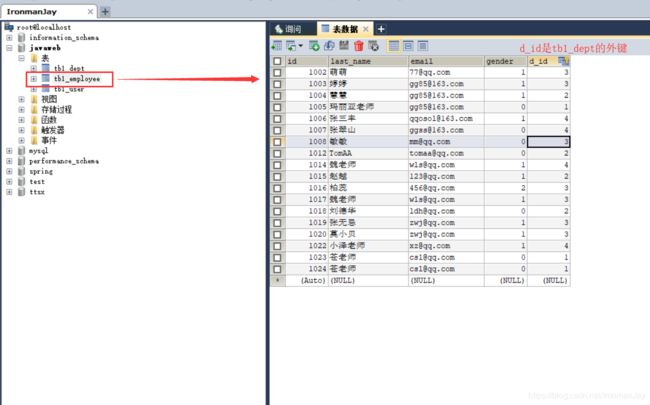
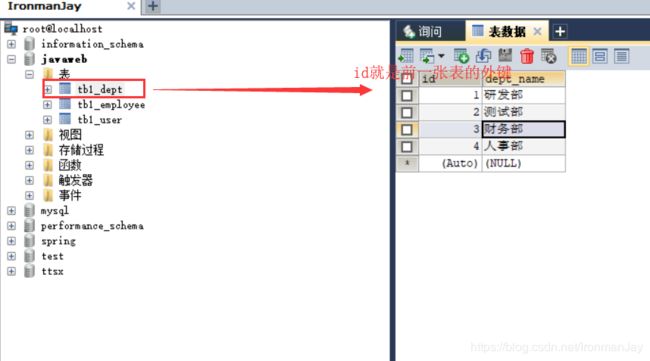
第一张图是tb1_employee表,里面的数据可以随便写,但是需要注意,d_id是作为另一张表的外键,因为我们要实现多表连接,id为主键,自增长。第二张图是tb1_dept表,里面的数据同理随便写,但是id作为tb1_employee表的外键。
2、在Idea中创建动态JavaWeb项目
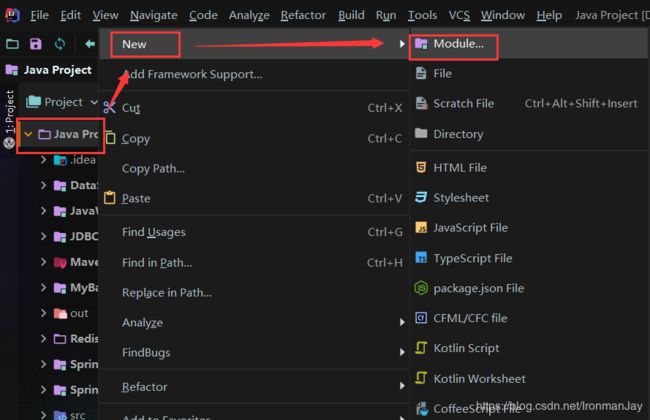
①在整个工程中新建Module。
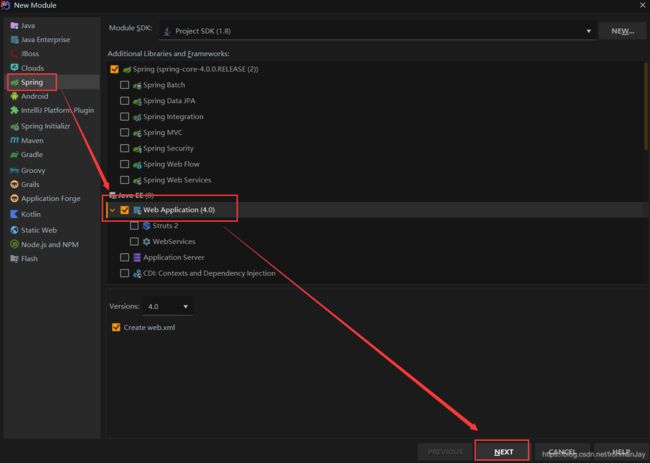
②选择Spring,再选择Web Application(4.0),然后下一步。
③输入项目名称,点击FINISH,即可完成项目的创建
3、配置项目结构
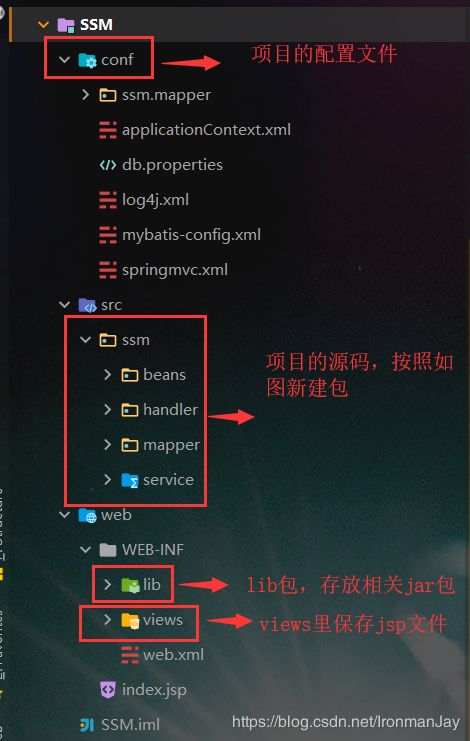
首先按照第一张图新建包,其中conf里面是整个项目的配置文件,相当于大脑,src中新建ssm包,保存整个项目的源码,相当于心脏,views里保存我们的jsp文件,为了展示内容,第二张图就是lib包,里面包括所需要的jar包,有很多,刚使用CSDN写博客,不知道怎么上传文件,有需要的可以私聊我,提供给各位读者。

4、配置web.xml
其中包括字符编码过滤器,IOC容器,并且我们是基于REST的,所以也需要配置,具体内容我已注释。
<?xml version="1.0" encoding="UTF-8"?>
-app xmlns:xsi="http://www.w3.org/2001/XMLSchema-instance" xmlns="http://java.sun.com/xml/ns/javaee" xsi:schemaLocation="http://java.sun.com/xml/ns/javaee http://java.sun.com/xml/ns/javaee/web-app_2_5.xsd" id="WebApp_ID" version="2.5">
<!-- 字符编码过滤器 -->
CharacterEncodingFilter
org.springframework.web.filter.CharacterEncodingFilter
encoding
UTF-8
CharacterEncodingFilter
/*
HiddenHttpMethodFilter
org.springframework.web.filter.HiddenHttpMethodFilter
HiddenHttpMethodFilter
/*
<!-- 初始化SpringIOC容器的监听器 -->
contextConfigLocation
classpath:applicationContext.xml
org.springframework.web.context.ContextLoaderListener
<!-- Springmvc的前端控制器 -->
springDispatcherServlet
org.springframework.web.servlet.DispatcherServlet
contextConfigLocation
classpath:springmvc.xml
1
-mapping>
-name>springDispatcherServlet -name>
-pattern>/ -pattern>
-mapping>
-app>5、配置数据库连接相关内容
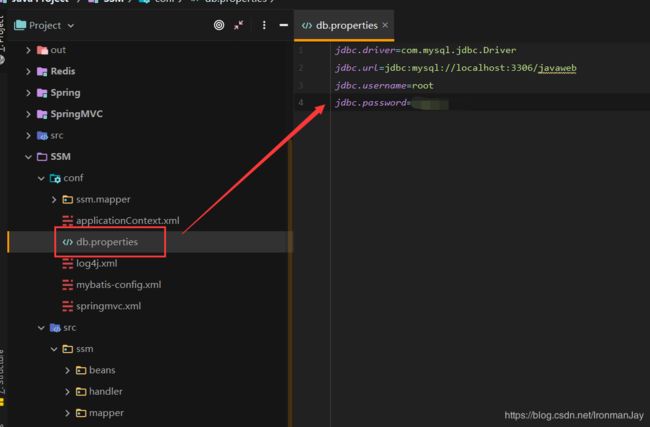
在conf配置包中新建db.properties,里面包括连接数据库相关内容,根据自身情况配置。
6、配置SpringMVC的配置文件
在conf中新建springmvc.xml文件,其中包括组件扫面,视图解析器,以及mvc的相关配置,其中视图解析器需要解释一下,这个就是当我们重定向或者转发请求操作等,直接给用户反馈在views包中的jsp内容。
<?xml version="1.0" encoding="UTF-8"?>
://www.springframework.org/schema/beans"
xmlns:xsi="http://www.w3.org/2001/XMLSchema-instance"
xmlns:context="http://www.springframework.org/schema/context"
xmlns:mvc="http://www.springframework.org/schema/mvc"
xsi:schemaLocation="http://www.springframework.org/schema/beans http://www.springframework.org/schema/beans/spring-beans.xsd http://www.springframework.org/schema/context http://www.springframework.org/schema/context/spring-context.xsd http://www.springframework.org/schema/mvc http://www.springframework.org/schema/mvc/spring-mvc.xsd">
<!-- 组件扫描 -->
<!-- 视图解析器 -->
<!-- mvc -->
7、配置MyBatis的配置文件
在conf包中新建mybatis-config.xml文件,配置MyBatis相关内容,我已在代码中注释。
<?xml version="1.0" encoding="UTF-8" ?>
<!DOCTYPE configuration
        PUBLIC "-//mybatis.org//DTD Config 3.0//EN"
        "http://mybatis.org/dtd/mybatis-3-config.dtd">

<!--配置-->
>

    <!--   settings:包含了很多的设置项     -->


>
8、配置MyBatis的配置文件
在conf包中新建log4j.xml文件。用来设置记录器的级别,存放器和布局等。
<?xml version="1.0" encoding="UTF-8" ?>
<!DOCTYPE log4j:configuration SYSTEM "log4j.dtd">

:configuration xmlns:log4j="http://jakarta.apache.org/log4j/">

 >
   -8" />
   >
    -5p %d{MM-dd HH:mm:ss,SSS} %m  (%F:%L) \n" />
   >
 >
 >
   >
 >
 >
   >
 >
 >
   >
   -ref ref="STDOUT" />
 >
:configuration>
9、配置SSM整合的配置文件
在conf包中新建applicationContext.xml文件。配置组件扫描,读取连接数据库的数据,使用事务,并实现SSM整合。
<?xml version="1.0" encoding="UTF-8"?>
://www.springframework.org/schema/beans"
xmlns:xsi="http://www.w3.org/2001/XMLSchema-instance"
xmlns:context="http://www.springframework.org/schema/context"
xmlns:tx="http://www.springframework.org/schema/tx"
xmlns:mybatis-spring="http://mybatis.org/schema/mybatis-spring"
xsi:schemaLocation="http://mybatis.org/schema/mybatis-spring http://mybatis.org/schema/mybatis-spring-1.2.xsd
http://www.springframework.org/schema/beans http://www.springframework.org/schema/beans/spring-beans.xsd
http://www.springframework.org/schema/context http://www.springframework.org/schema/context/spring-context-4.0.xsd
http://www.springframework.org/schema/tx http://www.springframework.org/schema/tx/spring-tx-4.0.xsd">
<!-- 组件扫描 -->
<!-- 数据源 -->
<!-- 事务 -->
<!-- -spring:scan base-package="ssm.mapper"> -spring:scan>-->
> 10、创建关于数据库表的类
在src/ssm下新建beans包,其中添加Employee.java和Department.java,用于从数据库中获取内容,并创建相关对象,里面实现get、set、toString、构造器等。
①Employee类
package ssm.beans;

//@Alias("employee") 具体指定一个别名
public class Employee {
    private Integer id;
    private String lastName;
    private String email;
    private Integer gender;
    private Department dept;

    public Employee() {
    }

    public Employee(Integer id, String lastName, String email, Integer gender/*, Department dept*/) {
        this.id = id;
        this.lastName = lastName;
        this.email = email;
        this.gender = gender;
        this.dept = dept;
    }

    public Integer getId() {
        return id;
    }

    public void setId(Integer id) {
        this.id = id;
    }

    public String getLastName() {
        return lastName;
    }

    public void setLastName(String lastName) {
        this.lastName = lastName;
    }

    public String getEmail() {
        return email;
    }

    public void setEmail(String email) {
        this.email = email;
    }

    public Integer getGender() {
        return gender;
    }

    public void setGender(Integer gender) {
        this.gender = gender;
    }

    public Department getDept() {
        return dept;
    }

    public void setDept(Department dept) {
        this.dept = dept;
    }

    @Override
    public String toString() {
        return "Employee{" +
                "id=" + id +
                ", lastName='" + lastName + '\'' +
                ", email='" + email + '\'' +
                ", gender=" + gender +
                ", dept=" + dept +
                '}';
    }

}
②Department类
package ssm.beans;

import java.util.List;

public class Department {
    private Integer id;
    private String departmentName;
    private List<Employee> emps;

    public List<Employee> getEmps() {
        return emps;
    }

    public void setEmps(List<Employee> emps) {
        this.emps = emps;
    }

    public Integer getId() {
        return id;
    }

    public void setId(Integer id) {
        this.id = id;
    }

    public String getDepartmentName() {
        return departmentName;
    }

    public void setDepartmentName(String departmentName) {
        this.departmentName = departmentName;
    }

    @Override
    public String toString() {
        return "Department{" +
                "id=" + id +
                ", departmentName='" + departmentName + '\'' +
                '}';
    }

}
11、编写展示内容的接口,并配置相关文件
在scr/ssm下新建mapper包,这里有两点注意,也需要配置两个东西,我分开说。
①首先新建EmployeeMapper接口,用于实现查询功能。
package ssm.mapper;

import ssm.beans.Employee;
import java.util.List;

public interface EmployeeMapper {

    public List<Employee> getAllEmps();

}
②再回到conf中,新建ssm.mapper,注意,这里的包名一定要和接口所在的包名一直,并且配置文件的名称要和上面的接口名称一致,否则会出错,在这个包内新建EmployeeMapper.xml配置文件,内容如下:
<?xml version="1.0" encoding="UTF-8" ?>
<!DOCTYPE mapper
PUBLIC "-//mybatis.org//DTD Mapper 3.0//EN"
"http://mybatis.org/dtd/mybatis-3-mapper.dtd">
<!--配置SQL映射-->
>
<!--public List> getAllEmps();-->
> 12、配置Service层服务
①首先在src/ssm下新建service包,在里面首先新建EmployeeService接口,主要用于后面的显示功能。
package ssm.service;

import ssm.beans.Employee;
import java.util.List;

public interface EmployeeService {

    public List<Employee> getAllEmps();

}
②然后同样再这个包中新建EmployeeServiceImpl接口实现类,具体实现上面的结构,并且实现自动装配,后续会调用第11步的接口。
package ssm.service;

import org.springframework.beans.factory.annotation.Autowired;
import org.springframework.stereotype.Service;
import ssm.beans.Employee;
import ssm.mapper.EmployeeMapper;
import java.util.List;

@Service
public class EmployeeServiceImpl implements EmployeeService {

    @Autowired
    private EmployeeMapper employeeMapper ;

    @Override
    public List<Employee> getAllEmps() {
        return employeeMapper.getAllEmps();
    }

}
13、配置首页显示内容
因为我们主要是做后端的,我们这次就不设计网页样式,只使用简单的标签,提供数据传输即可,首先配置首页,就是一个跳转链接,在web/WEB-INF中新建index.jsp。
<%--
  Created by IntelliJ IDEA.
  User: IronmanJay
  Date: 2020/2/23
  Time: 12:54
  To change this template use File | Settings | File Templates.
--%>
<%@ page contentType="text/html;charset=UTF-8" language="java" %>
<html>
  <head>
    <title>$Title$</title>
  </head>
  <body>
    <a href="emps">List All Emps</a>
  </body>
</html>
14、配置控制层,实现数据传输展示
来到src/ssm中,新建handler包,在里面新建EmployeeHandler实现类,这个具体实现我们的数据展示功能,使用自动装配,将数据装配进来,使用注解,实现组件扫描,目的是点击链接时,href能匹配到这个类,这里就用到了之前的接口,调用接口,实现方法,使用map添加数据,并将数据传输到list.jsp。
package ssm.handler;

import org.springframework.beans.factory.annotation.Autowired;
import org.springframework.stereotype.Controller;
import org.springframework.web.bind.annotation.RequestMapping;
import org.springframework.web.bind.annotation.RequestMethod;
import ssm.beans.Employee;
import ssm.service.EmployeeService;
import java.util.List;
import java.util.Map;

@Controller
public class EmployeeHandler {

    @Autowired
    private EmployeeService employeeService ;

    /**
     * 显示所有的员工信息
     */
    @RequestMapping(value="/emps" ,method=RequestMethod.GET)
    public String  listAllEmps(Map<String, Object> map) {
        List<Employee> emps = employeeService.getAllEmps();
        map.put("emps", emps);
        return "list";
    }
}
15、配置展示页面
我们在web/WEB-INF的views中新建list.jsp,使用JSTL和EL表达式,提取我们传输过来的内容,并展示出来。
<%--
  Created by IntelliJ IDEA.
  User: IronmanJay
  Date: 2020/2/23
  Time: 16:15
  To change this template use File | Settings | File Templates.
--%>
<%@ page contentType="text/html;charset=UTF-8" language="java" %>
<%--导入JSTL标签--%>
<%@taglib prefix="c" uri="http://java.sun.com/jsp/jstl/core" %>
<html>
<head>
    <title>Title</title>
</head>
<body>
    <h1 align="center">员工信息列表</h1>
    <table align="center" border="1px" width="70%" cellspacing="0px">
        <tr>
            <th>ID</th>
            <th>LastName</th>
            <th>Email</th>
            <th>Gender</th>
            <th>DeptName</th>
            <th>Operation</th>
            <c:forEach items="${emps}" var="emp">
                <tr align="center">
                    <td>${emp.id}</td>
                    <td>${emp.lastName}</td>
                    <td>${emp.email}</td>
                    <td>${emp.gender==0?'女':'男'}</td>
                    <td>${emp.dept.departmentName}</td>
                    <td>
                        <a href="#">Edit</a>
                        <a href="#">Delete</a>
                    </td>
                </tr>
            </c:forEach>
        </tr>
    </table>
    <h2 align="center"><a href="#">Add New Emp</a></h2>
</body>
</html>
至此,完成!
四、效果展示
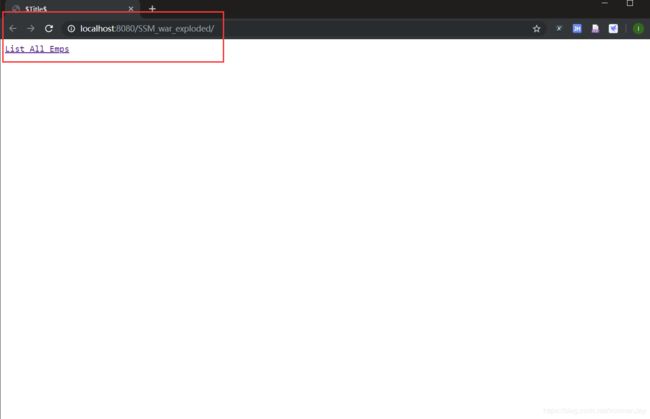
1、启动服务,来到首页。
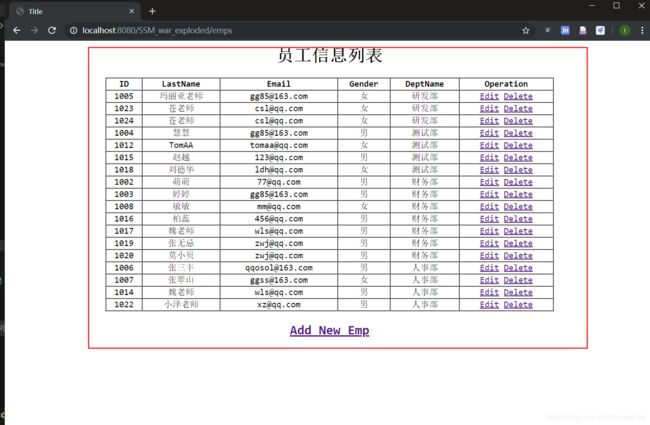
2、点击List All Emps,来到具体的展示界面,整个列表都是使用JSTL自动生成。
五、项目总结
整个项目已经完成,可以看到并不是特别难,只是比较复杂,并且暂时只实现展示的功能,看似简单,却是三个现在非常流行的框架的整合,里面涉及到非常多的知识,后续有时间我会更新增删改查的功能,并且在增删改查的基础上实现登录校验的功能,因为以前做过Python-Django的完成的web电商项目,所以上手比较快,如有兴趣,可以移步我的github仓库Django项目github地址,我已经将django电商项目上传,还是比较大的一个项目,实现了很多功能,喜欢的话给个star,谢谢各位读者。