「源码级回答」大厂高频Vue面试题(中)
写在前面
本篇是「源码级回答」大厂高频Vue面试题系列的第二篇,本篇也是选择了面试中经常会问到的一些经典面试题,从源码角度去分析。
想从第一篇开始看的,地址在
话不多说,干就完了!
简述 Vue 中 diff 算法原理
diff 简介
diff 算法是一种通过同层的树节点进行比较的高效算法,避免了对树进行逐层搜索遍历,所以时间复杂度只有 O(n)。diff 算法的在很多场景下都有应用,例如在 Vue 虚拟 dom 渲染成真实 dom 的新旧 VNode 节点比较更新时,就用到了该算法。diff 算法有两个比较显著的特点:
比较只会在同层级进行, 不会跨层级比较。
在 diff 比较的过程中,循环从两边向中间收拢。
updateChildren
我们知道,在对 model 进行操作时,会触发对应 Dep 中的 Watcher 对象。Watcher 对象会调用对应的 update 来修改视图。最终是将新产生的 VNode 节点与老 VNode 进行一个 patch 的过程,比对得出「差异」,最终将这些「差异」更新到视图上。
而 diff 算法又是patch 的核心内容,我们用 diff 算法可以比对出两颗树的「差异」,假设我们现在有如下两颗树,它们分别是新老 VNode 节点,这时候到了 patch 的过程,我们需要将他们进行比对: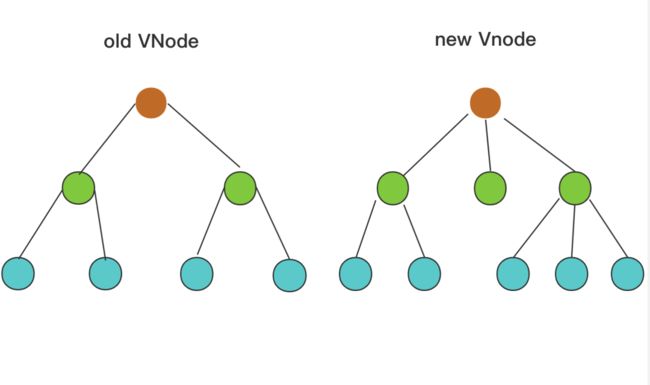
diff 算法是通过同层的树节点进行比较而非对树进行逐层搜索遍历的方式,所以时间复杂度只有 O(n),是一种相当高效的算法,如下图。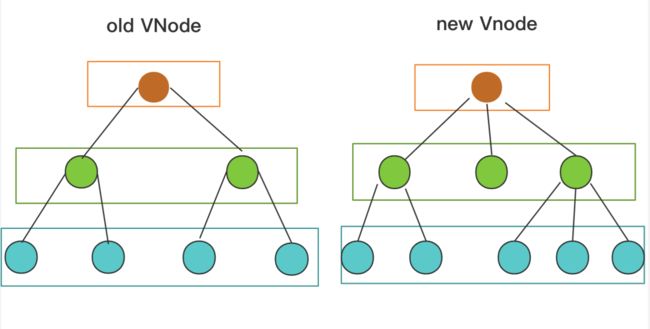
❝图中的相同颜色的方块中的节点会进行比对,比对得到「差异」后将这些「差异」更新到视图上。因为只进行同层级的比对,所以十分高效。
❞
patch 的过程比较复杂,我们这里主要说一下「oldCh 与 ch 都存在且不相同时,使用 updateChildren 函数来更新子节点」这种情况。
来看下updateChildren函数
❝为了方便理解,我在对应代码中添加了注释
❞
function updateChildren(
  parentElm,
  oldCh,
  newCh,
  insertedVnodeQueue,
  removeOnly
) {
  let oldStartIdx = 0; // oldVnode开始下标
  let newStartIdx = 0; // newVnode开始下标
  let oldEndIdx = oldCh.length - 1; // oldVnode结束下标
  let newEndIdx = newCh.length - 1; // newVnode结束下标
  let oldStartVnode = oldCh[0]; // oldVnode开始节点
  let newStartVnode = newCh[0]; // newVnode开始节点
  let oldEndVnode = oldCh[oldEndIdx]; // oldVnode结束节点
  let newEndVnode = newCh[newEndIdx]; // newVnode结束节点

  let oldKeyToIdx, idxInOld, vnodeToMove, refElm;

  // ...
}
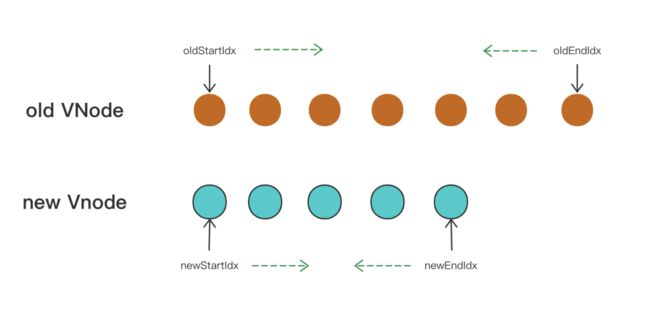
首先定义了 oldStartIdx、newStartIdx、oldEndIdx 以及 newEndIdx 分别是新老两个 VNode 的开始/结束的下标,同时 oldStartVnode、newStartVnode、oldEndVnode 以及 newEndVnode 分别指向这几个索引对应的 VNode 节点。 接下来是一个
 while 循环,在这过程中,oldStartIdx、newStartIdx、oldEndIdx 以及 newEndIdx 会逐渐向中间靠拢。
while (oldStartIdx <= oldEndIdx && newStartIdx <= newEndIdx) {
// ...
}
 首先当
首先当 oldStartVnode 或者 oldEndVnode 不存在的时候,oldStartIdx 与 oldEndIdx 继续向中间靠拢,并更新对应的 oldStartVnode 与 oldEndVnode 的指向。
if (isUndef(oldStartVnode)) {
  oldStartVnode = oldCh[++oldStartIdx];
} else if (isUndef(oldEndVnode)) {
  oldEndVnode = oldCh[--oldEndIdx];
}
接下来这一块,是将 oldStartIdx、newStartIdx、oldEndIdx 以及 newEndIdx 两两比对的过程,一共会出现 2*2=4 种情况。
首先是 oldStartVnode 与 newStartVnode 符合 sameVnode 时,说明老 VNode 节点的头部与新 VNode 节点的头部是相同的 VNode 节点,直接进行 patchVnode,同时 oldStartIdx 与 newStartIdx 向后移动一位。
if (sameVnode(oldStartVnode, newStartVnode)) {
  // 首先是 oldStartVnode 与 newStartVnode 符合 sameVnode 时,
  // 说明老 VNode 节点的头部与新 VNode 节点的头部是相同的 VNode 节点,直接进行 patchVnode,同时 oldStartIdx 与 newStartIdx 向后移动一位
  patchVnode(
    oldStartVnode,
    newStartVnode,
    insertedVnodeQueue,
    newCh,
    newStartIdx
  );
  oldStartVnode = oldCh[++oldStartIdx];
  newStartVnode = newCh[++newStartIdx];
}
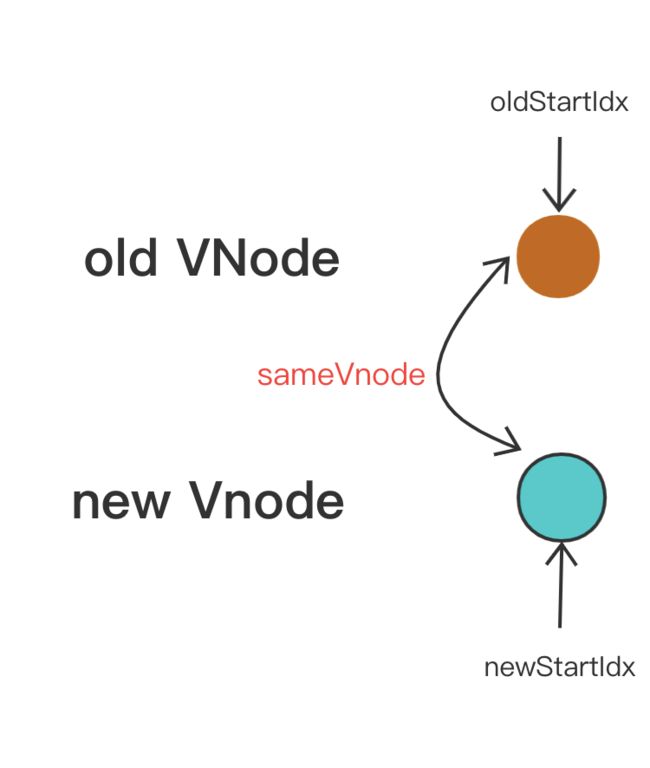
其次是 oldEndVnode 与 newEndVnode 符合 sameVnode,也就是两个 VNode 的结尾是相同的 VNode,同样进行 patchVnode 操作并将 oldEndVnode 与 newEndVnode 向前移动一位。
if (sameVnode(oldEndVnode, newEndVnode)) {
  // 其次是 oldEndVnode 与 newEndVnode 符合 sameVnode,
  // 也就是两个 VNode 的结尾是相同的 VNode,同样进行 patchVnode 操作并将 oldEndVnode 与 newEndVnode 向前移动一位。
  patchVnode(
    oldEndVnode,
    newEndVnode,
    insertedVnodeQueue,
    newCh,
    newEndIdx
  );
  oldEndVnode = oldCh[--oldEndIdx];
  newEndVnode = newCh[--newEndIdx];
}

接下来是oldStartVnode 与 newEndVnode 符合 sameVnode 的时候,也就是老 VNode 节点的头部与新 VNode 节点的尾部是同一节点的时候,将 oldStartVnode.elm 这个节点直接移动到 oldEndVnode.elm 这个节点的后面即可。然后 oldStartIdx 向后移动一位,newEndIdx 向前移动一位。
if (sameVnode(oldStartVnode, newEndVnode)) {
  // oldStartVnode 与 newEndVnode 符合 sameVnode 的时候,
  // 也就是老 VNode 节点的头部与新 VNode 节点的尾部是同一节点的时候,
  // 将 oldStartVnode.elm 这个节点直接移动到 oldEndVnode.elm 这个节点的后面即可。然后 oldStartIdx 向后移动一位,newEndIdx 向前移动一位。
  patchVnode(
    oldStartVnode,
    newEndVnode,
    insertedVnodeQueue,
    newCh,
    newEndIdx
  );
  canMove &&
    nodeOps.insertBefore(
      parentElm,
      oldStartVnode.elm,
      nodeOps.nextSibling(oldEndVnode.elm)
    );
  oldStartVnode = oldCh[++oldStartIdx];
  newEndVnode = newCh[--newEndIdx];
}

最后是oldEndVnode 与 newStartVnode 符合 sameVnode 时,也就是老 VNode 节点的尾部与新 VNode 节点的头部是同一节点的时候,将 oldEndVnode.elm 插入到 oldStartVnode.elm 前面。同样的,oldEndIdx 向前移动一位,newStartIdx 向后移动一位。
if (sameVnode(oldEndVnode, newStartVnode)) {
  // oldEndVnode 与 newStartVnode 符合 sameVnode 时,
  // 也就是老 VNode 节点的尾部与新 VNode 节点的头部是同一节点的时候,
  // 将 oldEndVnode.elm 插入到 oldStartVnode.elm 前面。同样的,oldEndIdx 向前移动一位,newStartIdx 向后移动一位。
  patchVnode(
    oldEndVnode,
    newStartVnode,
    insertedVnodeQueue,
    newCh,
    newStartIdx
  );
  canMove &&
    nodeOps.insertBefore(parentElm, oldEndVnode.elm, oldStartVnode.elm);
  oldEndVnode = oldCh[--oldEndIdx];
  newStartVnode = newCh[++newStartIdx];
}

如果都不满足以上四种情形,那说明没有相同的节点可以复用。于是则通过查找事先建立好的以旧的 VNode 为 key 值,对应 index 为 value 值的哈希表。
从这个哈希表中找到与 newStartVnode 一致 key 的旧的 VNode 节点,如果两者满足 sameVnode 的条件,在进行 patchVnode 的同时会将这个真实 dom 移动到 oldStartVnode 对应的真实 dom 的前面;如果没有找到,则说明当前索引下的新的 VNode 节点在旧的 VNode 队列中不存在,无法进行节点的复用,那么就只能调用 createElm 创建一个新的 dom 节点放到当前 newStartIdx 的位置。
最后还有一段代码:
// while 循环结束
if (oldStartIdx > oldEndIdx) {
  // 如果 oldStartIdx > oldEndIdx,说明老节点比对完了,但是新节点还有多的,需要将新节点插入到真实 DOM 中去,调用 addVnodes 将这些节点插入即可。
  refElm = isUndef(newCh[newEndIdx + 1]) ? null : newCh[newEndIdx + 1].elm;
  addVnodes(
    parentElm,
    refElm,
    newCh,
    newStartIdx,
    newEndIdx,
    insertedVnodeQueue
  );
} else if (newStartIdx > newEndIdx) {
  // 如果满足 newStartIdx > newEndIdx 条件,说明新节点比对完了,老节点还有多,将这些无用的老节点通过 removeVnodes 批量删除即可。
  removeVnodes(oldCh, oldStartIdx, oldEndIdx);
}
当 while 循环结束以后,如果 oldStartIdx > oldEndIdx,说明老节点比对完了,但是新节点还有多的,需要将新节点插入到真实 DOM 中去,调用 addVnodes 将这些节点插入即可。
如果满足 newStartIdx > newEndIdx 条件,说明新节点比对完了,老节点还有多,将这些无用的老节点通过 removeVnodes 批量删除即可。
Vue 组件中的 data 为什么是个函数?
❝其实这个问题还有下半句:而
❞new Vue实例里,data可以直接是一个对象?
先来看下平时在组件和new Vue时使用data的场景:
// 组件
data() {
return {
msg: "hello 森林",
}
}
// new Vue
new Vue({
data: {
msg: 'hello jack-cool'
},
el: '#app',
router,
template: '我们知道,Vue组件其实就是一个Vue实例。
JS中的实例是通过构造函数来创建的,每个构造函数可以new出很多个实例,那么每个实例都会继承原型上的方法或属性。
Vue的data数据其实是Vue原型上的属性,数据存在于内存当中
Vue为了保证每个实例上的data数据的独立性,规定了必须使用函数,而不是对象。
因为使用对象的话,每个实例(组件)上使用的data数据是相互影响的,这当然就不是我们想要的了。对象是对于内存地址的引用,直接定义个对象的话组件之间都会使用这个对象,这样会造成组件之间数据相互影响。
我们来看个示例:
// 创建一个简单的构建函数
var MyComponent = function() {
    // ...
}
// 原型链对象上设置data数据,data设为Object
MyComponent.prototype.data = {
  name: '森林',
  age: 20,
}
// 创建两个实例:春娇,志明
var chunjiao = new MyComponent()
var zhiming = new MyComponent()
// 默认状态下春娇和志明的年龄一样
console.log(chunjiao.data.age === zhiming.data.age) // true
// 改变春娇的年龄
chunjiao.data.age = 25;
// 打印志明的年龄,发现因为改变了春娇的年龄,结果造成志明的年龄也变了
console.log(chunjiao.data.age)// 25
console.log(zhiming.data.age) // 25
使用函数后,使用的是data()函数,data()函数中的this指向的是当前实例本身,就不会相互影响了。
总结一下,就是:
组件中的data是一个函数的原因在于:同一个组件被复用多次,会创建多个实例。这些实例用的是同一个构造函数,如果 data 是一个对象的话。那么所有组件都共享了同一个对象。为了保证组件的数据独立性要求每个组件必须通过 data 函数返回一个对象作为组件的状态。
而 new Vue 的实例,是不会被复用的,因此不存在引用对象的问题。
谈谈你对 Vue 生命周期的理解?
回答这个问题,我们先要概括的回答一下Vue生命周期是什么:
Vue 实例有一个完整的生命周期,也就是从开始创建、初始化数据、编译模版、挂载 Dom -> 渲染、更新 -> 渲染、卸载等一系列过程,我们称这是 Vue 的生命周期。
下面的表格展示了每个生命周期分别在什么时候被调用:
| 生命周期 | 描述 |
|---|---|
beforeCreate |
在实例初始化之后,数据观测(data observer) 之前被调用。 |
created |
实例已经创建完成之后被调用。在这一步,实例已完成以下的配置:数据观测(data observer),属性和方法的运算, watch/event 事件回调。但真实 dom 还没有生成,$el 还不可用 |
beforeMount |
在挂载开始之前被调用,相关的 render 函数首次被调用。 |
mounted |
el 被新创建的 vm.$el 替换,并挂载到实例上去之后调用该钩子。 |
beforeUpdate |
数据更新时调用,发生在虚拟 DOM 重新渲染和打补丁之前。 |
updated |
由于数据更改导致的虚拟 DOM 重新渲染和打补丁,在这之后会调用该钩子。 |
activited |
keep-alive 专属,组件被激活时调用 |
deactivated |
keep-alive 专属,组件被销毁时调用 |
beforeDestory |
实例销毁之前调用。在这一步,实例仍然完全可用。 |
destoryed |
Vue 实例销毁后调用。 |
Vue本质上是一个构造函数,定义在src/core/instance/index.js中:
// src/core/instance/index.js
function Vue(options) {
  if (process.env.NODE_ENV !== "production" && !(this instanceof Vue)) {
    warn("Vue is a constructor and should be called with the `new` keyword");
  }
  this._init(options);
}
构造函数的核心是调用了
_init方法,_init定义在src/core/instance/init.js中:
// src/core/instance/init.js
Vue.prototype._init = function(options?: Object) {
  const vm: Component = this;
  // a uid
  vm._uid = uid++;
  [1];
  let startTag, endTag;
  /* istanbul ignore if */
  if (process.env.NODE_ENV !== "production" && config.performance && mark) {
    startTag = `vue-perf-start:${vm._uid}`;
    endTag = `vue-perf-end:${vm._uid}`;
    mark(startTag);
  }

  // a flag to avoid this being observed
  vm._isVue = true;
  // merge options
  if (options && options._isComponent) {
    // optimize internal component instantiation
    // since dynamic options merging is pretty slow, and none of the
    // internal component options needs special treatment.
    initInternalComponent(vm, options);
  } else {
    vm.$options = mergeOptions(
      resolveConstructorOptions(vm.constructor),
      options || {},
      vm
    );
  }
  /* istanbul ignore else */
  if (process.env.NODE_ENV !== "production") {
    initProxy(vm);
  } else {
    vm._renderProxy = vm;
  }
  // expose real self
  vm._self = vm;
  initLifecycle(vm);
  initEvents(vm);
  initRender(vm);
  callHook(vm, "beforeCreate");
  initInjections(vm); // resolve injections before data/props
  initState(vm);
  initProvide(vm); // resolve provide after data/props
  callHook(vm, "created")[2];
  /* istanbul ignore if */
  if (process.env.NODE_ENV !== "production" && config.performance && mark) {
    vm._name = formatComponentName(vm, false);
    mark(endTag);
    measure(`vue ${vm._name} init`, startTag, endTag);
  }

  if (vm.$options.el) {
    vm.$mount(vm.$options.el);
  }
};
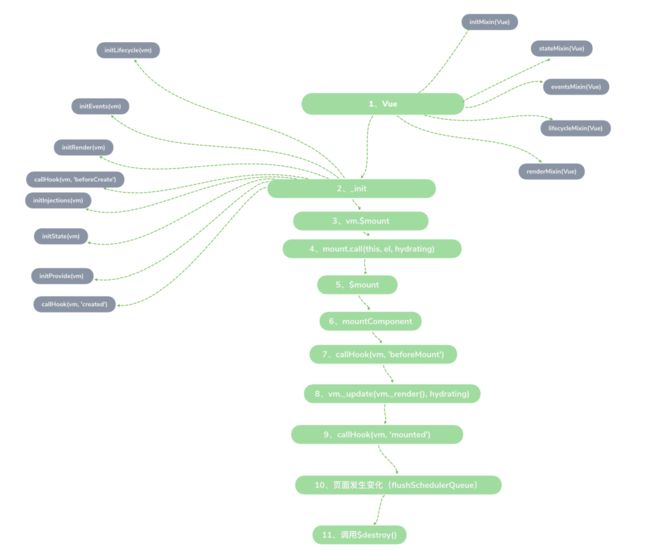
_init内调用了很多初始化函数,从函数名称可以看出分别是执行初始化生命周期(initLifecycle)、初始化事件中心(initEvents)、初始化渲染(initRender)、执行beforeCreate钩子(callHook(vm, 'beforeCreate'))、解析 inject(initInjections)、初始化状态(initState)、解析 provide(initProvide)、执行created钩子(callHook(vm, 'created'))。
在
_init函数的最后有判断如果有el就执行$mount方法。定义在src/platforms/web/entry-runtime-with-compiler.js中:
// src/platforms/web/entry-runtime-with-compiler.js

// ...

const mount = Vue.prototype.$mount;
Vue.prototype.$mount = function(
  el?: string | Element,
  hydrating?: boolean
): Component {
  el = el && query(el);

  /* istanbul ignore if */
  if (el === document.body || el === document.documentElement) {
    process.env.NODE_ENV !== "production" &&
      warn(
        `Do not mount Vue to  or  - mount to normal elements instead.`
      );
    return this;
  }

  const options = this.$options;
  // resolve template/el and convert to render function
  if (!options.render) {
    let template = options.template;
    if (template) {
      if (typeof template === "string") {
        // ...
      } else if (template.nodeType) {
        template = template.innerHTML;
      } else {
        // ...
        return this;
      }
    } else if (el) {
      template = getOuterHTML(el);
    }
    if (template) {
       // ...
    }
  }
  return mount.call(this, el, hydrating);
};
// ...

export default Vue;
这里面主要做了两件事:
1、 重写了Vue函数的原型上的$mount函数
2、 判断是否有模板,并且将模板转化成render函数
最后调用了runtime的mount方法,用来挂载组件,也就是mountComponent方法。
mountComponent内首先调用了beforeMount方法,然后在初次渲染和更新后会执行vm._update(vm._render(), hydrating)方法。最后渲染完成后调用mounted钩子。beforeUpdate和updated钩子是在页面发生变化,触发更新后,被调用的,对应是在src/core/observer/scheduler.js的flushSchedulerQueue函数中。beforeDestroy和destroyed都在执行$destroy函数时被调用。$destroy函数是定义在Vue.prototype上的一个方法,对应在src/core/instance/lifecycle.js文件中:
// src/core/instance/lifecycle.js

Vue.prototype.$destroy = function() {
  const vm: Component = this;
  if (vm._isBeingDestroyed) {
    return;
  }
  callHook(vm, "beforeDestroy");
  vm._isBeingDestroyed = true;
  // remove self from parent
  const parent = vm.$parent;
  if (parent && !parent._isBeingDestroyed && !vm.$options.abstract) {
    remove(parent.$children, vm);
  }
  // teardown watchers
  if (vm._watcher) {
    vm._watcher.teardown();
  }
  let i = vm._watchers.length;
  while (i--) {
    vm._watchers[i].teardown();
  }
  // remove reference from data ob
  // frozen object may not have observer.
  if (vm._data.__ob__) {
    vm._data.__ob__.vmCount--;
  }
  // call the last hook...
  vm._isDestroyed = true;
  // invoke destroy hooks on current rendered tree
  vm.__patch__(vm._vnode, null);
  // fire destroyed hook
  callHook(vm, "destroyed");
  // turn off all instance listeners.
  vm.$off();
  // remove __vue__ reference
  if (vm.$el) {
    vm.$el.__vue__ = null;
  }
  // release circular reference (#6759)
  if (vm.$vnode) {
    vm.$vnode.parent = null;
  }
};
Vue 中常见的性能优化方式
编码优化
尽量不要将所有的数据都放在
data中,data中的数据都会增加getter和setter,会收集对应的watchervue在v-for时给每项元素绑定事件尽量用事件代理拆分组件( 提高复用性、增加代码的可维护性,减少不必要的渲染 )
v-if当值为false时内部指令不会执行,具有阻断功能,很多情况下使用v-if替代v-show合理使用路由懒加载、异步组件
Object.freeze冻结数据
用户体验
app-skeleton骨架屏pwaserviceworker
加载性能优化
第三方模块按需导入 (
babel-plugin-component)滚动到可视区域动态加载 (
https://tangbc.github.io/vue-virtual-scroll-list)图片懒加载 (
https://github.com/hilongjw/vue-lazyload.git)
SEO 优化
预渲染插件
prerender-spa-plugin服务端渲染
ssr
打包优化
使用
cdn的方式加载第三方模块多线程打包
happypack、parallel-webpack控制包文件大小(
tree shaking/splitChunksPlugin)使用
DllPlugin提高打包速度
缓存/压缩
客户端缓存/服务端缓存
服务端
gzip压缩


