先上效果图
xx.gif
我是android opengl es的初学者,有很多东西还不懂,仍在学习;这里实现全景图浏览的一个思路是,先使用opengl绘制一个球体,这个球体中心位置在手机屏幕的中心,球体的半径为3。默认摄像机的位置在球体正前方半径为3的位置上,看着球体的中心,在收触摸屏幕的时候,不断调整摄像机的位置,但是保持距离球体中心的位置不变。
球体绘制成功后,将准备好的全景图,贴在球体的表面,就完成了(不需要对全景图进行特殊处理,我刚开始的思路是绘制一个正方体天空盒,然后对全景图进行处理,获得天空盒六个面的图像,然后将图像贴在六个面上,结果发现我不会。。。。)。
这里涉及到
opengl的绘制,可以看看android opengl es2.0完全入门这篇文章
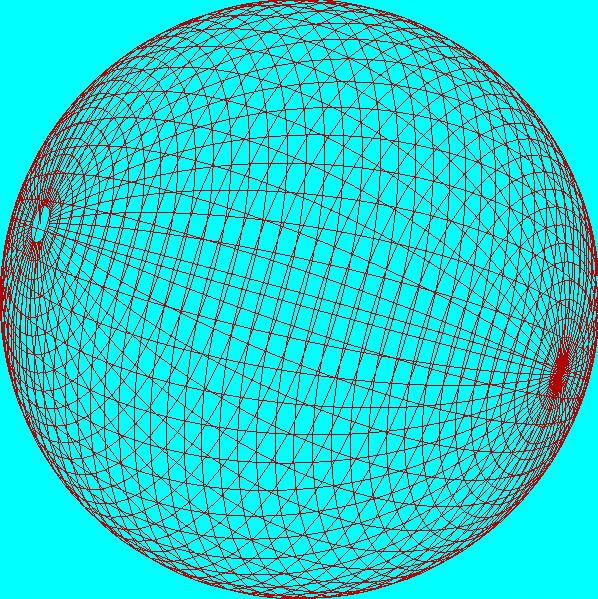
绘制球体,opengl es2.0只能绘制点,线和三角形,如果要绘制球体的话,需要将球体表面切分成成千上万个小矩形,矩形又可以切分成三角形来绘制,只要切分的够细,看上去就是球体。
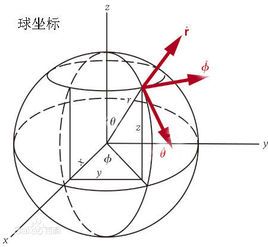
绘制球体需要你掌握一点三维空间和三角函数的知识
根据θ和β的角度,就可以计算球体上一个点的坐标,同时计算另外三个顶点坐标也是比较容易的。
package com.xz.demo;

import android.app.Activity;
import android.graphics.Bitmap;
import android.graphics.BitmapFactory;
import android.opengl.GLES20;
import android.opengl.GLSurfaceView;
import android.opengl.GLUtils;
import android.opengl.Matrix;
import android.os.Bundle;
import android.view.MotionEvent;
import android.view.ViewGroup;

import java.nio.ByteBuffer;
import java.nio.ByteOrder;
import java.nio.FloatBuffer;
import java.nio.ShortBuffer;

import javax.microedition.khronos.egl.EGLConfig;
import javax.microedition.khronos.opengles.GL10;

/**
 * Created by Administrator on 2016/8/31 0031.
 */
public class OPENGLTestActivity extends Activity {
    GLSurfaceView glSurfaceView;
    public float mAngleX = 0;// 摄像机所在的x坐标
    public float mAngleY = 0;// 摄像机所在的y坐标
    public float mAngleZ = 3;// 摄像机所在的z坐标

    public static String VL = "uniform mat4 uMVPMatrix;" +
            "attribute vec4 vPosition;" +
            "attribute vec2 a_texCoord;" +
            "varying vec2 v_texCoord;" +
            "void main() {" +
            "  gl_Position = uMVPMatrix * vPosition;" +
            "  v_texCoord = a_texCoord;" +
            "}";
    public static String FL = "precision mediump float;" +
            "varying vec2 v_texCoord;" +
            "uniform sampler2D s_texture;" +
            "void main() {" +
            "  gl_FragColor = texture2D( s_texture, v_texCoord );" +
            "}";

    @Override
    protected void onCreate(Bundle savedInstanceState) {
        super.onCreate(savedInstanceState);
        glSurfaceView = new GLSurfaceView(this);
        glSurfaceView.setLayoutParams(new ViewGroup.LayoutParams(-1, -1));
        setContentView(glSurfaceView);
        glSurfaceView.setEGLContextClientVersion(2);

        glSurfaceView.setRenderer(new RenderListener());
        glSurfaceView.setRenderMode(GLSurfaceView.RENDERMODE_WHEN_DIRTY);
    }

    float startRawX;
    float startRawY;

    double xFlingAngle;
    double xFlingAngleTemp;

    double yFlingAngle;
    double yFlingAngleTemp;

    @Override
    public boolean onTouchEvent(MotionEvent me) {
      //处理手指滑动事件,我这里的处理是判断手指在横向和竖向滑动的距离
      //这个距离隐射到球体上经度和纬度的距离,根据这个距离计算三维空间的两个
     //夹角,根据这个夹角调整摄像机所在位置
        if (me.getAction() == MotionEvent.ACTION_DOWN) {
            startRawX = me.getRawX();
            startRawY = me.getRawY();
        } else if (me.getAction() == MotionEvent.ACTION_MOVE) {

            float distanceX = startRawX - me.getRawX();
            float distanceY = startRawY - me.getRawY();

           //这里的0.1f是为了不上摄像机移动的过快
            distanceY = 0.1f * (distanceY) / getWindowManager().getDefaultDisplay().getHeight();

            yFlingAngleTemp = distanceY * 180 / (Math.PI * 3);

            if (yFlingAngleTemp + yFlingAngle > Math.PI / 2) {
                yFlingAngleTemp = Math.PI / 2 - yFlingAngle;
            }
            if (yFlingAngleTemp + yFlingAngle < -Math.PI / 2) {
                yFlingAngleTemp = -Math.PI / 2 - yFlingAngle;
            }
         //这里的0.1f是为了不上摄像机移动的过快
            distanceX = 0.1f * (-distanceX) / getWindowManager().getDefaultDisplay().getWidth();
            xFlingAngleTemp = distanceX * 180 / (Math.PI * 3);


            mAngleX = (float) (3 * Math.cos(yFlingAngle + yFlingAngleTemp) * Math.sin(xFlingAngle + xFlingAngleTemp));

            mAngleY = (float) (3 * Math.sin(yFlingAngle + yFlingAngleTemp));


            mAngleZ = (float) (3 * Math.cos(yFlingAngle + yFlingAngleTemp) * Math.cos(xFlingAngle + xFlingAngleTemp));

            glSurfaceView.requestRender();
        } else if (me.getAction() == MotionEvent.ACTION_UP) {
            xFlingAngle += xFlingAngleTemp;
            yFlingAngle += yFlingAngleTemp;
        }
        return true;
    }


    class RenderListener implements GLSurfaceView.Renderer {

        FloatBuffer verticalsBuffer;

        int CAP = 9;//绘制球体时,每次增加的角度
        float[] verticals = new float[(180/CAP) * (360/CAP) * 6 * 3];


        private final FloatBuffer mUvTexVertexBuffer;

        private final float[] UV_TEX_VERTEX = new float[(180/CAP) * (360/CAP) * 6 * 2];

        private int mProgram;
        private int mPositionHandle;
        private int mTexCoordHandle;
        private int mMatrixHandle;
        private int mTexSamplerHandle;
        int[] mTexNames;

        private final float[] mProjectionMatrix = new float[16];
        private final float[] mCameraMatrix = new float[16];
        private final float[] mMVPMatrix = new float[16];

        private int mWidth;
        private int mHeight;

        public RenderListener() {

            float x = 0;
            float y = 0;
            float z = 0;

            float r = 3;//球体半径
            int index = 0;
            int index1 = 0;
            double d = CAP * Math.PI / 180;//每次递增的弧度
            for (int i = 0; i < 180; i += CAP) {
                double d1 = i * Math.PI / 180;
                for (int j = 0; j < 360; j += CAP) {
                  //获得球体上切分的超小片矩形的顶点坐标(两个三角形组成,所以有六点顶点)
                    double d2 = j * Math.PI / 180;
                    verticals[index++] = (float) (x + r * Math.sin(d1 + d) * Math.cos(d2 + d));
                    verticals[index++] = (float) (y + r * Math.cos(d1 + d));
                    verticals[index++] = (float) (z + r * Math.sin(d1 + d) * Math.sin(d2 + d));
   //获得球体上切分的超小片三角形的纹理坐标
                    UV_TEX_VERTEX[index1++] = (j + CAP) * 1f / 360;
                    UV_TEX_VERTEX[index1++] = (i + CAP) * 1f / 180;

                    verticals[index++] = (float) (x + r * Math.sin(d1) * Math.cos(d2));
                    verticals[index++] = (float) (y + r * Math.cos(d1));
                    verticals[index++] = (float) (z + r * Math.sin(d1) * Math.sin(d2));

                    UV_TEX_VERTEX[index1++] = j * 1f / 360;
                    UV_TEX_VERTEX[index1++] = i * 1f / 180;

                    verticals[index++] = (float) (x + r * Math.sin(d1) * Math.cos(d2 + d));
                    verticals[index++] = (float) (y + r * Math.cos(d1));
                    verticals[index++] = (float) (z + r * Math.sin(d1) * Math.sin(d2 + d));

                    UV_TEX_VERTEX[index1++] = (j + CAP) * 1f / 360;
                    UV_TEX_VERTEX[index1++] = i * 1f / 180;

                    verticals[index++] = (float) (x + r * Math.sin(d1 + d) * Math.cos(d2 + d));
                    verticals[index++] = (float) (y + r * Math.cos(d1 + d));
                    verticals[index++] = (float) (z + r * Math.sin(d1 + d) * Math.sin(d2 + d));

                    UV_TEX_VERTEX[index1++] = (j + CAP) * 1f / 360;
                    UV_TEX_VERTEX[index1++] = (i + CAP) * 1f / 180;

                    verticals[index++] = (float) (x + r * Math.sin(d1 + d) * Math.cos(d2));
                    verticals[index++] = (float) (y + r * Math.cos(d1 + d));
                    verticals[index++] = (float) (z + r * Math.sin(d1 + d) * Math.sin(d2));

                    UV_TEX_VERTEX[index1++] = j * 1f / 360;
                    UV_TEX_VERTEX[index1++] = (i + CAP) * 1f / 180;

                    verticals[index++] = (float) (x + r * Math.sin(d1) * Math.cos(d2));
                    verticals[index++] = (float) (y + r * Math.cos(d1));
                    verticals[index++] = (float) (z + r * Math.sin(d1) * Math.sin(d2));

                    UV_TEX_VERTEX[index1++] = j * 1f / 360;
                    UV_TEX_VERTEX[index1++] = i * 1f / 180;


                }
            }
            verticalsBuffer = ByteBuffer.allocateDirect(verticals.length * 4)
                    .order(ByteOrder.nativeOrder())
                    .asFloatBuffer()
                    .put(verticals);
            verticalsBuffer.position(0);


            mUvTexVertexBuffer = ByteBuffer.allocateDirect(UV_TEX_VERTEX.length * 4)
                    .order(ByteOrder.nativeOrder())
                    .asFloatBuffer()
                    .put(UV_TEX_VERTEX);
            mUvTexVertexBuffer.position(0);
        }

        @Override
        public void onSurfaceCreated(GL10 gl, EGLConfig config) {

        }

        @Override
        public void onSurfaceChanged(GL10 gl, int width, int height) {

            mWidth = width;
            mHeight = height;
            mProgram = GLES20.glCreateProgram();

            int vertexShader = GLES20.glCreateShader(GLES20.GL_VERTEX_SHADER);
            GLES20.glShaderSource(vertexShader, VL);
            GLES20.glCompileShader(vertexShader);

            int fragmentShader = GLES20.glCreateShader(GLES20.GL_FRAGMENT_SHADER);
            GLES20.glShaderSource(fragmentShader, FL);
            GLES20.glCompileShader(fragmentShader);

            GLES20.glAttachShader(mProgram, vertexShader);
            GLES20.glAttachShader(mProgram, fragmentShader);

            GLES20.glLinkProgram(mProgram);

            mPositionHandle = GLES20.glGetAttribLocation(mProgram, "vPosition");
            mTexCoordHandle = GLES20.glGetAttribLocation(mProgram, "a_texCoord");
            mMatrixHandle = GLES20.glGetUniformLocation(mProgram, "uMVPMatrix");
            mTexSamplerHandle = GLES20.glGetUniformLocation(mProgram, "s_texture");

            mTexNames = new int[1];
            GLES20.glGenTextures(1, mTexNames, 0);
           //这里的全景图需要长宽的比例使2:1,不然上下顶点会出现形变
            Bitmap bitmap = BitmapFactory.decodeResource(getResources(), R.mipmap.qj3);
            GLES20.glActiveTexture(GLES20.GL_TEXTURE0);
            GLES20.glBindTexture(GLES20.GL_TEXTURE_2D, mTexNames[0]);
            GLES20.glTexParameteri(GLES20.GL_TEXTURE_2D, GLES20.GL_TEXTURE_MIN_FILTER, GLES20.GL_LINEAR);
            GLES20.glTexParameteri(GLES20.GL_TEXTURE_2D, GLES20.GL_TEXTURE_MAG_FILTER, GLES20.GL_LINEAR);
            GLES20.glTexParameteri(GLES20.GL_TEXTURE_2D, GLES20.GL_TEXTURE_WRAP_S, GLES20.GL_REPEAT);
            GLES20.glTexParameteri(GLES20.GL_TEXTURE_2D, GLES20.GL_TEXTURE_WRAP_T, GLES20.GL_REPEAT);
            GLUtils.texImage2D(GLES20.GL_TEXTURE_2D, 0, bitmap, 0);
            bitmap.recycle();
            float ratio = (float) height / width;
            Matrix.frustumM(mProjectionMatrix, 0, -1, 1, -ratio, ratio, 3, 7);


        }

        @Override
        public void onDrawFrame(GL10 gl) {
          //调整摄像机焦点位置,使画面滚动
            Matrix.setLookAtM(mCameraMatrix, 0, mAngleX, mAngleY, mAngleZ, 0, 0, 0, 0, 1, 0);

            Matrix.multiplyMM(mMVPMatrix, 0, mProjectionMatrix, 0, mCameraMatrix, 0);

            GLES20.glClear(GLES20.GL_COLOR_BUFFER_BIT | GLES20.GL_DEPTH_BUFFER_BIT);
            GLES20.glUseProgram(mProgram);
            GLES20.glEnableVertexAttribArray(mPositionHandle);
            GLES20.glVertexAttribPointer(mPositionHandle, 3, GLES20.GL_FLOAT, false,
                    12, verticalsBuffer);
            GLES20.glEnableVertexAttribArray(mTexCoordHandle);
            GLES20.glVertexAttribPointer(mTexCoordHandle, 2, GLES20.GL_FLOAT, false, 0,
                    mUvTexVertexBuffer);
            GLES20.glUniformMatrix4fv(mMatrixHandle, 1, false, mMVPMatrix, 0);
            GLES20.glUniform1i(mTexSamplerHandle, 0);


            GLES20.glDrawArrays(GLES20.GL_TRIANGLES, 0, (180/CAP) * (360/CAP) * 6);

            GLES20.glDisableVertexAttribArray(mPositionHandle);

        }
    }
}

