wpf框架学习笔记
WPF入门总结
可以让你快速学习的一些资料和途径
- WPF编程宝典.pdf (书的内容比较全, 建议可以选择跳过性的阅读 , 不懂得地方再翻)
- 深入浅出.pdf (主要以实例为主)
- 搜索一些简单的入门视频资料或者简单的项目, 文档比较丰富详细的, 进行下手。
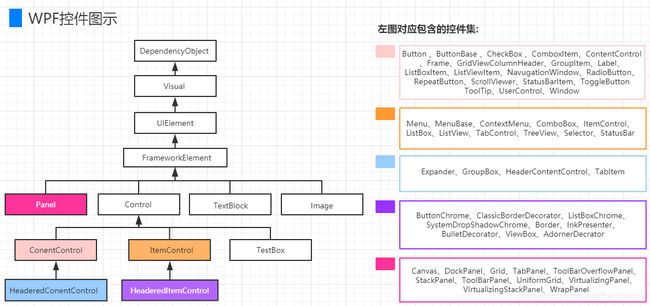
WPF的控件结构
各种控件类型详解
- ContentControl 类
- 设置内容的属性为 Content,例如
<Button Content="Hello"/> <Label Content="Hello"/> <CheckBox Content="Hello"/> - 控件目录下只允许设置一次Content
多个元素类型,正确的使用方式:<Button> <Button.Content> <Rectangle Width="30" Height="5" Fill="Yellow" Stroke="AliceBlue"/> </Button.Content> </Button><Button> <StackPanel Orientation="Horizontal"> <Rectangle Width="15" Height="10" Fill="Yellow" Stroke="AliceBlue" Margin="0 0 5 0"/> <TextBlock Text="暂停"/> </StackPanel> </Button>
- 设置内容的属性为 Content,例如
- HeaderedContentControl 类
- 相对于ContentControl来说、这类控件即可设置Content, 还有带标题的Header。
像比较常见的分组控件GroupBox、TabControl子元素TabItem、它们都是具备标题和内容的控件。<GroupBox Header="测试"> <TextBlock Text="This' a test demo"/> </GroupBox> <TabControl Height="100"> <TabItem Header="测试页面一"/> <TabItem Header="测试页面二"/> <TabItem Header="测试页面三"/> </TabControl> - 同样,该类控件目录下只允许设置一次Conent和Header
- 相对于ContentControl来说、这类控件即可设置Content, 还有带标题的Header。
- ItemsControl 类
- 此类控件大多数属于显示列表类的数据、设置数据源的方式一般通过 ItemsSource 设置。
<TabControl ItemsSource=""/>
在XAML中为对象属性赋值
- Attribute=Value形式
- 属性标签
- 标签扩展
布局容器
布局原则:先整体规划(Grid),再局部规划(Grid、StackPanel等)
- Grid——网格布局,其中控件或容器需指定位置,最常用的最外层布局容器。
Grid与table表格类似,具备分割空间的能力。可以通过Grid.Column和Grid.Row来设置元素所在的分割空间区域Grid.RowDefinitions:可以创建任意多行 Grid.ColumnDefinitions:可以创建任意多列 ColumnSpan:用于设置空间元素的跨列 RowSpan:用于设置空间元素的阔行 ShowGridLines:可以设置边距线的显示 - StackPanel——堆叠面板,其中的控件水平布局、竖直布局,有限空间内垂直或水平分布元素。元素的尺寸总和(长/高)不允许超过StackPanel的尺寸, 否则超出的部分不可见。默认的Orientation为Horizontal。
- WrapPanel——可以看作是具有自动换行功能的StackPanel容器。窗体太小时,其末尾的控件会自动换行。适用于自适应布局及元素的个数不固定的情况。默认的Orientation为Vertical。
- DockPanel——停靠面板,内部控件或容器可以放置在上、下、左、右,具备4个方向的锚定功能, 可适应灵活的非固定的页面布局。
LastChildFill:容器中的最后一个元素时,默认该元素填充DockPanel所有空间,默认值为True - Canvas——画布面板,用于完全控制每个元素的精确位置
- UniformGrid——与Grid不同的是,该容器具备Columns/Rows属性,通过设置该属性,UniformGrid则具备相应的行与列,但是设置的Columns/Rows不允许单独的进行容器的大小设置。
布局原则
-
一个窗口中中能包含一个元素。
-
控件的布局应该有容器来决定,而不是通过自身使用margin之类的东西来控制位置。
-
控件应避免明确的定义具体的尺寸,因为显示器分辨率及windows窗体的大小都有可能随时改变,如果明确的定义尺寸。
当窗体变动后就会出现大面积的空白或是缺失。但为了控件功能及效果的展示,应该限定一个可接受的最大及最小尺寸。通过MinWidth, MinHeight, MaxWidth, MaxHeight属性可以实现这一点。
-
不要将界面元素位置设置成与屏幕坐标相关。
-
容器应将有效空间共享给其子控件,这也是为了不在窗体调整后,遗留出大块的空余。
-
容器嵌套使用,因为不同的容器,表现效果不同,必要时应结合使用。
Style类(样式)的属性
- Setter:设置属性值
- 触发器(Triggers)
- Trigger:触发器,判断属性变化修改其样式
可以通过文档大纲点击相应元素的编辑模板来对触发器进行改造 - MultiTrigger:通过多个条件的设置、达到满足条件、触发器生效
- DataTrigger:通过数据的变化、触发器生效
- MultiDataTrigger : 多个数据条件的触发器
- EventTrigger : 事件触发器, 触发了某类事件时, 触发器生效。
- Trigger:触发器,判断属性变化修改其样式
- BasedOn:继承于其他样式
- TargetType:标记该样式的类型
如Button 则 TargetType="{x:Type Button}"
数据绑定(Binding)
Text={Binding ElementName=slider,Path=Value}
- {Binding }: Binding的声明语法, 一对尖括号,开头声明以Binding 开始。
- ElementName= : 该声明意为, 设置元素的名称
- Path: 设置关联元素的位置,上例中设置为元素的value属性。
  <StackPanel Grid.Row="1" Grid.Column="2">
    <TextBox Text="{Binding ElementName=slider, Path=Value, Mode=OneWay}" HorizontalAlignment="Center" VerticalAlignment="Center"/>
    <Slider x:Name="slider" Width="200" Value="50" Minimum="0" Maximum="100"/>
  </StackPanel>
绑定的模式Mode(五种)
- OneWay(单向绑定) : 当源属性发生变化更新目标属性, 类似上面的例子中, 滑动变化更新文本的数据。
- TwoWay(双向绑定) : 当源属性发生变化更新目标属性, 目标属性发生变化也更新源属性。
- OneTime(单次模式) : 根据第一次源属性设置目标属性, 在此之后所有改变都无效。
- OneWayToSource : 和OneWay类似, 只不过整个过程倒置。
- Default : 既可以是双向,也可以是单项, 除非明确表明某种模式, 否则采用该默认绑定
绑定到非元素上
上面的代码中,使用的绑定方式是根据元素的方式: ElementName=xxx, 如需绑定到一个非元素的对象, 则有一下几属性:
| 属性值 | 含义 |
|---|---|
| Source | 提供数据的对象本身 |
| RelativeSource | 使用RelativeSource对象指向源目标 |
| DataContext | 从当前元素向下, 找到第一个非空的DataContext属性 |
- Source : 指向一个数据源, 示例, TextBox使用绑定的方式用Source指向一个静态资源ABC:
<Window.Resources> <TextBox x:Key="txt1">测试绑定到非元素上</TextBox> </Window.Resources> <Grid> <TextBlock Text="{Binding Source={StaticResource ResourceKey=txt1},Path=Text}"/> </Grid> - RelativeSource : 使用一个名为RelativeSource的对象来根据不同的模式查找源对象
示例, 使用RelativeSource的FindAncestor模式, 查找父元素为StackPanel的Width值<StackPanel Grid.Row="1" Grid.Column="2" Width="220"> <StackPanel Width="150"/> <!-- TextBlock 的Text值为220 --> <TextBlock Text="{Binding Path=Width, RelativeSource={RelativeSource Mode=FindAncestor, AncestorType={x:Type StackPanel}}}"/> </StackPanel> - DataContext : 从当前的元素树向上查找到第一个非空的DataContext属性为源对象。
示例, 该示例用后台代码创建一个只包含Name的类, Test, 通过绑定窗口的DataContext上下文:
后台代码:
前台代码:public MainWindow() { InitializeComponent(); submit0.Content = "我运行了"; //this.DataContext = new Test() { Name = "小明" }; PageModel page = new PageModel(); page.ClassName = "高二三班"; page.Students = new List(); page.Students.Add(new Student() { Name = "张三", Age = "18", Sex = "男" }); page.Students.Add(new Student() { Name = "李四", Age = "19", Sex = "女" }); page.Students.Add(new Student() { Name = "王五", Age = "20", Sex = "男" }); // 将page绑定到DataContext上 this.DataContext = page; } public class PageModel { public string ClassName { get; set; } public List Students { get; set; } } public class Student { public string Name { get; set; } public string Age { get; set; } public string Sex { get; set; } } <Grid Grid.Column="3"> <Grid.RowDefinitions> <RowDefinition Height="20"/> <RowDefinition/> </Grid.RowDefinitions> <StackPanel Orientation="Horizontal" HorizontalAlignment="Center"> <TextBlock Margin="5 0 0 0" Text="班级名称:"/> <TextBlock Margin="5 0 0 0" Text="{Binding ClassName}"/> </StackPanel> <DataGrid Grid.Row="1" ItemsSource="{Binding Students}" AutoGenerateColumns="False"> <DataGrid.Columns> <DataGridTextColumn Header="名称" Binding="{Binding Name}"/> <DataGridTextColumn Header="年龄" Binding="{Binding Age}"/> <DataGridTextColumn Header="性别" Binding="{Binding Sex}"/> </DataGrid.Columns> </DataGrid> </Grid>
绑定更新
在上面的示例中, 从 源对象 -> 目标对象, 源对象的值发生改变, 目标会立刻响应。但是从目标 -> 源 , 未必会立即发生。
在WPF中,他们的行为右 binding中的 UpdateSourceTrigger属性控制, 关于UpdateSourceTrigger 下面列出了对应的枚举值。
| 属性值 | 含义 |
|---|---|
| propertyChanged | 当目标属性发生变化时立即更新源目标 |
| LostFocus | 当目标属性发生变化时并且目标丢失焦点是更新源目标 |
| Explicit | 除非调用BindingExpression.UpdateSource()方法, 否则无法更新资源 |
| Default | 根据目标属性的元数据确定更新行为, 大多数属性的默认行为是PropertyChanged, 但是TextBox.Text的属性默认行为是LostFocus |
控件模板(ControlTemplate)
什么是ControlTemplate?
ControlTemplate(控件模板)不仅是用于来定义控件的外观、样式, 还可通过控件模板的触发器(ControlTemplate.Triggers)修改控件的行为、响应动画等。
- Button的副本里面有一个Template的对象,其中就有ControlTemplate,可以看到ControlTemplate定义了一个Border,然后其中定义了一个内容呈现的控件,ControlPresenter则主要用于呈现按钮的显示内容主体。
[外链图片转存失败,源站可能有防盗链机制,建议将图片保存下来直接上传(img-Y2MkvOHV-1589003929524)(C:\Users\pc02101\Desktop\WPF学习笔记\Button里的控件模板.png)] - 可以用Border 作为Button按钮的边缘样式和整体的外观控制。
- ControlPresenter负责内容的展示和一部分属性的控制。
ControlTemplate中的TemplateBinding 的作用?
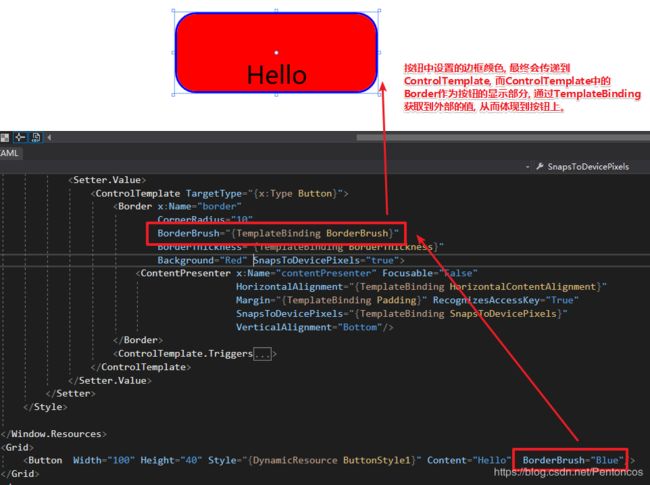
TemplateBinding 可以理解为, 通过模板绑定关联到指定的样式、属性。 如此一来 , 当按钮通过显示设置该属性, 则最终会影响着Template绑定的属性值。
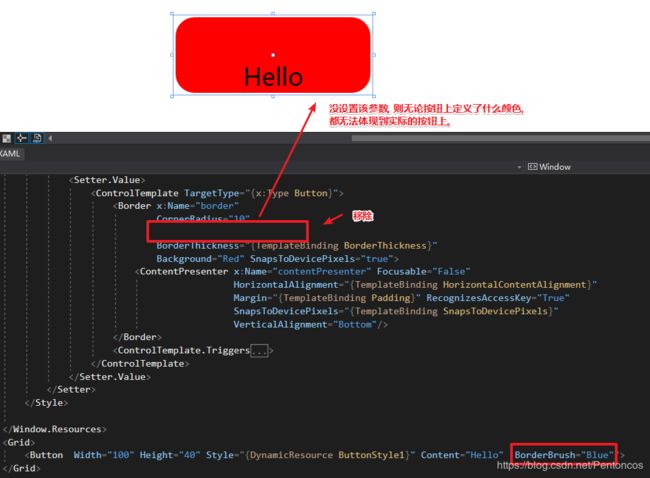
下面将通过代码演示, 有 TemplateBinding 和 无TemplateBinding 的区别, 在Button按钮中, 显示定义 按钮的边框颜色为 “Blue”, 分别看两者中的影响:
可以理解, TemplateBinding 主要的作用为, 与外部的属性关系起来, 使其达到改变样式属性的作用。
ControlTemplate.Triggers 触发器
检测到鼠标等的行为,通过TargetName找到Border控件,并进行改变控件相应Property的属性外观
ControlTemplate.EventTrigger 事件触发器
下面定义了一个EventTrigger 事件触发器,
当鼠标进入按钮区域时, 执行一个0.5秒的动画, 将按钮的背景颜色设置为 pink,
当鼠标离开按钮区域时, 执行一个0.5秒的动画,将按钮的背景颜色设置为Green。
<EventTrigger RoutedEvent="MouseEnter">
  <BeginStoryboard>
    <Storyboard>
      <ColorAnimation
        Storyboard.TargetName="border"
        Storyboard.TargetProperty="Background.Color" To="Pink"
        Duration="0:0:0.5"/>
    </Storyboard>
  </BeginStoryboard>
</EventTrigger>
自定义ControlTemplate
控件模板可以独立存在, 上面的例子中, 包含在样式文件中, 下面, 单独声明一个独立的控件模板:
- 创建一个ControlTemplate ,设定一个键名称, 指定其模板的类型
- 创建一个Border 用于设置按钮边样式
- 创建一个内容呈现的控件, 设置几个参数的TemplateBinding.
- 按钮的Template 绑定该模板
<Window.Resources>
  <ControlTemplate x:Key="ButtonTemplate" TargetType="{x:Type Button}">
    <Border Background="Red" CornerRadius="20">
      <ContentPresenter HorizontalAlignment="{TemplateBinding HorizontalAlignment}" VerticalAlignment="{TemplateBinding VerticalAlignment}"/>
    </Border>
  </ControlTemplate>

  <Style x:Key="demo1" TargetType="{x:Type Button}">
    <Setter Property="Foreground" Value="Blue"/>
    <Setter Property="FontSize" Value="30"/>
  </Style>
</Window.Resources>

<Button Style="{StaticResource demo1}" Width="100" Height="50" Margin="0 5 0 0" Template="{StaticResource ButtonTemplate}" Content="World" VerticalAlignment="Center" HorizontalAlignment="Center"/>
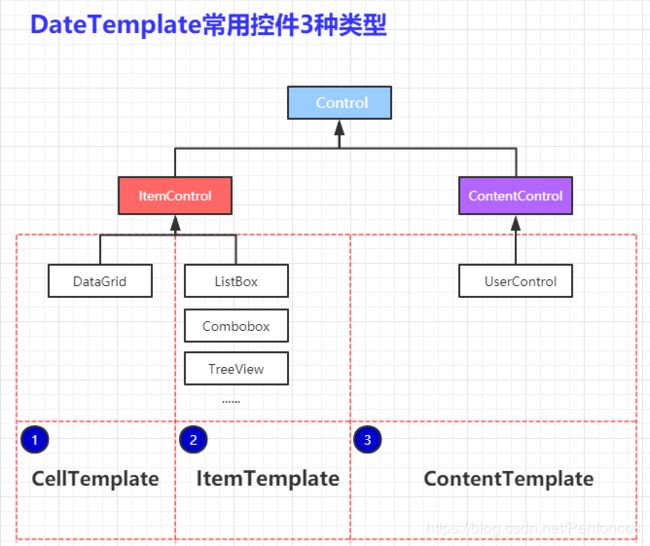
数据模板(DataTemplate)
- Grid这种列表表格中修改Cell的数据格式, CellTemplate可以修改单元格的展示数据的方式。
- 针对列表类型的控件, 例如树形控件,下拉列表,列表控件, 可以修改其中的ItemTemplate。
- 修改ContentTemplate, 例UserControl控件的数据展现形式。
CellTemplate 模板
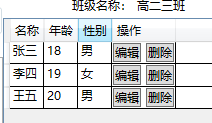
下面用一个例子, 来演示CellTemplate使用。例子实现一个DataGrid 展示一个普通的数据标, 同时新增一列CellTemplate添加两个自定义的按钮, 如下所示:
<DataGrid Grid.Row="1" ItemsSource="{Binding Students}" AutoGenerateColumns="False" IsReadOnly="True">
  <DataGrid.Columns>
    <DataGridTextColumn Header="名称" Binding="{Binding Name}"/>
    <DataGridTextColumn Header="年龄" Binding="{Binding Age}"/>
    <DataGridTextColumn Header="性别" Binding="{Binding Sex}"/>
    <DataGridTemplateColumn Header="操作">
      <DataGridTemplateColumn.CellTemplate>
        <DataTemplate>
          <StackPanel Orientation="Horizontal" VerticalAlignment="Center" HorizontalAlignment="Left">
            <Button Content="编辑"/>
            <Button Content="删除" Margin="5 0 0 0"/>
          </StackPanel>
        </DataTemplate>
      </DataGridTemplateColumn.CellTemplate>
    </DataGridTemplateColumn>
  </DataGrid.Columns>
</DataGrid>
最终的效果, 在数据的表格最后一列, 将会在一列中分别生成 两个普通按钮。
ItemTemplate 模板
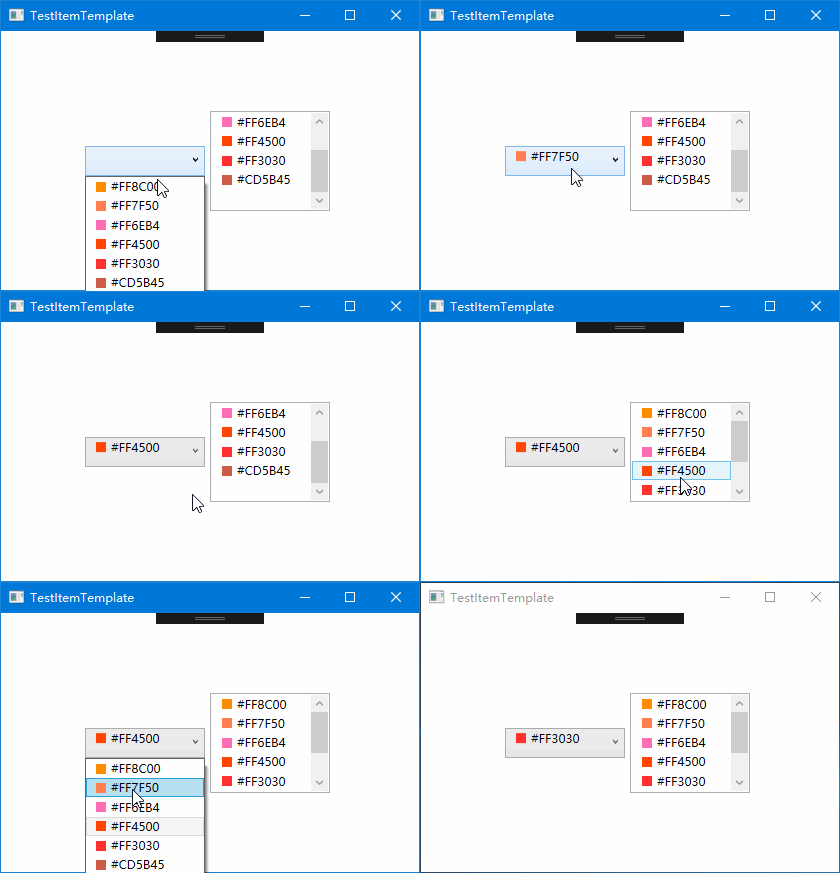
在列表的控件中, 常常会出现一些需求, 类似在下拉控件或树控件中添加一个 CheckBox选择框, 一个图标或图片, 这个时候, 我们就可以利用自定义的DataTemplate 来实现这个功能。
接下来, 用一个示例来简单演示其功能, 同样, 该例子演示利用 ListBox 和 ComboBox来绑定一个 颜色代码列表, 同时展示其颜色。
<Window.Resources>
  <DataTemplate x:Key="comTemplate">
    <StackPanel Orientation="Horizontal" Margin="5,0">
      <Border Width="10" Height="10" Background="{Binding Code}"/>
      <TextBlock Text="{Binding Code}" Margin="5,0"/>
    </StackPanel>
  </DataTemplate>
</Window.Resources>

<Grid>
  <StackPanel Orientation="Horizontal" HorizontalAlignment="Center">
    <ComboBox Name="cob" Width="120" Height="30" ItemTemplate="{StaticResource comTemplate}"/>
    <ListBox Name="lib" Width="120" Height="100" Margin="5,0"  ItemTemplate="{StaticResource comTemplate}"/>
  </StackPanel>
</Grid>
后台代码:
public MainWindow()
{
  InitializeComponent();
  List ColorList = new List();
  ColorList.Add(new Color() { Code = "#FF8C00" });
  ColorList.Add(new Color() { Code = "#FF7F50" });
  ColorList.Add(new Color() { Code = "#FF6EB4" });
  ColorList.Add(new Color() { Code = "#FF4500" });
  ColorList.Add(new Color() { Code = "#FF3030" });
  ColorList.Add(new Color() { Code = "#CD5B45" });

  cob.ItemsSource = ColorList;
  lib.ItemsSource = ColorList;
}

public class Color
{
  public string Code { get; set; }
}
ItemsControl 模板
定义ItemsControl 主要分两个步骤: 1.设置ItemsPanel容器, 用于容纳列表的最外层容器 2.定义子项的DataTemplate
<ItemsControl Name="ic">
  <ItemsControl.ItemsPanel>
    <ItemsPanelTemplate>
      <WrapPanel Orientation="Horizontal"/>  //ItemsPanel的容器需要满足一个条件, 则是属于Panel族的元素
    </ItemsPanelTemplate>
  </ItemsControl.ItemsPanel>

  <ItemsControl.ItemTemplate>
    <DataTemplate>
      <Button Width="50" Height="50" Content="{Binding Code}"/>
    </DataTemplate>
  </ItemsControl.ItemTemplate>
</ItemsControl>
上面代码中, 定义了一个WarpPanel 容器为ItemsControl的 最外层容器, 子项数据模板则绑定了一个按钮, 后台代码绑定几条数据, 查看其效果: 横排排列五个按钮, 内容分别是 1~6.
List tests = new List();
tests.Add(new Test() { Code = "1" });
tests.Add(new Test() { Code = "2" });
tests.Add(new Test() { Code = "3" });
tests.Add(new Test() { Code = "4" });
tests.Add(new Test() { Code = "6" });
ic.ItemsSource = tests;

