小程序开发
一.路由
1)在app.json文件里定义路由,注意路由的层级顺序问题。在app.json里定义的第一个路由是小程序启动的第一个页面,使用场景:在进入小程序主页之前的广告页面。
二.生命周期
1)onLaunch :小程序启动时执行的函数
onlonload函数:页面加载函数,只执行一次
onShow函数:监听页面显示 。
使用场景:1.如果当小程序调到首页时需要刷新数据,重新执行onload里的方法 ,可在onShow函数里再执行一次onload .
2.onLaunch里发送的请求和onLoad函数发送的请求是异步的。
三.小程序登录
微信最近更新的小程序登录方法,只能在用户浏览小程序页面之后,在需要获取个人信息的时候让用户主动触发登录功能,如果是直接跳出登录框,强制让用户登录,小程序发布时将不能通过审核。
const app = getApp()
Page({
  data: {
    userInfo: {},
    hasUserInfo: false,
    canIUse: wx.canIUse('button.open-type.getUserInfo'),
    loadingHidden: false,
    userInfo: app.globalData.userInfo,
  },
  onLoad: function () {
    if (app.globalData.userInfo) {
      this.setData({
        userInfo: app.globalData.userInfo,
        hasUserInfo: true
      })
    } else if (this.data.canIUse) {
      // 由于 getUserInfo 是网络请求,可能会在 Page.onLoad 之后才返回
      // 所以此处加入 callback 以防止这种情况
      app.userInfoReadyCallback = res => {
        this.setData({
          userInfo: res.userInfo,
          hasUserInfo: true
        })
      }
    } else {
      // 在没有 open-type=getUserInfo 版本的兼容处理
      wx.getUserInfo({
        success: res => {
          app.globalData.userInfo = res.userInfo
          this.setData({
            userInfo: res.userInfo,
            hasUserInfo: true
          })
        }
      })
    }
  },
  getUserInfo: function (e) {
    app.globalData.userInfo = e.detail.userInfo
    this.setData({
      userInfo: e.detail.userInfo,
      hasUserInfo: true
    })
  },
  bindGetUserInfo: function (e) {
    console.log(e.detail.userInfo)
    if (e.detail.userInfo) {
      //用户按了允许授权按钮
      app.globalData.userInfo = e.detail.userInfo
      this.setData({
        userInfo: e.detail.userInfo,
        hasUserInfo: true
      })
    } else {
      //用户按了拒绝按钮
      console.log("拒绝了")
    }
  },

})
四.小程序底部菜单栏
1)使用小程序性已封装好的:小程序底部菜单在app.json里设置tabBar.,如果是在这里设置底部菜单,最多只能设置五个菜单。
{
  "pages": [
    "pages/index/index", //起始页路由
    "pages/logs/logs",
    "pages/about/index",

  ],
  "window": {
    "backgroundTextStyle": "light",
    "navigationBarBackgroundColor": "#fff",
    "navigationBarTitleText": "WeChat",
    "navigationBarTextStyle": "black"
  },
  "usingComponents": {    //引入的组件
    "van-popup": "../../dist/popup/index",
    "van-icon": "../../dist/icon/index",
  },
  "sitemapLocation": "sitemap.json",
  "tabBar": {
    "color": "#8c8c8c",
    "selectedColor": "#2AA1DF",  //点击某个菜单的文字颜色
    "backgroundColor": "white",
    "list": [
      {
        "pagePath": "pages/index/index",
        "text": "首页",
        "iconPath": "images/nav/home-off.png",
        "selectedIconPath": "images/nav/home-on.png" //点击某个菜单的时的背景图
      },
      {
        "pagePath": "pages/product/index",
        "text": "产品",
        "iconPath": "images/nav/product-off.png",
        "selectedIconPath": "images/nav/product-on.png"
      },

    ],
    "position": "bottom"
  }
}
2)自己封装一个组件。
五.小程序中富文本的显示。
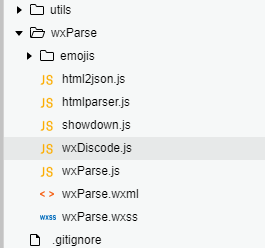
1)使用wxPase插件,下载wxPase 下载地址 https://github.com/icindy/wxParse/tree/master/wxParse。使用方法如下:
1.放入自己的项目
2.引入
3.使用
2)使用小程序自带的富文本组件
可能用到的转义方法
 //转义方法
  html_encode: function(str) {
    var arrEntities = {
      'lt': '<',
      'gt': '>',
      'nbsp': ' ',
      'amp': '&',
      'quot': '"'
    };
    return str.replace(/&(lt|gt|nbsp|amp|quot);/ig, function(all, t) {
      return arrEntities[t];
    });
  },

  html_decode: function(str) {
    var s = "";
    if (str.length == 0) return "";
    s = str.replace(/&/g, "&");
    s = s.replace(//g, ">");
    // s = s.replace(/ /g, " ");
    s = s.replace(/\'/g, "'");
    s = s.replace(/\"/g, """);
    s = s.replace(/\n/g, "
");
    return s;
  },
六.小程序的分享功能。
1)直接将页面发送给微信好友,小程序的button组件 open-type的值等于share时触发,触发的函数是onShareAppMessage
 分享好友


 onShareAppMessage: function () {
    var that = this;
    that.setData({ sharebox: true })
    return {
      title: that .data.name,  //分享时显示的名称
      path: '/pages/goods-details/index, //点击进入的页面路由
      success: function (res) {
        // 转发成功
      },
      fail: function (res) {
        // 转发失败
      }
    }
  },
2)生成小程序二维码保存到相册,扫描二维码进入指定页面。文档:https://developers.weixin.qq.com/miniprogram/dev/api-backend/open-api/qr-code/wxacode.getUnlimited.html
注意点:
1.参数scene的最大可见字符只有32个,如果参数较多,在生成二维码之前可以先调一个接口将scene的值存到数据库生成唯一的ID,然后将这个ID值赋值给scene。当扫描二维码进入页面时,先获取调参数scene,再根据scene去查的对应的字符。
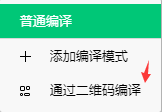
在开发版小程序测试扫描二维码进入页面时,在微信开发者工具的工具栏选择通过二维码编译的方式,选择生成的二维码进行编译, 。scene的值在onLaunch的回调里取值 res.query.scene
2.显示后台返回的base编码的图片,并将图片保存到相册,代码如下:
         //生成二维码
          wx.request({
            url: app.globalData.url+'/newapp/qrcode/wxa/unlimit',
            data: {
              scene: that.data.uid,
              page: "pages/goods-details/index"
            },
            header: {
              "Cloud-Auth": app.globalData.access_token,
              'content-type': 'application/x-www-form-urlencoded'
            },
            method: 'POST',
            success: function(res) {
            var newCode = res.data.data.replace(/[\r\n]/g, "");
              var aa = wx.getFileSystemManager();
              aa.writeFile({
                filePath: wx.env.USER_DATA_PATH + '/test.png',
                data: newCode.slice(22),
                encoding: 'base64',
                success: res => {
                 wx.getImageInfo({
                   src: wx.env.USER_DATA_PATH + '/test.png',
                   success(res){
                     that.setData({
                       codeimg: res.path,
                       sharecode: false,
                       sharebox: true
                     });
                   }
                 })
                },
                fail: err => {
                  console.log(err)
                }
              })
            }
          });

  //判断用户是否授权"保存到相册"
  savecode: function() {
    var that = this;
    wx.getSetting({
      success(res) {
        //没有权限,发起授权
        if (!res.authSetting['scope.writePhotosAlbum']) {
          wx.authorize({
            scope: 'scope.writePhotosAlbum',
            success() { //用户允许授权,保存图片到相册
              that.savePhoto();
            },
            fail() { //用户点击拒绝授权,跳转到设置页,引导用户授权
              wx.openSetting({
                success() {
                  wx.authorize({
                    scope: 'scope.writePhotosAlbum',
                    success() {
                      that.savePhoto();
                    }
                  })
                }
              })
            }
          })
        } else { //用户已授权,保存到相册
          that.savePhoto()
        }
      }
    })

  },
 // 保存到相册
  savePhoto: function() {
    var that = this;
    wx.saveImageToPhotosAlbum({
      filePath: wx.env.USER_DATA_PATH + '/test.png',
      success: function (res) {
        wx.showToast({
          title: '保存成功',
        })
      },
      fail: function (err) {
        console.log(err)
      }
    })

  },


