Node学习之————登陆/注册
最近在学习Node写接口,本篇文章简单记录一下如何用Node实现登陆注册功能,本人在广大博客上找了一下很多的教程,发现不是这样有问题就是那样有问题,所以自己就跟着Bilibli视频教程走了一遍Node!然后源码地址----> 点击获取源码
一,准备工作
- Node安装及配置
- MongoDB的安装及配置
- 数据库可视化工具:Navcat
- mongoose官网
- 接口测试工具:Postman
注意:以上安装及配置,自己解决
二,编码
1.初始化项目
新建一个项目文件夹,我们这里叫它:api-start,然后终端打开,初始化项目 npm init --yes
2.安装第三方模块
body-parser(npm i body-parser --save)是一个HTTP请求体解析中间件,使用这个模块可以解析JSON、Raw、文本、URL-encoded格式的请求体
express (npm i express --save)基于 Node.js 平台,快速、开放、极简的 Web 开发框架
mongoose(npm i mongoose --save)是在node.js异步环境下对mongodb进行便捷操作的对象模型工具
3.项目目录的建立
4.mongoDB的启动
Win+R,cmd 打开终端,输入命令:mongod,回车,将数据库启动成功!
5.代码
//入口文件server.js

const express = require('express');
const app = express(); // express实例化
const userRouter = require('./router/userRouter')
const bodyParser = require('body-parser');//用于req.body获取值的
const db = require('./db/conection')

// 作为中间件进行使用

app.use(bodyParser.json());
// 创建 application/x-www-form-urlencoded 编码解析
app.use(bodyParser.urlencoded({ extended: false }));
app.use('/user', userRouter);
//监听3000端口 开启服务
app.listen(3000, () => {
    console.log("服务器启动......")
})
//db/db.js
const mongoose = require('mongoose');
mongoose.connect('mongodb://localhost/admin', {
useNewUrlParser: true,
useUnifiedTopology: true
});
const db = mongoose.connection;
db.on('error', console.error.bind(console, 'connection error:'));
db.once('open', function () {
console.log("数据库连接成功!!")
});
// 操作数据库
const userSchema = new mongoose.Schema({
us: {
type: String,
required: true
},
ps: {
type: String,
required: true
},
age: Number,
sex: {
type: Number,
default: 0
}
})
const User = mongoose.model('user', userSchema);
User.remove().then((data) => {
console.log(data);
console.log("删除成功!!!")
}).catch((err) => {
console.log(err)
})//db/conection.js
const mongoose = require('mongoose');
mongoose.connect('mongodb://localhost/user', {
useNewUrlParser: true,
useUnifiedTopology: true
});
const db = mongoose.connection;
db.on('error', console.error.bind(console, 'connection error:'));
db.once('open', function () {
console.log("数据库连接成功!!")
});
//db/model/userModel.js

const Mongoose = require('mongoose')
// 将schema对象转化为数据模型
var userSchema = new Mongoose.Schema({
    username: {
        type: String,
        required: true
    },
    password: {
        type: String,
        required: true
    },
    age: {
        Number
    },
    sex: {
        type: Number,
        default: 0
    }
})

// 该数据对象和集合关联(“集合名”,schema对象)
var User = Mongoose.model('user', userSchema);

module.exports = User;
//router/userRouter.js
const express = require('express');
const router = express.Router();
const User = require('../db/model/userModel')
// 注册接口
router.post('/reg', (req, res) => {
// 获取数据
let {
username,
password
} = req.body;
console.log(username, password)
if (!username || !password) return res.send({
err: -1,
msg: '参数错误'
});
// 数据处理
// 先判断用户名是否存在
User.find({
username
}).then((data) => {
if (data.length <= 0) {
User.insertMany({
username: username,
password: password
}).then(() => {
// 返回数据
res.send({
err: 0,
msg: '注册成功!!'
})
}).catch((err) => {
res.send({
err: -2,
msg: '注册失败'
})
})
} else {
res.send({
err: -1,
msg: '用户名已存在!'
})
}
})
})
// 登录接口
router.post('/login', (req, res) => {
let {
username,
password
} = req.body
if (!username || !password) return res.send({
err: -1,
msg: "参数错误"
})
User.find({
username,
password
}).then((data) => {
if (data.length > 0) {
res.send({
err: 0,
msg: "登陆成功"
})
} else {
res.send({
err: -1,
msg: "登陆账号或密码错误,请重新输入!!"
})
}
}).catch((err) => {
res.send({
err: -2,
msg: "内部错误"
})
})
})
module.exports = router代码已经C,V完毕
6.启动项目
终端,nodenom server.js,启动成功!!
注意:nodemon 在控制台nodenom替代node命令执行nodejs文件,相当于一个挂起的服务器,监听保存代码,自动执行代码。省去了每次node命令去执行文件。这里需要安装nodenom,不然会报错! npm i nodenom -g
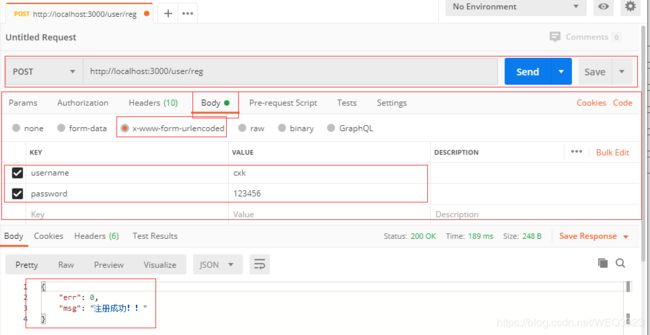
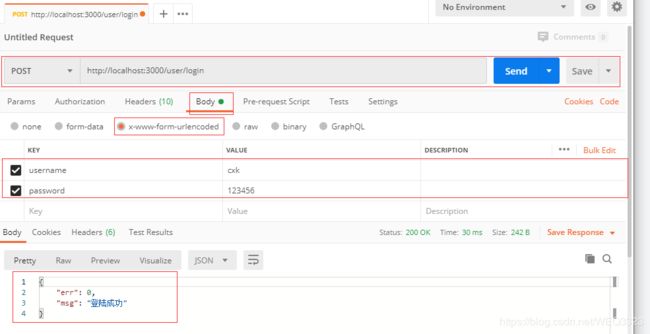
7.Postman测试接口
注册接口
当再次用username为cxk,password为123456,去注册时,会发现返回的信息
登录接口
接下来用刚刚注册的用户去登陆,此时No Problem
OK,用Node写一个简单的登陆注册接口就完成啦!!


