Android6.0 Launcher3 拖拽分析
1、序言
本文档是针对Android6.0版本的Launcher进行分析。各个版本的Launcher是有差异的,厂商也对Launcher客制化的比较多,所以本文只对Google原生代码的拖拽部分进行分析。
2、简介
拖拽是用户在操作桌面经常用到的操作也是客制化比较多的其中之一。拖拽可以分为以下几类:
1、 主屏幕上的ICON和Wiget
2、 文件夹中的图标
3、 抽屉中的ICON和Wiget
这三种情形的处理流程是相似的,所以我们只对在主屏幕的ICON和Wiget拖拽进行分析。
在本文档中,我很多都在代码中加了备注,方便查看。
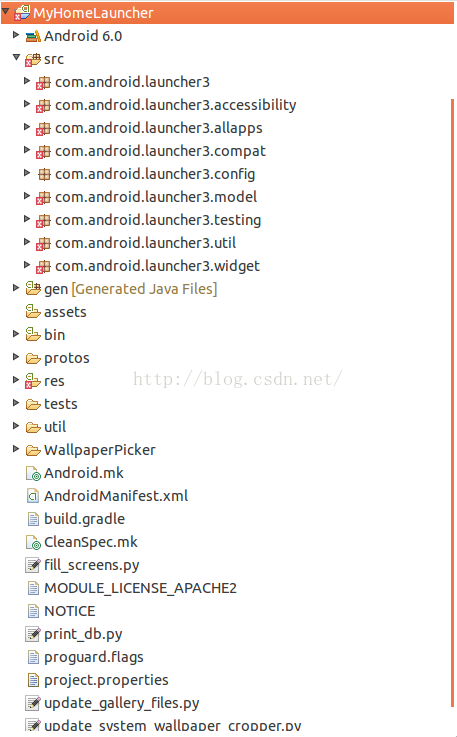
3、代码目录结构
主要用到的类有: Launcher.java
Workspace.java
DragController.java
4、架构流程分析
主要的流程可以分为三大步:
1、 点击开始拖拽;
2、 拖拽过程中;
3、 拖到目标位置完成拖拽;
4.1、模块主要类
主要用到的类有: Launcher.java
Workspace.java
DragController.java
4.2、流程分析以及流程图
原生Launcher上的拖拽处理都是通过长按开始的,Workspace的长按是在Launcher进行处理。
4.2.1、第一部分 长按开始拖拽
|
public boolean onLongClick(View v) { if (!isDraggingEnabled()) return false;//允许拖拽 if (isWorkspaceLocked()) return false;//是否被锁定 if (mState != State.WORKSPACE) return false;
if (v == mAllAppsButton) { onLongClickAllAppsButton(v); return true; } // 长按空白处 if (v instanceof Workspace) { if (!mWorkspace.isInOverviewMode()) {//判断是否在缩略图模式下 if (!mWorkspace.isTouchActive()) { showOverviewMode(true);//进入缩略图模式 mWorkspace.performHapticFeedback(HapticFeedbackConstants.LONG_PRESS, HapticFeedbackConstants.FLAG_IGNORE_VIEW_SETTING); return true; } else { return false; } } else { return false; } } |
流程如下:
先判断是否允许拖拽-----》是否锁定状态----》长按空白处-----》是否在缩略图模式
|
final boolean inHotseat = isHotseatLayout(v);//是否热键栏 if (!mDragController.isDragging()) {//没有进行拖拽 if (itemUnderLongClick == null) {//如果itemUnderLongClick为null,就是长按空白处一样的处理 // User long pressed on empty space//用户长按在空 mWorkspace.performHapticFeedback(HapticFeedbackConstants.LONG_PRESS, HapticFeedbackConstants.FLAG_IGNORE_VIEW_SETTING); if (mWorkspace.isInOverviewMode()) { mWorkspace.startReordering(v); } else { showOverviewMode(true);//进入缩略图模式 } } else {//不是抽屉按钮也不在文件夹中的元素 final boolean isAllAppsButton = inHotseat && isAllAppsButtonRank( mHotseat.getOrderInHotseat( longClickCellInfo.cellX, longClickCellInfo.cellY));//判断长按是否allapp按钮 if (!(itemUnderLongClick instanceof Folder || isAllAppsButton)) {//长按的不是allapp按钮也不在文件夹展开的布局中 // User long pressed on an item //调用Workspace.startDrag处理拖动 mWorkspace.startDrag(longClickCellInfo); } } } return true; |
如果是非空白处也就是在获取桌面CellLayout上一个被拖动的对象。处理代码如下:
接着处理,在非空白处长按,且没有拖拽,包含单元信息,长按的不是allapp按钮也不在文件夹就调用Workspace的startDrag方法进行处理。
以上两处实际上就是对拖拽的条件进行了限定。长按桌面进入缩略图也是在此进行处理,因为本文档是讲拖拽,所以不对缩略图进行过多讲解。
|
public void startDrag(CellLayout.CellInfo cellInfo) { startDrag(cellInfo, false); } |
接下来我们具体分析Workspace的startDrag方法。上代码:
继续深入:
|
public void startDrag(CellLayout.CellInfo cellInfo, boolean accessible) { View child = cellInfo.cell;
// Make sure the drag was started by a long press as opposed to a long click. //确保拖动通过长按下开始,而不是一个长点击。 if (!child.isInTouchMode()) { return; }
mDragInfo = cellInfo;// 更新单元信息 child.setVisibility(INVISIBLE);// 拖拽对象在原来的位置设为不可见 CellLayout layout = (CellLayout) child.getParent().getParent();//拖拽对象所在的屏幕 layout.prepareChildForDrag(child);
beginDragShared(child, this, accessible); } |
先判断拖拽对象是否处于touch状态,
如果是的就直接返回;然后隐藏拖拽对象;
标记该位置为未占用,目的是让在拖拽挤压的过程中,
|
public void (View child, Point relativeTouchPos, DragSource source, boolean accessible) { //取消拖拽的焦点设置不可按 child.clearFocus(); child.setPressed(false);
// The outline is used to visualize where the item will land if dropped //创建拖拽对象投射轮廓 mDragOutline = createDragOutline(child, DRAG_BITMAP_PADDING);
mLauncher.onDragStarted(child); // The drag bitmap follows the touch point around on the screen拖动的位图跟着触摸点在屏幕上周围 AtomicInteger padding = new AtomicInteger(DRAG_BITMAP_PADDING); final Bitmap b = createDragBitmap(child, padding);//创建拖拽图像 |
可以让其他图标占据;最后到beginDragShared方法。
|
// Clear the pressed state if necessary //如有必要,清除按下状态 if (child instanceof BubbleTextView) { BubbleTextView icon = (BubbleTextView) child; icon.clearPressedBackground(); } if (child.getTag() == null || !(child.getTag() instanceof ItemInfo)) { String msg = "Drag started with a view that has no tag set. This " + "will cause a crash (issue 11627249) down the line. " + "View: " + child + " tag: " + child.getTag(); throw new IllegalStateException(msg); } if (child.getParent() instanceof ShortcutAndWidgetContainer) { mDragSourceInternal = (ShortcutAndWidgetContainer) child.getParent(); } // 创建拖拽视图 DragView dv = mDragController.startDrag(b, dragLayerX, dragLayerY, source, child.getTag(), DragController.DRAG_ACTION_MOVE, dragVisualizeOffset, dragRect, scale, accessible); dv.setIntrinsicIconScaleFactor(source.getIntrinsicIconScaleFactor());
b.recycle(); |
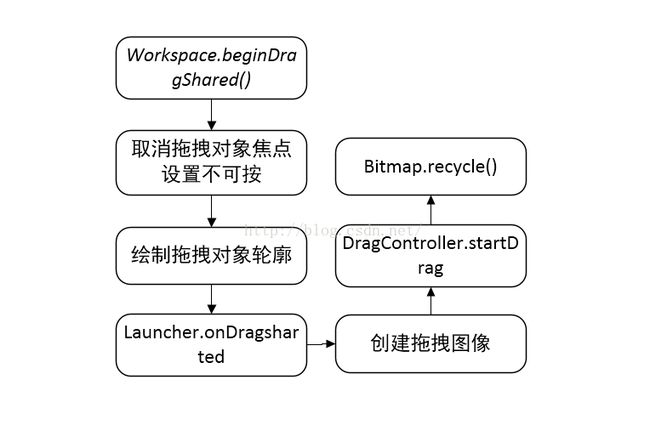
流程如图:
其中,经常出错的就是绘制拖拽对象轮廓,计算较多,容易出错。要多留意。
|
public DragView startDrag(Bitmap b, int dragLayerX, int dragLayerY, DragSource source, Object dragInfo, int dragAction, Point dragOffset, Rect dragRegion, float initialDragViewScale, boolean accessible) { if (PROFILE_DRAWING_DURING_DRAG) { android.os.Debug.startMethodTracing("Launcher"); }
// Hide soft keyboard, if visible // 隐藏软件盘 if (mInputMethodManager == null) { mInputMethodManager = (InputMethodManager) mLauncher.getSystemService(Context.INPUT_METHOD_SERVICE); } mInputMethodManager.hideSoftInputFromWindow(mWindowToken, 0);
for (DragListener listener : mListeners) { listener.onDragStart(source, dragInfo, dragAction); } |
除此之外,还有最重要的就是DragController的startDrag()。创建拖拽视图。
在startDrag中将分为两大部分进行处理。
|
public void onDragStart(final DragSource source, Object info, int dragAction) { if (ENFORCE_DRAG_EVENT_ORDER) { enfoceDragParity("onDragStart", 0, 0); } mIsDragOccuring = true; updateChildrenLayersEnabled(false); mLauncher.lockScreenOrientation();// 锁定屏幕 mLauncher.onInteractionBegin(); // Prevent any Un/InstallShortcutReceivers from updating the db while we are dragging InstallShortcutReceiver.enableInstallQueue(); if (mAddNewPageOnDrag) { mDeferRemoveExtraEmptyScreen = false; addExtraEmptyScreenOnDrag(); } } |
隐藏软键盘。调用各个监听对象 调用各个监听对象实现的onDragStart方法 这里就是在Workspace中的实现。代码如下:
mLauncher.lockScreenOrientation();// 锁定屏幕
InstallShortcutReceiver.enableInstallQueue();正在拖拽的时候,防止卸载或安装导致快捷图标变化更新数据库的操作。
addExtraEmptyScreenOnDrag();添加新的空白页
|
// 记录当前的状态 mDragging = true; mIsAccessibleDrag = accessible; mDragObject = new DropTarget.DragObject(); mDragObject.dragComplete = false; if (mIsAccessibleDrag) { //对于访问的拖拽,我们假设视图被从中心拖动。 mDragObject.xOffset = b.getWidth() / 2; mDragObject.yOffset = b.getHeight() / 2; mDragObject.accessibleDrag = true; } else { mDragObject.xOffset = mMotionDownX - (dragLayerX + dragRegionLeft); mDragObject.yOffset = mMotionDownY - (dragLayerY + dragRegionTop); } mDragObject.dragSource = source; mDragObject.dragInfo = dragInfo; final DragView dragView = mDragObject.dragView = new DragView(mLauncher, b, registrationX, registrationY, 0, 0, b.getWidth(), b.getHeight(), initialDragViewScale); if (dragOffset != null) { dragView.setDragVisualizeOffset(new Point(dragOffset)); } if (dragRegion != null) { dragView.setDragRegion(new Rect(dragRegion)); } // 触摸反馈 mLauncher.getDragLayer().performHapticFeedback(HapticFeedbackConstants.LONG_PRESS); dragView.show(mMotionDownX, mMotionDownY); handleMoveEvent(mMotionDownX, mMotionDownY); return dragView; |
接下来回到DragController的startDrag()方法。
dragView.show();显示DragView对象(将该DragView添加到DragLayer上)
handleMoveEvent();根据当前的位置处理移动事件
先对show进行分析
|
public void show(int touchX, int touchY) { mDragLayer.addView(this); // Start the pick-up animation 启动拾取动画 DragLayer.LayoutParams lp = new DragLayer.LayoutParams(0, 0); lp.width = mBitmap.getWidth(); lp.height = mBitmap.getHeight(); lp.customPosition = true; setLayoutParams(lp); // 设置显示位置 setTranslationX(touchX - mRegistrationX); setTranslationY(touchY - mRegistrationY); // Post the animation to skip other expensive work happening on the first frame //动画播放 post(new Runnable() { public void run() { mAnim.start(); } }); } |
如注释所写:显示DragView对象
4.2.2、第二部分 拖拽过程中
|
private void handleMoveEvent(int x, int y) { mDragObject.dragView.move(x, y); final int[] coordinates = mCoordinatesTemp; // 查找拖拽目标 DropTarget dropTarget = findDropTarget(x, y, coordinates); //更新拖拽对象的位置 mDragObject.x = coordinates[0]; mDragObject.y = coordinates[1]; checkTouchMove(dropTarget);// 检查拖动时的状态̬ // 检查我们是否在滚动区域上空盘旋 mDistanceSinceScroll += Math.hypot(mLastTouch[0] - x, mLastTouch[1] - y); mLastTouch[0] = x; mLastTouch[1] = y; checkScrollState(x, y);// 对拖动时的翻页进行判断处理 } |
handleMoveEvent();根据当前的位置处理移动事件
handleMoveEvent()是拖拽的主要方法。当用户触发拖拽后,DragController将通过该方法移动被拖拽物视图。
findDropTarget(x,y, coordinates); 使用了findDropTarget来查找当前位置对应的拖拽目的对象。其基本原理就是遍历所有已注册的拖拽目的对象,若其支持放入且当前位置位于该对象的触发区域内,则匹配成功返回该对象。
|
// 检查拖动时的状态 private void checkTouchMove(DropTarget dropTarget) { if (dropTarget != null) { if (mLastDropTarget != dropTarget) { if(mLastDropTarget!=null){ mLastDropTarget.onDragExit(mDragObject); } dropTarget.onDragEnter(mDragObject); } dropTarget.onDragOver(mDragObject); } else { if (mLastDropTarget != null) { mLastDropTarget.onDragExit(mDragObject); } } mLastDropTarget = dropTarget; } |
checkTouchMove(dropTarget);// 检查拖动时的状态
|
if (x < mScrollZone) { if (mScrollState == SCROLL_OUTSIDE_ZONE) { mScrollState = SCROLL_WAITING_IN_ZONE; if (mDragScroller.onEnterScrollArea(x, y, forwardDirection)) { dragLayer.onEnterScrollArea(forwardDirection); mScrollRunnable.setDirection(forwardDirection); mHandler.postDelayed(mScrollRunnable, delay); } } } else if (x > mScrollView.getWidth() - mScrollZone) { if (mScrollState == SCROLL_OUTSIDE_ZONE) { mScrollState = SCROLL_WAITING_IN_ZONE; if (mDragScroller.onEnterScrollArea(x, y, backwardsDirection)) { dragLayer.onEnterScrollArea(backwardsDirection); mScrollRunnable.setDirection(backwardsDirection); mHandler.postDelayed(mScrollRunnable, delay); } } } else { clearScrollRunnable(); } |
checkScrollState(x, y);// 对拖动时的翻页进行判断处理
找了一张网上的图片
4.2.3 第三部分 完成拖拽
|
public boolean onTouchEvent(MotionEvent ev) { case MotionEvent.ACTION_UP: // Ensure that we've processed a move event at the current pointer location. handleMoveEvent(dragLayerX, dragLayerY); mHandler.removeCallbacks(mScrollRunnable);
if (mDragging) { PointF vec = isFlingingToDelete(mDragObject.dragSource); if (!DeleteDropTarget.supportsDrop(mDragObject.dragInfo)) { vec = null; } if (vec != null) { dropOnFlingToDeleteTarget(dragLayerX, dragLayerY, vec); } else { drop(dragLayerX, dragLayerY); } } //// 拖放结束 endDrag(); break; } |
当用户将控件拖拽到目标位后,将手指从屏幕移开,处理流程如下:上代码
通过手指在屏幕的向上事件,onTouchEvent的MotionEvent.ACTION_UP处理。
1、 先判断是否在拖拽中。
2、 再判断是否到达可删除的区域
接着判断vec != null
如果不为空则拖动到垃圾箱中进行删除。为空则是放下Drop()的动作。
说明:onTouchEvent的MotionEvent.ACTION_UP处理和onInterceptTouchEvent的MotionEvent.ACTION_UP处理流程是一样的。
|
private void drop(float x, float y) { final int[] coordinates = mCoordinatesTemp; // x,y所在区域是否有合适的目标 final DropTarget dropTarget = findDropTarget((int) x, (int) y, coordinates); mDragObject.x = coordinates[0]; mDragObject.y = coordinates[1]; boolean accepted = false; if (dropTarget != null) { mDragObject.dragComplete=true; dropTarget.onDragExit(mDragObject); if(dropTarget.acceptDrop(mDragObject)) { dropTarget.onDrop(mDragObject); accepted = true; } } mDragObject.dragSource.onDropCompleted((View) dropTarget, mDragObject, false, accepted); } |
下面来看一下Drop方法:
findDropTarget();查找当前位置对应的拖拽目的对象,
其基本原理就是遍历所有已注册的拖拽目的对象,若其支持放入且当前位置位于该对象的触发区域内,则匹配成功返回该对象.
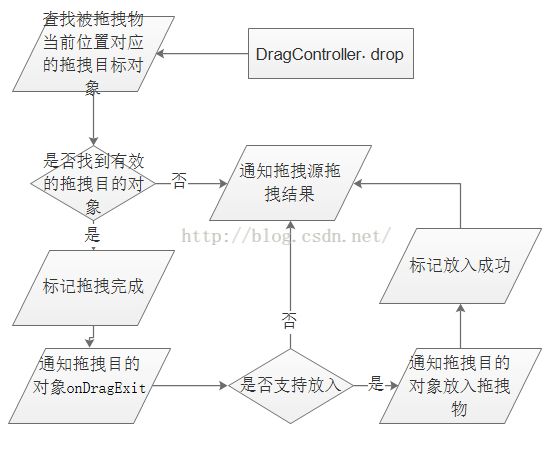
接着判断是否找到有效的拖拽目的对象(dropTarget != null)
mDragObject.dragComplete = true;// 标记拖拽完成
dropTarget.onDragExit(mDragObject);// 通知拖拽目的对象已离开
if判断 dropTarget.acceptDrop(mDragObject)是否支持放入
dropTarget.onDrop(mDragObject);// 拖拽物被放置到拖拽目的 // 这个方法最终将拖拽对象放置到目标位置,Workspace实现该方法。
以上的流程借助网上的一张图片:
下面分析findDropTarget();查找当前位置对应的拖拽目的对象,
其基本原理就是遍历所有已注册的拖拽目的对象,若其支持放入且当前位置位于该对象的触发区域内,则匹配成功返回该对象.上原代码:
|
private DropTarget findDropTarget(int x, int y, int[] dropCoordinates) { final Rect r = mRectTemp; final ArrayList final int count = dropTargets.size(); for (int i=count-1; i>=0; i--) {// 遍历拖拽目的对象 DropTarget target = dropTargets.get(i); if (!target.isDropEnabled())// 是否支持放入 continue; target.getHitRectRelativeToDragLayer(r); mDragObject.x = x;// 更新被拖拽物的位置信息 mDragObject.y = y; if (r.contains(x, y)) {// 指定位置是否位于有效出发范围内 dropCoordinates[0] = x; dropCoordinates[1] = y; mLauncher.getDragLayer().mapCoordInSelfToDescendent((View) target, dropCoordinates); return target; } } return null; } |
如注释缩写,不过多解释。
下面对Workspace中的Ondrop重点代码拿出来说明
|
public void onDrop(final DragObject d) { mDragViewVisualCenter = d.getVisualCenter(mDragViewVisualCenter); CellLayout dropTargetLayout = mDropToLayout; } |
DragObject.getVisualCenter(mDragViewVisualCenter);//计算拖动View的视觉中心
|
if (dropTargetLayout != null) { if (mLauncher.isHotseatLayout(dropTargetLayout)) { mapPointFromSelfToHotseatLayout(mLauncher.getHotseat(), mDragViewVisualCenter); } else { mapPointFromSelfToChild(dropTargetLayout, mDragViewVisualCenter, null); } } |
CellLayout dropTargetLayout = mDropToLayout;// Drop的Celllayout对象
这个判断当前是否在Hotseat上,求出相对于dropTargetLayout的视觉中心坐标。
|
if (!mInScrollArea && createUserFolderIfNecessary(cell, container, dropTargetLayout, mTargetCell, distance, false, d.dragView, null)) { return; } |
以上是:如果拖拽的对象是一个快捷图标并且最近的位置上也是一个快捷图标,就创建一个文件夹来防止这两个图标。
继续
|
if (addToExistingFolderIfNecessary(cell, dropTargetLayout, mTargetCell, distance, d, false)) { return; } |
添加到已存在的文件夹上
|
if(getScreenIdForPageIndex(mCurrentPage)!=screenId && !hasMovedIntoHotseat) { snapScreen = getPageIndexForScreenId(screenId); snapToPage(snapScreen); } |
拖动时可能落点在别的页面,所以还会有页面滑动的效果
|
LauncherModel.modifyItemInDatabase(mLauncher, info, container, screenId, lp.cellX, lp.cellY, item.spanX, item.spanY); |
对数据库进行更新的操作。
这样整个的拖拽就是这个样子。


