JS原生轮播图(带原理、思考步骤、详情)——WEB(一)
首先说一下js原生轮播图的感悟吧
怎么说呢?做轮播图的时候路途太坎坷先是看各种博文领悟学习别人的代码,但感觉不是很完整条理也没有那么清晰,又去某站学习了一下函数封装轮播无缝等的视频才感觉没有那么难,零零碎碎时间加起来用了两天我才敢说我掌握了,但是都不能说吃透。但作为一个JS文档都没过过的人还是有点吃力,但是基础的还是知道的毕竟做过一些小damo,总的来说收获挺大。
另外上周才开始写的博客一周涨粉了6个,我突然觉得我一定要每周写下去,好歹要对得起我的读者嘛,当然我师父对我之前的WEB(一)文档做出了指点,之后会抽空重新整理一下,因为越是条理清晰就越简单了不少,下来也要反复熟记这些套路才是哈哈哈。
10.21-10.25之 WEB任务(一)
1、一周复习hcj,HTML一般用的也就那些东西,了解一下行内元素、块级元素、行内块元素。
2、清除浮动(好像是五种还是六种方式)
3、BFC(概念、触发、作用、应用)
4、居中问题(水平垂直居中方法,大概有十来种,你自己总结一下)
5、圣杯布局(flex、float、position要会,尤其前两种,gird和table了解就行)
6、轮播图:js原生做弄清楚原理有箭头,实现了写导航点自动播放然后无缝
注:就是不是让你全背下来,但是常用的要会,不能写什么都要翻文档,菜鸟或者w3c都可以 。
上一篇:圣杯布局、双飞翼布局
上一篇:JS轮播图前言animate.js函数的封装
六、JS原生轮播图
原理
首先来说一下原理吧:
-
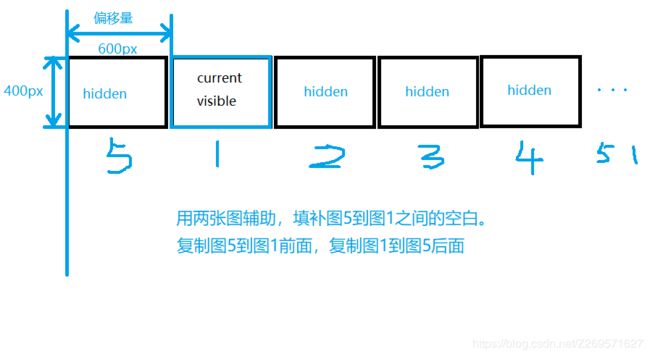
我的布局是5张图,序号设置为1,2,3,4,5

如图所示,你做轮播图肯定要第5张之后紧接第1张啊(同理第一张之前紧接第五张)然后又从第1张开始播放,这叫无缝,那怎么实现呢? -
其实很简单,在html布局中,放图片顺序为5,1,2,3,4,5,1如图所示,看似只有5张图,其实放了7张图,然后全部
float:left横向排成一行,当然要记得清除浮动,具体怎么做可以在我之前的清除浮动文章啊,布局等文章查看。 -
那放7张图干嘛?就好比轮播到5了(给7张图一个下标0,1,2,3,4,5,6,7),下一张到7(就是最后的图片1)时立马跳到序号为1的图片(就是开头的图片1),然后就可以继续轮播了。
注意哈:跳是图上那个current visible蓝色框框跳转移动,左右移动也是,下面的图片位置是一直没有动的,显示给用户的只有current visible蓝色框框里面的内容
-
那为什么要在图片1前放一个图片5呢?就是因为你一直点左箭头,反向轮播啦,原理一样的。
-
然后注意这里图片的宽600px,基本等下js里面要用到的所有数据都来源于此。第一个图片5的
left:0px,第二个图片1的left:-600px,之后每个图片递加-600px。
(原理差不多就这样,不懂的可以评论我)
功能
下面来说一下轮播图实现的功能:
- 第一,能无缝自动轮播
- 第二,鼠标移到图片上停止轮播
- 第三,点击左键,上一张
- 第四,点击右键,下一张
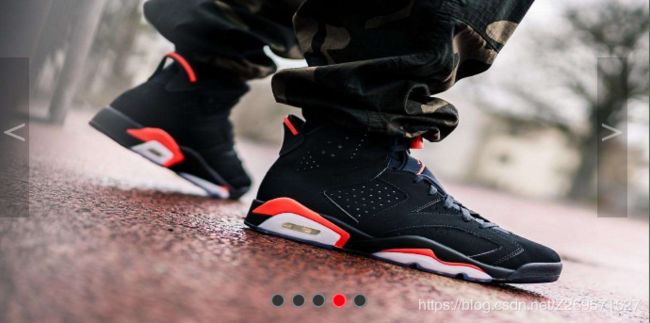
- 第五,小红圆点跟随图片
- 第六,点击小圆点,到对应的图片
- 第七,要判断当前动画是否完成,完成了才能执行左右键点击,这个主要是为了防止连续点击产生的bug。
实现
实现步骤其实就是根据功能来实现的,代码备注有1~8的顺序,按顺序就可以看到具体思路了。
不过封装的animate是核心函数,首先把这个写了,要是不懂的跟进一下我的另一篇专门讲怎么写和封装这个animat的博客,这里轮播图实现情况尽量用IE查看因为这里获取元素样式用的是IE的方法。
//封装animate函数

function getStyle(obj,attr){			//获取样式
			if(obj.currentStyle){
				return obj.currentStyle[attr];
			}
			else{
				return obj.getComputedStyle(obj,null)[attr]
			}
}

function animate(obj,json,callback){
	clearInterval(obj.timer);		//控制多次点击不重定义定时器
	obj.timer=setInterval(function(){
		var isStop=true;			//判断是否所有运动完成
		for(var attr in json){
			var now=0;
			if(attr=='opacity'){
				now=parseInt(getStyle(obj,attr)*100)
			}
			else{
				now=parseInt(getStyle(obj,attr))
			}


			var speed=(json[attr]-now)/6;
			if(speed>0){
				speed=Math.ceil(speed);
			}else{
				speed=Math.floor(speed);
			}
			var current=now+speed;

			if(attr=='opacity'){
				obj.style[attr]=current/100;
			}
			else{
				obj.style[attr]=current+'px';
			}

			if (json[attr] != current) {	//任意一个定义的最后的动画值与当前值不等,不停止移动
				isStop=false;
			}
		}
		if(isStop==true){
			clearInterval(obj.timer);	//动画完成清除定时器
			if(callback){
				callback();
			};
		}
	},0.1)
}
下面是HTML+CSS+JS:
<!DOCTYPE html>
<html lang="en">
<head>
<meta charset="UTF-8">
<title>Rotation chart</title>
<script src="js/animate.js"></script>
</head>
<style>
*{
padding: 0px;
margin: 0px;
list-style:none;
text-decoration: none;
}
#container{
height:300px;
width: 600px;
position: relative;
border: 1px solid #465;
overflow: hidden;
}
#list{
position: absolute;
width: 4200px;
height: 300px;
z-index: 1;
overflow: hidden;
left: -600px;
}
#list img{
float: left;
width: 600px;
height: 300px;
}
#buttons{
position: absolute;
left: 250px;
bottom: 20px;
height: 10px;
width: 100px;
z-index: 2;
}
#buttons span{
float: left;
margin-right: 5px;
width: 10px;
height: 10px;
border: 1px solid #fff;
border-radius: 50%;
background: #333;
cursor: pointer;
z-index: 2;
border: 2px solid #b9beba;
border-color: hsla(0,0%,100%,.4);
}
}
#prev {
left: 20px;
position: absolute;
}
#next {
right: 20px;
}
.arrow {
position: absolute;
top: 53px;
z-index: 2;
display: none;
width: 28px;
height: 148px;
font-size: 36px;
font-weight: bold;
line-height: 139px;
text-align: center;
color: hsla(0,0%,100%,.4);
background-color: rgba(0,0,0,.2);
cursor: pointer;
}
#container:hover .arrow
{ display: block; }
#buttons .on {
background: #f10215;
}
</style>
<body>
<div class="header">
<div id="container">
<div id="list" class="list">
<div class="list"><img src="images/5.jpg" alt="5"/></div>
<div class="list"><img src="images/1.jpg" alt="1"/></div>
<div class="list"><img src="images/2.jpg" alt="2"/></div>
<div class="list"><img src="images/3.jpg" alt="3"/></div>
<div class="list"><img src="images/4.jpg" alt="4"/></div>
<div class="list"><img src="images/5.jpg" alt="5"/></div>
<div class="list"><img src="images/1.jpg" alt="1"/></div> <!-- 方便实现无缝衔接跳转 -->
</div>
<div id="buttons">
<span index="1" class="on"></span>
<span index="2"></span>
<span index="3"></span>
<span index="4"></span>
<span index="5"></span>
</div>
<a href="javascript:;" id="prev" class="arrow"><</a>
<a href="javascript:;" id="next" class="arrow">></a>
</div>
</div>
<script>
var prev=document.getElementById("prev"); //左箭头
var next=document.getElementById("next"); //右箭头
var list=document.getElementById("list"); //5(7)张图片
var buttons=document.getElementById("buttons"); //所有小圆点
var imgwidth=list.children[0].offsetWidth; //获取图片的宽度
var span=document.getElementById("buttons").getElementsByTagName("span"); //每一个单独的小圆点
var index=1; //起始值为0,为衔接的开头的alt=5的图片
//被封装的函数实现下一张图片切换
var Moving=false;//8、设定一个监控动画是否完成的监控器
gogogo=function(){
if(!Moving){ //8.1如果当前动画没有动了,上一个动画完成
Moving=true; //8.2设置当前动画开始动
index++;
animate(list,{left:-600*index},function(){
if(index===6){ //1、设置当跳转到第一张alt=1,实现无缝轮播
list.style.left="-600px";
index=1;
}
Moving=false;//8.3animate结束当前动画停止动
});
spanchange();
}
};
//被封装的函数实现上一张图片切换
before=function(){
if(!Moving){ //8.1如果当前动画没有动了,上一个动画完成
Moving=true; //8.2设置当前动画开始动
index--;
animate(list,{left:-600*index},function(){
if(index==0){ //当index减到0的时候跳转到后面alt=5的图片
list.style.left="-3000px";
index=5; //把当前的index改为5
}
Moving=false;//8.3animate结束当前动画停止动
})
spanchange();
}
};
//1、打开定时器
var timer=setInterval(
// function(){ //打开定时器
// index++;
// animate(list,{left:-600*index},function(){
// if(index===6){ //1、设置当跳转到第一张alt=1,实现无缝轮播
// list.style.left="-600px";
// index=1;
// }
// });
// }, <=================被函数gogogo()封装了
gogogo,1000)
//2、鼠标移动到container上停止轮播,清空定时器
container.onmouseover=function(){
clearInterval(timer);
}
//3、鼠标移动到container上开始轮播,打开定时器,并且封装函数gogogo
container.onmouseout=function(){
timer=setInterval(gogogo,1000)
}
//4、右箭头点击,下一张
next.onclick=gogogo;
//5、左箭头点击,上一张与向下一张的逻辑相反
prev.onclick=before; //创建封装函数before
//6、小圆点点击跳到对应图
for(var i=0;i<span.length;i++){
span[i].idx=i; //把小圆点的下标存储起来为idx,注意对象是span没哟个小圆点
span[i].onclick=function(){
index=this.idx+1;
animate(list,{left:-600*index});
spanchange();
}
}
//7、小圆点点击样式改变,注意要把函数放在gogogo,before里面
function spanchange(){
//7.2要给圆点清空样式,暴力全部清空
for(var i=0;i<span.length;i++){
span[i].className="";
}
// 7.1 span[index-1].className='on'; //图片索引值=圆点索引值+1,但img索引值为6时要设置小圆点索引为0
if(index==6){
span[0].className='on';
}else if(index==0){
span[4].className='on';
}
else{
span[index-1].className='on';
}
}
</script>
</body>

