Python实现Pillow处理图像文件
- 推荐自己的专栏:分享一些Python案例,将所学用出来
- 使用Python图像处理库Pillow处理图像文件
- 使用Python处理实际问题时,往往需要使用由第三方开发的开源Python软件库
- Pillow位于PyPI中的图像处理库(PIL:Python Image Library),提供了广泛的文件格式转化,强大的图像处理能力(图像存储,图像显示,格式转化以及基本的图像处理操作等)
- 有关Pillow的信息,可以查阅在线文档https://pillow.readthedocs.org
使用pip安装Pillow
我的Python版本:python3.7
打开cmd,输入
pip3 install Pillow
- 查看用pip安装了多少pytho包(及其版本)
pip list- pip安装的python包,在python安装路径/Lib/site-packages下
注意哦:
Pillow库包含几十个模块,组织在名为PIL的包(可以理解为:文件夹)中
PIL.Image提供了一些包括从文件加载图像和创建新图像的函数,其中的Image用来表示图像对象
打开和显示图像
from PIL import Image

im = Image.open("D:\zgh\picture\zgh.jpg")  #读入图片
im.show()  #展示图片
print(im.format,im.size,im.mode)
- im.format返回包含图像格式的字符串(JPEG、GIF、TIFF、BMP、PNG…)
- im.size返回包含图像宽度和高度的元组,单位为像素
- im.mode返回包含图像模式的字符串(RGB、CYMK、Grayscale…)
运行:
图像的基本操作
copy()拷贝图像crop()剪裁图像paste()将一个图像粘贴(覆盖)在另一个图像上面resize()用于调整图像大小rotate()用于旋转和翻转图像filter()用于图像过滤new()可以创建一个给定模式和大小的新图像对象
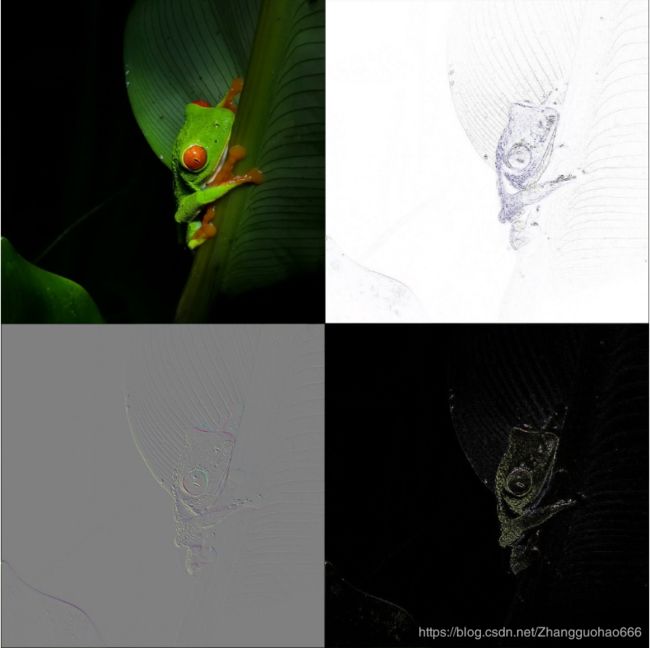
把一幅图像的4个副本排列成2×2网格;在左上方的副本是原始图像,而画面右上方、左下方、右下方则分别使用模块PIL.ImageFilter中定义的内置过滤器CONTOUR、EMBOSS、FIND_EDGES进行过滤
import sys
import os
import PIL.Image
import PIL.ImageFilter

im = PIL.Image.open(sys.argv[1])
width,height = im.size

#创建新图像,大小为原始图像的4倍
newIm = PIL.Image.new(im.mode,(2*width,2*height))

#左上角:原始图像
newIm.paste(im,(0,0,width,height))

#右上角:轮廓过滤
contour = im.filter(PIL.ImageFilter.CONTOUR)
newIm.paste(contour,(width,0,2*width,height))

#左下角:浮雕过滤
emboss = im.filter(PIL.ImageFilter.EMBOSS)
newIm.paste(emboss,(0,height,width,2*height))

#右下角:边缘过滤
edges = im.filter(PIL.ImageFilter.FIND_EDGES)
newIm.paste(edges,(width,height,2*width,2*height))

#显示结果图像
newIm.show()
批量图像格式转换
使用PIL.Image模块的open()函数打开图像文件时,会根据文件内容自动确定文件格式。使用Image对象的save()方法保存图像时,可以指定格式,从而实现格式转换
- glob模块可以使用通配符匹配文件名。
例如:glob.glob( "D:\zgh\desktop\Python\*.jpg")可以返回D:\zgh\desktop\Python下的所有后缀为jpg的文件列表 - os.path.splitext()可以拆分文件名和后缀
import sys
import glob
import os
import PIL.Image

img_path = sys.argv[1] + "/*." +sys.argv[2]

for file in glob.glob(img_path):
    f,s = os.path.splitext(file)
    outfile = f + "." + sys.argv[3]
    PIL.Image.open(file).save(outfile)
在控制台中输入:

运行
转换后的png文件就在D:\zgh\desktop\Python这个路径下
批量调整图片大小
调整图片大小也是网络开发或图像软件预览常用的一种基本技术
使用Image对象的resize()方法可以调整图像大小
import sys
import os
import glob
from PIL import Image

img_path = sys.argv[1] + "/*." +sys.argv[2]
img_width = int(sys.argv[3])
img_height = int(sys.argv[4])

for file in glob.glob(img_path):
    f,s = os.path.splitext(file)
    outfile = f + "_" + sys.argv[3] + "~" + sys.argv[4] + "." + sys.argv[2]
    img = Image.open(file)
    img_out = img.resize((img_width,img_height))
    img_out.save(outfile)
批量创建略所图
略缩图是网络开发或图像软件预览常用的一种基本技术
使用Python的Pillow图像库中Image模块中的Image对象的thumbnail()方法,可以很方便的建立略缩图
import sys
import os
import glob
import PIL.Image

img_path = sys.argv[1] + "/*." +sys.argv[2]

size = (128,128)

for file in glob.glob(img_path):
    f,s = os.path.splitext(file)
    outfile = f + "_tn." + sys.argv[3]
    img = PIL.Image.open(file)
    img.thumbnail(size,PIL.Image.ANTIALIAS)
    img.save(outfile)
在控制台中输入:

运行
转换后的略缩图文件就在D:\zgh\desktop\Python这个路径下
批量图像加文字水印
图片加水印是防止盗版的有效方式之一
首先使用Python的Pillow图像库中Image模块的new函数可以创建水印图像对象,并使用ImageDraw模块在水印图像上绘制文字,最后通过Image模块的composite函数合成水印图像和原图像
import sys
import os
import glob
from PIL import Image,ImageDraw,ImageFont

img_path = sys.argv[1] + "/*." +sys.argv[2]

for file in glob.glob(img_path):
    f,s = os.path.splitext(file)
    outfile = f + "_watermark." + sys.argv[2]
    img = Image.open(file)
    img_watermark = Image.new('RGBA', img.size)
    fnt = ImageFont.truetype("c:/Windows/fonts/Tahoma.ttf", 100)
    draw = ImageDraw.Draw(img_watermark)
    draw.text((0,0), sys.argv[3], font=fnt)
    img_out = Image.composite(img_watermark, img, img_watermark)
    img_out.save(outfile)
在控制台输入:

运行结果(以其中一张图片为例:水印在左上角)

批量图片加图片水印
加图片水印的原理和加文字水印相同,首先使用Python的Pillow图像库中的Image模块的new函数可以创建水印图像对象,并使用图像对象的paste方法把log图像粘贴到水印图像,最后通过Image模块的composite函数合成水印图像和原图像
import sys
import os
import glob
from PIL import Image

img_path = sys.argv[1] + "/*." +sys.argv[2]

for file in glob.glob(img_path):
    f,s = os.path.splitext(file)
    outfile = f + "_log." + sys.argv[2]
    img = Image.open(file)
    img_log = Image.open(sys.argv[3])
    img_mark = Image.new('RGBA', img.size)
    img_mark.paste(img_log,(0,0))
    img_out = Image.composite(img_mark, img, img_mark)
    img_out.save(outfile)


