imageAI使用教程
github地址: https://github.com/OlafenwaMoses/ImageAI
相关文件可见百度云盘
链接:https://pan.baidu.com/s/10mUt_2qUzsXXgE0Osd0X6A
提取码:ttsp
Table of Contents
1 安装
1.1 相关依赖
1.2 imageAI安装
2 图像预测
2.1 基本模型
2.2 多图预测
2.3 预测速度调整
2.4 多线程预测
3 目标检测
3.1 基本检测
3.2 目标检测、提取与微调
3.3 自定义对象检测
3.4 加速
3.5 隐藏/显示对象名称和概率
3.6 图像输入输出类型
4 视频目标检测、跟踪与分析
4.1 基础视频
4.2 自定义类型
4.3 摄像机/实时流视频检测。
4.4 视频分析
5 自定义模型培训
6 自定义图像预测
1 安装
1.1 相关依赖
pip3 install --upgrade tensorflow
pip3 install numpy
pip3 install scipy
pip3 install opencv-python
pip3 install pillow
pip3 install matplotlib
pip3 install h5py
pip3 install keras
1.2 imageAI安装
pip3 install https://github.com/OlafenwaMoses/ImageAI/releases/download/2.0.2/imageai-2.0.2-py3-none-any.whl 或者直接下载 imageai-2.0.2-py3-none-any.whl,再在下载目录下用pip3安装,例如
pip3 install C:\User\MyUser\Downloads\imageai-2.0.2-py3-none-any.whl 2 图像预测
2.1 基本模型
ImageAI提供了4种不同的算法和模型类型来执行图像预测。要对任何图片执行图像预测,请执行以下简单步骤。图像预测的4种算法包括SqueezeNet算法、ResNet算法、InceptionV3算法和DenseNet算法。这些算法中的每一个都有单独的模型文件,您必须使用这些文件,具体取决于算法的选择。要下载模型文件以供选择算法,请单击以下任意链接:
-SqueezeNet(大小=4.82 mb,预测时间最快,精度中等)。
-Microsoft Research提供的ResNet50(大小=98mb,预测时间快,精度高)。
-由Google Brain团队执行的InceptionV3(大小=91.6mb,预测速度慢且精度更高)。
-DenseNet121,由Facebook AI Research提供(Size=31.6mb,预测时间较慢,精度最高)
太棒了!下载此模型文件后,启动一个新的python项目,然后将该模型文件复制到项目文件夹中,python文件(.py文件)将位于该文件夹中。下载下面的图像,或者在您的计算机上获取任何图像并将其复制到python项目的文件夹中。然后创建一个python文件并为其命名;FirstPrediction.py就是一个例子。然后将下面的代码编写到python文件中:
1.jpg
提示:
模型文件下载在根目录的models子目录下
图片文件在根目录的images子目录下
样例代码(First_Prediction.py)
# 导入ImageAI库和python os类
from imageai.Prediction import ImagePrediction
import os

execution_path = 'E:\imageAI'  # imageAI 根目录
prediction = ImagePrediction()  # 图片预测预备

# 模型文件下载在根目录的models子目录下
# 选择一个神经网络

# 1 DenseNet 预测时间较慢,精度最高
# prediction.setModelTypeAsDenseNet()
# prediction.setModelPath(
#     os.path.join(execution_path, 'models',
#                  "DenseNet-BC-121-32.h5"))  # 加载模型文件地址

# 2 InceptionV3 预测速度慢且精度更高
# prediction.setModelTypeAsInceptionV3()
# prediction.setModelPath(
#     os.path.join(execution_path, 'models',
#                  'inception_v3_weights_tf_dim_ordering_tf_kernels.h5'))

# 3 ResNet 预测时间快,精度高
prediction.setModelTypeAsResNet()
prediction.setModelPath(
    os.path.join(execution_path, 'models',
                 'resnet50_weights_tf_dim_ordering_tf_kernels.h5'))

# 4 squeezenet 预测时间最快,精度中等
# prediction.setModelTypeAsSqueezeNet()
# prediction.setModelPath(
#     os.path.join(execution_path, 'models',
#                  'squeezenet_weights_tf_dim_ordering_tf_kernels.h5'))

prediction.loadModel()  # 加载模型

# 图片文件在执行目录的images子目录下
redictions, probabilities = prediction.predictImage(
    os.path.join(execution_path, 'images', "1.jpg"),
    result_count=5)  # 加载待预测的图片地址,输出5个最高可能的类型
for eachPrediction, eachProbability in zip(predictions,
                                           probabilities):  # 输出格式 预测类型 : 可能性大小
    print(eachPrediction, ' : ', eachProbability)
结果(选择了ResNet):
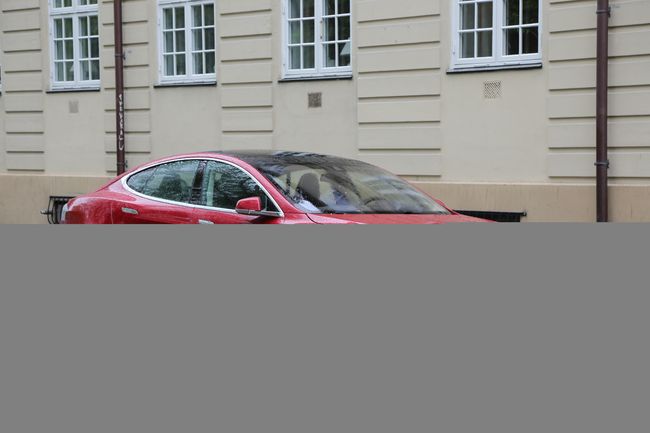
convertible  :  52.459537982940674
sports_car  :  37.61286735534668
pickup  :  3.175118938088417
car_wheel  :  1.8175017088651657
minivan  :  1.7487028613686562
2.2 多图预测
可以使用单个函数(即.pretMultipleImage()函数)对多个图像运行图像预测。它的工作原理如下:
-定义普通图像预测实例。
-设置模型类型和模型路径。
-调用.loadModel()函数。
-创建一个数组,并将要预测的每个映像的所有字符串路径添加到该数组中。
-然后通过调用.pretMultipleImage()函数并在图像数组中进行解析来执行预测,还可以通过解析RESULT_COUNT_PER_IMAGE=5来设置每个图像所需的预测数(默认值为2)
样例代码(Multi_Prediction.py)
# 导入ImageAI库和python os类
from imageai.Prediction import ImagePrediction
import os

execution_path = 'E:\imageAI'  # imageAI 根目录
multiple_prediction = ImagePrediction()  # 图片预测预备

multiple_prediction.setModelTypeAsResNet()
multiple_prediction.setModelPath(
    os.path.join(execution_path, 'models',
                 'resnet50_weights_tf_dim_ordering_tf_kernels.h5'))

multiple_prediction.loadModel()  # 加载模型

all_images_array = []  # 存放所有的测试图片的数组

all_files = os.listdir(os.path.join(execution_path, 'myimages'))  # 多图片文件目录
for each_file in all_files:
    if (each_file.endswith("jpg")
            or each_file.endswith('.png')):  # 只预测jpg和png格式的文件
        all_images_array.append(
            os.path.join(execution_path, 'myimages', each_file))

results_array = multiple_prediction.predictMultipleImages(
    all_images_array, result_count_per_image=5)  # 输出5个最高可能的类型

for each_result in results_array:
    # 输出每个图片的五个可能类别
    predictions, percentage_probabilities = each_result[
        'predictions'], each_result['percentage_probabilities']
    for index in range(len(predictions)):
        # 输出每个类别的可能性大小
        print(predictions[index], ' : ', percentage_probabilities[index])
    print('---------------------------')
结果(选择了ResNet):
king_penguin  :  99.17049407958984
magpie  :  0.5325432866811752
killer_whale  :  0.10074214078485966
black_stork  :  0.04736874543596059
Boston_bull  :  0.02190503873862326
---------------------------
park_bench  :  54.671889543533325
patio  :  30.31955659389496
lakeside  :  3.775469958782196
folding_chair  :  1.6704175621271133
shopping_cart  :  1.4237137511372566
---------------------------
pay-phone  :  34.05987322330475
CD_player  :  8.037229627370834
desktop_computer  :  6.571460515260696
loudspeaker  :  4.9332063645124435
parking_meter  :  4.163774847984314
---------------------------
2.3 预测速度调整
ImageAI现在为所有图像预测任务提供预测速度。预测速度允许您以20%-60%的速率缩短预测时间,但只有轻微的变化,但预测结果是准确的。可用的预测速度是"normal"(默认), "fast", "faster" and "fastest"。您所需要做的就是说明加载模型时所需的速度模式,如下所示。
将MultiPrediction.py中的
multiple_prediction.loadModel() # 加载模型改为
multiple_prediction.loadModel(prediction_speed='fastest') # 快速加载模型速度将大大提高,时间将大大缩短。
2.4 多线程预测
当开发在多线程(如用户界面)上运行繁重任务的程序时,您应该考虑在一个新线程中运行您的预测。在新线程中使用ImageAI运行图像预测时,必须注意以下事项:
-您可以创建预测对象,设置它的模型类型,在新线程之外设置模型路径和json路径。
-.loadModel()必须位于新线程中,并且图像预测(predictImage()必须发生在新线程中。
下面是使用多线程进行图像预测的示例代码:
# 导入ImageAI库和python os类
from imageai.Prediction import ImagePrediction
import os
import threading

execution_path = 'E:\imageAI'  # imageAI 根目录
prediction = ImagePrediction()  # 图片预测预备

prediction.setModelTypeAsResNet()
prediction.setModelPath(
    os.path.join(execution_path, 'models',
                 'resnet50_weights_tf_dim_ordering_tf_kernels.h5'))

pictures_folder = os.path.join(execution_path, 'myimages')
all_files = os.listdir(pictures_folder)  # 多图片文件目录


class PredictionThread(threading.Thread):
    def __init__(self):
        threading.Thread.__init__(self)

    def run(self):
        global prediction
        prediction_thread = prediction
        prediction_thread.loadModel()
        for eachPicture in all_files:
            if (eachPicture.endswith('.png') or eachPicture.endswith('.jpg')):
                predictions, percentage_probabilities = prediction_thread.predictImage(
                    os.path.join(pictures_folder, eachPicture), result_count=1)
                for prediction, percentage_probability in zip(
                        predictions, percentage_probabilities):
                    print(prediction, " : ", percentage_probability)


predictionThread = PredictionThread()
predictionThread.start()
3 目标检测
ImageAI提供了非常方便和强大的方法来对图像进行物体检测和从图像中提取每个对象。对象检测类支持RetinaNet,YOLOv3和TinyYOLOv3。要开始执行物体检测,您必须通过以下链接下载RetinaNet,YOLOv3或TinyYOLOv3物体检测模型:
- RetinaNet (尺寸= 145 mb,高性能和准确性,检测时间更长)
- YOLOv3 (尺寸= 237 mb,性能和准确度适中,检测时间适中)
- TinyYOLOv3 (大小= 34 mb,针对速度和中等性能进行了优化,检测时间快)
3.1 基本检测
下载对象检测模型文件后,应将模型文件复制到.py文件所在的项目文件夹中。然后创建一个python文件并为其命名; 一个例子是FirstObjectDetection.py。然后将下面的代码写入python文件:
# coding: utf-8
from imageai.Detection import ObjectDetection
import os

execution_path = '..\..'  # imageAI根目录

detector = ObjectDetection()  # 加载检测器

# resnet png格式可以正常输出文本,且有标记的新图片
# detector.setModelTypeAsRetinaNet()  # 设置模型网络类型
# detector.setModelPath(
#     os.path.join(execution_path, 'models', 'Object Detection',
#                  "resnet50_coco_best_v2.0.1.h5"))  # 设置模型文件路径

# YOLOv3 用不了
# detector.setModelTypeAsYOLOv3()
# detector.setModelPath(
#     os.path.join(execution_path, 'models', 'Object Detection', 'yolo.h5'))

# TinyYOLOv3 png格式可以正常输出文本,且有标记的新图片
detector.setModelTypeAsTinyYOLOv3()
detector.setModelPath(
    os.path.join(execution_path, 'models', 'Object Detection',
                 "yolo-tiny.h5"))

detector.loadModel()  # 加载模型
detections = detector.detectObjectsFromImage(
    input_image=os.path.join(execution_path, 'myimages',
                             "image2.jpg"),  # 输入待检测图片路劲
    output_image_path=os.path.join(execution_path, 'myimages',
                                   "image2new.png"),  # 输出图片路径 特别提醒用png别用jpg
    minimum_percentage_probability=30)  # 输出检测到的物品的最小可能性阈值

for eachObject in detections:
    print(eachObject["name"], " : ", eachObject["percentage_probability"],
          ' : ', eachObject['box_points'])  # 目标名 : 可能性大小 : 目标区域
    print("--------------------------------")
针对使用github上教程代码会报错如下的问题
ensure you specified correct input image, input type, output type and/or output image path我的方案是,将输出格式以jpg换为png格式,则resnet和TinyYOLOv3可以正常执行,而YOLOv3依然故障,不管了233
输出结果如下:
laptop  :  30.240696668624878  :  (305, 241, 387, 283)
--------------------------------
donut  :  54.28292155265808  :  (15, 379, 130, 438)
--------------------------------
person  :  58.40651988983154  :  (170, 104, 285, 296)
--------------------------------
person  :  62.51210570335388  :  (412, 120, 567, 282)
--------------------------------
person  :  84.3508780002594  :  (307, 169, 384, 256)
--------------------------------
3.2 目标检测、提取与微调
在上面使用的示例中,我们对图像运行对象检测,它将检测到的对象返回到一个数组中,并保存在每个对象上绘制了矩形标记的新图像。在我们的下一个示例中,我们将能够从输入图像中提取每个对象并独立保存它。
下面的示例代码与前面的对象确定代码非常相同,我们将把检测到的每个对象保存为单独的图像。
Object Detection, Extraction and Fine-tune.py
from imageai.Detection import ObjectDetection
import os

execution_path = '..\..'

detector = ObjectDetection()
detector.setModelTypeAsTinyYOLOv3()
detector.setModelPath(
    os.path.join(execution_path, 'models', 'Object Detection', "yolo-tiny.h5"))
detector.loadModel()

detections, objects_path = detector.detectObjectsFromImage(
    input_image=os.path.join(execution_path, 'myimages', 'image3.jpg'),
    output_image_path=os.path.join(execution_path, 'myimages',
                                   'image3new.jpg'),
    minimum_percentage_probability=30,
    extract_detected_objects=True)  # 提取检测到的物体

for eachObject, eachObjectPath in zip(detections, objects_path):
    print(eachObject['name'], ' : ', eachObject['percentage_probability'],
          ' : ', eachObject['box_points'])
    print("Object's image saved in " + eachObjectPath)
    print('------------------')
针对出现的同样的问题
ensure you specified correct input image, input type, output type and/or output image path这一次我没有改成png格式输出,事实证明改成png也没用。我改了detector.detectObjectsFromImage所在文件的源码
首先添加包(没有scipy包的自行 pip install scipy)
from scipy.misc import imsave其次(建议删除的代码选择注释掉而不要直接删除,以免误删),将每一个
pltimage.imsave(splitted_image_path, splitted_copy)注释掉,在其后添加
imsave(splitted_image_path, splitted_copy)将每一个
pltimage.imsave(output_image_path, detected_copy)注释掉,在其后添加
imsave(output_image_path, detected_copy)即可正确输出结果如下:
dog  :  56.6261887550354  :  (395, 324, 449, 434)
Object's image saved in ..\..\myimages\image3new.jpg-objects\dog-1.jpg
------------------
motorcycle  :  42.00790226459503  :  (264, 190, 354, 306)
Object's image saved in ..\..\myimages\image3new.jpg-objects\motorcycle-2.jpg
------------------
person  :  34.74055230617523  :  (143, 119, 170, 159)
Object's image saved in ..\..\myimages\image3new.jpg-objects\person-3.jpg
------------------
person  :  40.157753229141235  :  (461, 131, 509, 222)
Object's image saved in ..\..\myimages\image3new.jpg-objects\person-4.jpg
------------------
person  :  64.91311192512512  :  (157, 159, 246, 362)
Object's image saved in ..\..\myimages\image3new.jpg-objects\person-5.jpg
------------------
person  :  78.07609438896179  :  (601, 130, 640, 222)
Object's image saved in ..\..\myimages\image3new.jpg-objects\person-6.jpg
------------------
person  :  89.72328901290894  :  (10, 100, 65, 252)
Object's image saved in ..\..\myimages\image3new.jpg-objects\person-7.jpg
------------------
person  :  97.73168563842773  :  (536, 99, 580, 228)
Object's image saved in ..\..\myimages\image3new.jpg-objects\person-8.jpg
------------------
输出文件夹内的图片为
还有一个重要的功能你需要知道!
您会记得,检测到的每个对象的百分比概率都是由DetectObjectsFromImage()函数返回的。该函数有一个参数Minimum_Percentage_Probability,其默认值为50(值范围在0-100之间),但在本例中它设置为30。这意味着该函数只返回检测到的对象(如果其百分比概率为30或更高)。该值保持在这一数值上,以确保检测结果的完整性。通过将Minimum_Percentage_Probability设置为等于较小的值以检测更多的对象,或将较大的值设置为检测较少的对象数,可以微调对象检测。
3.3 自定义对象检测
ImageAI支持的对象检测模型(Retinanet)可以检测80种不同类型的对象。它们包括:
'person', 'bicycle', 'car', 'motorcycle', 'airplane', 'bus', 'train',
'truck', 'boat', 'traffic light', 'fire hydrant', 'stop_sign',
'parking meter', 'bench', 'bird', 'cat', 'dog', 'horse', 'sheep', 'cow',
'elephant', 'bear', 'zebra', 'giraffe', 'backpack', 'umbrella', 'handbag',
'tie', 'suitcase', 'frisbee', 'skis', 'snowboard', 'sports ball', 'kite',
'baseball bat', 'baseball glove', 'skateboard', 'surfboard',
'tennis racket', 'bottle', 'wine glass', 'cup', 'fork', 'knife', 'spoon',
'bowl', 'banana', 'apple', 'sandwich', 'orange', 'broccoli', 'carrot',
'hot dog', 'pizza', 'donot', 'cake', 'chair', 'couch', 'potted plant',
'bed', 'dining table', 'toilet', 'tv', 'laptop', 'mouse', 'remote',
'keyboard', 'cell phone', 'microwave', 'oven', 'toaster', 'sink',
'refrigerator', 'book', 'clock', 'vase', 'scissors', 'teddy bear',
'hair dryer', 'toothbrush'
对应中文为
'人', '自行车', '汽车', '摩托车', '飞机', '公共汽车', '火车', '卡车', '船', '交通灯', '消防栓',
'停车标志', '停车收费表', '长椅', '鸟', '猫', '狗', '马', '羊', '牛', '大象', '熊', '斑马',
'长颈鹿', '背包', '伞', '手提包', '领带', '手提箱', '飞盘', '滑雪板', '运动球', '风筝', '棒球棒',
'棒球手套', '滑板', '冲浪板', '网球拍', '瓶子', '酒杯', '杯子', '叉子', '刀', '勺子', '碗', '香蕉',
'苹果', '三明治', '橙', '花椰菜', '胡萝卜', '热狗', '披萨', '不要', '蛋糕', '椅子', '沙发', '盆栽',
'床', '餐桌', '卫生间', '电视', '笔记本电脑', '鼠标', '遥控器', '键盘', '手机', '微波炉', '烤箱',
'水槽', '冰箱', '书籍', '时钟', '花瓶', '剪刀', '泰迪熊', '吹风机', '牙刷'
有趣的是,ImageAI允许您对上面的一个或多个项目执行检测。这意味着您可以自定义要在图像中检测到的对象类型。让我们看看下面的代码:
from imageai.Detection import ObjectDetection
import os

execution_path = '..\..'

detector = ObjectDetection()

# detector.setModelTypeAsTinyYOLOv3()
# detector.setModelPath(
#     os.path.join(execution_path, 'models', 'Object Detection', "yolo-tiny.h5"))

detector.setModelTypeAsRetinaNet()
detector.setModelPath(
    os.path.join(execution_path, 'models', 'Object Detection',
                 "resnet50_coco_best_v2.0.1.h5"))

detector.loadModel()

custom_objects = detector.CustomObjects(car=True, motorcycle=True)
detections = detector.detectCustomObjectsFromImage(
    custom_objects=custom_objects,
    input_image=os.path.join(execution_path, 'myimages', 'image3.jpg'),
    output_image_path=os.path.join(execution_path, 'myimages',
                                   'image3custom.jpg'),
    minimum_percentage_probability=30)

for eachObject in detections:
    print(eachObject['name'], " : ", eachObject['percentage_probability'],
          ' : ', eachObject['box_points'])
    print('----------------')
文本结果输出为
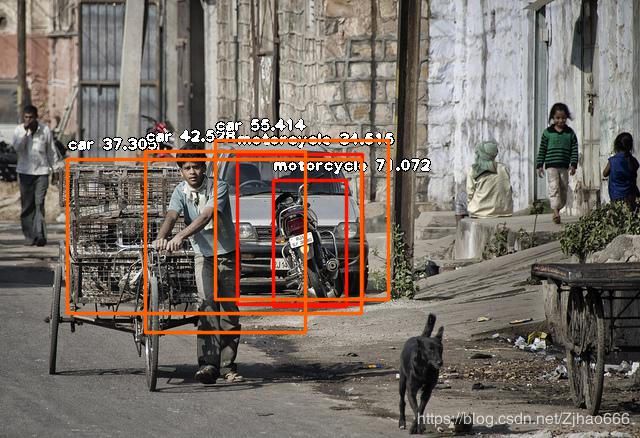
motorcycle  :  34.51491296291351  :  [237 154 362 304]
----------------
motorcycle  :  71.0715651512146  :  [273 180 346 306]
----------------
car  :  37.305331230163574  :  [ 67 159 361 313]
----------------
car  :  42.52847731113434  :  [145 151 305 332]
----------------
car  :  55.41401505470276  :  [215 140 388 299]
----------------
图片输出为
3.4 加速
类似于第二章,ImageAI现在为所有对象检测任务提供检测速度。检测速度使您能够以20%-80%的速度缩短检测时间,但检测结果只有轻微变化,但检测结果准确。在降低最小百分比概率参数的同时,检测速度可以与正常速度相匹配,同时大大缩短了检测时间。可用的检测速度为 "normal"(default), "fast", "faster" , "fastest" 和 "flash"。您所需要做的就是说明加载模型时所需的速度模式,如下所示。
detector.loadModel(detection_speed="fast")3.5 隐藏/显示对象名称和概率
ImageAI提供了隐藏检测到的对象名称和/或百分比概率的选项,使其不会显示在保存/返回的检测到的图像上。使用DetectObjectsFromImage()和DetectCustomObjectsFromImage()函数,可以分别将参数‘Display_Object_Name’和‘Display_Percentage_Probability’设置为True 或者 False。查看以下代码:
detections = detector.detectObjectsFromImage(
    input_image=os.path.join(execution_path, 'myimages', 'image3.jpg'),
    output_image_path=os.path.join(execution_path, 'myimages',
                                   'image3new_nolabels.jpg'),
    minimum_percentage_probability=30,
    display_object_name=False,
    display_percentage_probability=False)  # 提取检测到的物体
在上面的代码中,我们指定不应同时显示对象名称和百分比概率。正如您在下面的结果中所看到的,检测到的图像中没有显示对象的名称及其各自的百分比概率。
3.6 图像输入输出类型
ImageAI支持3种输入类型,即图像文件的文件路径(默认)、图像数组和图像文件流,以及2种输出类型:图像文件(默认)和数字数组。这意味着您现在可以在生产应用程序中执行对象检测,例如在以上述任何格式返回文件的Web服务器和系统上。
要使用Numpy数组或文件流输入执行对象检测,只需在.detectObjectsFromImage() 函数或 .detectCustomObjectsFromImage() 函数中声明输入类型。请参见下面的示例。
detections = detector.detectObjectsFromImage(input_type="array", input_image=image_array , output_image_path=os.path.join(execution_path , "image.jpg")) # numpy数组输入
detections = detector.detectObjectsFromImage(input_type="stream", input_image=image_stream , output_image_path=os.path.join(execution_path , "test2new.jpg")) # 文件流输入
要使用numpy数组输出执行对象检测,只需声明输出类型。
在 .detectObjectsFromImage() 函数或 .detectCustomObjectsFromImage() 函数中。请参见下面的示例。
detected_image_array, detections = detector.detectObjectsFromImage(output_type="array", input_image="image.jpg" ) # numpy数组输出4 视频目标检测、跟踪与分析
4.1 基础视频
由于视频对象检测是一项计算密集型任务,我们建议您使用安装了NVIDIA GPU和GPU版本的TensorFlow的计算机来执行此实验。执行视频对象检测CPU的速度将比使用NVIDIA GPU供电计算机的速度慢。您可以使用Google Colab进行此实验,因为它有NVIDIA K80图形处理器可用。
共用目标检测的模型。
下载对象检测模型文件后,应将模型文件复制到.py文件所在的项目文件夹中。然后创建一个python文件并为其命名;FirstVideoObjectDetection.py就是一个例子。然后将下面的代码编写到python文件中:
# coding: utf-8
from imageai.Detection import VideoObjectDetection
import os

execution_path = '..\..'

detector = VideoObjectDetection()
detector.setModelTypeAsRetinaNet()
detector.setModelPath(
    os.path.join(execution_path, 'models', 'Object Detection',
                 'resnet50_coco_best_v2.0.1.h5'))
detector.loadModel()

video_path = detector.detectObjectsFromVideo(
    input_file_path=os.path.join(execution_path, 'videos', 'traffic.mp4'),
    output_file_path=os.path.join(execution_path, 'videos',
                                  'traffic-detected'),
    frames_per_second=20,
    log_progress=True)
print(video_path)
标签依旧是目标检测中的那80个
4.2 自定义类型
有趣的是,ImageAI允许您对上面的一个或多个项目执行检测。这意味着您可以自定义要在视频中检测到的对象类型。让我们看看下面的代码:
# coding: utf-8
from imageai.Detection import VideoObjectDetection
import os

execution_path = '..\..'

detector = VideoObjectDetection()
detector.setModelTypeAsRetinaNet()
detector.setModelPath(
    os.path.join(execution_path, 'models', 'Object Detection',
                 'resnet50_coco_best_v2.0.1.h5'))
detector.loadModel()

# 自定义
custom_objects = detector.CustomObjects(
    person=True, bicycle=True, motorcycle=True)
video_path = detector.detectCustomObjectsFromVideo(
    custom_objects=custom_objects,
    input_file_path=os.path.join(execution_path, 'videos', 'traffic.mp4'),
    output_file_path=os.path.join(execution_path, 'videos',
                                  'traffic_custom_detected'),
    frames_per_second=20,
    log_progress=True)
print(video_path)
在上面的代码中,在加载模型之后(也可以在加载模型之前完成),我们定义了一个新变量“CUSTOM_Objects=Detector.CustomObjects()”,在该变量中,我们将其Person、Car和Motorccyle属性设置为True。这是告诉模型只检测我们设置为True的对象。然后,我们调用“Detector.DetectCustomObjectsFromVideo()”,这是一个允许我们执行自定义对象检测的函数。然后,我们将“Custom_Objects”值设置为我们定义的自定义对象变量。
4.3 摄像机/实时流视频检测。
ImageAI现在可以在支持摄像机输入的情况下进行实时视频检测。使用OpenCV的VideoCapture()函数,您可以从设备摄像机、通过电缆或IP摄像机连接的摄像机加载实时视频流,并将其解析为ImageAI的DetectObjectsFromVideo()和DetectCustomObjectsFromVideo()函数。支持用于检测视频文件中的对象的所有功能也可用于检测摄像机的实时视频源中的对象。下面是从设备摄像头检测实时视频源的示例。
# coding: utf-8
from imageai.Detection import VideoObjectDetection
import os
import cv2

execution_path = '..\..'

camera = cv2.VideoCapture()

detector = VideoObjectDetection()
detector.setModelTypeAsRetinaNet()
detector.setModelPath(
    os.path.join(execution_path, 'models', 'Object Detection',
                 'resnet50_coco_best_v2.0.1.h5'))
detector.loadModel()

video_path = detector.detectObjectsFromVideo(
    camera_input=camera,
    output_file_path=os.path.join(execution_path, 'videos',
                                  'traffic_detected'),
    frames_per_second=20,
    log_progress=True,
    minimum_percentage_probability=40)
上面的代码与检测视频文件的代码的不同之处在于,我们定义了OpenCVVideoCapture实例并将默认的设备摄像机加载到其中。然后,我们将定义的摄像机解析为Camera_INPUT参数,该参数将替换用于视频文件的INPUT_FILE_PATH。
4.4 视频分析
ImageAI现在视频对象检测类中为视频文件输入和摄像机输入提供商业级视频分析。此功能允许开发人员深入了解使用ImageAI处理的任何视频。这种洞察力可以实时可视化,存储在NoSQL数据库中,以备将来查看或分析。
对于视频分析,DetectObjectsFromVideo()和DetectCustomObjectsFromVideo()现在允许您声明自己定义的函数,该函数将对检测到的视频的每一帧、秒和/或分钟执行,以及在视频检测结束时执行的函数状态。一旦说明了这些函数,它们将收到关于帧/秒/分钟的索引、检测到的对象(名称、百分比概率和Box_Points)、检测到的每个唯一对象的实例数以及在一秒/分钟和整个视频中检测到的每个唯一对象的平均出现次数的原始但全面的分析数据。
要获得视频分析,您所需要做的就是指定一个函数,说明它将接收的相应参数,并在检测函数中将该函数名解析为per_frame_function、per_sec_function、per_minute_function和Video_complete_函数参数。下面是视频分析功能的示例。
from imageai.Detection import VideoObjectDetection
import os
import cv2

execution_path = '..\..'


def forFrame(frame_number, output_array, output_count):
    print('For Frame ', frame_number)
    print('Output for each object : ', output_array)
    print('Output count for unique objects : ', output_count)
    print('------------END OF A FRAME --------------')


def forSeconds(second_number, output_arrays, count_arrays,
               average_output_count):
    print('Second : ', second_number)
    print('Array for the outputs of each frame ', output_arrays)
    print('Array for output count for unique objects in each frame : ',
          count_arrays)
    print('Output average count for unique objects in the last second: ',
          average_output_count)
    print('------------END OF A SECOND --------------')


def forMinute(minute_number, output_arrays, count_arrays,
              average_output_count):
    print("MINUTE : ", minute_number)
    print("Array for the outputs of each frame ", output_arrays)
    print("Array for output count for unique objects in each frame : ",
          count_arrays)
    print("Output average count for unique objects in the last minute: ",
          average_output_count)
    print("------------END OF A MINUTE --------------")


detector = VideoObjectDetection()
detector.setModelTypeAsRetinaNet()
detector.setModelPath(
    os.path.join(execution_path, 'models', 'Object Detection',
                 'resnet50_coco_best_v2.0.1.h5'))
detector.loadModel(detection_speed="fast")

video_path = detector.detectCustomObjectsFromVideo(
    input_file_path=os.path.join(execution_path, 'videos', 'traffic.mp4'),
    output_file_path=os.path.join(execution_path, 'videos',
                                  'traffic_detected_frame_second_minute'),
    frames_per_second=10,
    per_frame_function=forFrame,
    per_second_function=forSeconds,
    per_minute_function=forMinute,
    minimum_percentage_probability=30)
5 自定义模型培训
ImageAI使用最先进的SqueezeNet、ResNet50、InceptionV3和DenseNet提供最简单、最强大的方法来训练自定义图像预测模型,您可以将这些模型加载到imageai.Prediction.Custom.CustomImagePrediction类中。这使您可以在与任何类型的对象/人员相对应的任何一组图像上训练自己的模型。培训过程生成一个JSON文件,该文件映射图像数据集中的对象类型,并创建许多模型。然后,您将以最高的精度对模型进行峰值处理,并使用生成的模型和JSON文件执行自定义图像预测。
由于模型培训是一项计算密集型任务,我们强烈建议您使用装有NVIDIA GPU和安装了TensorFlow的GPU版本的计算机来执行此实验。在CPU上执行模型培训将花费我数小时或数天的时间。使用NVIDIA GPU支持的计算机系统,这将需要几个小时。您可以使用Google Colab进行此实验,因为它有NVIDIA K80图形处理器可用。
要训练自定义预测模型,需要准备要用于训练模型的图像。您将按如下方式准备图像:
- 创建一个数据集文件夹,其名称为您希望您的数据集被命名为(例如,PETS)。
- 在DataSet文件夹中,按列名创建一个文件夹train 。
- 在DataSet文件夹中,创建名为test的文件夹。
- 在Train文件夹中,为要对模型进行预测的每个对象创建一个文件夹,并为该文件夹指定一个与相应的对象名称相对应的名称(例如,狗、猫、松鼠、蛇)。
- 在测试文件夹中,为要对模型进行预测的每个对象创建一个文件夹,并为该文件夹指定一个与相应的对象名称相对应的名称(例如,狗、猫、松鼠、蛇)。
- 在Train文件夹中的每个文件夹中,将每个对象的图像放在其各自的文件夹中。这些图像是用来训练模型的。
- 要生成在实际应用中性能良好的模型,我建议每个对象大约有500个或更多的图像。每个物体有1000张图像,真是太棒了。在测试文件夹中的每个文件夹中,将每个对象的大约100到200个图像放在其各自的文件夹中。这些图像是用来在模型训练时对模型进行测试的图像。
- 完成此操作后,图像数据集文件夹的结构应如下所示:
pets//train//dog//dog-train-images pets//train//cat//cat-train-images pets//train//squirrel//squirrel-train-images pets//train//snake//snake-train-images pets//test//dog//dog-test-images pets//test//cat//cat-test-images pets//test//squirrel//squirrel-test-images pets//test//snake//snake-test-images- 然后,您的培训代码如下所示
from imageai.Prediction.Custom import ModelTraining
model_trainer = ModelTraining()
model_trainer.setModelTypeAsResNet()
model_trainer.setDataDirectory("train_test_root_folder")
model_trainer.trainModel(
    num_objects=4,
    num_experiments=100,
    enhance_data=True,
    batch_size=32,
    show_network_summary=True)
是的。只需5行代码,您就可以在自定义数据集上训练4种最先进的深入学习算法中的任何一种。现在让我们来看看上面的代码是如何工作的。
在上面的代码中,我们开始了培训过程。函数中的参数如下:
num_objects:这是为了说明图像数据集中对象类型的数量。
num_experiments:这是说明网络将在所有训练图像上训练的次数,这也称为“纪元”。
enhance_data(可选):用于说明我们是否希望网络生成经过修改的培训图像副本,以获得更好的性能。
batch_size:这是用来说明网络将处理的图像的数量。对图像进行分批处理,直到每次执行的实验都将图像耗尽为止。
show_network_summary:这是要说明网络是否应该在控制台中显示培训网络的结构。
6 自定义图像预测
ImageAI提供了4种不同的算法和模型类型,以便使用自定义模型执行自定义图像预测。您将能够使用ImageAI训练的模型和相应的MODEL_CLASS JSON文件来预测您训练模型所针对的自定义对象。在这个例子中,我们将使用为20个实验训练的模型,IdenProf是一个由穿制服的专业人员组成的数据集,在测试数据集上达到了65.17%的准确率(您可以使用自己的训练模型和生成的JSON文件)。此“类”主要用于使用您自己的自定义模型。在以下链接中下载模型的ResNet模型和JSON文件:
- ResNet (Size = 90.4 mb)
- IdenProf model_class.json file
太棒了!下载了这个模型文件和JSON文件之后,启动一个新的python项目,然后将模型文件和JSON文件复制到您的python文件(.py文件)所在的项目文件夹中。下载下面的图像,或在您的计算机上拍摄任何包括以下专业人员(主厨、医生、工程师、农民、消防员、法官、机械师、飞行员、警察和服务员)的图像,并将其复制到您的python项目的文件夹中。然后创建一个python文件并为其命名;例如FirstCustomPrediction.py。然后将下面的代码编写到python文件中:
from imageai.Prediction.Custom import CustomImagePrediction
import os

execution_path = '..\..'

prediction = CustomImagePrediction()
prediction.setModelTypeAsResNet()
prediction.setModelPath(
    os.path.join(execution_path, 'Custom Image Prediction',
                 'resnet50_coco_best_v2.0.1.h5'))
prediction.setJsonPath(
    os.path.join(execution_path, 'Custom Image Prediction',
                 'model_class.json'))
prediction.loadModel(num_objects=10)

predictions, probabilities = prediction.predictImage(
    os.path.join(execution_path, 'myimages', '4.jpg'), result_count=5)

for eachPrediction, eachProbability in zip(predictions, probabilities):
    print(eachPrediction + ' : ' + eachProbability)


