实战:CentOS不重启,在线添加硬盘
转载自:http://blog.51cto.com/skypegnu1/1429375
大纲
1、通过VMware Workstation为虚拟机添加硬盘
2、强制Linux扫描SCSI设备
系统版本
| OS | ||
| CentOS 6.4_64 (VMware虚拟机) |
一、前言
作为系统管理员,可能有需求在现有的基础上,新增磁盘以提供更大的存储空间。我们知道 SATA接口以及SAS,SCSI 都是支持热插拔的特性。下面简单介绍一个方法,实现不重新启动Linux,新增磁盘。
我们通过 VMware 虚拟机来演示整个过程。
二、为VMware主机新增一块磁盘
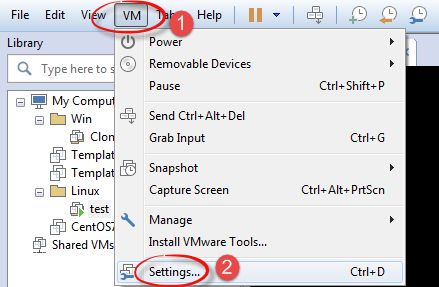
1、在线为CentOS添加磁盘,首先点击 VM > Settings
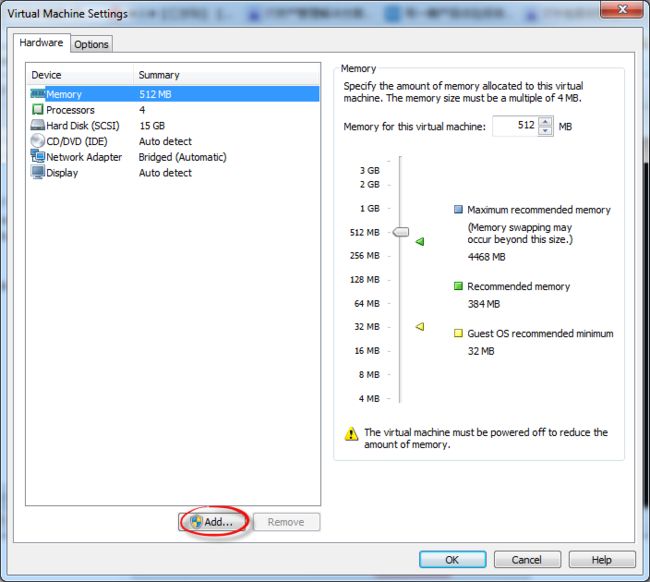
2、在弹出的Virtual Machine Settings窗口中,选择下方的 "Add" 按钮。
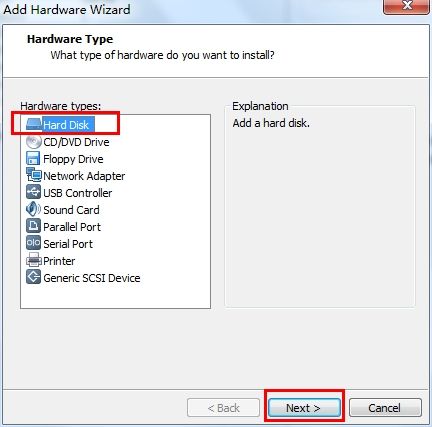
3、然后进入"Add Hardware Wizard"添加硬件向导, 选择 "Hard Disk", 然后 "Next"
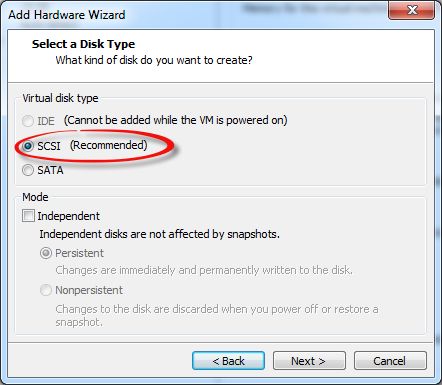
4、接下来选择“Disk Type”,我们选择 SCSI(Small Computer System Interface),即小型计算机系统接口 , 不能选择IDE,VMware也非常友好的提示"Cannot be added while the VM is powerd on"。为什么呢? 因为IDE接口的硬盘是不支持热插拔的设备,所以我们必须选择SCSI或者SATA类型的接口,支持热插拔的类型才行。
5、下一步,我们直接选择"Create a new virtual disk",创建一个新的虚拟磁盘,如果你想添加已经存在的虚拟磁盘,请选择第2项,这里不建议选择第3项"Use a physical disk"
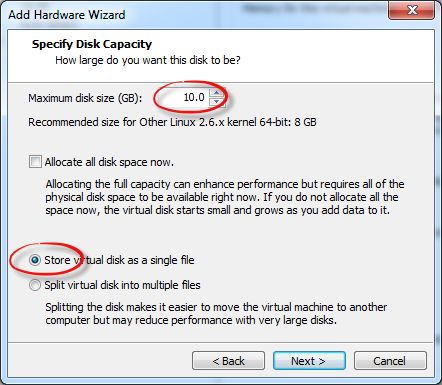
6、选择磁盘大小,根据自己的需要合理指定大小即可。
-
Allocate all disk space now. 选择它,那么会立刻在我们物理磁盘上申请并分配我们指定的大小空间,可以提高虚拟机的性能,但是会占用更多的空间。相反,如果不勾选它,默认情况下,消耗的空间根据实际虚拟机中占用的磁盘空间大小动态分配。
-
Store virtual disk as a single file. 把虚拟磁盘存储为单个文件,如果宿主机文件系统是NTFS,那么建议选择它。
-
Split virtual disk into multiple files. 把虚拟磁盘切割为多块存储在多个文件中,这样可以更容易移动到其他计算机上,但是可能降低性能。其实我认为最主要的原因是某些文件系统,如FAT的单个文件最大限制为4G,所以切分为多个文件进行存储,可以避免单个文件过大而无法存储的问题。
7、然后点击"Finish", 即添加成功。
三、重新检测 SATA/SCSI bus
通常,磁盘添加完成后,需要重启一下计算机,内核会自动检测到这个新的设备。我们可以使用
# ls /dev/sd*来查看,一般是以/dev/sd[a-z]命名的设备文件。
但是,在生产环境中,是不允许我们随意重启服务器的,我们会尽可能的选择不重启系统的方式来解决,现在我们就来探讨一种不重启而让内核检测到SCSI磁盘的方法。
## A rescan can be issued by typing the followingcommand:
[root@localhost ~]# echo "- - -" > /sys/class/scsi_host/host#/scan

## Replace host#
Replace host# with actual value such as host0. You can find scsi_host value using the following command:
[root@localhost ~]# ls /sys/class/scsi_host
Output: host0

Now type the following to send a rescan request:
# echo "- - -" > /sys/class/scsi_host/host0/scan
# fdisk -l
# tail -f /var/log/message
以root用户执行下面的命令,强制内核再次检测PCI设备:
[root@localhost ~]# ls /dev/sd*
/dev/sda  /dev/sda1  /dev/sda2  /dev/sda3

[root@localhost ~]# echo '- - -' > /sys/class/scsi_host/host0/scan

[root@localhost ~]# ls /dev/sd*
/dev/sda  /dev/sda1  /dev/sda2  /dev/sda3  /dev/sdb

[root@localhost ~]# fdisk -l
[root@localhost ~]# tail -f /var/log/message
最关键的是这一行命令:
![]()
注意:三个"- - -"号之间有空格。执行完这条命令后,查看系统日志/var/log/messages,发现对SCSI设备进行了一次重新扫描。
OK,至此我们已经顺利新增了一块磁盘,那么接下来可以进行fdisk分区,mkfs格式化等操作了。
四、第二种方式: 添加单个设备
How Do I Delete a Single Device Called /dev/sdc?
In addition to re-scanning the entire bus, a specific device can be added or existing device deleted using the following command:
# echo 1 > /sys/block/devName/device/delete    # devName
# echo 1 > /sys/block/sdc/device/delete        # sdc
How Do I Add a Single Device Called /dev/sdc?
To add a single device explicitly, use the following syntax:
# echo "scsi add-single-device    " > /proc/scsi/scsi
Where,
<H> : Host
<B> : Bus (Channel)
<T> : Target (Id)
<L> : LUN numbers(LUN)
For e.g. add /dev/sdc with host # 0, bus # 0, target # 2, and LUN # 0, enter:
# echo "scsi add-single-device 0 0 2 0">/proc/scsi/scsi
# fdisk -l
# cat /proc/scsi/scsi
1、如何确定
检查 /proc/scsi/scsi 文件, 确定新磁盘的 Id
[root@localhost ~]# cat /proc/scsi/scsi
Attached devices:
Host: scsi0 Channel: 00 Id: 00 Lun: 00
  Vendor: VMware,  Model: VMware Virtual S Rev: 1.0
  Type:   Direct-Access                    ANSI  SCSI revision: 02
Host: scsi2 Channel: 00 Id: 00 Lun: 00
  Vendor: NECVMWar Model: VMware IDE CDR10 Rev: 1.00
  Type:   CD-ROM                           ANSI  SCSI revision: 05
可以看到, 最大的 【Id】号为:00 , 那么新增的磁盘 Id 就为 1
2、使用 fdisk -l 命令列出当前系统的磁盘信息
[root@localhost ~]# fdisk -l

Disk /dev/sda: 16.1 GB, 16106127360 bytes
255 heads, 63 sectors/track, 1958 cylinders
Units = cylinders of 16065 * 512 = 8225280 bytes
Sector size (logical/physical): 512 bytes / 512 bytes
I/O size (minimum/optimal): 512 bytes / 512 bytes
Disk identifier: 0x000d691c

   Device Boot      Start         End      Blocks   Id  System
/dev/sda1   *           1          26      204800   83  Linux
Partition 1 does not end on cylinder boundary.
/dev/sda2              26         157     1048576   82  Linux swap / Solaris
Partition 2 does not end on cylinder boundary.
/dev/sda3             157        1959    14474240   83  Linux
3、执行命令, re-scan SCSI 总线
[root@localhost ~]# echo "scsi add-single-device 0 0 1 0" > /proc/scsi/scsi4、再次使用 fdisk -l 命令列出当前系统的磁盘信息
[root@localhost ~]# fdisk -l

Disk /dev/sda: 16.1 GB, 16106127360 bytes
255 heads, 63 sectors/track, 1958 cylinders
Units = cylinders of 16065 * 512 = 8225280 bytes
Sector size (logical/physical): 512 bytes / 512 bytes
I/O size (minimum/optimal): 512 bytes / 512 bytes
Disk identifier: 0x000d691c

   Device Boot      Start         End      Blocks   Id  System
/dev/sda1   *           1          26      204800   83  Linux
Partition 1 does not end on cylinder boundary.
/dev/sda2              26         157     1048576   82  Linux swap / Solaris
Partition 2 does not end on cylinder boundary.
/dev/sda3             157        1959    14474240   83  Linux

Disk /dev/sdb: 10.7 GB, 10737418240 bytes
255 heads, 63 sectors/track, 1305 cylinders
Units = cylinders of 16065 * 512 = 8225280 bytes
Sector size (logical/physical): 512 bytes / 512 bytes
I/O size (minimum/optimal): 512 bytes / 512 bytes
Disk identifier: 0x00000000
好了,我们可以看到系统已经识别到了新增设备, /dev/sdb。接下来我们就可以使用它了,创建分区和格式化。
五、创建分区、格式化、挂载
一、创建分区
[root@localhost ~]# fdisk /dev/sdb
Device contains neither a valid DOS partition table, nor Sun, SGI or OSF disklabel
Building a new DOS disklabel with disk identifier 0x2445d233.
Changes will remain in memory only, until you decide to write them.
After that, of course, the previous content won't be recoverable.

Warning: invalid flag 0x0000 of partition table 4 will be corrected by w(rite)

WARNING: DOS-compatible mode is deprecated. It's strongly recommended to
         switch off the mode (command 'c') and change display units to
         sectors (command 'u').

Command (m for help): n                        ## 创建新分区
Command action
   e   extended
   p   primary partition (1-4)
p                                              ## 主分区
Partition number (1-4): 1                      ## 主分区编号
First cylinder (1-1305, default 1):
Using default value 1
Last cylinder, +cylinders or +size{K,M,G} (1-1305, default 1305): +5G     ## 主分区大小

Command (m for help): p

Disk /dev/sdb: 10.7 GB, 10737418240 bytes
255 heads, 63 sectors/track, 1305 cylinders
Units = cylinders of 16065 * 512 = 8225280 bytes
Sector size (logical/physical): 512 bytes / 512 bytes
I/O size (minimum/optimal): 512 bytes / 512 bytes
Disk identifier: 0x2445d233

   Device Boot      Start         End      Blocks   Id  System
/dev/sdb1               1         654     5253223+  83  Linux

Command (m for help): w                         ## 保存
在写入分区表后,可能会导致 kernel 无法重新获取新分区表信息,此时可以直接通过 reboot 来处理。 当然,我们可不能随随便便的 reboot, 我们可以使用 partprobe 命令来强制 kernel 读取新的分区表信息。
partprobe 命令是包含在 parted 包中的, 如果系统提示: command not found。 我们安装 parted 即可。
## install parted
[root@localhost ~]# yum -y install parted

## reload partition table
[root@localhost ~]# partprobe
二、格式化
[root@localhost ~]# fdisk -l

Disk /dev/sda: 16.1 GB, 16106127360 bytes
255 heads, 63 sectors/track, 1958 cylinders
Units = cylinders of 16065 * 512 = 8225280 bytes
Sector size (logical/physical): 512 bytes / 512 bytes
I/O size (minimum/optimal): 512 bytes / 512 bytes
Disk identifier: 0x000d691c

   Device Boot      Start         End      Blocks   Id  System
/dev/sda1   *           1          26      204800   83  Linux
Partition 1 does not end on cylinder boundary.
/dev/sda2              26         157     1048576   82  Linux swap / Solaris
Partition 2 does not end on cylinder boundary.
/dev/sda3             157        1959    14474240   83  Linux

Disk /dev/sdb: 10.7 GB, 10737418240 bytes
255 heads, 63 sectors/track, 1305 cylinders
Units = cylinders of 16065 * 512 = 8225280 bytes
Sector size (logical/physical): 512 bytes / 512 bytes
I/O size (minimum/optimal): 512 bytes / 512 bytes
Disk identifier: 0x2445d233

   Device Boot      Start         End      Blocks   Id  System
/dev/sdb1               1         654     5253223+  83  Linux

## 我们可以清晰的看到  /dev/sdb1 , 格式化
[root@localhost ~]# mkfs.ext4 /dev/sdb1
三、创建挂载点并更新 /etc/fstab
## Create a Mount Point
[root@localhosts ~]# mkdir /data

## Mount  /dev/sdb1 to /data
[root@localhost ~]# mount /dev/sdb1 /data

## Update /etc/fstab
# vi /etc/fstab

Append as follows:
/dev/sdb1       /data      ext4     defaults    1  2

Optional Task: Label the partition
You can label the partition using e2label. For example, if you want to label the new partition /backupDisk, enter
# e2label /dev/sdb1 /backupDisk
系统挂载的一些限制:
-
根目录 / 是必须挂载的,而且一定要先于其他 mount point 被挂载
-
其他 mount point 必须为已建立的目录
-
所有 mount point 在同一时间之内,只能挂载一次
-
所有 partition 在同一时间之内,只能挂载一次
-
如若进行卸载(umount), 必须先将工作目录切换到 mount point(及其子目录)之外
Linux环境中每个Block Device都有一个全局唯一的UUID,可以标识这个设备,我们可以在fstab中使用UUID替换设备名称(/dev/sd#)的方式。
[root@localhost ~]# cat /etc/fstab

#
# /etc/fstab
# Created by anaconda on Sun Jul 26 23:00:18 2015
#
# Accessible filesystems, by reference, are maintained under '/dev/disk'
# See man pages fstab(5), findfs(8), mount(8) and/or blkid(8) for more info
#
UUID=d1fde868-a435-4c70-b4a6-1ab336eab4ea /                       ext4    defaults        1 1
UUID=848acf4f-4e8a-4a5a-a834-97335d66514a /boot                   ext4    defaults        1 2
UUID=ac49dbf5-a20e-42c1-b915-a1632378dd6b swap                    swap    defaults        0 0
tmpfs                   /dev/shm                tmpfs   defaults        0 0
devpts                  /dev/pts                devpts  gid=5,mode=620  0 0
sysfs                   /sys                    sysfs   defaults        0 0
proc                    /proc                   proc    defaults        0 0
/dev/sdb1		/data			ext4	defaults	1 2
我们可以看到, 利用 UUID 也是可以进行挂载的。那么如何查看 Block Device 的UUID呢? 块设备(block device)
1、首先使用lsblk命令可以清晰的获取全局的块设备布局。
[root@localhost ~]# lsblk
NAME   MAJ:MIN RM  SIZE RO TYPE MOUNTPOINT
sr0     11:0    1 1024M  0 rom
sda      8:0    0   15G  0 disk
├─sda1   8:1    0  200M  0 part /boot
├─sda2   8:2    0    1G  0 part [SWAP]
└─sda3   8:3    0 13.8G  0 part /
sdb      8:16   0   10G  0 disk
└─sdb1   8:17   0    5G  0 part /data
2、使用blkid命令可以获取设备的UUID。或者 ls -l /dev/disk/by-uuid
[root@localhost ~]# blkid
/dev/sda1: UUID="848acf4f-4e8a-4a5a-a834-97335d66514a" TYPE="ext4"
/dev/sda2: UUID="ac49dbf5-a20e-42c1-b915-a1632378dd6b" TYPE="swap"
/dev/sda3: UUID="d1fde868-a435-4c70-b4a6-1ab336eab4ea" TYPE="ext4"
/dev/sdb1: UUID="a02ef65b-2174-451f-800f-c4335cba5e61" TYPE="ext4"
3、然后就可以复制UUID, 进行挂载操作了
