Ubuntu下安装Mariadb
引言:mariadb在mysql被oracle收归旗下之后,开始作为Linux默认的数据库系统,这里主要描述如何来安装mariadb的步骤。
1. 安装指令
sudo apt install software-properties-commonsudo apt-key adv --recv-keys --keyserver hkp://keyserver.ubuntu.com:80 0xF1656F24C74CD1D8
执行结果:
Executing: /tmp/tmp.p9r0OfEIH2/gpg.1.sh --recv-keys
--keyserver
hkp://keyserver.ubuntu.com:80
0xF1656F24C74CD1D8
gpg: requesting key C74CD1D8 from hkp server keyserver.ubuntu.com
gpg: key C74CD1D8: public key "MariaDB Signing Key " imported
gpg: Total number processed: 1
gpg: imported: 1 (RSA: 1)
sudo add-apt-repository 'deb [arch=amd64,i386,ppc64el] http://mirrors.tuna.tsinghua.edu.cn/mariadb/repo/10.2/ubuntu xenial main'sudo apt update执行结果如下:
bladestone@bladestone-laptop:~$ sudo apt update
Hit:1 http://mirrors.aliyun.com/ubuntu xenial InRelease
Hit:2 http://mirrors.aliyun.com/ubuntu xenial-updates InRelease
Get:3 http://mirrors.aliyun.com/ubuntu xenial-backports InRelease [92.2 kB]
Get:4 http://mirrors.aliyun.com/ubuntu xenial-security InRelease [94.5 kB]
Hit:5 http://archive.canonical.com/ubuntu xenial InRelease
Get:6 http://mirrors.tuna.tsinghua.edu.cn/mariadb/repo/10.2/ubuntu xenial InRelease [3,874 B]
Get:7 http://mirrors.tuna.tsinghua.edu.cn/mariadb/repo/10.2/ubuntu xenial/main amd64 Packages [5,865 B]
Get:8 http://mirrors.tuna.tsinghua.edu.cn/mariadb/repo/10.2/ubuntu xenial/main i386 Packages [5,864 B]
Fetched 202 kB in 7s (26.7 kB/s)
Reading package lists... Done
Building dependency tree
Reading state information... Done
3 packages can be upgraded. Run 'apt list --upgradable' to see them.
>> sudo apt install mariadb-server

Reading package lists... Done
Building dependency tree
Reading state information... Done
The following packages were automatically installed and are no longer required:
  linux-headers-4.4.0-28 linux-headers-4.4.0-28-generic linux-image-4.4.0-28-generic linux-image-extra-4.4.0-28-generic
Use 'sudo apt autoremove' to remove them.
The following additional packages will be installed:
  galera-3 gawk iproute libjemalloc1 libmariadbclient18 libmysqlclient18 mariadb-client-10.2 mariadb-client-core-10.2 mariadb-common
  mariadb-server-10.2 mariadb-server-core-10.2 socat
Suggested packages:
  gawk-doc mailx mariadb-test tinyca
The following packages will be REMOVED:
  mariadb-client-10.0 mariadb-client-core-10.0 mariadb-server-10.0 mariadb-server-core-10.0
The following NEW packages will be installed:
  galera-3 gawk iproute libjemalloc1 libmariadbclient18 libmysqlclient18 mariadb-client-10.2 mariadb-client-core-10.2 mariadb-server-10.2
  mariadb-server-core-10.2 socat
The following packages will be upgraded:
  mariadb-common mariadb-server
2 upgraded, 11 newly installed, 4 to remove and 1 not upgraded.
Need to get 21.8 MB of archives.
After this operation, 48.4 MB of additional disk space will be used.
Do you want to continue? [Y/n] y
Get:1 http://ftp.osuosl.org/pub/mariadb/repo/10.2/ubuntu xenial/main amd64 galera-3 amd64 25.3.15-xenial [7,741 kB]
Get:2 http://mirrors.aliyun.com/ubuntu xenial/main amd64 gawk amd64 1:4.1.3+dfsg-0.1 [398 kB]
Get:3 http://mirrors.aliyun.com/ubuntu xenial/main amd64 iproute all 1:4.3.0-1ubuntu3 [2,428 B]
Get:4 http://mirrors.aliyun.com/ubuntu xenial/universe amd64 libjemalloc1 amd64 3.6.0-9ubuntu1 [78.9 kB]
Get:5 http://mirrors.aliyun.com/ubuntu xenial/universe amd64 socat amd64 1.7.3.1-1 [321 kB]
Get:6 http://ftp.osuosl.org/pub/mariadb/repo/10.2/ubuntu xenial/main amd64 mariadb-server all 10.2.1+maria-1~xenial [2,960 B]
Get:7 http://ftp.osuosl.org/pub/mariadb/repo/10.2/ubuntu xenial/main amd64 libmysqlclient18 amd64 10.2.1+maria-1~xenial [2,932 B]
Get:8 http://ftp.osuosl.org/pub/mariadb/repo/10.2/ubuntu xenial/main amd64 mariadb-common all 10.2.1+maria-1~xenial [3,234 B]
Get:9 http://ftp.osuosl.org/pub/mariadb/repo/10.2/ubuntu xenial/main amd64 libmariadbclient18 amd64 10.2.1+maria-1~xenial [583 kB]
Get:10 http://ftp.osuosl.org/pub/mariadb/repo/10.2/ubuntu xenial/main amd64 mariadb-client-core-10.2 amd64 10.2.1+maria-1~xenial [689 kB]
Get:11 http://ftp.osuosl.org/pub/mariadb/repo/10.2/ubuntu xenial/main amd64 mariadb-client-10.2 amd64 10.2.1+maria-1~xenial [1,095 kB]
Get:12 http://ftp.osuosl.org/pub/mariadb/repo/10.2/ubuntu xenial/main amd64 mariadb-server-core-10.2 amd64 10.2.1+maria-1~xenial [4,456 kB]
2. 查看sourcelist.
>> sudo vi /etc/apt/sources.list
# MariaDB 10.2 repository list - created 2016-08-14 12:39 UTC
# http://downloads.mariadb.org/mariadb/repositories/
deb [arch=amd64,i386] http://mirrors.tuna.tsinghua.edu.cn/mariadb/repo/10.2/ubuntu xenial main
deb-src http://mirrors.tuna.tsinghua.edu.cn/mariadb/repo/10.2/ubuntu xenial main
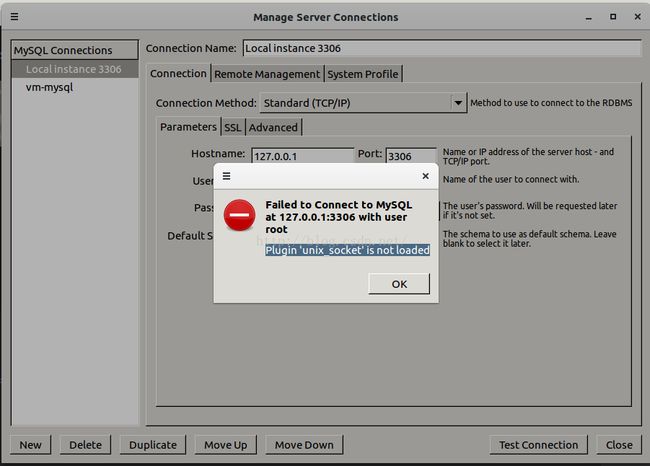
安装完成Mariadb之后,基于mysql workbench无法连接mariadb, 提示"Plugin 'unix_socket' is not loaded"的错误细心:
什么是unix_socket plugin?
是一种安全机制,允许使用操作系统的安全机制连接数据库,通过unix_socket组件,通常使用用在Ubuntu 15.04+以上的系统中。
解决的方法:
1. 尝试登陆mysql的命令, mysql -u root -p, 如果看到如下错误,则需要进入步骤2,否则直接进入步骤6.
bladestone@bladestone-laptop:~$ sudo mysql -u root -p
Enter password:
ERROR 1524 (HY000): Plugin 'unix_socket' is not loaded
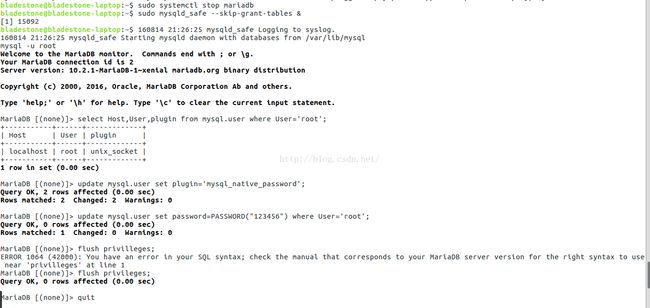
2. 停止服务,使用设置native方式来访问,重置缺省密码
>> sudo systemctl stop mariadb # 停止服务
>> sudo mysqld_safe --skip-grant-tables & # 进入安全模式,并设置为后台进程
>> mysql -u root # 登陆mysql
>> select Host,User,plugin from mysql.user where User='root'; # 查询用户
>> update mysql.user set plugin='mysql_native_password'; #重置加密模式
>> update mysql.user set password=PASSWORD("newpassword") where User='root'; #重置密码
>> flush privileges; #刷新权限信息
>> exit
杀掉进程,重新启动服务
>> sudo kill -9 $(pgrep mysql) # 杀掉进程
>> sudo service mariadb start # 重新启动服务
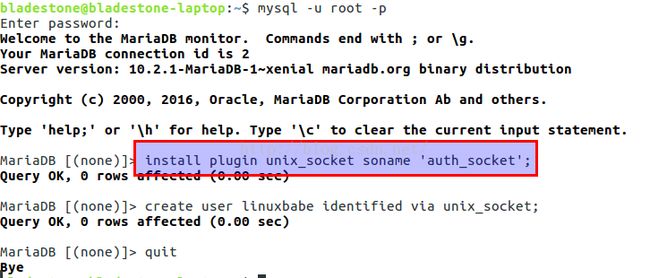
3. 登陆mysql, 安装unix_soket
>> mysql -u root -p
>> install plugin unix_socket soname 'auth_socket';
然后就可以正常访问了.
4. 参考资料
- https://downloads.mariadb.org/mariadb/repositories/#mirror=tuna&distro=Ubuntu&distro_release=xenial--ubuntu_xenial&version=10.2
- https://www.linuxbabe.com/mariadb/plugin-unix_socket-is-not-loaded-2


