FileBeat+Elasticsearch+Logstash+Kibana日志收集分析系统搭建
准备阶段
6.0以上版本需要jdk1.8,自行安装
wget https://artifacts.elastic.co/downloads/beats/filebeat/filebeat-6.0.0-linux-x86_64.tar.gz
wget https://artifacts.elastic.co/downloads/elasticsearch/elasticsearch-6.0.0.tar.gz
wget https://artifacts.elastic.co/downloads/logstash/logstash-6.0.0.tar.gz
wget https://artifacts.elastic.co/downloads/kibana/kibana-6.0.0-linux-x86_64.tar.gz
安装Elasticsearch
1、解压
tar -zxvf elasticsearch-6.0.0.tar.gz
2、配置
修改/elasticsearch-6.3.0/config下的配置文件
vi elasticsearch.yml

-
#
# Set the bind address to a specific IP (IPv4 or IPv6):
#这里设置成localhost则只能用http://localhost:9200访问,若虚拟机和主机ip不一样,则无法访问虚拟机上的es
#设置成192.168.0.102这种局域网ip则可在局域网内通过http://192.168.0.102这个地址访问
#楼主这里是dhcp动态ip所以直接设置成0.0.0.0可以方便的供其他机器访问
network.host: 0.0.0.0
#
# Set a custom port for HTTP:
#
http.port: 9200
3、启动
sh /home/canthny/elasticsearch-5.6.1/bin/elasticsearch直接启动,关闭窗口后即关闭
nohup sh /home/canthny/elasticsearch-5.6.1/bin/elasticsearch & 后台启动
第一次一般启动会报错:
4、常见的错误
ERROR: bootstrap checks failed
max file descriptors [4096] for elasticsearch process likely too low, increase to at least [65536]
root用户 vi /etc/security/limits.conf添加如下内容:
* soft nofile 65536
* hard nofile 131072
* soft nproc 2048
* hard nproc 4096
max number of threads [1024] for user [es] likely too low, increase to at least [2048]
root用户 vi /etc/security/limits.d/90-nproc.conf
* soft nproc 2048
max virtual memory areas vm.max_map_count [65530] likely too low, increase to at least [262144]
root用户下 vi /etc/sysctl.conf
vm.max_map_count=655360
system call filters failed to install; check the logs and fix your configuration or disable system call filters at your own risk
在elasticsearch.yml中配置bootstrap.system_call_filter为false,注意要在Memory下面:
bootstrap.memory_lock: false
bootstrap.system_call_filter: false
如果改了不生效,则reboot服务器或者重新加载配置指令即可。
5、常用命令
启动成功直接访问http://x.x.x.x:9200即可
http://x.x.x.x:9200/_cat/indices?v 查看所有索引
http://x.x.x.x:9200/_cat/health?v 健康检查
http://x.x.x.x:9200/[index_name]/_search? 查询索引下内容
安装Kibana
tar –zxvf kibana-6.0.0-linux-x86_64.tar.gz
mv kibana*_64 kibana
cd kibana/config
vi kibana.yml修改port,host,elasticurl等
#port
server.port: 5601
#host同上面elasticsearch所述,通常配置localhost或者机器ip,这里0.0.0.0图个方便,便于局域网动态ip访问。
server.host: "0.0.0.0"

#这里是部署在一台机器上,直接localhost,否则指定ip即可
elasticsearch.url: "http://localhost:9200"
nohup bin/kibana &
启动成功访问http://x.x.x.x:5601即可
Kibana的用法下篇文章会细说
安装Logstash
tar -zxvf logstash-6.0.0.tar.gz
cd /logstash-6.0.0
vi demo-config.conf
input {
  beats {
    port => 5044
  }
}

# The filter part of this file is commented out to indicate that it
# is optional.

filter {

}

output {
    elasticsearch {
      hosts => "localhost:9200"
      manage_template => false
      index => "mc_monitor_%{+YYYY.MM.dd}"
    }
}
这是最简单的配置示例
input:数据源,这里打开5044端口监听beats的数据,也可以很多其他的配置方式,如redis、kafka等等
filter:配置拦截器清洗、格式化数据,很多配置方式grok、mutate、json、codec等等
output:输出到elasticsearch,配置模板,索引名称等信息
在logstash-6.0.0目录下nohup ./bin/logstash -f demo-config.conf & 后台启动logstash
/logstash-6.0.0/logs目录下有日志logstash-plain.log,这里可以看到收集过滤转发数据时的报错,很重要。后续调试filter的时候有用
FileBeat安装
tar xzvf filebeat-6.0.0-linux-x86_64.tar.gz
mv filebeat-6.0.0-linux-x86_64 filebeat-6.0.0
cd filebeat-6.0.0
修改配置文件vi filebeat.yml,如下:
filebeat.inputs:

- type: log

  enabled: true

  paths:

    - /var/log/*.log


#----------------------------- Logstash output --------------------------------
output.logstash:

  hosts: ["127.0.0.1:5044"]
nohup ./filebeat -c filebeat.yml & 后台启动
刚开始可能会在本地安装filebeat进行调试,这里附上windows安装方法
下载https://artifacts.elastic.co/downloads/beats/filebeat/filebeat-6.3.0-windows-x86_64.zip
解压重命名Filebeat
进入该目录
PowerShell.exe -ExecutionPolicy UnRestricted -File .\install-service-filebeat.ps1
修改filebeat.yml
.\filebeat.exe运行filebeat
不要关闭窗口即可
可以logs目录下的filebeat日志,里面会有监听文件的路径以及和logstash交互的日志,便于拍错
日志收集测试
确认所有服务都启动正常后,可以向指定路径
/var/logs/*.log
D:\logs\nginx\access*.log
写入日志
一种在http://x.x.x.x:9200/_cat/indices?v 下可以查看到新建立的索引
另一种在http://x.x.x.x:5601/的kibana中进行查看
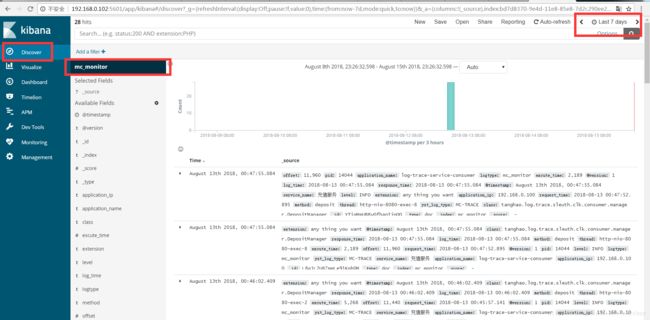
首先在Management中新建索引,名字就是你在logstash里配置的index名称,或者是上面elasticsearch中查到的索引名称
然后在Discover中查询该索引即可,注意选择索引和顶部的查询日期,查询结果如下图
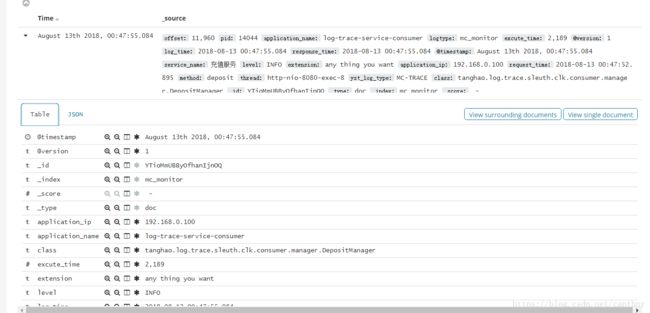
点开箭头可以看到具体的数据字段
当然这里只是最简单的环境搭建和数据采集。实现了日志收集功能。下篇文章会结合nginx日志来展示elk如何在数据采集的基础上进行分析,重点讲述logstash数据格式化以及Kibana的可视化分析功能。
谢谢!


