深度学习Object Detection目标检测之《YOLOv3原理详细剖析》
目录
- 一,综述
- Object Detection概述
- 作者简介
- Pytorch Implementation 代码实现
- 二,从输入到输出 Forward Pass
- Input&Output 网络的输入与输出是什么
- 如何理解网络的三组输出
- 三组输出如何转化为预测结果
- 三,从输出到输入 Back Propagation
- Loss Function 损失函数
- 预测坐标x,y,w,h的设计
- 四,YOLOv3 Network Structure 网络结构
- Darknet53
- 五,Yolov3 Paper 论文拾遗
- 六,后记
一,综述
2020年新年,新型冠状病毒肆虐,SARS的阴霾再次笼罩神州大地。在家自我隔离,正好写点东西,继续之前的几篇文章,这次写点目标检测的内容。
Object Detection概述
现在是2020年初,直到2018年以前,最具代表性的经典目标检测网络就是RCNN系列,YOLO系列,SSD系列。RCNN,YOLO,SSD这几篇经典论文奠定了使用神经网络进行目标检测的开创性工作基础。YOLO属于One Stage的经典Detection网络之一,YOLO v3算是最新的改进版本(YOLO nano?!);Faster RCNN乃Two Stage的Detection网络,RPN网络的创造性设计给后续很多工作提供了思路。
个人比较喜欢YOLO,速度快,检测效果不错,网络结构清晰,非常适合工程上使用。本文之目的在于剖析目标检测网络之YOLOv3,目标是从作者的Paper,Darknet网络结构,Pytorch的实现,网络训练调参等目标检测网络的方方面面来彻底剖析和理解此网络的所有,如果有时间的话。。。
作者简介
I am a graduate student advised by Ali Farhadi. I work on computer vision.
I maintain the Darknet Neural Network Framework, a primer on tactics in Coq, occasionally work on research, and try to stay off twitter.
Outside of computer science, I enjoy skiing, hiking, rock climbing, and playing with my Alaskan malamute puppy, Kelp.
作者的画风几乎都是很。。。dark。。。

作者的官网
作者的Youtube频道
Youtube有他在University of Washington的CV课程
作者2017年的TED演讲
总之是个很幽默很逗的人,文风很飘~~
Pytorch Implementation 代码实现
推荐一个https://github.com/BobLiu20/YOLOv3_PyTorch的YOLOv3 pytorch实现
git clone https://github.com/BobLiu20/YOLOv3_PyTorch.git
YOLOv3的pytorch实现有很多,推荐用此实现进行学习原因是:
1. 实现比较完整,训练,预测,指标都有
2. 使用pytorch手工实现了Darknet53和Darknet tiny,没有使用Darknet原生实现cfg进行转换,方便自己修改和调整
3. 提供了原生pytorch在COCO上的预训练的权重,并且分离了Backbone权重
4. 数据增强使用了imgaug
作者Darknet实现YOLOV3
二,从输入到输出 Forward Pass
Input&Output 网络的输入与输出是什么
搞清楚输入,输出是深入理解网络的一个很好的开始。
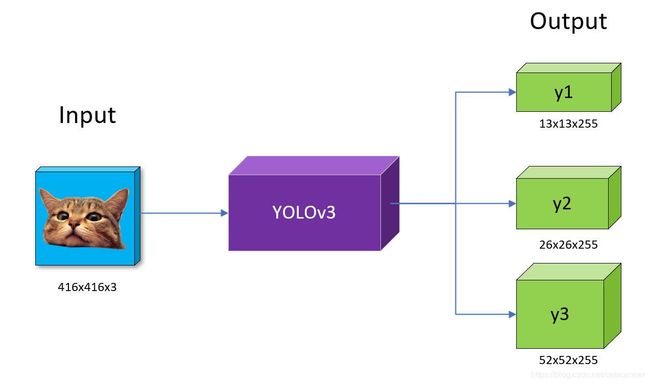
我们暂时只关注蓝色的输入和绿色的输出部分,因为毕竟一个Detection网络的作用就是输入图像,输出一些框框和框框的分类。YOLO内部实现放后面讲。
输入:如上图浅蓝色的猫,这个比较容易理解,网络输入图像为**416*416*3通道的RGB图像矩阵
输出:输出为三组Feature map,分别是13*13*255,26*26*255,52*52*255,得到了三组Feature map之后,稍加处理就是最终结果。最终结果其实就是这张图上的物体的定位框和框的分类。
所以现在的问题就是如何将网络的三组输出转化成最终的Bbox及分类。
如何理解网络的三组输出
关于空间维度和通道维度
输出的三组Feature Map中13x13,26x26,52x52称作空间维度,255是通道维度。
如果只看输入输出的维度,我们可以很快速的写一个最简单的卷积网络来满足416x416x3的图像输入并且输出13*13*255,26*26*255,52*52*255和YOLOv3保持一致,例如随便设计一个:
import numpy as np
import torch
import torch.nn as nn

class FakeYOLOv3(nn.Module):

    def __init__(self):
        super(FakeYOLOv3, self).__init__()
        self.conv1 = nn.Conv2d(3, 255, 32 ,stride=32)
        self.conv2 = nn.Conv2d(3, 255, 16 ,stride=16)
        self.conv3 = nn.Conv2d(3, 255, 8  ,stride=8)

    def forward(self, x):
        y1 = self.conv1(x)
        y2 = self.conv2(x)
        y3 = self.conv3(x)
        return y1,y2,y3

yolo = FakeYOLOv3()
print(yolo)

input_image = np.random.randn(416,416,3) #随机生成一张416的RGB图像
input_image = np.transpose(input_image, (2, 0, 1)).astype(np.float32)
make_batch = torch.from_numpy(input_image).unsqueeze(0)
y1,y2,y3 = output = yolo(make_batch)
print(y1.shape)
print(y2.shape)
print(y3.shape)
看一下网络结构:
FakeYOLOv3(
  (conv1): Conv2d(3, 255, kernel_size=(32, 32), stride=(32, 32))
  (conv2): Conv2d(3, 255, kernel_size=(16, 16), stride=(16, 16))
  (conv3): Conv2d(3, 255, kernel_size=(8, 8), stride=(8, 8))
)
torch.Size([1, 255, 13, 13])
torch.Size([1, 255, 26, 26])
torch.Size([1, 255, 52, 52])
输入输出与YOLOv3惊人的一致,从这里就可以对YOLO网络设计之简洁窥探一二了,没有任何多余的机制!
我们来计算一下这个简单的网络有多少参数量,
*(32*32*3+1)*255+(16*16*3+1)*255+(8*8*3+1)255=1028925
我们用pytorch来跑一下是不是计算正确
total_params = sum(p.numel() for p in yolo.parameters() if p.requires_grad)
结果
total_params = 1028925
看来我们的计算是正确的,简单的三个卷积,通道规模稍微一叠加就有100万个可求梯度的参数,第一这个网络可能具有一定的拟合能力(但stride太大,信息丢失很多),第二当前真实的网络其实很少用kernel很大的卷积,第三后面会讲到一些网络结构设计的基本原理,包括BN,Residue残差网络,1x1卷积,等一些概念,为了减少参数量,降低训练难度,提高精度
而真正的YOLOv3网络结构也会在后面会详细说,目前就可以理解为上面这个网络多了一些卷积,BN,Relu层,Res层。
255哪来的?
首先我们要知道每组输出的255个通道维度是哪里来的。这并不是网络的固定参数,而是根据识别物体的类别进行变化的。COCO2014数据集有80个物体分类,所以其实这个255就可以理解为:
3个Anchor*[x,y,w,h,objectiveness,cls1,cls2,cls3...cls80] = 255
#方括号里是4+1+80=85个参数,每个尺度有3个Anchor即3*85= 255
尺度:这里所说的每个尺度就是指y1,y2,y3这三组Feature map,为什么要有三组其实是为了优化对于不同大小物体的检测,如上面所说,在13x13x255这个尺度上,一个空间上1x1的点对于原图的感受野是32*32,如果物体很小只有原图上8x8个像素,那这个尺度对于这类小目标就比较不容易进行定位和识别。这个思想可以参考FPN(Feature Pyramid Network)特征金字塔网络Feature Pyramid Networks for Object Detection 因为YOLO前几个版本对小物体的识别较弱,所以这版通过此方法加强了对于小物体的识别。但也在速度上有所妥协,速度和精度不可得兼。
Anchor:中文称作‘锚点’,就是预设几个固定大小的框框,然后在检测的时候以这些框框为初始大小去进行物体的检测和网络的调整,在学习出来的权重影响下计算得出的[x,y,h,w]其实是基于这些固定框框的偏移和缩放而不是实际位置。YOLOv3一共设计了9个anchor,每个尺度分配3个anchor,用通俗的话说就是先找一个尺度,例如13x13的Feature map,分配给这个尺度的三个anchor分别是[116,90],[156,198],[373,326],要注意的是在yolov3中,anchor是实际图像中的大小,然后再选择13x13中的一个点,先用[116,90]这个anchor在权重影响后去图上框一下看看有没有物体,然后再用[156,198]这个anchor去试一试,最后试[373,326],试完这3个anchor这个点的识别任务就结束了。实际上这个过程全部是矩阵运算,所以13x13x3次预测是一次性计算完成的。而我们需要去训练的就是这个在每个点都能去影响anchor偏移缩放的整体的网络权重。
画一组图来说明一下:

以y1这组13x13x255的Feature map为例,紫色,黄色,绿色为分配给y1的三个Anchor尺寸

我们使用13x13最中间红色的那组255维度的特征来进行预测
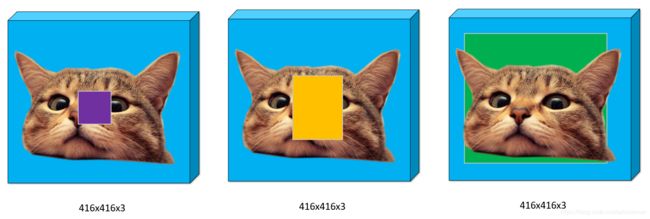
我们可以看到三个不同尺寸anchor覆盖到图像上的情况

这组预测结果中的三组85个参数就是网络前向Inference后对这三个Anchor的偏移和缩放,如上图中的空心框所示。我们可以看到绿色的一组预测的比较好,并不是故意画成这样,事实上也是如此,越接近物体尺寸的anchor能越好的去预测物体,这个和YOLO的训练方法也是有关系的。
为什么YOLOv3默认的9个Anchor是:
13x13:[116, 90], [156, 198], [373, 326]
26x26:[30, 61], [62, 45], [59, 119]
52x52: [10, 13], [16, 30], [33, 23]
这些呢?答案是统计。原作者统计了COCO数据集中的所有物体的尺寸,找出9个最能代表全部的框框大小,这边一般会使用Kmeans进行聚类,代码实现很多,例如:Initial Anchor Boxes Estimation using KMeans Clusterring for Faster-RCNN
为什么是9个?
YOLOv3设计如此,太少有些对象无法很好覆盖,太多计算量会增大,这可以根据数据情况调整。
为什么不用1个Anchor,反正网络能学习?
主要是为了帮助网络学习,简单说就是我预设的1个框框要是大小和距离和GroundTruth差很多,无法覆盖多样性,很可能导致网络无法收敛。
到这边对于Anchor就基本就很好理解了
关于[85个参数]:
- x,y,w,h就是物体大小和位置,但在实际操作中网络并非直接预测相对(0,0)的坐标。
- objectiveness也很好理解,上述x,y,w,h所框定的内容是一个物体的概率
- cls1,cls2…cls80就是上述x,y,w,h所框定的内容属于某一个类别的概率,例如 [0.1,0.15,0.9,0.78,…,0.4,0.01]
三组输出如何转化为预测结果
现在三组FeatureMap上的每个11255都做出了三个预测(三个Anchor),也就是一共(13x13+26x26+52x52)*3=10647个预测,最后如何转变成实际预测结果呢?
- 根据Objectiveness值进行过滤,例如<0.5的全部去掉
- 剩下的框进行NMS,Non-Maximum Suppression也就是常说的非极大值抑制
- 剩下的预测整理后就是最终输出结果
但为什么是每个Feature Map上的1x1x255都要预测一个物体?这就和YOLOv3的设计有关系了,后面慢慢说。
NMS(Non-Maximum Suppression)非极大值抑制
nms比较简单,如图所示,就是按照置信度以及重叠面积按照一定的规则去掉多余的框框:

关于soft nms可以自行爬文,Improving Object Detection With One Line of Code,可以提高一些检出率。
一个简单的NMS的实现方便理解:
import random
import numpy as np
#假设box=[x1,y1,x2,y2,score]
def nms(boxes,bar):
    x1 = boxes[:,0]
    y1 = boxes[:,1]
    x2 = boxes[:,2]
    y2 = boxes[:,3]
    scores = boxes[:,4]
    areas = (x2-x1+1)*(y2-y1+1)
    order = np.argsort(-scores)
    keep = []
    while order.size > 0:
        i = order[0]
        keep.append(i)

        xx1 = np.maximum(x1[i],x1[order[1:]])
        yy1 = np.maximum(y1[i],y1[order[1:]])
        xx2 = np.minimum(x2[i],x2[order[1:]])
        yy2 = np.minimum(y2[i],y2[order[1:]])

        w = np.maximum(0.0, xx2-xx1+1)
        h = np.maximum(0.0, yy2-yy1+1)

        inter = w*h
        iou = inter / (areas[i]+areas[order[1:]]-inter)

        indexes = np.where(iou <= bar)[0]
        print("inds")
        print(iou)
        print(indexes)
        order = order[indexes+1]
        print(order)
    return keep
到这里前向的计算就全部完成了,接下来我们来看看网络怎么学习
三,从输出到输入 Back Propagation
Loss Function 损失函数
我们来看一下原版YOLO损失函数的数学表达式:You Only Look Once: Unified, Real-Time Object Detection重新手打一遍:
L o s s = λ c o o r d ∑ i = 0 S 2 ∑ j = 0 B 1 i j o b j [ ( x i − x ^ i ) 2 + ( y i − y ^ i ) 2 ] + λ c o o r d ∑ i = 0 S 2 ∑ j = 0 B 1 i j o b j [ ( w i − w ^ i ) 2 + ( h i − h ^ i ) 2 ] + ∑ i = 0 S 2 ∑ j = 0 B 1 i j o b j ( C i − C ^ i ) 2 + λ n o o b j ∑ i = 0 S 2 ∑ j = 0 B 1 i j n o o b j ( C i − C ^ i ) 2 + ∑ i = 0 S 2 1 i j o b j ∑ c ∈ c l a s s e s ( p i ( c ) − p ^ i ( c ) ) 2 Loss=\lambda_{coord}\sum_{i=0}^{S^2}\sum_{j=0}^{B}\mathbb{1}_{ij}^{obj}\Big[(x_i-\hat{x}_i)^2+(y_i-\hat{y}_i)^2\Big] \\ +\lambda_{coord}\sum_{i=0}^{S^2}\sum_{j=0}^{B}\mathbb{1}_{ij}^{obj}\bigg[\Big(\sqrt{w_i}-\sqrt{\hat{w}_i}\Big)^2+\Big(\sqrt{h_i}-\sqrt{\hat{h}_i}\Big)^2\bigg] \\ +\sum_{i=0}^{S^2}\sum_{j=0}^{B}\mathbb{1}_{ij}^{obj}\Big(C_i-\hat{C}_i\Big)^2\\+\lambda_{noobj}\sum_{i=0}^{S^2}\sum_{j=0}^{B}\mathbb{1}_{ij}^{noobj}\Big(C_i-\hat{C}_i\Big)^2\\+\sum_{i=0}^{S^2}\mathbb{1}_{ij}^{obj}\sum_{c\in{classes}}(p_i(c)-\hat{p}_i(c))^2 Loss=λcoordi=0∑S2j=0∑B1ijobj[(xi−x^i)2+(yi−y^i)2]+λcoordi=0∑S2j=0∑B1ijobj[(wi−w^i)2+(hi−h^i)2]+i=0∑S2j=0∑B1ijobj(Ci−C^i)2+λnoobji=0∑S2j=0∑B1ijnoobj(Ci−C^i)2+i=0∑S21ijobjc∈classes∑(pi(c)−p^i(c))2
因为yolov3作者没有给出数学表达式,而且找遍了网络也找不到有人写过,那就只能自己写一个了
YOLOv3损失函数数学表达式:
L o s s k = λ x y ∑ i = 0 S k 2 ∑ j = 0 A n k 1 i j o b j [ − t x ^ i ⋅ log t x i − ( 1 − t x ^ i ) ⋅ log ( 1 − t x i ) ] + λ x y ∑ i = 0 S k 2 ∑ j = 0 A n k 1 i j o b j [ − t y ^ i ⋅ log t y i − ( 1 − t y ^ i ) ⋅ log ( 1 − t y i ) ] + λ w h ∑ i = 0 S k 2 ∑ j = 0 A n k 1 i j o b j [ ( t w i − t w ^ i ) 2 + ( t h i − t h ^ i ) 2 ] + λ c o n f ∑ i = 0 S k 2 ∑ j = 0 A n k 1 i j o b j [ − C ^ i ⋅ log C i − ( 1 − C ^ i ) ⋅ log ( 1 − C i ) ] + λ n o o b j ∑ i = 0 S k 2 ∑ j = 0 A n k 1 i j n o o b j [ − C ˉ ^ i ⋅ log C i − ( 1 − C ˉ ^ i ) ⋅ log ( 1 − C i ) ] + λ c l s ∑ i = 0 S k 2 ∑ j = 0 A n k 1 i j o b j 1 N c l a s s ∑ c ∈ c l a s s [ − p ^ i ( c ) ⋅ log p ( c ) i − ( 1 − p ^ i ( c ) ⋅ log ( 1 − p i ( c ) ) ] ( 1 ) Loss_k=\lambda_{xy}\sum_{i=0}^{{S_k}^2}\sum_{j=0}^{{An}_k}\mathbb{1}_{ij}^{obj}\Big[-\hat{t_x}_i\cdot\log{{t_x}_i-(1-\hat{t_x}_i)\cdot\log(1-{t_x}_i)}\Big] \\ +\lambda_{xy}\sum_{i=0}^{{S_k}^2}\sum_{j=0}^{{An}_k}\mathbb{1}_{ij}^{obj}\Big[-\hat{t_y}_i\cdot\log{{t_y}_i-(1-\hat{t_y}_i)\cdot\log(1-{t_y}_i)}\Big]\\+\lambda_{wh}\sum_{i=0}^{{S_k}^2}\sum_{j=0}^{{An}_k}\mathbb{1}_{ij}^{obj}\bigg[\Big({t_w}_i-{\hat{t_w}_i}\Big)^2+\Big({t_h}_i-{\hat{t_h}_i}\Big)^2\bigg] \\ +\lambda_{conf}\sum_{i=0}^{{S_k}^2}\sum_{j=0}^{{An}_k}\mathbb{1}_{ij}^{obj}\Big[-\hat{C}_i\cdot\log{{C}_i-(1-\hat{C}_i)\cdot\log(1-{C}_i)}\Big]\\+\lambda_{noobj}\sum_{i=0}^{{S_k}^2}\sum_{j=0}^{{An}_k}\mathbb{1}_{ij}^{noobj}\Big[-\hat{\bar{C}}_i\cdot\log{{C}_i-(1-\hat{\bar{C}}_i)\cdot\log(1-{C}_i)}\Big]\\+\lambda_{cls}\sum_{i=0}^{{S_k}^2}\sum_{j=0}^{{An}_k}\mathbb{1}_{ij}^{obj}\frac{1}{N_{class}}\sum_{c\in{class}}\Big[-\hat{p}_i(c)\cdot\log{{p(c)}_i-\big(1-\hat{p}_i(c)\cdot\log(1-{p}_i(c)\big)}\Big]\space\space(1) Lossk=λxyi=0∑Sk2j=0∑Ank1ijobj[−tx^i⋅logtxi−(1−tx^i)⋅log(1−txi)]+λxyi=0∑Sk2j=0∑Ank1ijobj[−ty^i⋅logtyi−(1−ty^i)⋅log(1−tyi)]+λwhi=0∑Sk2j=0∑Ank1ijobj[(twi−tw^i)2+(thi−th^i)2]+λconfi=0∑Sk2j=0∑Ank1ijobj[−C^i⋅logCi−(1−C^i)⋅log(1−Ci)]+λnoobji=0∑Sk2j=0∑Ank1ijnoobj[−Cˉ^i⋅logCi−(1−Cˉ^i)⋅log(1−Ci)]+λclsi=0∑Sk2j=0∑Ank1ijobjNclass1c∈class∑[−p^i(c)⋅logp(c)i−(1−p^i(c)⋅log(1−pi(c))] (1)
T o t a l L o s s = ∑ k = 1 3 L o s s k ( 2 ) Total\space Loss=\sum_{k=1}^3Loss_k\space\space(2) Total Loss=k=1∑3Lossk (2)
其实大家一看就明白了,变化不大,就是原版YOLO都是用的MSE(Mean Squared Error均方误差)来计算的,v3中用了几项BCE(Binary Cross Entropy二元交叉熵)。另外v1中一个特征点只预测一个分类,v3中预测三个,可从公式(1)的最后一行看出来。
关于x,y的loss到底是用均方误差还是交叉熵这个问题我看网上有一些争议,照道理对于数值回归问题使用均方误差会多一些,但因为YOLO对于位置的特殊设计使得xy都是用sigmoid函数归一化到[0,1]之间的数值,所以我这边公式中用的也是BCE。
另外原YOLO Paper里这个空心的‘1’字似乎CSDN的Latex并不支持,有知道怎么打的请留言告诉我一下。
MSE & BCE?
MSE均方误差我们看一下pytorch的实现公式:
l n = ( x n − y n ) 2 l_n=(x_n-y_n)^2 ln=(xn−yn)2
BCE二元交叉熵我们也先来看一看pytorch的实现公式:
l n = − w n [ y n ⋅ log x n + ( 1 − y n ) ⋅ log ( 1 − x n ) ] l_n=-w_n[y_n\cdot\log{x_n}+(1-y_n)\cdot\log{(1-x_n)}] ln=−wn[yn⋅logxn+(1−yn)⋅log(1−xn)]
交叉熵是什么?
提到熵不得不提香农

克劳德 • 香农(Claude Shannon, 1916-2001)
此处略去1000字
信息量公式
h ( x ) = − log 2 p ( x ) h(x)=-\log_2{p(x)} h(x)=−log2p(x)
信息熵,就是信息量的期望,公式
H ( p ) = − ∑ i = 1 n p ( x i ) log 2 p ( x i ) H(p)=-\sum_{i=1}^np(x_i)\log_2{p(x_i)} H(p)=−i=1∑np(xi)log2p(xi)
交叉熵,计算公式
H ( p , q ) = − ∑ i = 1 n p ( x i ) log 2 q ( x i ) H(p,q)=-\sum_{i=1}^np(x_i)\log_2q(x_i) H(p,q)=−i=1∑np(xi)log2q(xi)
二元交叉熵,就是交叉熵的一个特例,等价上面pytorch给出的公式:
H ( p , q ) = − p ( x ) log 2 q ( x ) − ( 1 − p ( x ) ) log 2 ( 1 − q ( x ) ) H(p,q)=-p(x)\log_2{q(x)-(1-p(x))\log_2{(1-q(x))}} H(p,q)=−p(x)log2q(x)−(1−p(x))log2(1−q(x))
KL散度,计算公式
D K L ( p ∣ ∣ q ) = H ( p , q ) − H ( p ) = ∑ i = 1 n p ( x i ) log 2 p ( x i ) q ( x i ) D_{KL}(p||q)=H(p,q)-H(p)=\sum_{i=1}^np(x_i)\log_2{\frac{p(x_i)}{q(x_i)}} DKL(p∣∣q)=H(p,q)−H(p)=i=1∑np(xi)log2q(xi)p(xi)
相关信息论的内容可以自行爬文,不是此文重点,这边举个例子说明为什么把除了wh的其他变量的Loss从MSE换到BCE。
我们把官方YOLOv3中COCO的80个类别问题简化一下,假设现在只有四类,猫,豹,狮子,老虎。对于一张训练图像来说,其中13x13中的一个点的某个anchor覆盖区域(一只猫)经过YOLOv3前向计算后得到 [ x , y , h , w , 0.9 , 0.2 , 0.7 , 0.3 , 0.05 ] [x,y,h,w,0.9,0.2,0.7,0.3,0.05] [x,y,h,w,0.9,0.2,0.7,0.3,0.05]概率预测,而对于这张图实际的预测结果应该是 [ x ^ , y ^ , w ^ , h ^ , 1.0 , 1.0 , 0 , 0 , 0 ] [\hat{x},\hat{y},\hat{w},\hat{h},1.0,1.0,0,0,0] [x^,y^,w^,h^,1.0,1.0,0,0,0],我们再简化一下问题,只看后面对于分类的预测 [ 0.2 , 0.7 , 0.3 , 0.05 ] [0.2,0.7,0.3,0.05] [0.2,0.7,0.3,0.05]和 [ 1.0 , 0 , 0 , 0 ] [1.0,0,0,0] [1.0,0,0,0]之间的差别(距离),那这个差别(距离)最简单的办法就是均方误差MSE,也就是用对应位相减平方求和,但为什么要使用交叉熵呢?
这里有一个重要的问题要说明,YOLOv3在分类上使用的是sigmoid函数而不是softmax函数,所以才能使用Binary Cross Entropy.换句话说就是其实这里所求的根本不是预测概率分布 [ 0.2 , 0.7 , 0.3 , 0.05 ] [0.2,0.7,0.3,0.05] [0.2,0.7,0.3,0.05]和真实概率分布 [ 1.0 , 0 , 0 , 0 ] [1.0,0,0,0] [1.0,0,0,0]之间的差别,而是[0.2]和[1.0]的距离,[0.7]&[0]的距离,[0.3]&[0]的距离,[0.05]&[0]的距离,因为每一位预测都是独立分布的!所以也可以看到其实预测概率和不为1.用作者的意思就是说yolo预测的是属于每一个独立分类的概率,也就是说如果分类里有动物,猫科和猫三类,那预测一只猫的框框这三类应该都为1.
为什么要说KL散度,我看很多文章直接写交叉熵是用来计算2个分布之间的差距的,其实不然。信息论中交叉熵的定义是这样说的(来自wiki):
In information theory, the cross entropy between two probability distributions p and q over the same underlying set of events measures the average number of bits needed to identify an event drawn from the set if a coding scheme used for the set is optimized for an estimated probability distribution q, rather than the true distribution p.
其实就是说,交叉熵是一个信息论的概念,描述平均花多少bit信息才能在给定真实分布p下消除估计分布q对于信息的不确定性,KL散度才是计算两个概率分布的差异。但为什么还是使用交叉熵?
1. 假设我的显存可以存下所有训练图片,那 H ( p ) H(p) H(p)就是一个常数,所以优化KL等价于优化交叉熵,因为 D K L ( p ∣ ∣ q ) = H ( p , q ) − H ( p ) D_{KL}(p||q)=H(p,q)-H(p) DKL(p∣∣q)=H(p,q)−H(p)。
2. 现实中我们不可能一次训练所有的样本,每个batch中的 H b a t c h ( p ) H_{batch}(p) Hbatch(p)和全部样本的 H ( p ) H(p) H(p) 是不一样的,所以会导致训练不稳定
那交叉熵比起均方差有什么优点呢?
一,逻辑回归使用MSE会容易导致梯度消失
二,逻辑回归使用Cross Entropy利于优化
梯度
一般预测概率都会把结果通过sigmoid函数或者softmax函数归一化到[0,1]之间
我们以YOLOv3最后sigmoid+Loss为例,我们简化一下问题,假设输入为x,权重为w
z = f ( x ) = w x + b z=f(x)=wx+b z=f(x)=wx+b
sigmoid函数:
a = σ ( z ) = 1 1 + e − z a=\sigma(z)=\frac{1}{1+e^{-z}} a=σ(z)=1+e−z1
其导数:
a ′ = σ ′ ( z ) = σ ( z ) ⋅ ( 1 − σ ( z ) ) a'=\sigma'(z)=\sigma(z)\cdot(1-\sigma(z)) a′=σ′(z)=σ(z)⋅(1−σ(z))
二元交叉熵重写一下:
h ( a ) = − y log 2 a − ( 1 − y ) log 2 ( 1 − a ) h(a)=-y\log_2{a-(1-y)\log_2{(1-a)}} h(a)=−ylog2a−(1−y)log2(1−a)
其一阶导数:
h ′ ( a ) = 1 − y 1 − a − y a h'(a)= \frac{1-y}{1-a}-\frac{y}{a} h′(a)=1−a1−y−ay
求梯度就是求 h h h对 w w w的导数(偏导数),即求
δ = ∂ h ∂ w \delta = \frac{\partial h}{\partial w} δ=∂w∂h
根据链式法则
δ = ∂ h ∂ w = ∂ h ∂ a ⋅ ∂ a ∂ z ⋅ ∂ z ∂ w = − ( y σ ( z ) − 1 − y 1 − σ ( z ) ) ⋅ σ ( z ) ( 1 − σ ( z ) ) ⋅ x \delta = \frac{\partial h}{\partial w}=\frac{\partial h}{\partial a}\cdot \frac{\partial a}{\partial z}\cdot \frac{\partial z}{\partial w}=-(\frac{y}{\sigma(z)}-\frac{1-y}{1-\sigma(z)})\cdot \sigma(z)(1-\sigma(z))\cdot x δ=∂w∂h=∂a∂h⋅∂z∂a⋅∂w∂z=−(σ(z)y−1−σ(z)1−y)⋅σ(z)(1−σ(z))⋅x
简化上式得到:
δ = ( σ ( z ) − y ) x \delta=(\sigma (z)-y)x δ=(σ(z)−y)x
当步长为 η \eta η时,学习率就等于:
η δ = η ( σ ( z ) − y ) x \eta\delta=\eta(\sigma (z)-y)x ηδ=η(σ(z)−y)x
这边我们可以看到,当 σ ( z ) \sigma(z) σ(z)接近 y y y的时候,就是预测相对比较准确的时候学习率降低,当两者相差越大,学习率越大,学习速度越快.比较符合我们对与学习的直观感受.
同样的道理,当sigmoid函数+MSE我们也能推导出其学习率:
η δ = η ( σ ( z ) − y ) σ ′ ( z ) x = η ( σ ( z ) − y ) σ ( z ) ( 1 − σ ( z ) ) x \eta\delta=\eta(\sigma(z)-y)\sigma'(z)x=\eta(\sigma(z)-y)\sigma(z)(1-\sigma(z))x ηδ=η(σ(z)−y)σ′(z)x=η(σ(z)−y)σ(z)(1−σ(z))x
这个式子看起来不太稳定,当 σ ( z ) \sigma(z) σ(z)较小接近0的时候我们会发现梯度接近0,就不太利于学习,不如sigmoid+bce的学习率来的漂亮,所以逻辑回归的时候才会普遍使用交叉熵来做差,但不代表mse不能用,现实中可以使用.
为什么w,h参数不用bce交叉熵来做Loss?
其实本身darknet的实现中x,y都使用的是bce来计算的,把xy用bce来计算,我们通过上面的推导也可以窥探一二,这不就是因为sigmoid+bce比较合得来么,另外作者也试过,逻辑回归xy效果较好,用mse会丢掉几个点.w,h因为是数值回归,有可能>1,所以不能使用交叉熵.
Loss函数中一堆 λ \lambda λ是什么鬼?
为了平衡各组不同的LOSS对最终的LOSS的影响,这个可以参考yolov1的paper里作者的这段话:
We used sum-squared error because it is easy to optimize, however it does not perfectly align with our goal of maximizing average precision. It weights localization errorequallywithclassificationerrorwhichmaynotbeideal. Also, in every image many grid cells do not contain any object. This pushes the “confidence” scores of those cells towards zero, often overpowering the gradient from cells that do contain objects. This can lead to model instability, causing training to diverge early on.
To remedy this, we increase the loss from bounding box coordinate predictions and decrease the loss from confidence predictions for boxes that don’t contain objects. We usetwoparameters, λcoord andλnoobj toaccomplishthis. We set λ c o o r d = 5 a n d λ n o o b j = 0.5 \lambda_{coord} = 5\space and\space \lambda_{noobj} = 0.5 λcoord=5 and λnoobj=0.5.
Sum-squared error also equally weights errors in large boxes and small boxes. Our error metric should reflect that small deviations in large boxes matter less than in small boxes. To partially address this we predict the square root of the bounding box width and height instead of the width and height directly.
作者说用开根号来平衡大框里小变化和小框里大变化带来的不平衡的问题,例如宽度同样变化10个像素,对于90变化10以及10变化10,作者想要凸显后者的差距要大于前者,所以如果不开根号,那两者的差都为10,看不出差别
90 + 10 − 90 = 0.5132 \sqrt{90+10}-\sqrt{90}=0.5132 90+10−90=0.5132
10 + 10 − 10 = 1.3099 \sqrt{10+10}-\sqrt{10}=1.3099 10+10−10=1.3099
发现同样的变化在小尺度上反馈较大,证明差距较大,一定程度上达到了作者的初衷.
为什么v3里没有使用?其实是一样的,这就要讲到YOLOv3预测坐标x,y,w,h的设计问题
预测坐标x,y,w,h的设计
们先来看作者是如何设计xywh的:
b x = σ ( t x ) + c x b y = σ ( t y ) + c y b w = p w e t w b h = p h e t h b_x=\sigma(t_x)+c_x \\ b_y=\sigma(t_y)+c_y \\ b_w=p_we^{t_w} \\ b_h=p_he^{t_h} bx=σ(tx)+cxby=σ(ty)+cybw=pwetwbh=pheth

所以其实刚刚我们全篇讲的xywh其实是这边的tx,ty,tw和th,通过上面4个式子才能转化成实际featuremap(网格,grid)上的预测,最后还要分别和anchor以及stride相乘才能得到相对于原图的大小.
为什么这么设计?
这么做的一个核心要素就是降低网络学习的难度,归一化,保持数值稳定.
要想为什么深度网络越深越难训练?打个比方在残差网络ResNet出来之前,一个25层隐层的神经网络能做到的事情一个50层的网络为什么连正常训练都办不到呢?不就是让50层的网络中的某些层学习到一些等价映射吗?可现实中网络太深就退化了,根本无法训练到理论上的等价映射.所以某种程度上我们人类能够帮助网络学习减少的工作量就直接在设计中就排除掉,不要对网络本身的学习能力太过依赖.
例如如果我们直接去预测bx和by,那会出现一个情况就是所有的网格,无论是13x13还是26x26,还是52x52中的每个点首先要通过GroundTruth学到一个内容就是自己这个cell相对于(0,0)的位置,不同的cell有不同的位置,还是举这张图的例子:
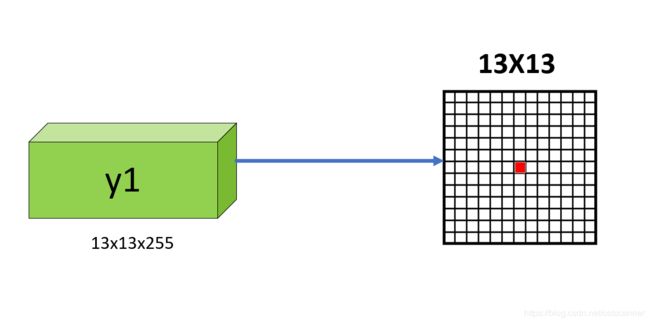
红点首先要学习到我预测的所有坐标都需要先加上(6,6),右下角的cell首先要学习到我所有预测的点都要加上(12,12),每个点都要学一个具体的值出来,不说数值回归容不容易优化的问题,结果就直接导致网络学习的负担加重了,而这完全可以通过作者的方法排除掉,每个点都无需知道自己所在的位置,所有的预测都是’相对’自身而言.这样一来,网络的负担一下子减轻了,每个点都只需要预测一个[0~1]的数值就可以了,归一化了.这个归一化,去量纲,正则化贯穿深度学习始终.
b w b_w bw和 b h b_h bh为什么要用幂函数来计算?
b x b_x bx, b y b_y by用sigmoid很容易理解,归[0,1],但为什么 b w b_w bw, b h b_h bh要用幂函数?很简单,指数函数的反函数就是幂函数嘛…
b w = p w e t w b_w=p_we^{t_w} bw=pwetw
这个公式反过来写:
t w = l o g ( b w p w ) = l o g b w − l o g p w t_w=log(\frac{b_w}{p_w})=log{b_w}-log{p_w} tw=log(pwbw)=logbw−logpw
这样一看原因可能就清楚了,尺度缩放到对数空间,利于稳定梯度.我们来推导一下:
l w = f m s e ( t w − t ^ w ) l_w=f_{mse}(t_w-\hat{t}_w) lw=fmse(tw−t^w)
求导
f m s e ′ = 2 ( t w − t ^ w ) f'_{mse}=2(t_w-\hat{t}_w) fmse′=2(tw−t^w)
根据链式法则:
δ = 2 ( t w − t ^ w ) x = 2 ( l o g b w − l o g b ^ w ) x \delta=2(t_w-\hat{t}_w)x=2(logb_w-log{\hat{b}_w})x δ=2(tw−t^w)x=2(logbw−logb^w)x
我们可以看到,如果不在对数空间 b w b_w bw和 b ^ w \hat{b}_w b^w的差值的变化范围就会比较大,例如[373,326]和[410,410]这两个bbox,w,h的差会来到37,84,但是log后,差值0.22,基本可以缩小到和其他loss的差不多的量级,which is around 1,这才不会因为这一项而使得容易梯度消失或爆炸.也可以看出 t w t h t_wt_h twth是数值回归,有可能会大于1这个事实.
另外,关于yolov1中使用开根号来平衡loss的问题,这边我们也来算一下是否能够得到平衡,计算一下(以自然对数底数为例):
log 100 − log 90 = 0.1054 log 20 − log 10 = 0.6931 \log{100}-\log{90}=0.1054 \\ \log{20}-\log{10}=0.6931 log100−log90=0.1054log20−log10=0.6931
也能达到类似的效果,其实这个问题从log图像就可以看出来:
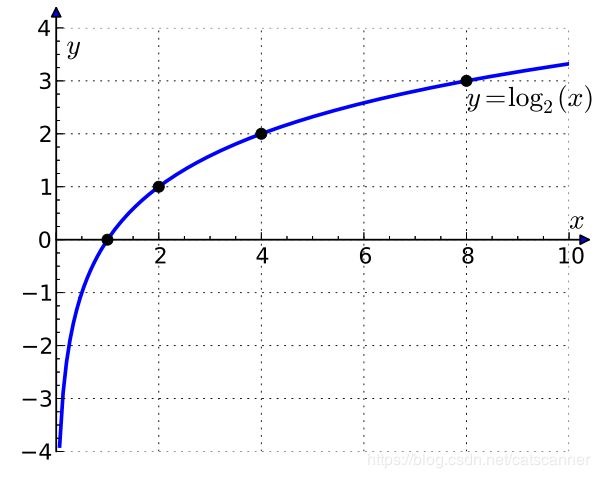
log函数梯度是随x增加单调递减的,求导就可得出 1 x log a \frac{1}{x\log{a}} xloga1,所以相同的x差值在y轴方向上是不断被压缩的.
注意指数函数 l o g x logx logx中 x x x不为0
有时候训练网络会遇到NaN的问题,有可能是计算loss或者反向传播中log函数中x为0导致的,所以在计算具体的log的时候一般会在log函数里加一个极小的值,例如上述pytorch实现中,计算 t w t_w tw和 t h t_h th的log函数中都加了一个小值 1 0 − 16 10^{-16} 10−16:
tw[b, best_n, gj, gi] = math.log(gw/anchors[best_n][0] + 1e-16)
th[b, best_n, gj, gi] = math.log(gh/anchors[best_n][1] + 1e-16)
如何理解“GroundTruth中心点落在哪个格子就由哪个格子对物体进行预测”这句话?
我们来看v1原文中是怎么说的:
YOLO predicts multiple bounding boxes per grid cell. At training time we only want one bounding box predictor to be responsible for each object. We assign one predictor to be “responsible” for predicting an object based on which prediction has the highest current IOU with the ground truth. This leads to specialization between the bounding box predictors. Each predictor gets better at predicting certain sizes, aspect ratios, or classes of object, improving overall recall.
原文说的已经比较清楚,v3也是一样,其实就是把每张样本图中的框框中心点分别映射到13x13,26x26,52x52上的某个cell,然后这三个cell里再分别找分配给自己的三个anchor哪个与框框IOU最高就用这个anchor来进行操作.
四,YOLOv3 Network Structure 网络结构
Darknet53
先来看论文里的图:

一个真实的pytorch版本yolov3 model图,模型转换成ONNX用netron画的,由于图太长,我切成4段,首位相连即可
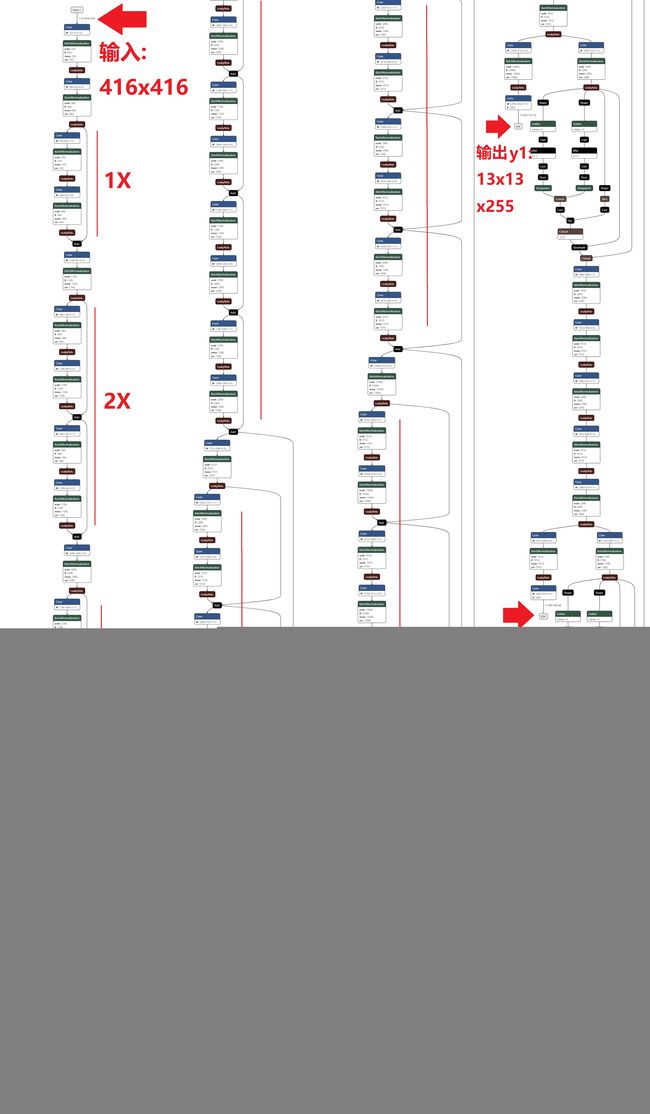
上图就一目了然了,几个重点放大一下:

上图的一个结构就是一个Res单元,包括两组(卷积层,BatchNormalization层,激活层ReLU)
为何叫53?
paper中结构图的左侧一列1x,2x,8x就是指的有多少个这样的Res单元相连.一个Res单元中有2个卷积层,所以darknet53就是这个网络有多少卷积层,算一下
2 + R e s 单 元 1 x + 1 + R e s 单 元 2 x + 1 + R e s 单 元 8 x + 1 + R e s 单 元 8 x + 1 + R e s 单 元 4 x + 1 = 2 + 1 ∗ 2 + 1 + 2 ∗ 2 + 1 + 8 ∗ 2 + 1 + 8 ∗ 2 + 1 + 4 ∗ 2 + 1 = 53 2+Res单元1x+1+Res单元2x+1+Res单元8x+1+Res单元8x+1+Res单元4x+1\\ =2+1*2+1+2*2+1+8*2+1+8*2+1+4*2+1\\ =53 2+Res单元1x+1+Res单元2x+1+Res单元8x+1+Res单元8x+1+Res单元4x+1=2+1∗2+1+2∗2+1+8∗2+1+8∗2+1+4∗2+1=53
这就是53的由来,指的是darknet的backbone.
关于upsampling
我们来看一下图上的上采样层

就是把小尺寸的feature map通过上采样变成和要相加的shortcut一致,因为shortcut是从浅层网络来的,浅层的feature map的空间维度较大,所以要把高层的feature map通过nearest近邻算法或者其他双线性,三线性方法插值变大尺寸一致后就可以和浅层的feature map相加了.
netron的conv层怎么看?
举个例子,如图

如图,原图<3x416x416>通过一个<32x3x3x3>的卷积后输出怎么算?
这边<32x3x3x3>中是:<卷积后的通道维度x原图的通道维度x宽x高>这样就容易理解了,所以strides是2,kernel size是3,结果其实就是<32x208x208>,都看到这里了你告诉我卷积不会算?!
为什么神经网络可以用来做位置检测?
从使用神经网络进行分类到目标检测经历了一段有趣的过程,RCNN到Fast RCNN到Faster RCNN,YOLO也从v1发展到了v3,我们常常用分类网络的Backbone也当作Detection网络的Backbone来使用,**可以进行这样使用的原因是卷积网络的Feature map与其上的待检测物体特征位置强相关。
About ReceptiveField 关于感受野
在52*52的feature map上,每个1*1的像素对应原图的8*8(416除以52=8)的区域,或称感受野,感受域,26*26的map上每个1*1的像素对应原图16*16的区域,在13*13的map上每个1*1的像素对应原图32*32的区域。因为此网络是FCN,也就是全卷积神经网络,通常简单来理解要让待识别物体在最后的feature map上能留下至少1个1*1的点,物体在原图上最少要有8*8个像素。
五,Yolov3 Paper 论文拾遗
关于直接预测xy相对与图像原始wh的offset的尝试
Anchor box x,y offset predictions. We tried using the normal anchor box prediction mechanism where you predict the x,y offset as a multiple of the box width or height using a linear activation. We found this formulation decreased model stability and didn’t work very well.
当成线性回归问题结果不是很好
关于xy的loss使用线性回归还是逻辑回归的问题
Linear x,y predictions instead of logistic. We tried using a linear activation to directly predict the x,y offset instead of the logistic activation. This led to a couple point drop in mAP.
这个问题我们上面已经讨论过了
关于Focal Loss在YOLOv3的有效性问题
作者是这样写的:
Focal loss. We tried using focal loss. It dropped our mAP about 2 points. YOLOv3 may already be robust to the problem focal loss is trying to solve because it has separate objectness predictions and conditional class predictions. Thus for most examples there is no loss from the class predictions? Or something? We aren’t totally sure.
知乎是这样讨论的:为什么 YOLOv3 用了 Focal Loss 后 mAP 反而掉了?大概的原因大家基本都讨论到了.
双IOU阈值法的有效性问题
Dual IOU thresholds and truth assignment. Faster RCNN uses two IOU thresholds during training. If a prediction overlaps the ground truth by .7 it is as a positive example,by [.3−.7] it is ignored,less than.3 for all ground truth objects it is a negative example. We tried a similar strategy but couldn’t get good results.
结论是不work
作者对0.3的IOU指标颇为不满
YOLOv3 is a good detector. It’s fast, it’s accurate. It’s not as great on the COCO average AP between .5 and .95 IOU metric. But it’s very good on the old detection metric of .5 IOU. Why did we switch metrics anyway? The original COCO paper just has this cryptic sentence: “A full discussion of evaluation metrics will be added once the evaluation server is complete”. Russakovsky et al report that that humans have a hard time distinguishing an IOU of .3 from .5! “Training humans to visually inspect a bounding box with IOU of 0.3 and distinguish it from one with IOU 0.5 is surprisingly difficult.” [18] If humans have a hard time telling the difference, how much does it matter?
认为人都分不清楚机器何德何能?
作者对使用这些detector进行军事等用途表示担忧
But maybe a better question is: “What are we going to do with these detectors now that we have them?” A lot of the people doing this research are at Google and Facebook. I guess at least we know the technology is in good hands and definitely won’t be used to harvest your personal information and sell it to… wait, you’re saying that’s exactly what it will be used for?? Oh…
Well the other people heavily funding vision research are the military and they’ve never done anything horrible like killing lots of people with new technology oh wait…
I have a lot of hope that most of the people using computer vision are just doing happy, good stuff with it, like counting the number of zebras in a national park [13], or tracking their cat as it wanders around their house[19]. But computer vision is already being put to questionable use and as researchers we have a responsibility to at least consider the harm our work might be doing and think of ways to mitigate it. We owe the world that much.
作者的确很逗,希望如作者所愿,所有的detector都用来数数农场里的斑马或者追踪一下自家的喵咪看看他们成天都在干什么,也希望工业界不要用AI来作恶。
另外作者的Introduction写的也十分幽默
Sometimes you just kinda phone it in for a year, you know? I didn’t do a whole lot of research this year. Spent a lot of time on Twitter. Played around with GANs a little. I had a little momentum left over from last year [12] [1]; I managed to make some improvements to YOLO. But, honestly, nothing like super interesting, just a bunch of small changes that make it better. I also helped out with other people’s research a little. Actually, that’s what brings us here today. We have a camera-ready deadline [4] and we need to cite some of the random updates I made to YOLO but we don’t have a source. So get ready for a TECH REPORT! The great thing about tech reports is that they don’t need intros, y’all know why we’re here. So the end of this introduction will signpost for the rest of the paper. First we’ll tell you what the deal is withYOLOv3. Then we’ll tell you how we do. We’ll also tell you about some things we tried that didn’t work. Finally we’ll contemplate what this all means.
大意就是作者一年里把大部分时间都花在了玩twitter上,又玩了玩GAN,根本没有时间做research,无奈deadline太紧,只能随意给YOLO加了点佐料就成了YOLOv3… 我信你个鬼!
六,后记
假期即将结束,发现代码,训练还有指标还没来得及详细写,但来日方长,希望病毒早日过去,大家的生活都能尽快回到正轨上。
catscanner
2020.2.2


