Flink 1.10.0基于Yarn Cluster部署
目录
- 1.环境准备
- 2.集群规划
- 3.用户和组
- 4.SSH免密登陆
- 5.集群远程分发,同步脚本
- 6.安装JDK
- 7.安装zookeeper
- 8.部署hadoop HA集群
- 9.部署Flink on yarn集群
- 10.集群开机自启
1.环境准备
软件版本:

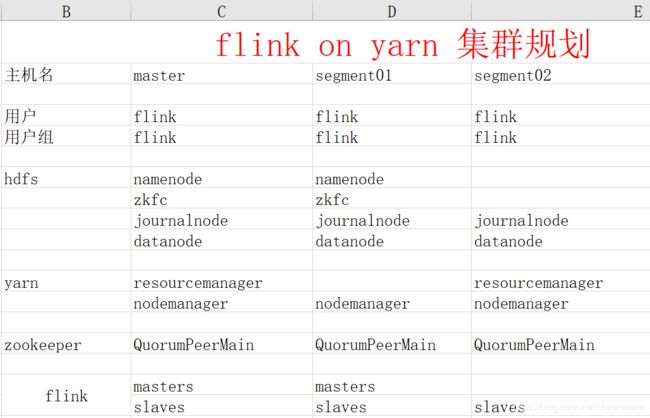
2.集群规划
3.用户和组
1)用户:flink 组:flink
[root@master ~]# useradd flink
[root@master ~]# passwd flink
Changing password for user flink.
New password:
BAD PASSWORD: it does not contain enough DIFFERENT characters
BAD PASSWORD: is too simple
Retype new password:
passwd: all authentication tokens updated successfully.
[root@master ~]# groupadd flink
groupadd: group 'flink' already exists
2)配置sudoer权限
[root@master ~]# vim /etc/sudoers

4.SSH免密登陆
1)生成公钥和私钥
[flink@master ~]$ ssh-keygen -t rsa
然后敲(三个回车),就会生成两个文件id_rsa(私钥)、id_rsa.pub(公钥)
[flink@master ~]$ ssh-keygen -t rsa
Generating public/private rsa key pair.
Enter file in which to save the key (/home/flink/.ssh/id_rsa):
Created directory '/home/flink/.ssh'.
Enter passphrase (empty for no passphrase):
Enter same passphrase again:
Your identification has been saved in /home/flink/.ssh/id_rsa.
Your public key has been saved in /home/flink/.ssh/id_rsa.pub.
The key fingerprint is:
e3:f4:48:2a:60:c9:43:b1:fe:22:fb:0a:25:58:42:b6 flink@master
The key's randomart image is:
+--[ RSA 2048]----+
| o.              |
|o .o             |
|.E+              |
|.* .             |
|o O     S        |
| + +   = +       |
|o . o . o .      |
|.o . .           |
|oo.              |
+-----------------+
[flink@master ~]$ cd .ssh
[flink@master .ssh]$ ls
id_rsa  id_rsa.pub
[flink@master .ssh]$
2)将公钥拷贝到要免密登录的目标机器上
[flink@master .ssh]$ ssh-copy-id master
[flink@master .ssh]$ ssh-copy-id segment01
[flink@master .ssh]$ ssh-copy-id segment02
3)在另外两个节点重复同样的操作
5.集群远程分发,同步脚本
1)在flink目录下创建bin目录,并在bin目录下创建文件xsync ,xcall.sh
[flink@master ~]$ mkdir bin
[flink@master ~]$ cd bin/
[flink@master bin]$ vim xsync
#!/bin/bash
#1 获取输入参数个数,如果没有参数,直接退出
pcount=$#
if((pcount==0)); then
echo no args;
exit;
fi

#2 获取文件名称
p1=$1
fname=`basename $p1`
echo fname=$fname

#3 获取上级目录到绝对路径
pdir=`cd -P $(dirname $p1); pwd`
echo pdir=$pdir

#4 获取当前用户名称
user=`whoami`

#5  发送到集群其它主机
    echo ------------------- master --------------
	rsync -av $pdir/$fname $user@master:$pdir
	echo ------------------- segment01 --------------
	rsync -av $pdir/$fname $user@segment01:$pdir
	echo ------------------- segment02 --------------
	rsync -av $pdir/$fname $user@segment02:$pdir
[flink@master bin]$ vim xcall.sh
#! /bin/bash

for i in master segment01 segment02
do
        echo --------- $i ----------
        ssh $i "$*"
done
2)修改脚本 xsync ,xcall.sh 具有执行权限
[flink@master bin]$ chmod 777 xsync
[flink@master bin]$ chmod 777 xcall.sh
3)将脚本放到 /usr/local/bin 目录下
[flink@master bin]$ sudo cp xcall.sh /usr/local/bin/
[flink@master bin]$ sudo cp xsync /usr/local/bin/
4)将脚本同步到其它节点
[flink@master ~]$ su root
[root@master flink]# cd /usr/local/
[root@master local]# xsync bin/
fname=bin
pdir=/usr/local
------------------- master --------------
sending incremental file list

sent 73 bytes  received 13 bytes  172.00 bytes/sec
total size is 765  speedup is 8.90
------------------- segment01 --------------
sending incremental file list
bin/
bin/xcall.sh
bin/xsync

sent 927 bytes  received 54 bytes  1962.00 bytes/sec
total size is 765  speedup is 0.78
------------------- segment02 --------------
sending incremental file list
bin/
bin/xcall.sh
bin/xsync

sent 927 bytes  received 54 bytes  1962.00 bytes/sec
total size is 765  speedup is 0.78
6.安装JDK
1)/opt目录下创建module和software文件夹
在三台机器上修改/opt 用户:用户组
[root@master ~]# chown flink:flink /opt/
[flink@master opt]$ mkdir module
[flink@master opt]$ mkdir software
2)所需软件导入到master的/opt/software目录下
![]()
3)解压JDK到/opt/module目录下
[flink@master software]$ tar -xzvf jdk-8u241-linux-x64.tar.gz -C /opt/module/
4)配置JDK环境变量
[root@master module]# vi /etc/profile
在profile文件末尾添加JDK路径
#JAVA_HOME
export JAVA_HOME=/opt/module/jdk1.8.0_241
export PATH=${JAVA_HOME}/bin:${PATH}
让修改后的文件生效
[root@master module]# source /etc/profile
5)测试JDK是否安装成功
[root@master module]# java -version
java version "1.8.0_241"
6)将master中的JDK和环境变量分发到segment01、segment02两台主机
[root@master module]# xsync /etc/profile
[flink@master opt]$ xsync module/
[flink@segment01 ~]$ source /etc/profile
[flink@segment02 ~]$ source /etc/profile
7)xcall.sh脚本关于jps 命令
[flink@master opt]$ xcall.sh jps
--------- master ----------
bash: jps: command not found
--------- segment01 ----------
4740 Jps
--------- segment02 ----------
bash: jps: command not found
这是因为jps并非是shell中的自有命令,所以需要稍微处理一下
分别在三台机器中, 添加软链接
[flink@master bin]$ sudo ln -s /opt/module/jdk1.8.0_241/bin/jps /usr/local/bin/jps
[flink@master ~]$ xcall.sh jps
--------- master ----------
5062 Jps
--------- segment01 ----------
4891 Jps
--------- segment02 ----------
4653 Jps
7.安装zookeeper
1)解压
[flink@master software]$ tar -xzvf zookeeper-3.4.10.tar.gz -C /opt/module/
2)三个节点配置环境变量
[flink@master module]$ sudo vim /etc/profile
#ZOOKEEPER_HOME
export ZOOKEEPER_HOME=/opt/module/zookeeper-3.4.10
export PATH=$PATH:$ZOOKEEPER_HOME/bin
[flink@master module]$ source /etc/profile
3)修改zoo.cfg文件
[flink@master conf]$ mv zoo_sample.cfg zoo.cfg
[flink@master conf]$ vim zoo.cfg
# The number of milliseconds of each tick
tickTime=2000
# The number of ticks that the initial
# synchronization phase can take
initLimit=10
# The number of milliseconds of each tick
tickTime=2000
# The number of ticks that the initial
# synchronization phase can take
initLimit=10
# The number of ticks that can pass between
# sending a request and getting an acknowledgement
syncLimit=5
# the directory where the snapshot is stored.
# do not use /tmp for storage, /tmp here is just
# example sakes.
dataDir=/home/flink/data/zookeeperdata
# the port at which the clients will connect
clientPort=2181
# the maximum number of client connections.
# increase this if you need to handle more clients
#maxClientCnxns=60
#
# Be sure to read the maintenance section of the
# administrator guide before turning on autopurge.
#
# http://zookeeper.apache.org/doc/current/zookeeperAdmin.html#sc_maintenance
#
# The number of snapshots to retain in dataDir
#autopurge.snapRetainCount=3
# Purge task interval in hours
# Set to "0" to disable auto purge feature
#autopurge.purgeInterval=1
server.1=master:2888:3888
server.2=segment01:2888:3888
server.3=segment02:2888:3888
4)在三个节点上创建myid文件 /home/flink/data/zookeeperdata目录下创建
master ----------1
segment01-----2
segment02-----3
[flink@master zookeeperdata]$ pwd
/home/flink/data/zookeeperdata
[flink@master zookeeperdata]$ vim myid
1
5)同步zookeeper
[flink@master module]$ xsync zookeeper-3.4.10/
6)启动
[flink@master module]$ zkServer.sh
7)验证

8.部署hadoop HA集群
1)解压
[flink@master software]$ tar -xzvf hadoop-2.8.3.tar.gz -C /opt/module/
2)配置环境变量
[flink@master module]$ sudo vim /etc/profile
##HADOOP_HOME
export HADOOP_HOME=/opt/module/hadoop-2.8.3
export PATH=$PATH:$HADOOP_HOME/bin
export PATH=$PATH:$HADOOP_HOME/sbin
[flink@master module]$ source /etc/profile
3)修改配置文件
hadoop-env.sh
core-site.xml
hdfs-site.xml
mapred-site.xml
yarn-site.xml
slaves
[flink@master module]$ cd hadoop-2.8.3/etc/hadoop/
[flink@master hadoop]$ vim hadoop-env.sh
export JAVA_HOME=/opt/module/jdk1.8.0_241
[flink@master hadoop]$ vim core-site.xml

<!-- 指定 hdfs 的 访问入口 namenode访问入口 完全分布式 hdfs://master:9000
          高可用中两个namenode 这里配置的是两个namenode nameservice 组名  yantian hdfs://yantian-->

fs.defaultFS</name>
hdfs://yantian/</value>
</property>

<!-- 指定 hadoop 数据存储目录 -->

hadoop.tmp.dir</name>
/home/flink/data/hadoopdata/</value>
</property>

<!-- 指定 zookeeper 集群访问地址 -->

ha.zookeeper.quorum</name>
master:2181,segment01:2181,segment02:2181</value>
</property>
</configuration>
[flink@master hadoop]$ vim hdfs-site.xml

<!-- 指定副本数 -->

 dfs.replication</name>
 2</value>
</property>

<!--指定 hdfs 的 nameservice 为 yantian,需要和 core-site.xml 中保持一致-->

 dfs.nameservices</name>
 yantian</value>
</property>

<!-- yantian 下面有两个 NameNode,分别是 nn1,nn2 -->

 dfs.ha.namenodes.yantian</name>
 nn1,nn2</value>
</property>

<!-- nn1 的 RPC 通信地址 -->

 dfs.namenode.rpc-address.yantian.nn1</name>
 master:8020</value>
</property>

<!-- nn1 的 http 通信地址 -->

 dfs.namenode.http-address.yantian.nn1</name>
 master:50070</value>
</property>

<!-- nn2 的 RPC 通信地址 -->

 dfs.namenode.rpc-address.yantian.nn2</name>
 segment01:8020</value>
</property>

<!-- nn2 的 http 通信地址 -->

 dfs.namenode.http-address.yantian.nn2</name>
 segment01:50070</value>
</property>

<!-- 指定 NameNode 的 edits 元数据在 JournalNode 上的存放位置 QJM -->

 dfs.namenode.shared.edits.dir</name>
qjournal://master:8485;segment01:8485;segment02:8485/yantian</value>
</property>

<!-- 指定 JournalNode 在本地磁盘存放数据的位置 -->

 dfs.journalnode.edits.dir</name>
 /home/flink/data/hadoopdata/journaldata</value>
</property>

<!-- 开启 NameNode 失败自动切换 -->

 dfs.ha.automatic-failover.enabled</name>
 true</value>
</property>

<!-- 配置失败自动切换实现方式 -->
<!-- 此处配置在安装的时候切记检查不要换行-->

 dfs.client.failover.proxy.provider.yantian</name>
org.apache.hadoop.hdfs.server.namenode.ha.ConfiguredFailoverProxyProvider</value>
</property>

<!-- 配置隔离机制方法,多个机制用换行分割,即每个机制暂用一行-->

 dfs.ha.fencing.methods</name>

 sshfence
 shell(/bin/true)
 </value>
</property>

<!-- 使用 sshfence 隔离机制时需要 ssh 免登陆 -->

 dfs.ha.fencing.ssh.private-key-files</name>
 /home/flink/.ssh/id_rsa</value>
</property>

<!-- 配置 sshfence 隔离机制超时时间 -->

 dfs.ha.fencing.ssh.connect-timeout</name>
 30000</value>
</property>
</configuration>
[flink@master hadoop]$ mv mapred-site.xml.template mapred-site.xml
[flink@master hadoop]$ vim mapred-site.xml

<!-- 指定 mr 框架为 yarn 方式 -->

 mapreduce.framework.name</name>
 yarn</value>
</property>

<!-- 设置 mapreduce 的历史服务器地址和端口号 -->

mapreduce.jobhistory.address</name>
segment01:10020</value>
</property>
<!-- mapreduce 历史服务器的 web 访问地址 -->

mapreduce.jobhistory.webapp.address</name>
segment01:19888</value>
</property>
</configuration>
[flink@master hadoop]$ vim yarn-site.xml


<!-- Site specific YARN configuration properties -->
<!-- Site specific YARN configuration properties -->
<!-- 开启 RM 高可用 -->

 yarn.resourcemanager.ha.enabled</name>
 true</value>
</property>
<!-- 指定 RM 的 cluster id -->

 yarn.resourcemanager.cluster-id</name>
 yarn_yantian</value>
</property>
<!-- 指定 RM 的名字 -->

 yarn.resourcemanager.ha.rm-ids</name>
 rm1,rm2</value>
</property>

<!-- 分别指定 RM 的地址 -->

 yarn.resourcemanager.hostname.rm1</name>
 master</value>
</property>

 yarn.resourcemanager.hostname.rm2</name>
 segment02</value>
</property>
<!-- 指定 zk 集群地址 -->

 yarn.resourcemanager.zk-address</name>
 master:2181,segment01:2181,segment02:2181</value>
</property>

<!-- 要运行 MapReduce 程序必须配置的附属服务 -->

 yarn.nodemanager.aux-services</name>
 mapreduce_shuffle</value>
</property>

<!-- 开启 YARN 集群的日志聚合功能 -->

 yarn.log-aggregation-enable</name>
 true</value>
</property>

<!-- YARN 集群的聚合日志最长保留时长 -->

 yarn.log-aggregation.retain-seconds</name>
 86400</value>
</property>

<!-- 启用自动恢复 -->

 yarn.resourcemanager.recovery.enabled</name>
 true</value>
</property>

    yarn.nodemanager.pmem-check-enabled</name>
    false</value>
</property>

    yarn.nodemanager.vmem-check-enabled</name>
    false</value>
</property>
<!-- 制定 resourcemanager 的状态信息存储在 zookeeper 集群上-->

 yarn.resourcemanager.store.class</name>
org.apache.hadoop.yarn.server.resourcemanager.recovery.ZKRMStateStore</value>
</property>

yarn.resourcemanager.am.max-attempts</name>
4</value>
The maximum number of application master execution attempts.</description>
</property>

</configuration>
[flink@master hadoop]$ vim slaves
master
segment01
segment02
4)同步文件
[flink@master module]$ xsync hadoop-2.8.3/
[flink@master module]$ source /etc/profile
[flink@master module]$ hadoop version
Hadoop 2.8.3
5)下面步骤按照顺序执行
1)三台节点启动zk
zkServer.sh start
2)启动journalnode QJM
3台分别启动
hadoop-daemon.sh start journalnode
3)格式化namenode 选择一个namenode节点
master节点
hadoop namenode -format
成功: has been successfully formatted.
4)将master的元数据 远程发送到segment01另一个namenode
scp -r /home/flink/data/hadoopdata/dfs/ segment01:/home/flink/data/hadoopdata/
5)格式化zkfc
和zookeeper通信 在zookeeper中创建存储namenode状态信息的znode
在一个namenode上执行即可
hdfs zkfc -formatZK
Successfully created /hadoop-ha/yantian in ZK
6)启动集群顺序

7)验证
[flink@master hadoopdata]$ xcall.sh jps
--------- master ----------
7840 Jps
7346 ResourceManager
7459 NodeManager
6788 DataNode
6666 NameNode
7018 JournalNode
7228 DFSZKFailoverController
4847 QuorumPeerMain
--------- segment01 ----------
6180 Jps
5748 JournalNode
4678 QuorumPeerMain
5638 DataNode
5978 NodeManager
5884 DFSZKFailoverController
5550 NameNode
--------- segment02 ----------
5760 NodeManager
4672 QuorumPeerMain
5844 ResourceManager
5654 JournalNode
6024 Jps
5544 DataNode
9.部署Flink on yarn集群
1)解压
[flink@master software]$ tar -xzvf flink-1.10.0-bin-scala_2.11.tgz -C /opt/module/
2)添加hadoop的依赖jar包到lib目录下
[flink@master software]$ cp flink-shaded-hadoop-2-uber-2.8.3-10.0.jar /opt/module/flink-1.10.0/lib/

3)配置环境变量
[flink@master lib]$ sudo vim /etc/profile
#FLINK_HOME
export FLINK_HOME=/opt/module/flink-1.10.0
export PATH=$PATH:$FLINK_HOME/bin
export HADOOP_CONF_DIR=/opt/module/hadoop-2.8.3/etc/hadoop
[flink@master lib]$ source /etc/profile
4)配置文件
flink-conf.yaml
masters
slaves
zoo.cfg
[flink@master conf]$ vim flink-conf.yaml
################################################################################
#  Licensed to the Apache Software Foundation (ASF) under one
#  or more contributor license agreements.  See the NOTICE file
#  distributed with this work for additional information
#  regarding copyright ownership.  The ASF licenses this file
#  to you under the Apache License, Version 2.0 (the
#  "License"); you may not use this file except in compliance
#  with the License.  You may obtain a copy of the License at
#
#      http://www.apache.org/licenses/LICENSE-2.0
#
#  Unless required by applicable law or agreed to in writing, software
#  distributed under the License is distributed on an "AS IS" BASIS,
#  WITHOUT WARRANTIES OR CONDITIONS OF ANY KIND, either express or implied.
#  See the License for the specific language governing permissions and
# limitations under the License.
################################################################################


#==============================================================================
# Common
#==============================================================================

# The external address of the host on which the JobManager runs and can be
# by specifying the --host  parameter of the bin/jobmanager.sh executable.
# In high availability mode, if you use the bin/start-cluster.sh script and setup
# the conf/masters file, this will be taken care of automatically. Yarn/Mesos

jobmanager.rpc.address: master

# The RPC port where the JobManager is reachable.

jobmanager.rpc.port: 6123


# The heap size for the JobManager JVM

jobmanager.heap.size: 1024m


# The total process memory size for the TaskManager.
#

taskmanager.memory.process.size: 1568m

# It is not recommended to set both 'taskmanager.memory.process.size' and Flink memory.
#
# taskmanager.memory.flink.size: 1280m

# The number of task slots that each TaskManager offers. Each slot runs one parallel pipeline.

taskmanager.numberOfTaskSlots: 1

# The parallelism used for programs that did not specify and other parallelism.

parallelism.default: 1

# The default file system scheme and authority.
#
# By default file paths without scheme are interpreted relative to the local
# root file system 'file:///'. Use this to override the default and interpret
# relative paths relative to a different file system,
# for example 'hdfs://mynamenode:12345'
#
# fs.default-scheme

#==============================================================================
# High Availability
# The high-availability mode. Possible options are 'NONE' or 'zookeeper'.
#
high-availability: zookeeper

# The path where metadata for master recovery is persisted. While ZooKeeper stores
# the small ground truth for checkpoint and leader election, this location stores
# the larger objects, like persisted dataflow graphs.
#
# Must be a durable file system that is accessible from all nodes
# (like HDFS, S3, Ceph, nfs, ...)
#
high-availability.storageDir: hdfs://yantian/flink/recovery

# The list of ZooKeeper quorum peers that coordinate the high-availability
# setup. This must be a list of the form:
# "host1:clientPort,host2:clientPort,..." (default clientPort: 2181)
#
high-availability.zookeeper.quorum: master:2181,segment01:2181,segment02:2181


# It can be either "creator" (ZOO_CREATE_ALL_ACL) or "open" (ZOO_OPEN_ACL_UNSAFE)
# The default value is "open" and it can be changed to "creator" if ZK security is enabled
#
# high-availability.zookeeper.client.acl: open
high-availability.zookeeper.path.root: /flink
#==============================================================================
# Fault tolerance and checkpointing
#==============================================================================

# The backend that will be used to store operator state checkpoints if
# checkpointing is enabled.
# .
#
# state.backend: filesystem

# Directory for checkpoints filesystem, when using any of the default bundled
# state backends.
#
state.checkpoints.dir:  hdfs://yantian/flink/checkpoints

# Default target directory for savepoints, optional.
#
state.savepoints.dir: hdfs://yantian/flink/savepoints

# Flag to enable/disable incremental checkpoints for backends that
# support incremental checkpoints (like the RocksDB state backend).
#
# state.backend.incremental: false

# The failover strategy, i.e., how the job computation recovers from task failures.
# Only restart tasks that may have been affected by the task failure, which typically includes

jobmanager.execution.failover-strategy: region

#==============================================================================
# Rest & web frontend
#==============================================================================

# The port to which the REST client connects to. If rest.bind-port has
# not been specified, then the server will bind to this port as well.
#
#rest.port: 8081

# The address to which the REST client will connect to
#
#rest.address: 0.0.0.0

# Port range for the REST and web server to bind to.
#
#rest.bind-port: 8080-8090

# The address that the REST & web server binds to
#
#rest.bind-address: 0.0.0.0

# Flag to specify whether job submission is enabled from the web-based
# runtime monitor. Uncomment to disable.

#web.submit.enable: false

#==============================================================================
# Advanced
#==============================================================================

# Override the directories for temporary files. If not specified, the
# system-specific Java temporary directory (java.io.tmpdir property) is taken.
#
# For framework setups on Yarn or Mesos, Flink will automatically pick up the
# containers' temp directories without any need for configuration.
#
# Add a delimited list for multiple directories, using the system directory
# delimiter (colon ':' on unix) or a comma, e.g.:
#     /data1/tmp:/data2/tmp:/data3/tmp
#
# Note: Each directory entry is read from and written to by a different I/O
# thread. You can include the same directory multiple times in order to create
# multiple I/O threads against that directory. This is for example relevant for
# high-throughput RAIDs.
#
# io.tmp.dirs: /tmp
#需要手动创建,否则启动不了集群
io.tmp.dirs: /home/flink/data/flinkdata/tmp
env.log.dir: /home/flink/data/flinkdata/logs

# The classloading resolve order. Possible values are 'child-first' (Flink's default)
# and 'parent-first' (Java's default).
#
# Child first classloading allows users to use different dependency/library
# versions in their application than those in the classpath. Switching back
# to 'parent-first' may help with debugging dependency issues.
#
# classloader.resolve-order: child-first

# The amount of memory going to the network stack. These numbers usually need
# no tuning. Adjusting them may be necessary in case of an "Insufficient number
# of network buffers" error. The default min is 64MB, the default max is 1GB.
#
# taskmanager.memory.network.fraction: 0.1
# taskmanager.memory.network.min: 64mb
# taskmanager.memory.network.max: 1gb

#==============================================================================
# Flink Cluster Security Configuration
#==============================================================================

# Kerberos authentication for various components - Hadoop, ZooKeeper, and connectors -
# may be enabled in four steps:
# 1. configure the local krb5.conf file
# 2. provide Kerberos credentials (either a keytab or a ticket cache w/ kinit)
# 3. make the credentials available to various JAAS login contexts
# 4. configure the connector to use JAAS/SASL

# The below configure how Kerberos credentials are provided. A keytab will be used instead of
# a ticket cache if the keytab path and principal are set.

# security.kerberos.login.use-ticket-cache: true
# security.kerberos.login.keytab: /path/to/kerberos/keytab
# security.kerberos.login.principal: flink-user

# The configuration below defines which JAAS login contexts

# security.kerberos.login.contexts: Client,KafkaClient

#==============================================================================
# ZK Security Configuration
#==============================================================================

# Below configurations are applicable if ZK ensemble is configured for security

# Override below configuration to provide custom ZK service name if configured
# zookeeper.sasl.service-name: zookeeper

# The configuration below must match one of the values set in "security.kerberos.login.contexts"
# zookeeper.sasl.login-context-name: Client

#==============================================================================
# HistoryServer
#==============================================================================

# The HistoryServer is started and stopped via bin/historyserver.sh (start|stop)

# Directory to upload completed jobs to. Add this directory to the list of
# monitored directories of the HistoryServer as well (see below).
jobmanager.archive.fs.dir: hdfs://yantian/flink/completed_jobs/

# The address under which the web-based HistoryServer listens.
historyserver.web.address: 0.0.0.0

# The port under which the web-based HistoryServer listens.
historyserver.web.port: 8082

# Comma separated list of directories to monitor for completed jobs.
historyserver.archive.fs.dir: hdfs://yantian/flink/completed_jobs/

# Interval in milliseconds for refreshing the monitored directories.
historyserver.archive.fs.refresh-interval: 10000
[flink@master conf]$ vim masters
master:8081
segment01:8081
[flink@master conf]$ vim slaves
master
segment01
segment02
[flink@master conf]$ vim zoo.cfg
# The number of milliseconds of each tick
tickTime=2000

# The number of ticks that the initial  synchronization phase can take
initLimit=10

# The number of ticks that can pass between  sending a request and getting an acknowledgement
syncLimit=5

# The directory where the snapshot is stored.
#flinkZK 大写的ZK
dataDir=/home/flink/data/flinkZK/dataDir
dataLogDir=/home/flink/data/flinkZK/dataLogDir

# The port at which the clients will connect
clientPort=2181

# ZooKeeper quorum peers
server.1=master:2888:3888
server.2=segment01:2888:3888
server.3=segment02:2888:3888
# server.2=host:peer-port:leader-port
5)启动集群
[flink@master module]$ start-cluster.sh
Starting HA cluster with 2 masters.
Starting standalonesession daemon on host master.
Starting standalonesession daemon on host segment01.
Starting taskexecutor daemon on host master.
Starting taskexecutor daemon on host segment01.
Starting taskexecutor daemon on host segment02.
[flink@master ~]$ xcall.sh jps
--------- master ----------
114161 QuorumPeerMain
116465 TaskManagerRunner
114752 JournalNode
115216 NodeManager
114387 NameNode
10947 Jps
114516 DataNode
116116 StandaloneSessionClusterEntrypoint
115098 ResourceManager
114973 DFSZKFailoverController
--------- segment01 ----------
93155 TaskManagerRunner
91621 QuorumPeerMain
92804 StandaloneSessionClusterEntrypoint
115892 Jps
91847 DataNode
91963 JournalNode
91754 NameNode
92255 NodeManager
92110 DFSZKFailoverController
--------- segment02 ----------
82352 JournalNode
83202 TaskManagerRunner
82772 ResourceManager
82231 DataNode
104822 Jps
82109 QuorumPeerMain
82494 NodeManager
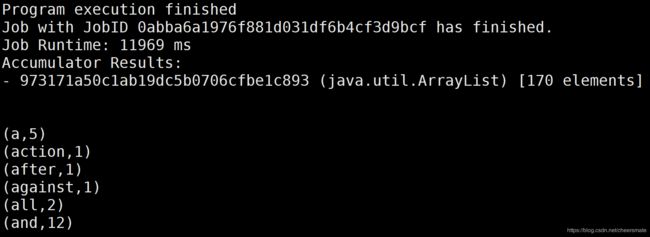
6)测试
[flink@master flink-1.10.0]$ ./bin/flink run -m yarn-cluster ./examples/batch/WordCount.jar
10.集群开机自启
1)集群启动脚本
[flink@master bin]$ vim flinkStart.sh
#!/bin/bash
echo "-------------------------启动zookeeper----------------------------"

echo "Now,starting Zookeeper."
ssh master $ZOOKEEPER_HOME/bin/zkServer.sh start
ssh segment01 $ZOOKEEPER_HOME/bin/zkServer.sh start
ssh segment02 $ZOOKEEPER_HOME/bin/zkServer.sh start

ssh master $ZOOKEEPER_HOME/bin/zkServer.sh status
ssh segment01 $ZOOKEEPER_HOME/bin/zkServer.sh status
ssh segment02 $ZOOKEEPER_HOME/bin/zkServer.sh status
echo "Now,Zookeeper is started."

echo "-------------------------启动hdfs----------------------------"

echo "Now,starting hdfs."
ssh master $HADOOP_HOME/sbin/start-dfs.sh
echo "Now,hdfs started."

echo "-------------------------启动yarn----------------------------"

echo "Now,starting yarn."
ssh master $HADOOP_HOME/sbin/start-yarn.sh
ssh segment02 $HADOOP_HOME/sbin/yarn-daemon.sh start resourcemanager
echo "Now,yarn started."
echo "-------------------------启动flink----------------------------"
echo "Now,starting flink."
ssh master $FLINK_HOME/bin/start-cluster.sh
echo "Now,flink started."
2)集群停止脚本
[flink@master bin]$ vim flinkStop.sh
#!/bin/bash
echo "-------------------------停止flink----------------------------"
echo "Now,shutting flink."
ssh master $FLINK_HOME/bin/stop-cluster.sh
echo "Now,flink stopped."

echo "-------------------------关闭hdfs----------------------------"

echo "Now,shutting hdfs."
ssh master $HADOOP_HOME/sbin/stop-dfs.sh
echo "Now,hdfs stopped."

echo "-------------------------关闭yarn----------------------------"

echo "Now,shutting yarn."
ssh master $HADOOP_HOME/sbin/stop-yarn.sh
ssh segment02 $HADOOP_HOME/sbin/yarn-daemon.sh stop resourcemanager
echo "Now,yarn stopped."

echo "-------------------------关闭zookeeper----------------------------"

echo "Now,shutting Zookeeper."
ssh master $ZOOKEEPER_HOME/bin/zkServer.sh stop
ssh segment01 $ZOOKEEPER_HOME/bin/zkServer.sh stop
ssh segment02 $ZOOKEEPER_HOME/bin/zkServer.sh stop

echo "Now,Zookeeper stopped."
[flink@master bin]$ chmod 777 flinkStart.sh
[flink@master bin]$ chmod 777 flinkStop.sh
3)设置开机自启
[root@master bin]# vi /etc/rc.d/rc.local
#*******************在文件末尾追加开机自启设置*******
cd /home/flink/bin #切换到脚本所在目录
su - flink -c 'bash flinkStart.sh' #执行脚本以命令的形式传给flink用户