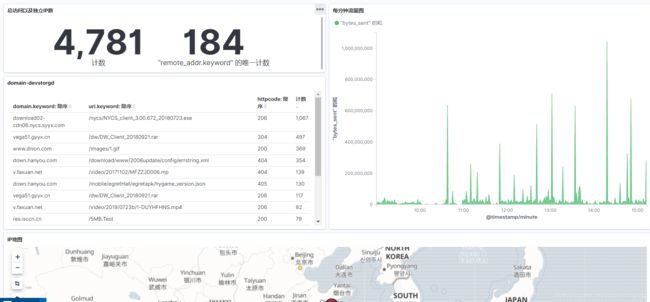
elk + kafka + filebeat搭建日志分析系统
整体结构
原博文:https://blog.csdn.net/weixin_38098312/article/details/80181415
![]()
所有使用到的软件,百度云链接: https://pan.baidu.com/s/1mx8PigBXdFFfsTh_kQKM0A 提取码: ggdn
| IP | 服务 |
|---|---|
| 61.160.243.133 | logstash+elasticsearch+kibana |
| 61.160.243.164 | kafka(zookeeper) + elasticsearch |
| 61.160.243.173 | kafka(zookeeper) |
| 61.160.243.174 | kafka(zookeeper) + elasticsearch |
| 183.2.235.70 | filebeat |
- 首先配置java环境,jdk,这个是基本的,上述所有软件都需要
- 使用kafka集群做缓存层,而不是直接将filebeat收集到的日志信息写入logstash,让整体结构更健壮,减少网络环境,导致数据丢失。filebeat负责将收集到的数据写入kafka,logstash取出数据并处理。
kafka集群的搭建
1.下载并解压kafka安装包到 /usr/local/kafka,解压就能用,不需要编译。
2. 配置zookeeper组件:/usr/local/kafka/config/zookeeper.properties,三台机器一样
#目录需要自己创建

dataDir=/usr/local/zookeeper
dataLogDir=/usr/local/zookeeper/log
clientPort=2181
maxClientCnxns=100
tickTime=2000
initLimit=10
syncLimit=5

server.1=61.160.243.173:2888:3888
server.2=61.160.243.174:2888:3888
server.3=61.160.243.164:2888:3888
- /usr/local/zookeeper/下创建myid文件,文件内容(1|2|3)跟下面server.properties配置中broker.id的值一致
- 修改/usr/local/kafka/config/server.properties,除了broker.id,跟host.name其他一样
#################################61.160.243.173#########################
broker.id=1
prot = 9092
host.name = 61.160.243.173
num.network.threads=3
num.io.threads=8
socket.send.buffer.bytes=102400
socket.receive.buffer.bytes=102400
socket.request.max.bytes=104857600
log.dirs=/tmp/kafka-logs
num.partitions=16
num.recovery.threads.per.data.dir=1
offsets.topic.replication.factor=1
transaction.state.log.replication.factor=1
transaction.state.log.min.isr=1
log.retention.hours=168
log.segment.bytes=1073741824
log.retention.check.interval.ms=300000
zookeeper.connect=61.160.243.173:2181,61.160.243.174:2181,61.160.243.164:2181
zookeeper.connection.timeout.ms=6000
group.initial.rebalance.delay.ms=0
#################################61.160.243.174#########################
broker.id=2
host.name = 61.160.243.174
#################################61.160.243.164#########################
broker.id=3
host.name = 61.160.243.164
- 首先启动zookkeeper,之后启动kafka ,关闭的时候相反。机器都是centos7所以直接配置 通过systemctl启动。配置文件:
/lib/systemd/system/zookeeper.service
[Unit]
Description=Zookeeper service
After=network.target

[Service]
Type=simple
User=root
Group=root
ExecStart=/usr/local/kafka/bin/zookeeper-server-start.sh  /usr/local/kafka/config/zookeeper.properties
ExecStop=/usr/local/kafka/bin/zookeeper-server-stop.sh
Restart=on-failure

[Install]
WantedBy=multi-user.target
/lib/systemd/system/kafka.service
[Unit]
Description=Apache Kafka server (broker)
After=network.target  zookeeper.service

[Service]
Type=simple
User=root
Group=root
ExecStart= /usr/local/kafka/bin/kafka-server-start.sh  /usr/local/kafka/config/server.properties
ExecStop= /usr/local/kafka/bin/kafka-server-stop.sh
Restart=on-failure

[Install]
WantedBy=multi-user.target
- 顺序启动zookeeper(systemctl start zookeeper.service)和 kafka(systemctl start kafka.service),并查看状态:


- 测试kafka
创建toppic
# --create:表示创建
# --zookeeper 后面的参数是zk的集群节点
# --replication-factor 1 :表示复本数
# --partitions 2:表示分区数
# --topic test:表示topic的主题名称

/usr/local/kafka/bin/kafka-topics.sh --create --zookeeper  61.160.243.173:2181,61.160.243.174:2181,61.160.243.164:2181   --replication-factor 1 --partitions 2   --topic  testtopic
查看toppic,–zookeeper 指定一台机器就行
/usr/local/kafka/bin/kafka-topics.sh --zookeeper 61.160.243.173:2181,61.160.243.174:2181,61.160.243.164:2181 --list
查看topic
/usr/local/kafka/bin/kafka-topics.sh --zookeeper 61.160.243.173:2181,61.160.243.174:2181,61.160.243.164:2181 --list
写入并查看消息
/usr/local/kafka/bin/kafka-console-producer.sh --broker-list 61.160.243.173:9092 --topic testtopic
/usr/local/kafka/bin/kafka-console-consumer.sh --bootstrap-server   61.160.243.173:9092  --from-beginning --topic testtopic
elk集群配置
- 修改各个机器的host文件,后面配置中有用到主机名,所以四台机器都要修改。

- 安装都是解压安装包到指定路径就行,没有太多可以说明的。解压完成后对应修改配置文件即可。
elasticsearch master节点
###配置
# cluster.name 集群名称
# node.name 节点主机名
# node.master 是否参与主节点竞选
# node.data:true  指定该节点是否存储索引数据,默认为true。本例没配置,所有节点都存储包括主节点
# discovery.zen.ping.unicast.hosts 配置上elasticsearch 集群除本机外其他机器
# cluster.initial_master_nodes 引导启动集群的机器IP或者主机名
# http.port http端口,kibana中会用到 。
# transport.tcp.port 设置节点间交互的tcp端口,默认是9300。

cluster.name: esfornginx
node.name: DEVSTOR-JSCZ-BBK-WEIYUAN-243-133
node.master: true
path.logs: /usr/local/data/log/
network.host: 61.160.243.133
http.port: 9200
discovery.zen.ping.unicast.hosts: ["server41","server42"]
cluster.initial_master_nodes: ["DEVSTOR-JSCZ-BBK-WEIYUAN-243-133"]
elasticsearch DATA节点:
############################61.160.243.174#########################
cluster.name: esfornginx
node.name: server41
node.master: false
path.logs: /usr/local/data/log/
network.host: 61.160.243.174
http.port: 9200
discovery.zen.ping.unicast.hosts: ["DEVSTOR-JSCZ-BBK-WEIYUAN-243-133","server42"]


############################61.160.243.164#########################
cluster.name: esfornginx
node.name: server42
node.master: false
path.logs: /usr/local/data/log/
network.host: 61.160.243.164
http.port: 9200
discovery.zen.ping.unicast.hosts: ["DEVSTOR-JSCZ-BBK-WEIYUAN-243-133","server41"]
- 配置通过systemctl启动文件/lib/systemd/system/elasticsearch.service (systemctl start elasticsearch.service),注意elasticsearch是不允许通过root用户启动的,所有手动启动的时候要切换到非root才行。
[Unit]
Description=Elasticsearch
Documentation=http://www.elastic.co
Wants=network-online.target
After=network-online.target

[Service]
RuntimeDirectory=elasticsearch
PrivateTmp=true
Environment=ES_HOME=/usr/local/elasticsearch
Environment=ES_PATH_CONF=/usr/local/elasticsearch/config
Environment=PID_DIR=/var/run/elasticsearch
WorkingDirectory=/usr/local/elasticsearch
User=elk
Group=elk
ExecStart=/usr/local/elasticsearch/bin/elasticsearch -p ${PID_DIR}/elasticsearch.pid --quiet

# StandardOutput is configured to redirect to journalctl since
# some error messages may be logged in standard output before
# elasticsearch logging system is initialized. Elasticsearch
# stores its logs in /var/log/elasticsearch and does not use
# journalctl by default. If you also want to enable journalctl
# logging, you can simply remove the "quiet" option from ExecStart.
StandardOutput=journal
StandardError=inherit

# Specifies the maximum file descriptor number that can be opened by this process
LimitNOFILE=65535

# Specifies the maximum number of processes
LimitNPROC=4096

# Specifies the maximum size of virtual memory
LimitAS=infinity

# Specifies the maximum file size
LimitFSIZE=infinity

# Disable timeout logic and wait until process is stopped
TimeoutStopSec=0

# SIGTERM signal is used to stop the Java process
KillSignal=SIGTERM

# Send the signal only to the JVM rather than its control group
KillMode=process

# Java process is never killed
SendSIGKILL=no

# When a JVM receives a SIGTERM signal it exits with code 143
SuccessExitStatus=143

[Install]
WantedBy=multi-user.target
kibana
/usr/local/kibana/config/kibana.yml
# i18n.locale: "zh-CN"  web界面中文
# server.port  监听端口
server.port: 5601
server.host: "61.160.243.133"
elasticsearch.hosts: ["http://61.160.243.133:9200"]
i18n.locale: "zh-CN"
启动命令:systemctl start kibana.service
启动文件配置:/lib/systemd/system/kibana.service
[Unit]
Description=Kibana  Server Manager

[Service]
ExecStart=/usr/local/kibana/bin/kibana

[Install]
WantedBy=multi-user.target
filebeat
收集nginx日志,并输出到kafka,有些配置项没有列出来,默认即可,其他输出配置不用注释掉即可
filebeat.inputs:
- type: log
  enabled: true
  paths:
    - /usr/local/nginx/logs/access.log
  fields:
     type: accesslog
     host: 235_70
output.kafka:
    enable: true
    hosts: ["61.160.243.173:9092"]
    topic: es-nginxlogs
    compression: gzip
    max_message_bytes: 100000
启动脚本/etc/init.d/filebeat (这台机器6的系统,所以通过service start filebeat启动 ):
#!/bin/bash
PATH=/usr/bin:/sbin:/bin:/usr/sbin
export PATH
agent="/usr/local/filebeat/filebeat"
args="-c /usr/local/filebeat/filebeat.yml -path.home /usr/local/filebeat -path.config /usr/local/filebeat -path.data /usr/local/filebeat/data -path.logs /var/log/filebeat"
test_args="test config -c /usr/local/filebeat/filebeat.yml"
test() {
$agent $args $test_args
}
start() {
    pid=`ps -ef |grep /usr/local/filebeat/data |grep -v grep |awk '{print $2}'`
    if [ ! "$pid" ];then
        echo "Starting filebeat: "
        test
        if [ $? -ne 0 ]; then
            echo
            exit 1
        fi
        $agent $args &
        if [ $? == '0' ];then
            echo "start filebeat ok"
        else
            echo "start filebeat failed"
        fi
    else
        echo "filebeat is still running!"
        exit
    fi
}
stop() {
    echo -n $"Stopping filebeat: "
    pid=`ps -ef |grep /usr/local/filebeat/data |grep -v grep |awk '{print $2}'`
    if [ ! "$pid" ];then
echo "filebeat is not running"
    else
        kill $pid
echo "stop filebeat ok"
    fi
}
restart() {
    stop
    start
}
status(){
    pid=`ps -ef |grep /usr/local/filebeat/data |grep -v grep |awk '{print $2}'`
    if [ ! "$pid" ];then
        echo "filebeat is not running"
    else
        echo "filebeat is running"
    fi
}
case "$1" in
    start)
        start
    ;;
    stop)
        stop
    ;;
    restart)
        restart
    ;;
    status)
        status
    ;;
    *)
        echo $"Usage: $0 {start|stop|restart|status}"
        exit 1
esac
logstash
1 . 修改配置文件如下,新建配置文件logesfornginx.conf
input{
    kafka{
        bootstrap_servers => "61.160.243.173:9092,61.160.243.174:9092,61.160.243.164:9092"
        topics => ["es-nginxlogs"]
        codec => json
    }
}
filter {
    grok {
        match => { "message" => "%{NGINXACCESS}" }

    }
    geoip {
      source => "remote_addr"
      target => "geoip"
      database => "/usr/local/logstash/GeoLite2-City.mmdb"
      add_field => [ "[geoip][coordinates]", "%{[geoip][longitude]}" ]
      add_field => [ "[geoip][coordinates]", "%{[geoip][latitude]}" ]
      add_field => [ "timestamp", "%{timeunix}%{timeunixms}" ]
    }
    mutate {
      convert => [ "[geoip][coordinates]", "float" ]
      convert => [ "httpcode","integer" ]
      convert => [ "bytes_sent","integer" ]
      replace => { "type" => "nginx_access" }
      remove_field => "message"
    }
    date {
      match => [ "timestamp","YYYY-MM-dd HH:mm:ss","UNIX_MS"]
      target => "@timestamp"
    }
    mutate {
      remove_field => "timeunixms"
      remove_field => "timeunix"

    }

}

output{
    elasticsearch {
        hosts => ["61.160.243.133:9200"]
        index => "logstash-%{[fields][type]}111-%{+YYYY.MM.dd}"
        }
    stdout{
        codec=>rubydebug
    }
}
- input 跟 output配置是必须的,filter是对数据进行处理。grok配置用大白话的意思是将kafka中取出来的数据message字段内容,使用%{NGINXACCESS}进行格式化处理,提取出自己想要的内容。%{NGINXACCESS}定义在/usr/local/logstash/patterns/nginx 中,文件内容写在下面。
grok预定义匹配字段:https://github.com/elastic/logstash/blob/v1.4.2/patterns/grok-patterns
%{IPORHOST:remote_addr}:意思是通过IPORHOST代表的正则去匹配原始信息,将匹配到的内容,用remote_addr代表:
remote_addr:IPORHOST匹配的内容
只有所有项都匹配成功才能,这条数据才能被格式化成想要的样子。写错一点都会失败。
这么处理的目的是后面方便通过kibana画图更方便,比如,referer,ua,每次请求的字节数,访问IP,状态码,响应时间等等,想要跟清晰的展示,这些你肯定要用到。
getip,根据IP得到坐标,方便后面展示来源。
58.216.33.181 1564034952.317 HTTP/1.1 - 206 - 2097472 GET http://vega51.gyyx.cn/dw/DW_Client_20180921.rar [- -] - - 183.2.235.70 application/x-rar-compressed http://xwb.gyyx.cn/ Mozilla/5.0 (Windows NT 6.1; WOW64) AppleWebKit/537.36 (KHTML, like Gecko) Chrome/69.0.3497.100 Safari/537.36 0.280 - -&- - - Hm_lvt_e924c3167e6fb451d00dfae361b6b261=1564033477; Hm_lpvt_e924c3167e6fb451d00dfae361b6b261=1564033477 - - - - bytes=9443475456-9445572607 30502 - - 8e74481370e3733f29765bbc1f463ab6&3 - - - -
HOSTPORT1 (?:%{HOSTPORT}|-)
TAB1 \t
HTTPREFERER (?:%{URI}|%{USERNAME}|-)
FILETYPE (?:%{USERNAME}/%{USERNAME:filetype}(;\s.*?)?|-)
NGINXACCESS ^%{IPORHOST:remote_addr}%{TAB1}%{INT:timeunix}\.%{INT:timeunixms}%{TAB1}HTTP/%{NUMBER:httpversion}%{TAB1}-%{TAB1}%{NUMBER:httpcode}%{TAB1}.*?%{TAB1}%{NUMBER:bytes_sent}%{TAB1}%{WORD:request_meth
od}%{TAB1}http(s)?://%{HOSTNAME:domain}%{URIPATH:uri}(\?.*)?%{TAB1}\[%{HOSTPORT1:upstream_addr}.*\]%{TAB1}.*?%{IP:server_ip}%{TAB1}%{FILETYPE:filetype}%{TAB1}%{HTTPREFERER:referer}%{TAB1}%{DATA:user-agent}%
{TAB1}%{NUMBER:request_time}%{TAB1}.*$
2 . logstash启动文件:
[Unit]
Description=logstash  Server Manager
After=network.target
[Service]
ExecStart=/usr/local/logstash/bin/logstash -f /usr/local/logstash/config/logesfornginx.conf

[Install]
WantedBy=multi-user.target


