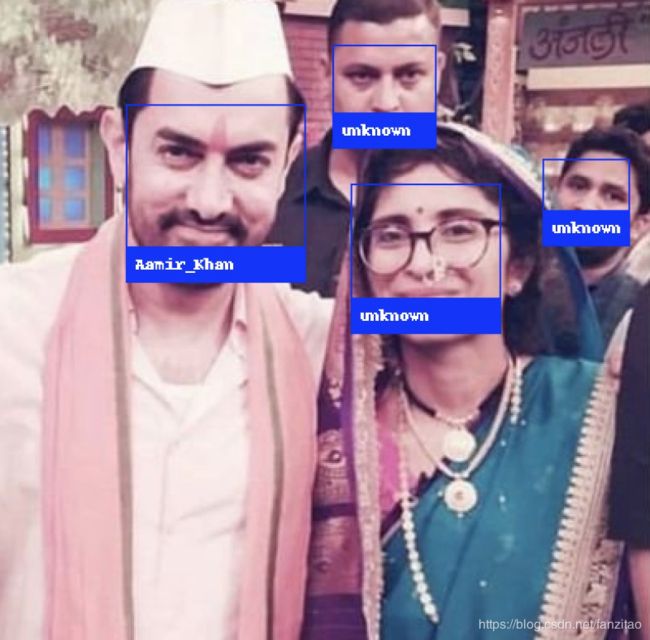
人脸识别入门到实战
本来我只是从事短视频推荐,和CV领域并没有什么交集。但是在推荐中遇到了一些问题,例如:
- 视频打散,例如用户播放了较多某个网红的视频,导致召回该网红的视频过多;
- 视频标签,娱乐明星/网红/体育名人/政治人物等;
- 版权,某个大V入驻了社区,他创作的视频只准他一个人发;
但是我们当时又没有专门从事CV领域的算法工程师,考虑到CV和NLP领域很多即插即用的工具包,所以我决定自己搞定这个问题。在github上一阵搜索,选定了star最多的项目:face_recognition
1. 环境配置
1.1 安装openblas
    1. 从www.openblas.net下载tar压缩包
    2. 解压后从命令号进入文件夹,执行“make”命令进行编译,这一步需要一些时间
    3. 编译完后执行“make install”命令进行安装
1.2 安装dlib
git clone https://github.com/davisking/dlib.git
cd dlib
mkdir build
cd build
cmake .. -DDLIB_USE_CUDA=1 -DUSE_AVX_INSTRUCTIONS=1
cmake --build .
cd ..
python setup.py install
验证dlib是否可以使用cuda
import dlib
dlib.DLIB_USE_CUDA
True
1.3 安装face_recognition
pip install 安装face_recognition
2. 人脸识别入门
人脸识别入门文章推荐阅读face_regognition作者写的一篇博客,如果英文不太好,也不用担心,知乎有热心群众翻译好了。
我在这里也结合代码,做一下总结。
2.1 应用
一个能催生多个独角兽的领域,应用前景自然是非常广泛的。在我们生活中经常会碰到的应用包括:
- 刷脸支付,比如支付宝刷脸支付
- 刷脸进站,高铁站目前已经普及
- 刷脸验证,广义上说,刷脸支付和刷脸进站都属于刷脸验证
- 相册管理,绝大多数手机自带的相册都提供根据人脸识别结果对相册进行归类的功能
- 视频理解,这个比较容易理解
2.2 行业现状
人脸识别算是图像领域近年来最成功的应用之一。国内有专门从事该领域的第三方AI服务公司,例如:旷世、商汤等;也有提供设备+服务的公司,例如:海康、大华、赛维;以及共有云厂商巨头:阿里、百度、华为、腾讯等。
但是人脸识别一般是与业务强关联的,例如我们对场景需要识别的是一些海外国家的知名人物,目前国内公有云厂商并没有覆盖。而谷歌cloud价格让人望而生畏,所以我们决定自己研发。
2.2 人脸识别流程
2.2.1 人脸检测
虽然人脸检测和目标检测有一些差异,但是基本原理差不多:在图片不同尺度、不同位置枚举出N多小框,然后判断框住的是不是人脸。所以,为了准确的检出这些人脸,需要判断的框会非常多,一般是几十万。需要解决的问题主要有:
- 如果准确判断
- 如何快速判断
- 如何调整框的位置,使得框的准确
- 合并同一张脸
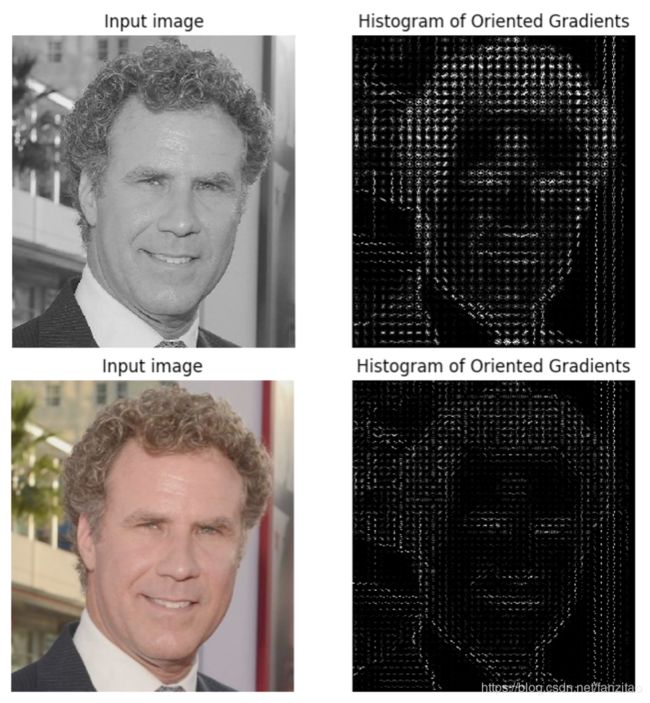
人脸检测算法很多,对于绝大多数需求来说梯度直方图(HOG)和级联卷积神经网络(CNN)这两种算法足够了,取决于你的硬件配置和对响应时长的要求。HOG不需要训练模型,CNN虽然设计到深度神经网络,但是模型比较通用,也不需要自己专门训练。
在dlib中,选择hog或者cnn,需要做的只是修改一下接口的参数即可。关于HOG的原理可以网上搜索一下。如果你想单独体验一下HOG,可以利用skimage包中对应的api来实现,下面给一端可视化的代码。
import matplotlib.pyplot as plt
from skimage.feature import hog
from skimage import data, exposure, io
import sys

image = io.imread(sys.argv[1])
fd, hog_image = hog(image, orientations=8, pixels_per_cell=(16, 16),
                    cells_per_block=(1, 1), visualize=True, multichannel=True)
fig, (ax1, ax2) = plt.subplots(1, 2, figsize=(8, 4), sharex=True, sharey=True)
ax1.axis('off')
ax1.imshow(image, cmap=plt.cm.gray)
ax1.set_title('Input image')

hog_image_rescaled = exposure.rescale_intensity(hog_image, in_range=(0, 10))
ax2.axis('off')
ax2.imshow(hog_image_rescaled, cmap=plt.cm.gray)
ax2.set_title('Histogram of Oriented Gradients')
plt.show()
下面是在我电脑上针对两张明暗不同的图生成的结果。
有的时候,你需要的不仅仅是一小块人脸,可能头发、耳朵、脖子等部位你也需要。例如,你想用人脸识别的结果,判断里面出现的人的性别。这时候,你可以对图片中的人脸进行一些扩展。
import os
import face_recognition
from PIL import Image
import sys
def extract_faces_from_image(source_image_file, output_directory):
    image = face_recognition.load_image_file(source_image_file)
    h, w, _ =  image.shape
    faces = face_recognition.face_locations(image)
    extracted_image_file_paths = []
    image_name = source_image_file.split(r'/')[-1].split('.')[0]
    print image_name
    ratio = 0.3
    for i in range(len(faces)):
        top, right, bottom, left = faces[i]
        top -= int((bottom - top) * ratio)
        bottom += int((bottom - top) * ratio)
        left -= int((right - left) * ratio)
        right += int((right - left) * ratio)
        print top, right, bottom, left

        top = max(top, 0)
        left = max(left, 0)
        bottom = min(bottom, h)
        right = min(right, w)
        extracted_image = Image.fromarray(image[top:bottom, left:right])
        extracted_image_file_path = "%s_face_%s.png" % (image_name, str(i))
        print(" Saving - %s"%extracted_image_file_path)
        extracted_image.save("%s/%s" % (output_directory, extracted_image_file_path), "PNG")
        extracted_image_file_paths.append(extracted_image_file_path)
    return extracted_image_file_paths

extract_faces_from_image(sys.argv[1], '/Users/Jerry/face_detect/')
2.2.2 人脸对齐

如上图所示,图片中的人脸受角度、光照等影响比较大。如果想后续表征和识别取得好的效果,对齐这一步必须做好。人脸对齐的目的就是对角度有偏倚的人脸做矫正,提升识别精度。
目前对齐的基本方法就是:锚定特征点,这些特征点对应到人脸的五官、轮廓、眉毛等,然后根据这些特征点对人脸进行旋转缩放,使得对齐后的人脸符合对称原则和比例原则。
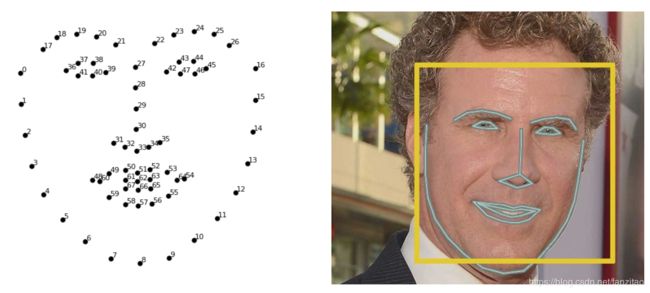
下面是一段生成人脸特征点的代码,输入一张图片就可以看到可视化的结果。
import sys
import dlib
from skimage import io

# You can download the required pre-trained face detection model here:
# http://dlib.net/files/shape_predictor_68_face_landmarks.dat.bz2
predictor_model = "shape_predictor_68_face_landmarks.dat"

file_name = sys.argv[1]

face_detector = dlib.get_frontal_face_detector()
face_pose_predictor = dlib.shape_predictor(predictor_model)

win = dlib.image_window()
image = io.imread(file_name)

detected_faces = face_detector(image, 1)
print("Found {} faces in the image file {}".format(len(detected_faces), file_name))

win.set_image(image)
for i, face_rect in enumerate(detected_faces):
        print("- Face #{} found at Left: {} Top: {} Right: {} Bottom: {}".format(i, face_rect.left(), face_rect.top(), face_rect.right(), face_rect.bottom()))
        pose_landmarks = face_pose_predictor(image, face_rect)
        win.add_overlay(pose_landmarks)
dlib.hit_enter_to_continue()
下面是一段人脸检测+对齐的代码,好像是某个工具官方的example,不记得了。
import sys
import dlib
import cv2
import openface

# You can download the required pre-trained face detection model here:
# http://dlib.net/files/shape_predictor_68_face_landmarks.dat.bz2
predictor_model = "shape_predictor_68_face_landmarks.dat"

# Take the image file name from the command line
file_name = sys.argv[1]

# Create a HOG face detector using the built-in dlib class
face_detector = dlib.get_frontal_face_detector()
face_pose_predictor = dlib.shape_predictor(predictor_model)
face_aligner = openface.AlignDlib(predictor_model)

# Take the image file name from the command line
file_name = sys.argv[1]

# Load the image
image = cv2.imread(file_name)

# Run the HOG face detector on the image data
detected_faces = face_detector(image, 1)

print("Found {} faces in the image file {}".format(len(detected_faces), file_name))

# Loop through each face we found in the image
for i, face_rect in enumerate(detected_faces):

        # Detected faces are returned as an object with the coordinates
        # of the top, left, right and bottom edges
        print("- Face #{} found at Left: {} Top: {} Right: {} Bottom: {}".format(i, face_rect.left(), face_rect.top(), face_rect.right(), face_rect.bottom()))

        # Get the the face's pose
        pose_landmarks = face_pose_predictor(image, face_rect)

        # Use openface to calculate and perform the face alignment
        alignedFace = face_aligner.align(534, image, face_rect, landmarkIndices=openface.AlignDlib.OUTER_EYES_AND_NOSE)

        # Save the aligned image to a file
        cv2.imwrite("aligned_face_{}.jpg".format(i), alignedFace)
2.2.3 脸部编码
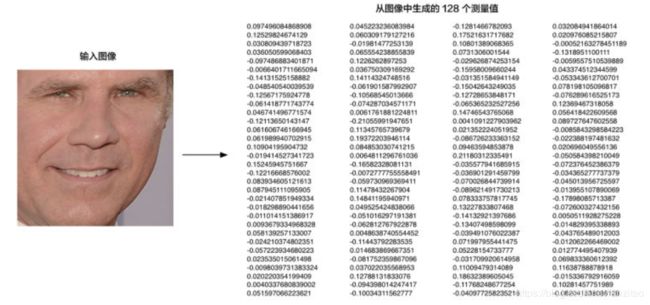
这一步的目的是对对齐后人脸做表征学习,将其表示成容易被机器处理的稠密向量。
对图片做表征是很常见的操作,通常都是利用某种卷积网络做特征提取,例如利用youtube-8m对图片做语义表征。原始模型的任务一般都是分类人物,损失函数选取logloss之类。
但是人脸识别有其的特殊性,例如:类别数大于特征数,而且存在"撞脸"的情况,所以需要捕获不同人脸之间的细微差别。谷歌在2015年提出了triplet loss,很好的解决了上述问题。
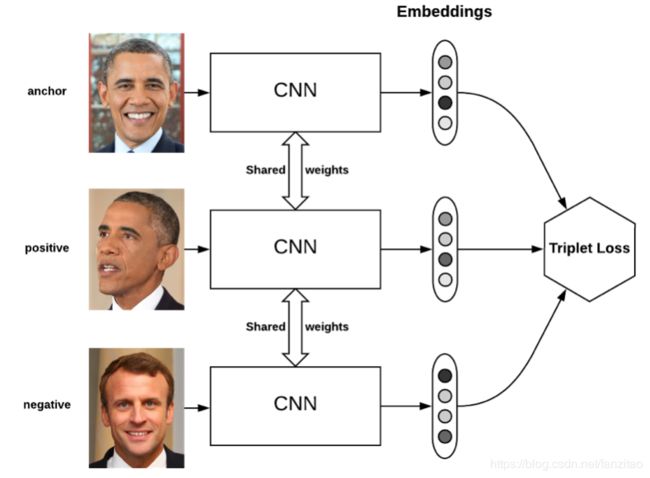
在上面的模型中,每次输入是一个三元组(anchor, positive, negative),输出的embedding维度是可控的,如果不进行降维的话,一般最多几万维。
基本原则:
anchor和positive是同一个人,他们两个输出的向量距离要很小;
anchor和negative是不同人,他们两个输出的向量距离要大;
而且我们还可以加一个阈值:d(anchor, negative) > d(anchor, positive) + threshod, 我们人为只有差值超过这个阈值的时候,才是置信的(容易区分)。
triplet loss在做这一类问题是,准确率比logloss高很多;同时,提取出的特征也要好用很多。
但是缺点就是容易过拟合,后续也有很多类似的改进。
所幸的是,一般情况下不需要我们自己去训练该网络,dlib中已经有了预置的模型,我们直接拿来用即可。下图是特征提取得到的结果的例子:
2.2.4 人脸识别
利用上一步得到的向量去人脸库中"比对",找出最可能的人。如果是类似支付宝刷脸认证,只需要当前摄像头采集的人脸特征向量和预存的你的人脸向量计算一个距离即可。如果是人脸识别问题,可以用KNN计算最近邻。或者利用faiss建立一个人脸库,然后利用当前人脸对应的特征向量去人脸向量库中做向量检索。关于faiss的安装和使用可以参见我的另一篇文章。
3. 实践
3.1 数据采集
首先,你需要针对你的业务需求,列出你需要识别出的人物。如果你需要识别的不是公众人物,那么就需要找人来标注数据。如果是公众人物,那么通常可以从谷歌图片下载到足够的图片。
这里可以安利一个下载谷歌图片的工具google_image_download。安装完成之后,几行代码即可。
import os

with open('./name_list.txt','r') as reader:#每行一个人物姓名
    for line in reader:
        name, idx = line.strip().split('\t')#加id防止重名
        dir_name = '%s_%s' % (idx,name)
        print dir_name
        cmd = 'googleimagesdownload -k "%s" -l 100' % dir_name #100是每个人物下载的图片数
        os.system(cmd)
        break
3.2 数据清洗
face_recognition对训练数据的要求是:每张图片只允许有一张人脸。所以,我们要把从谷歌下载的图片中,没有人脸,有多个人脸的图片去掉。完全依赖人工,工作量比较大,我们可以借助dlib的人脸检测api,把不符合要求的图片删除。
当然,最终还是需要人工检测一次,可能里面存在一些错误图片。
3.3 模型训练
这部分代码在face_recognition项目的example中有完整代码。
