Android Activity startActivity流程简介
分享一下我老师大神的人工智能教程!零基础,通俗易懂!http://blog.csdn.net/jiangjunshow
也欢迎大家转载本篇文章。分享知识,造福人民,实现我们中华民族伟大复兴!
1. 基本概念
1.1 Instrumentation是什么?
顾名思义,仪器仪表,用于在应用程序中进行“测量”和“管理”工作。一个应用程序中只有一个Instrumentation实例对象,且每个Activity都有此对象的引用。Instrumentation将在任何应用程序运行前初始化,可以通过它监测系统与应用程序之间的所有交互,即类似于在系统与应用程序之间安装了个“窃听器”。
当ActivityThread 创建(callActivityOnCreate)、暂停、恢复某个Activity时,通过调用此对象的方法来实现,如:
1) 创建: callActivityOnCreate
2) 暂停: callActivityOnPause
3) 恢复: callActivityOnResume
Instrumentation和ActivityThread的关系,类似于老板与经理的关系,老板负责对外交流(如与Activity Manager Service
它通过以下两个成员变量来对当前应用进程中的Activity进行管理:
private List mWaitingActivities; private List mActivityMonitors; 其功能函数下表所示:
| 功能 | 函数 |
| 增加删除Monitor | addMonitor(ActivityMonitor monitor) removeMonitor(ActivityMonitor monitor) |
| Application与Activity生命周期控制 | newApplication(Class clazz, Context context) newActivity(ClassLoader cl, String className,Intent intent) callActivityOnCreate(Activity activity, Bundle icicle) callActivityOnDestroy(Activity activity) callActivityOnStart(Activity activity) callActivityOnRestart(Activity activity) callActivityOnResume(Activity activity) callActivityOnStop(Activity activity) callActivityOnPause(Activity activity) |
| Instrumentation生命周期控制 | onCreate(Bundle arguments) start() onStart() finish(int resultCode, Bundle results) onDestroy() |
| 发送用户操控信息到当前窗口 | sendCharacterSync(int keyCode) sendPointerSync(MotionEvent event) sendTrackballEventSync(MotionEvent event) sendTrackballEventSync(MotionEvent event) |
| 同步操作 | startActivitySync(Intent intent) //它调用Context.startActivity runOnMainSync(Runnable runner) waitForIdle() |
2. Android应用程序启动过程(MainActivity)
即MainActivity的启动过程,在此过程中,将创建一个新的进程来执行此MainActivity。
Android应用程序从Launcher启动流程如下所示:
/***************************************************************** * Launcher通过Binder告诉ActivityManagerService, * 它将要启动一个新的Activity; ****************************************************************/Launcher.startActivitySafely-> Launcher.startActivity-> //要求在新的Task中启动此Activity //intent.addFlags(Intent.FLAG_ACTIVITY_NEW_TASK) Activity.startActivity-> Activity.startActivityForResult-> Instrumentation.execStartActivity-> // ActivityManagerNative.getDefault()返回AMS Proxy接口 ActivityManagerNative.getDefault().startActivity-> ActivityManagerProxy.startActivity-> ActivityManagerService.startActivity-> (AMS) ActivityManagerService.startActivityAsUser-> ActivityStack.startActivityMayWait-> ActivityStack.resolveActivity(获取ActivityInfo) //aInfo.name为main Activity,如:com.my.test.MainActivity //aInfo.applicationInfo.packageName为包名,如com.my.test ActivityStack.startActivityLocked-> //ProcessRecord callerApp; 调用者即Launcher信息 //ActivityRecord sourceRecord; Launcher Activity相关信息 //ActivityRecord r=new ActivityRecord(...),将要创建的Activity相关信息 ActivityStack.startActivityUncheckedLocked-> //Activity启动方式:ActivityInfo.LAUNCH_MULTIPLE/LAUNCH_SINGLE_INSTANCE/ // ActivityInfo.LAUNCH_SINGLE_TASK/LAUNCH_SINGLE_TOP) // 创建一个新的task,即TaskRecord,并保存在ActivityRecord.task中 //r.setTask(new TaskRecord(mService.mCurTask, r.info, intent), null, true) // 把新创建的Activity放在栈顶 ActivityStack.startActivityLocked-> ActivityStack.resumeTopActivityLocked-> ActivityStack.startPausingLocked (使Launcher进入Paused状态)-> /***************************************************************** * AMS通过Binder通知Launcher进入Paused状态 ****************************************************************/ ApplicationThreadProxy.schedulePauseActivity-> //private class ApplicationThread extends ApplicationThreadNative ApplicationThread.schedulePauseActivity-> ActivityThread.queueOrSendMessage-> // 调用Activity.onUserLeaveHint // 调用Activity.onPause // 通知activity manager我进入了pause状态 ActivityThread.handlePauseActivity-> /***************************************************************** * Launcher通过Binder告诉AMS,它已经进入Paused状态 ****************************************************************/ ActivityManagerProxy.activityPaused-> ActivityManagerService.activityPaused-> ActivityStack.activityPaused->(把Activity状态修改为PAUSED) ActivityStack.completePauseLocked-> // 参数为代表Launcher这个Activity的ActivityRecord // 使用栈顶的Activity进入RESUME状态 ActivityStack.resumeTopActivityLokced-> //topRunningActivityLocked将刚创建的放于栈顶的activity取回来 // 即在ActivityStack.startActivityUncheckedLocked中创建的 /***************************************************************** * AMS创建一个新的进程,用来启动一个ActivityThread实例, * 即将要启动的Activity就是在这个ActivityThread实例中运行 ****************************************************************/ ActivityStack.startSpecificActivityLocked-> // 创建对应的ProcessRecord ActivityManagerService.startProcessLocked-> // 启动一个新的进程 // 新的进程会导入android.app.ActivityThread类,并且执行它的main函数, // 即实例化ActivityThread, 每个应用有且仅有一个ActivityThread实例 Process.start("android.app.ActivityThread",...)-> // 通过zygote机制创建一个新的进程 Process.startViaZygote-> // 这个函数在进程中创建一个ActivityThread实例,然后调用 // 它的attach函数,接着就进入消息循环 ActivityThread.main-> /***************************************************************** * ActivityThread通过Binder将一个ApplicationThread类的Binder对象 * 传递给AMS,以便AMS通过此Binder对象来控制Activity整个生命周期 ****************************************************************/ ActivityThread.attach-> IActivityManager.attachApplication(mAppThread)-> ActivityManagerProxy.attachApplication-> ActivityManagerService.attachApplication-> // 把在ActivityManagerService.startProcessLocked中创建的ProcessRecord取出来 ActivityManagerService.attachApplicationLocked-> /***************************************************************** * AMS通过Binder通知ActivityThread一切准备OK,它可以真正启动新的Activity了 ****************************************************************/ // 真正启动Activity ActivityStack.realStartActivityLocked-> ApplicationThreadProxy.scheduleLaunchActivity-> ApplicationThread.scheduleLaunchActivity-> ActivityThread.handleLaunchActivity-> // 加载新的Activity类,并执行它的onCreate ActivityThread.performLaunchActivity /*1) Instrumentation.newActivity: 加载新类,即创建Activity对象; 2) ActivityClientRecord.packageInfo.makeApplication:创建Application对象; 3) Activity.attach(Context context, ActivityThread aThread, Instrumentation instr, IBinder token, int ident, Application application, Intent intent, ActivityInfo info, CharSequence title, Activity parent, String id, NonConfigurationInstances lastNonConfigurationInstances, Configuration config):把Application attach到Activity, 即把Activtiy 相关信息设置到新创建的Activity中 4) Instrumentation.callActivityOnCreate:调用onCreate;*/ // 使用Activity进入RESUMED状态,并调用onResume ActivityThread.handleResumeActivity 3. ActivityManagerService
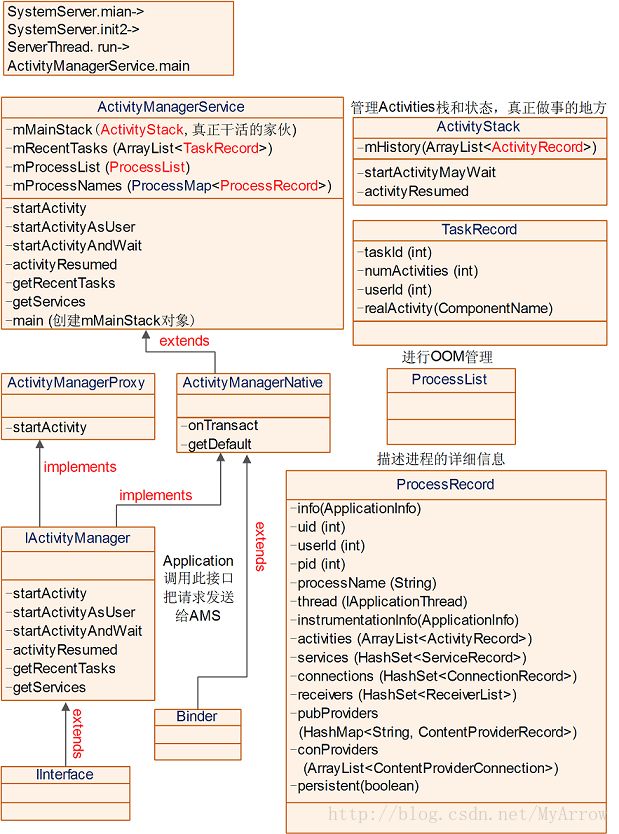
3.1 类中关键信息
public final class ActivityManagerService extends ActivityManagerNative implements Watchdog.Monitor, BatteryStatsImpl.BatteryCallback { ... // Maximum number of recent tasks that we can remember. static final int MAX_RECENT_TASKS = 20; public ActivityStack mMainStack; // 管理Activity堆栈 // Whether we should show our dialogs (ANR, crash, etc) or just perform their // default actuion automatically. Important for devices without direct input // devices. private boolean mShowDialogs = true; /** * Description of a request to start a new activity, which has been held * due to app switches being disabled. */ static class PendingActivityLaunch { ActivityRecord r; ActivityRecord sourceRecord; int startFlags; } /** * Activity we have told the window manager to have key focus. */ ActivityRecord mFocusedActivity = null; /** * List of intents that were used to start the most recent tasks. */ final ArrayList mRecentTasks = new ArrayList(); /** * Process management. */ final ProcessList mProcessList = new ProcessList(); /** * All of the applications we currently have running organized by name. * The keys are strings of the application package name (as * returned by the package manager), and the keys are ApplicationRecord * objects. */ final ProcessMap mProcessNames = new ProcessMap(); /** * The currently running isolated processes. */ final SparseArray mIsolatedProcesses = new SparseArray(); ... public static final Context main(int factoryTest) { //main入口函数 AThread thr = new AThread(); thr.start(); synchronized (thr) { while (thr.mService == null) { try { thr.wait(); } catch (InterruptedException e) { } } } ActivityManagerService m = thr.mService; mSelf = m; ActivityThread at = ActivityThread.systemMain(); mSystemThread = at; Context context = at.getSystemContext(); context.setTheme(android.R.style.Theme_Holo); m.mContext = context; m.mFactoryTest = factoryTest; m.mMainStack = new ActivityStack(m, context, true); // 创建ActivityStack m.mBatteryStatsService.publish(context); m.mUsageStatsService.publish(context); synchronized (thr) { thr.mReady = true; thr.notifyAll(); } m.startRunning(null, null, null, null); return context; }} 3.2 家族图谱
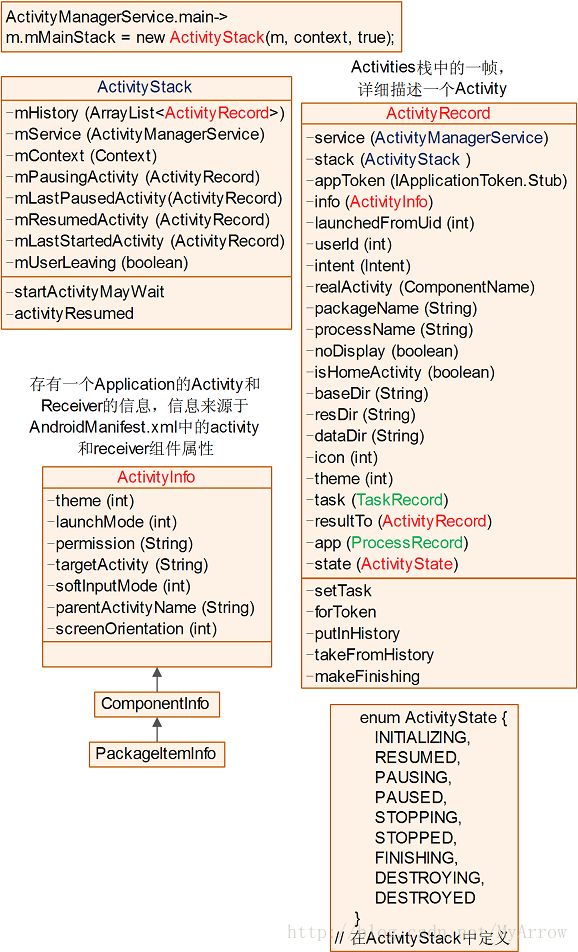
4. ActivityStack-真正做事的家伙
ActivityManagerService使用它来管理系统中所有的Activities的状态,Activities使用stack的方式进行管理。它是真正负责做事的家伙,很勤快的,但外界无人知道!
4.1 类中关键信息
/** * State and management of a single stack of activities. */final class ActivityStack { final ActivityManagerService mService; final boolean mMainStack; final Context mContext; enum ActivityState { INITIALIZING, RESUMED, PAUSING, PAUSED, STOPPING, STOPPED, FINISHING, DESTROYING, DESTROYED } /** * The back history of all previous (and possibly still * running) activities. It contains HistoryRecord objects. */ final ArrayList mHistory = new ArrayList(); /** * Used for validating app tokens with window manager. */ final ArrayList mValidateAppTokens = new ArrayList(); /** * List of running activities, sorted by recent usage. * The first entry in the list is the least recently used. * It contains HistoryRecord objects. */ final ArrayList mLRUActivities = new ArrayList(); /** * List of activities that are waiting for a new activity * to become visible before completing whatever operation they are * supposed to do. */ final ArrayList mWaitingVisibleActivities = new ArrayList(); /** * List of activities that are ready to be stopped, but waiting * for the next activity to settle down before doing so. It contains * HistoryRecord objects. */ final ArrayList mStoppingActivities = new ArrayList(); /** * List of activities that are in the process of going to sleep. */ final ArrayList mGoingToSleepActivities = new ArrayList(); /** * When we are in the process of pausing an activity, before starting the * next one, this variable holds the activity that is currently being paused. */ ActivityRecord mPausingActivity = null; /** * This is the last activity that we put into the paused state. This is * used to determine if we need to do an activity transition while sleeping, * when we normally hold the top activity paused. */ ActivityRecord mLastPausedActivity = null; /** * Current activity that is resumed, or null if there is none. */ ActivityRecord mResumedActivity = null; /** * This is the last activity that has been started. It is only used to * identify when multiple activities are started at once so that the user * can be warned they may not be in the activity they think they are. */ ActivityRecord mLastStartedActivity = null; /** * Set to indicate whether to issue an onUserLeaving callback when a * newly launched activity is being brought in front of us. */ boolean mUserLeaving = false; ActivityStack(ActivityManagerService service, Context context, boolean mainStack) { mService = service; mContext = context; mMainStack = mainStack; ... } ...} 4.2 家族图谱
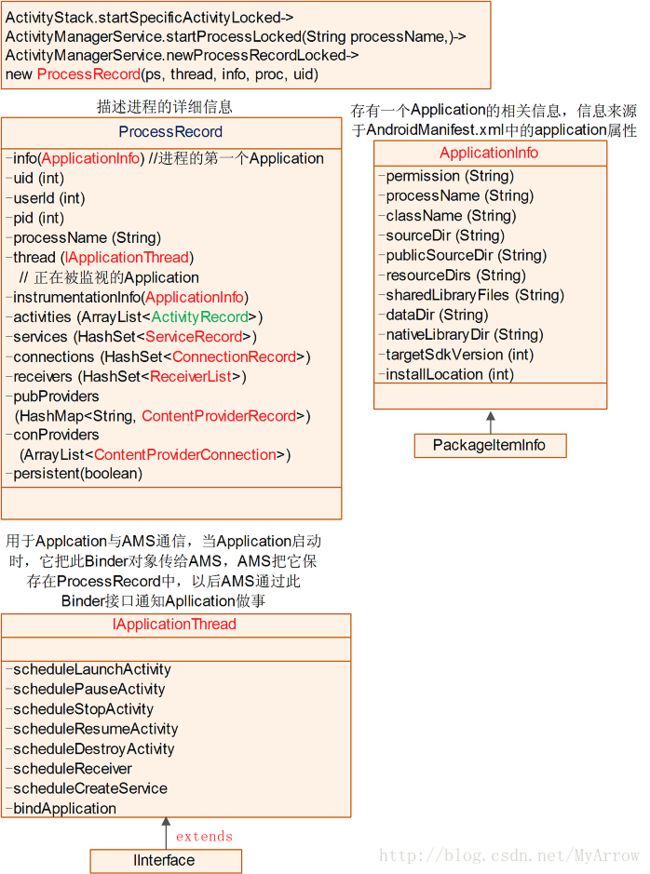
5. ProcessRecord
记录了一个进程的相关信息。
5.1 类中关键信息
/** * Full information about a particular process that * is currently running. */class ProcessRecord { final ApplicationInfo info; // all about the first app in the process final boolean isolated; // true if this is a special isolated process final int uid; // uid of process; may be different from 'info' if isolated final int userId; // user of process. final String processName; // name of the process IApplicationThread thread; // the actual proc... may be null only if // 'persistent' is true (in which case we // are in the process of launching the app) // 是ApplicationThread对象的远程接口, // 通过此接口通知Activity进入对应的状态 int pid; // The process of this application; 0 if none ApplicationInfo instrumentationInfo; // the application being instrumented BroadcastRecord curReceiver;// receiver currently running in the app // contains HistoryRecord objects final ArrayList activities = new ArrayList(); // all ServiceRecord running in this process final HashSet services = new HashSet(); // services that are currently executing code (need to remain foreground). final HashSet executingServices = new HashSet(); // All ConnectionRecord this process holds final HashSet connections = new HashSet(); // all IIntentReceivers that are registered from this process. final HashSet receivers = new HashSet(); // class (String) -> ContentProviderRecord final HashMap pubProviders = new HashMap(); // All ContentProviderRecord process is using final ArrayList conProviders = new ArrayList(); boolean persistent; // always keep this application running? boolean crashing; // are we in the process of crashing? Dialog crashDialog; // dialog being displayed due to crash. boolean notResponding; // does the app have a not responding dialog? Dialog anrDialog; // dialog being displayed due to app not resp. boolean removed; // has app package been removed from device? boolean debugging; // was app launched for debugging? boolean waitedForDebugger; // has process show wait for debugger dialog? Dialog waitDialog; // current wait for debugger dialog ProcessRecord(BatteryStatsImpl.Uid.Proc _batteryStats, IApplicationThread _thread, ApplicationInfo _info, String _processName, int _uid) { batteryStats = _batteryStats; info = _info; isolated = _info.uid != _uid; uid = _uid; userId = UserHandle.getUserId(_uid); processName = _processName; pkgList.add(_info.packageName); thread = _thread; maxAdj = ProcessList.HIDDEN_APP_MAX_ADJ; hiddenAdj = clientHiddenAdj = emptyAdj = ProcessList.HIDDEN_APP_MIN_ADJ; curRawAdj = setRawAdj = -100; curAdj = setAdj = -100; persistent = false; removed = false; } ...} 5. 2 家族图谱
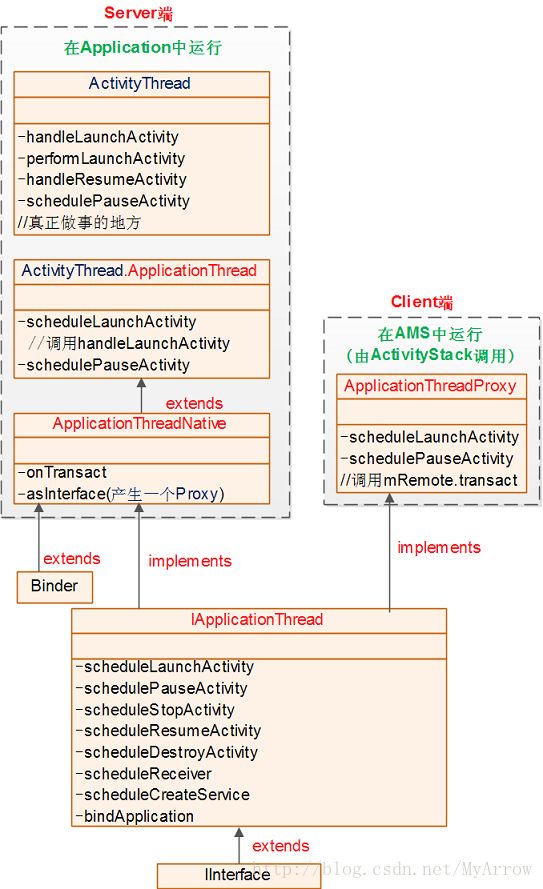
6. IApplicationThread接口AMS->Application
IApplicationThread为AMS作为客户端访问Application服务器端的Binder接口。当创建Application时,将把此Binder对象传递给AMS,然后AMS把它保存在mProcessNames.ProcessRecord.thread中。当需要通知Application工作时,则调用IApplicationThread中对应的接口函数。
其相互关系如下图所示:
给我老师的人工智能教程打call!http://blog.csdn.net/jiangjunshow
新的改变
我们对Markdown编辑器进行了一些功能拓展与语法支持,除了标准的Markdown编辑器功能,我们增加了如下几点新功能,帮助你用它写博客:
- 全新的界面设计 ,将会带来全新的写作体验;
- 在创作中心设置你喜爱的代码高亮样式,Markdown 将代码片显示选择的高亮样式 进行展示;
- 增加了 图片拖拽 功能,你可以将本地的图片直接拖拽到编辑区域直接展示;
- 全新的 KaTeX数学公式 语法;
- 增加了支持甘特图的mermaid语法1 功能;
- 增加了 多屏幕编辑 Markdown文章功能;
- 增加了 焦点写作模式、预览模式、简洁写作模式、左右区域同步滚轮设置 等功能,功能按钮位于编辑区域与预览区域中间;
- 增加了 检查列表 功能。
功能快捷键
撤销:Ctrl/Command + Z
重做:Ctrl/Command + Y
加粗:Ctrl/Command + B
斜体:Ctrl/Command + I
标题:Ctrl/Command + Shift + H
无序列表:Ctrl/Command + Shift + U
有序列表:Ctrl/Command + Shift + O
检查列表:Ctrl/Command + Shift + C
插入代码:Ctrl/Command + Shift + K
插入链接:Ctrl/Command + Shift + L
插入图片:Ctrl/Command + Shift + G
合理的创建标题,有助于目录的生成
直接输入1次#,并按下space后,将生成1级标题。
输入2次#,并按下space后,将生成2级标题。
以此类推,我们支持6级标题。有助于使用TOC语法后生成一个完美的目录。
如何改变文本的样式
强调文本 强调文本
加粗文本 加粗文本
标记文本
删除文本
引用文本
H2O is是液体。
210 运算结果是 1024.
插入链接与图片
链接: link.
图片: ![]()
带尺寸的图片: ![]()
当然,我们为了让用户更加便捷,我们增加了图片拖拽功能。
如何插入一段漂亮的代码片
去博客设置页面,选择一款你喜欢的代码片高亮样式,下面展示同样高亮的 代码片.
// An highlighted block var foo = 'bar'; 生成一个适合你的列表
- 项目
- 项目
- 项目
- 项目
- 项目1
- 项目2
- 项目3
- 计划任务
- 完成任务
创建一个表格
一个简单的表格是这么创建的:
| 项目 | Value |
|---|---|
| 电脑 | $1600 |
| 手机 | $12 |
| 导管 | $1 |
设定内容居中、居左、居右
使用:---------:居中
使用:----------居左
使用----------:居右
| 第一列 | 第二列 | 第三列 |
|---|---|---|
| 第一列文本居中 | 第二列文本居右 | 第三列文本居左 |
SmartyPants
SmartyPants将ASCII标点字符转换为“智能”印刷标点HTML实体。例如:
| TYPE | ASCII | HTML |
|---|---|---|
| Single backticks | 'Isn't this fun?' |
‘Isn’t this fun?’ |
| Quotes | "Isn't this fun?" |
“Isn’t this fun?” |
| Dashes | -- is en-dash, --- is em-dash |
– is en-dash, — is em-dash |
创建一个自定义列表
- Markdown
- Text-to- HTML conversion tool
- Authors
- John
- Luke
如何创建一个注脚
一个具有注脚的文本。2
注释也是必不可少的
Markdown将文本转换为 HTML。
KaTeX数学公式
您可以使用渲染LaTeX数学表达式 KaTeX:
Gamma公式展示 Γ ( n ) = ( n − 1 ) ! ∀ n ∈ N \Gamma(n) = (n-1)!\quad\forall n\in\mathbb N Γ(n)=(n−1)!∀n∈N 是通过欧拉积分
Γ ( z ) = ∫ 0 ∞ t z − 1 e − t d t . \Gamma(z) = \int_0^\infty t^{z-1}e^{-t}dt\,. Γ(z)=∫0∞tz−1e−tdt.
你可以找到更多关于的信息 LaTeX 数学表达式here.
新的甘特图功能,丰富你的文章
gantt
        dateFormat  YYYY-MM-DD
        title Adding GANTT diagram functionality to mermaid
        section 现有任务
        已完成               :done,    des1, 2014-01-06,2014-01-08
        进行中               :active,  des2, 2014-01-09, 3d
        计划一               :         des3, after des2, 5d
        计划二               :         des4, after des3, 5d
- 关于 甘特图 语法,参考 这儿,
UML 图表
可以使用UML图表进行渲染。 Mermaid. 例如下面产生的一个序列图::
这将产生一个流程图。:
- 关于 Mermaid 语法,参考 这儿,
FLowchart流程图
我们依旧会支持flowchart的流程图:
- 关于 Flowchart流程图 语法,参考 这儿.
导出与导入
导出
如果你想尝试使用此编辑器, 你可以在此篇文章任意编辑。当你完成了一篇文章的写作, 在上方工具栏找到 文章导出 ,生成一个.md文件或者.html文件进行本地保存。
导入
如果你想加载一篇你写过的.md文件或者.html文件,在上方工具栏可以选择导入功能进行对应扩展名的文件导入,
继续你的创作。
mermaid语法说明 ↩︎
注脚的解释 ↩︎


